Unit 3: Grade 09 Exploring Technologies - Materials, Machines, Tools, & Process
This unit you will use your current learning to design and communicate your project designs. Using the shop resources, hand tools, and shop machines will allow you to work with different materials and project build processes to complete/finish your designs by not just designing them, but also building them. From this you will gain new insight into the full process from design start to finished product build, gain experience using related tools and machines, and allow you to see a bigger picture of the project design, materials, and build process.
Course Units and Descriptions
| Unit | Description |
|---|---|
| Review course outline for more details | |
| 1 | Careers & Safety- Intro, computers, organization, safety, and careers |
| 2 | Design Process - SPICE- Faulty towers, logo design, and project box |
| 3 | Materials, Machines, Tools, & Process- Acubend, key ring holder, key ring accessory |
| 4 | Project Research, Design, & Build- Bridge/tower, mag-lev, co2 dragster |
| 5 | Web Portfolio- Showcase course work, projects, and understanding with web portfolio and presentation |
Unit Content Activity Quick Links, Click to Jump to Specific Activity!

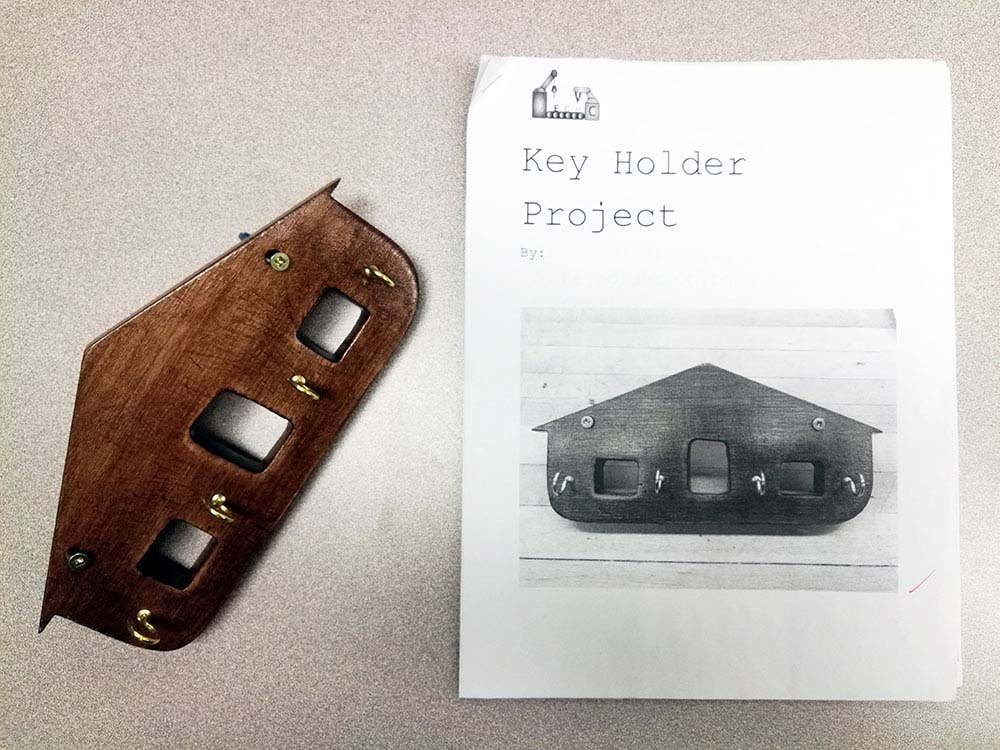
 Unit 3, Act. 1: Key Holder
Situation:
You come home every day and your keys seem to get misplaced. You decide that something has to be done so that the keys have a place to keep.
Problem/Challenge:
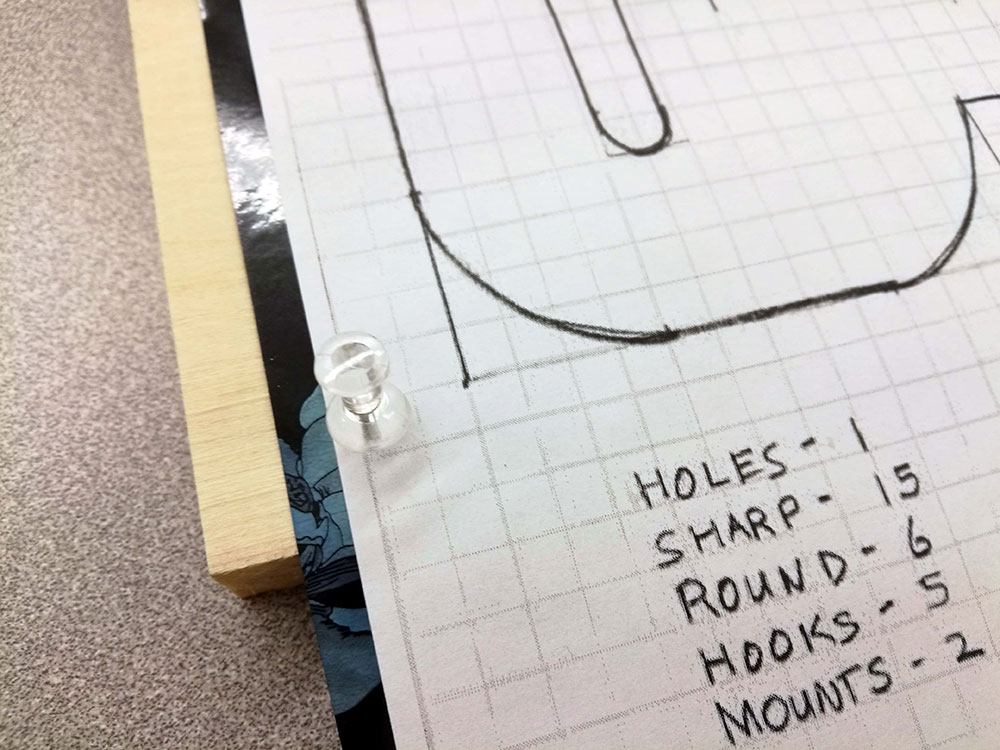
The challenge is to design, cut, shape, and finish a custom key holder with following requirements in its design:
- Minimum of at least 5 wide round cut corners
- Minimum of at least 5 sharp inside or outside corners at any angle
- At least one big non-circular hole, hint you will need to drill two holes close
- A length of 20 to 26 cm
- A minimum thickness of 9mm and minimum width of 2 cm width everywhere (keep in mind placement of hole and shape features)
- Installed 4-6 key holder hooks with some method of mounting to wall
- A smooth finish with no real sharp edges and corners
- Finished and coated by brush to seal and protect the wood on front and sides
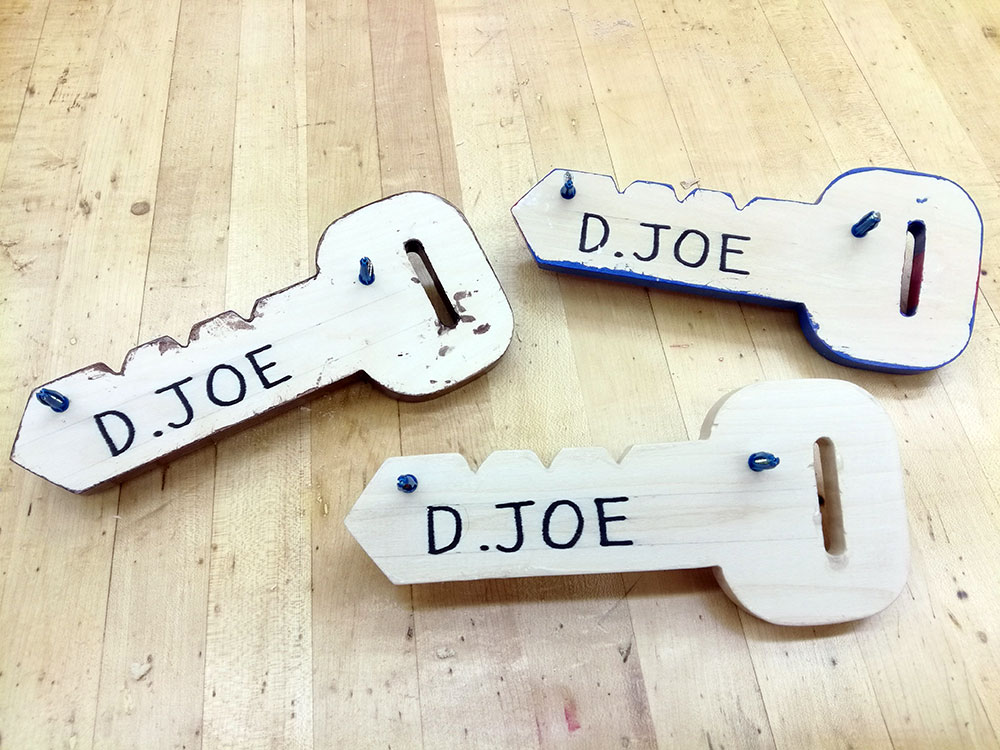
- Your name permanently on the back of key holder, 20 mm Gothic font style
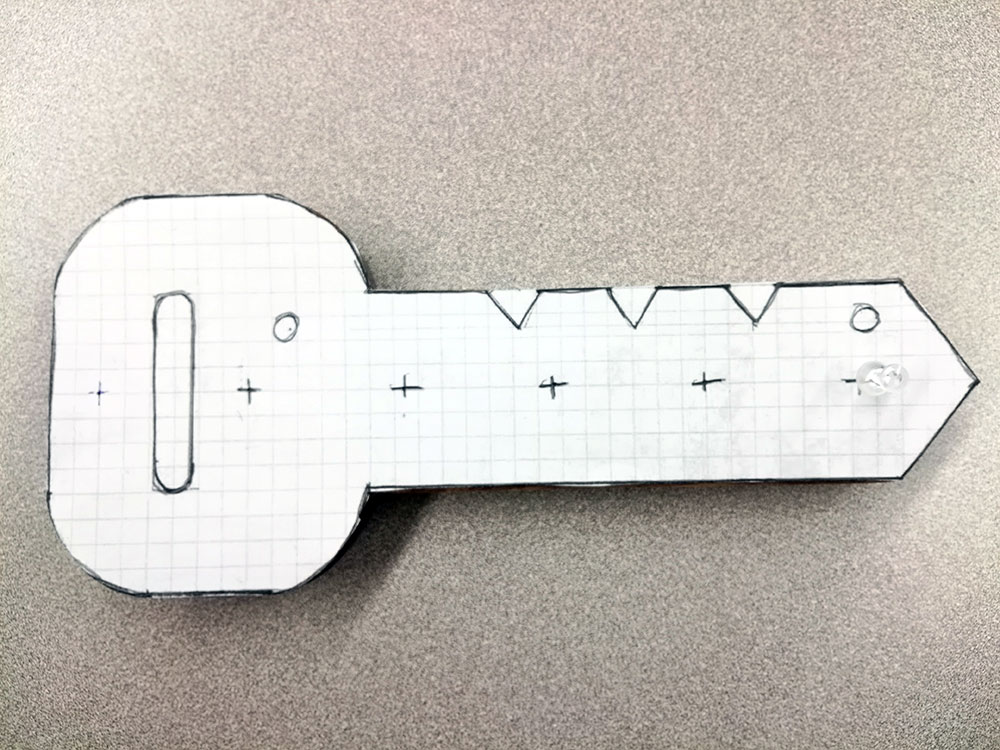
- Require hand-sketched thumbnails, computer or hand sketched final full-size oblique, and a computer or hand sketched scaled orthographic of key holder shape
- Final submission to include key holder and report (title page, SPICE process, rough work and sketches, and conclusion/reflection -digital and/or hand) in project box
Investigation/Ideas:

Key Points on Drawings

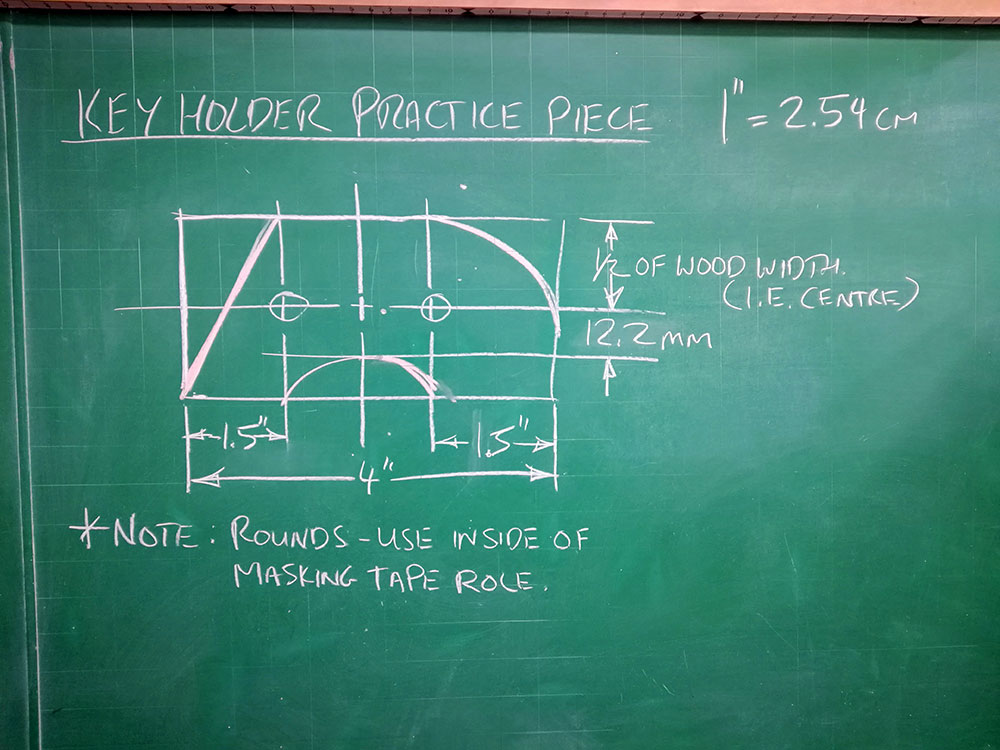
Thumbnails will have to be done by hand, but the orthographic and oblique can be done either by hand or by computer. Using Illustrator or similar vector type drawing program, or even a CAD program if familiar could be used to create your design of your key ring holder.
Orthographic by Hand
Quick instructions below:
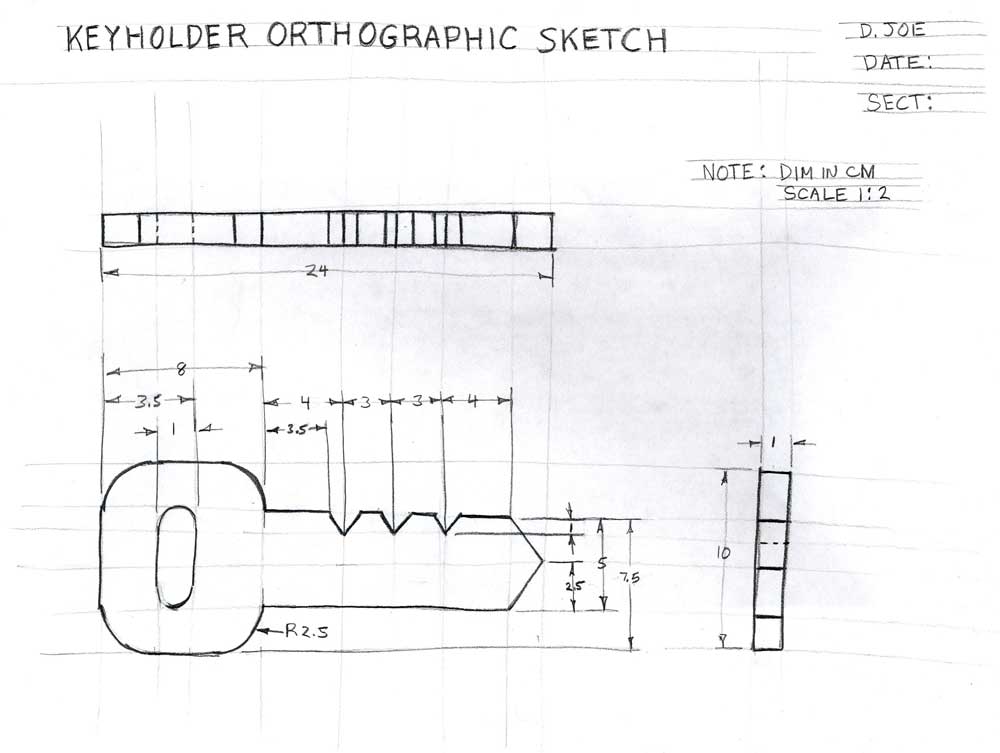
- Figure out which scale to use. For example, if you want a 1:2 scale, divide all of your measurements by 2 to use on sizing up you drawing
- Choose the front view (best view that 1) shows the most detail, 2) least hidden lines, and 3) length across the page)
- Centre your Envelope within the boarders
- Use light construction lines to start building your object on paper (2h lead weight)
- Darken object lines and fill in notes and labels in Gothic font
- Make and Fill in the information block in Gothic font
- Remember to keep X-axis and Y-axis spacing between object views the same for all three views
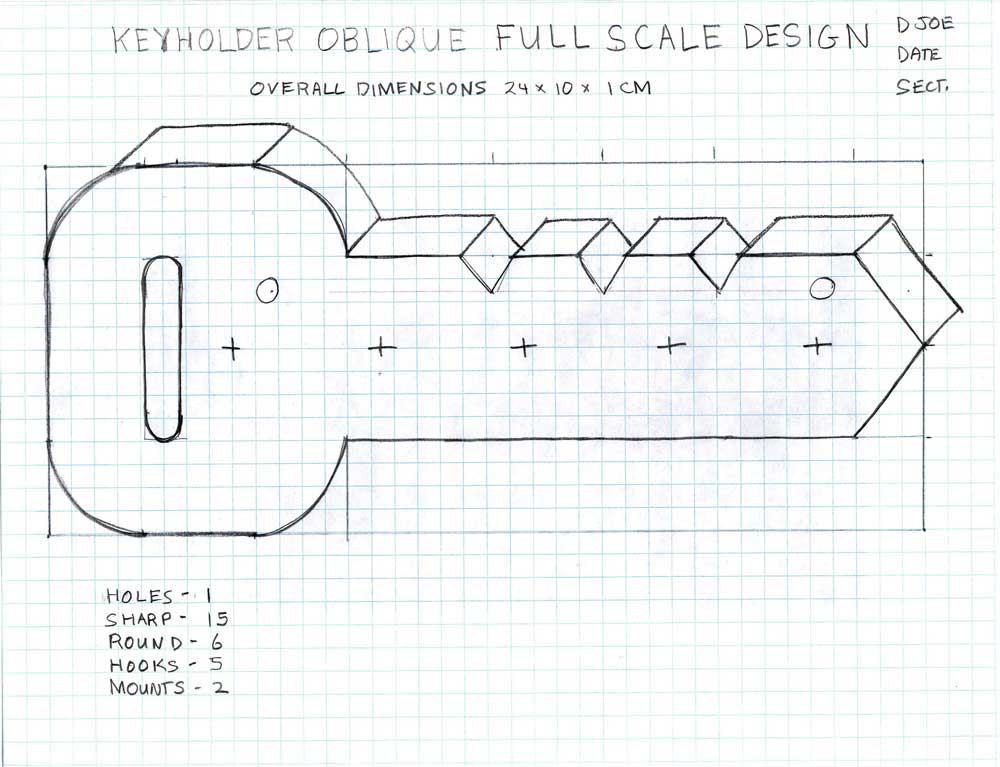
Creating an Oblique by Hand
- Start with a rectangle box in an oblique format
- Draw your object on the face
- Extend thickness line straight down at major features
- Close bottom of object
Creating an Oblique by Computer
- Create your orthographic first, and then copy the front view
- Duplicate the object directly above original at a height of the thickness of key holder
- Connect similar object features on the front view with straight lines
Instructor can do a review/demo on these steps for those needing a refresher on this.
Hand Tools in the Shop
There are a number of tools that you may need during your key holder construction. The following is just a few that you need to be familiar with.
Layout Tools:
Use only a pencil to mark wood appropriately. The combination, carpenter and framing squares are used to line up and layout your designs and design features, such as your shape design and key holder hook alignment. You will find the carpenter square the most common and easiest to use with your project.

Framing

Carpenter

Combination
Sanding Tools:
Rasps are used to take a lot of wood material off quickly, leaving a very rough surface which comes usually in the flat/half round shape. Files take off small amounts of wood in a consistent format according to their shape. Common shapes and how they look:

Rasp

Round

Half-Round

Flat
When Filing your work, it is important to keep the following in mind:
- Clamp your work when hand shaping it, preferably to a table vice
- Using a table vice, you may need to put some scrap wood or cardboard to protect your soft wood surface from being damaged from the clamp/vice teeth
- Proper filing requires you to stand (not sit) while filing, and use two hands moving both your arms and shoulders in a smooth horizontal movement
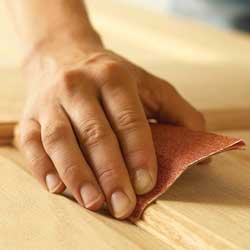
Sand Paper:
Sand paper is used to finish-off and customize specific areas of wood object. A sanding block may be used to keep sanding straight and consistent.
General Safety
Not just knowing what the safe operation of a machine (below), tool use, and/or shop process, being prepared to know what to do if there is an emergency is just as important. Below are key points that you must be aware of when working in a shop environment.

- room awareness
- machine space clearance
- clean work space
- organized work area
- operation procedures
- safety contracts
- tools, machines, & materials permission
- E-stops to turn power off in room
- fire safety blanket
- fire extinguisher
- fire exit plan
- safety first-aid
- safety glasses
- hearing protection
- clothing protection (work aprons)
- breathing dust mask
- ventilation area
- horseplay concerns
- focused on work
- good metal health
- prepared to work
- others safety & support
- work with a partner
- right tool for the job
- think twice then act
Machine Parts, Operation, and Safety
There are several machines in the shop that allow you to create your project. By knowing their major parts, safe operation, having a safe attitude, and respect for these machines, you will be able to use them without injury. You will need to learn and demonstrate safe use of these machines, fill in safety contracts (below) and teachers record sheet before being allowed to use them to create your key ring holder.


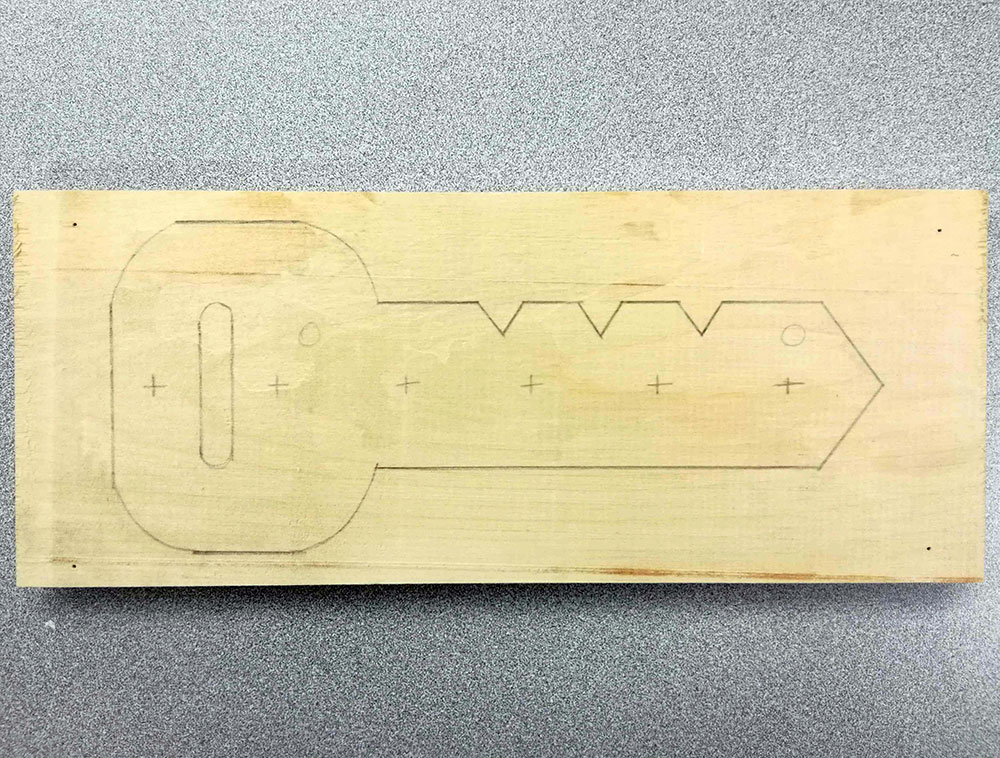
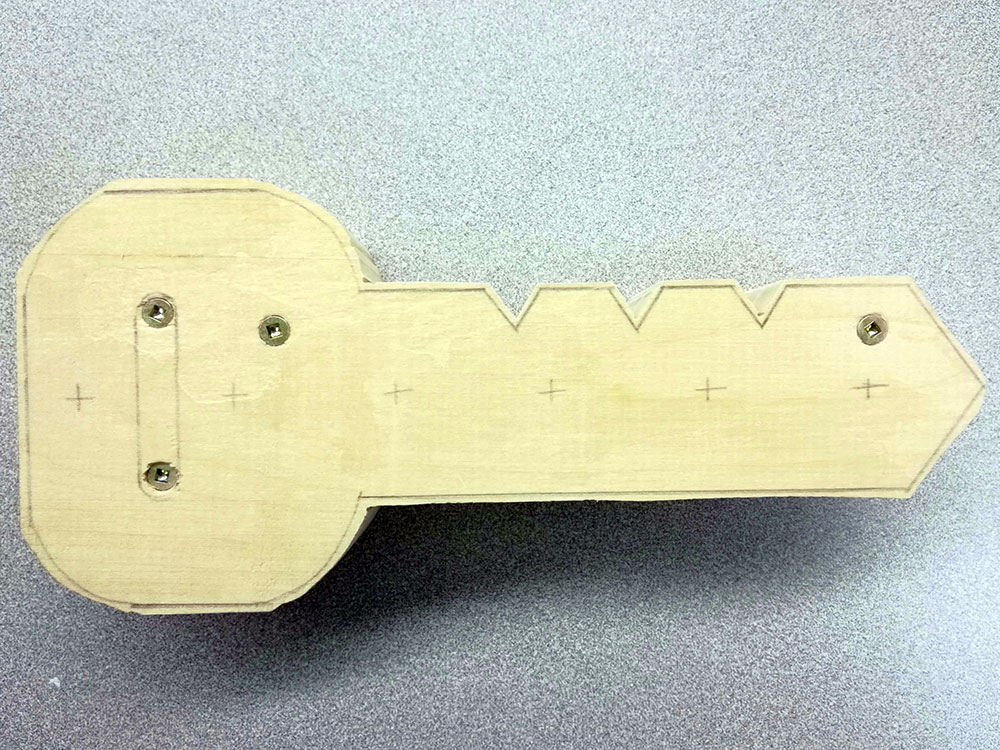
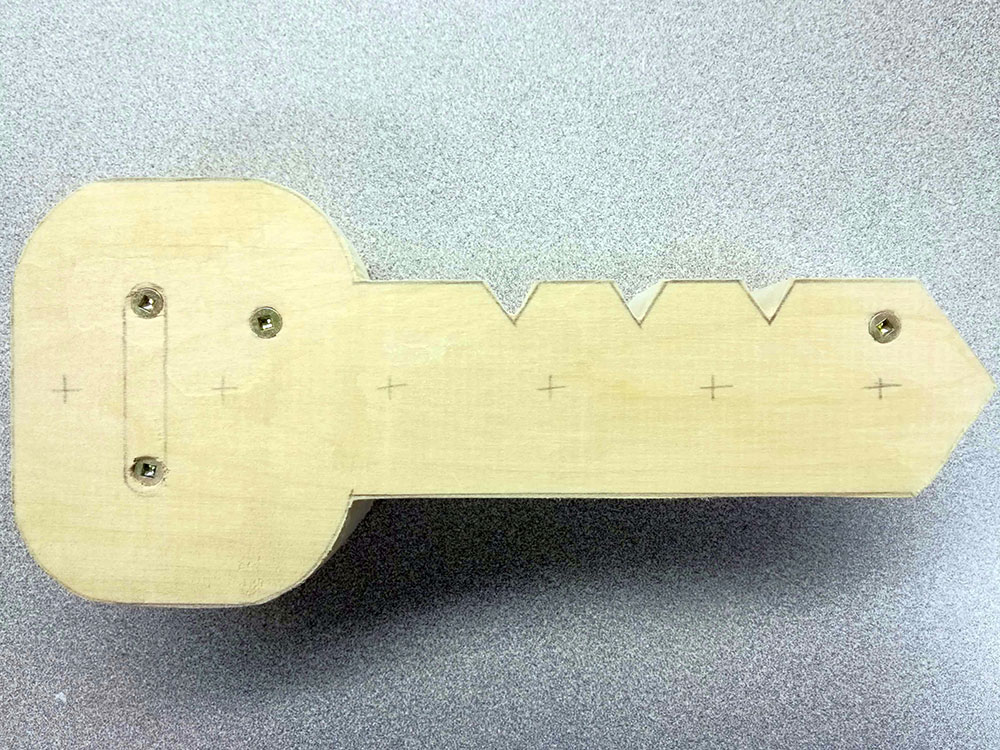
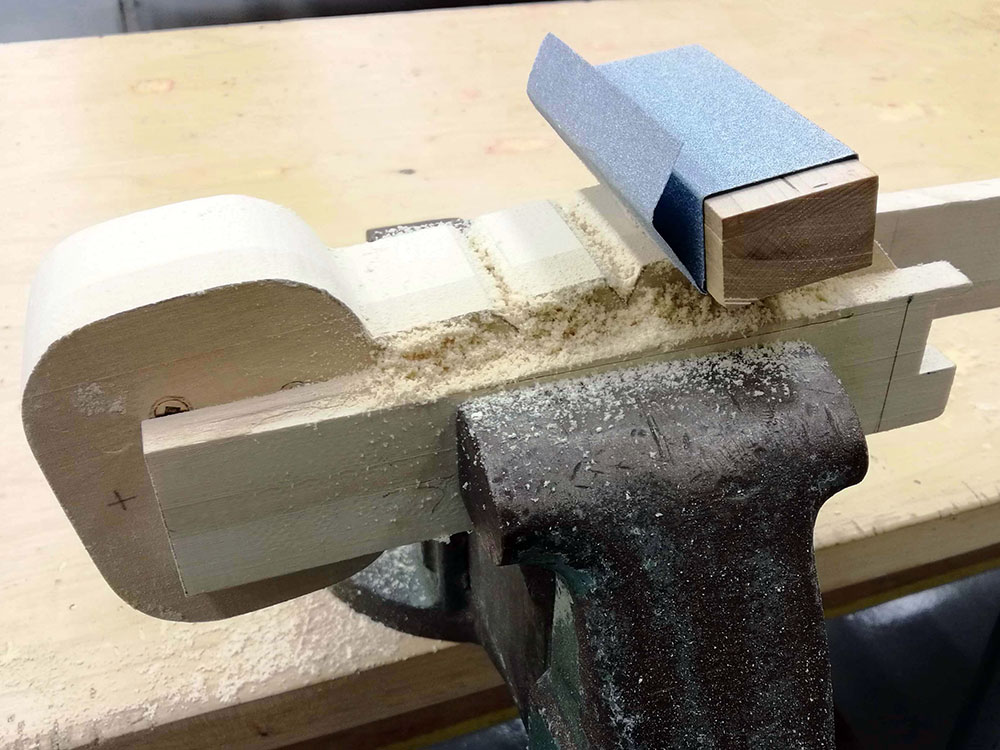
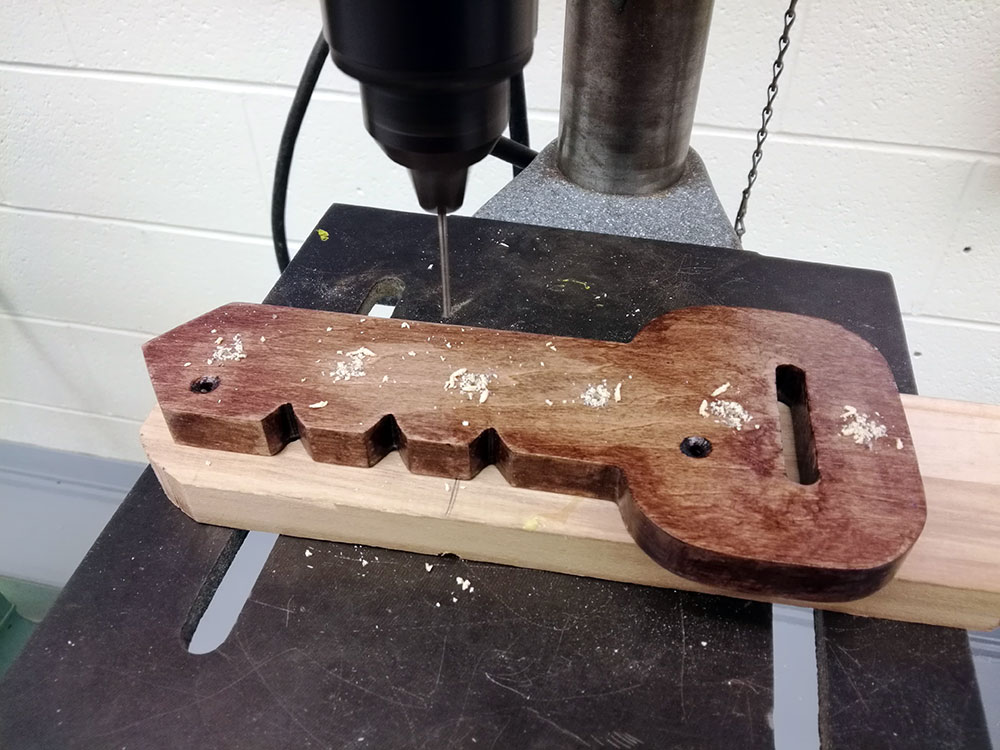
Cut Out Process of Your Key Holder

Images in this section show project support process steps and related information to be discussed with your instructor. Mouse over each image/step shown for more related and detailed information. The wood image to the right is an example of a practice piece used with all of the machines to practice/demonstrate safe use of machine after reviewing machine operation, safety concerns, and machine part identification. The gallery has more pictures of students practising layout and safe wood cutting machine use.
When you get your wood for your key holder, after you have signed safety sheets and demonstrated safe use of these machines, it is strongly recommended that you should put your name in Gothic font, 20 mm with permanent marker once you know where your design is going to be, so that it is on the back of your design to prevent it from being lost or accidentally taken.
Images below show ideas on how to transfer your image to the wood, cut-out and shape using various machines above, then using hand tools to refine and smooth surfaces and edges of your project. You may notice this key holder example is very thick in the images below. This was done to create three at the same time to show later versions of multiple finishes for protection, smoothness, and finished look.
Carbon Paper

Transfer
Close-up
Transfered
Cut Out
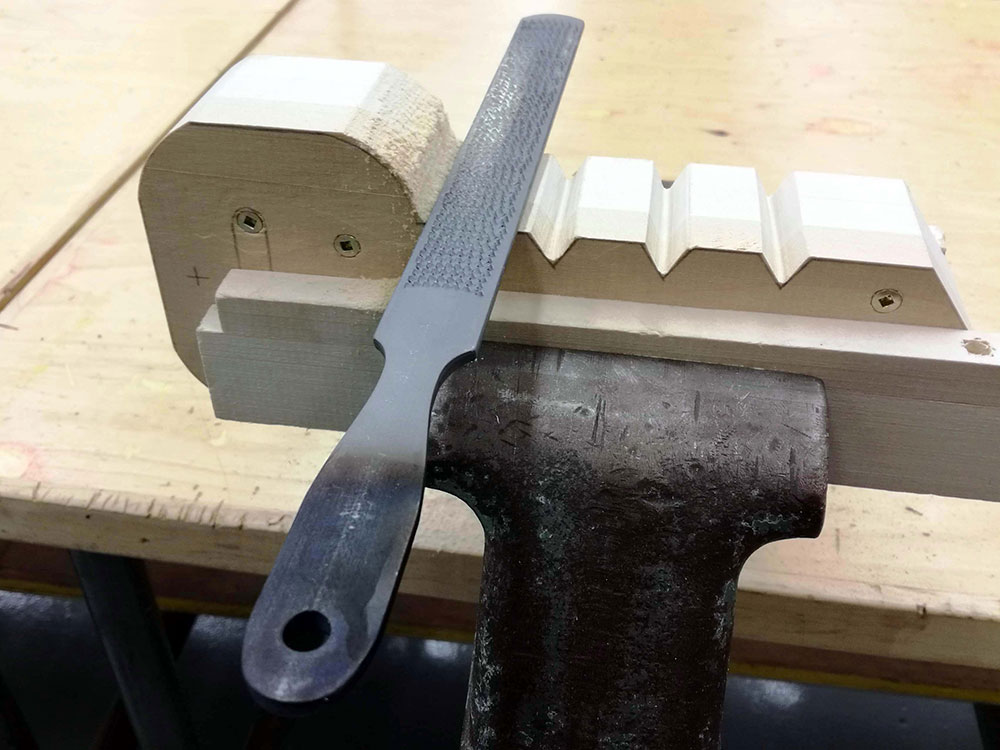
Rasp
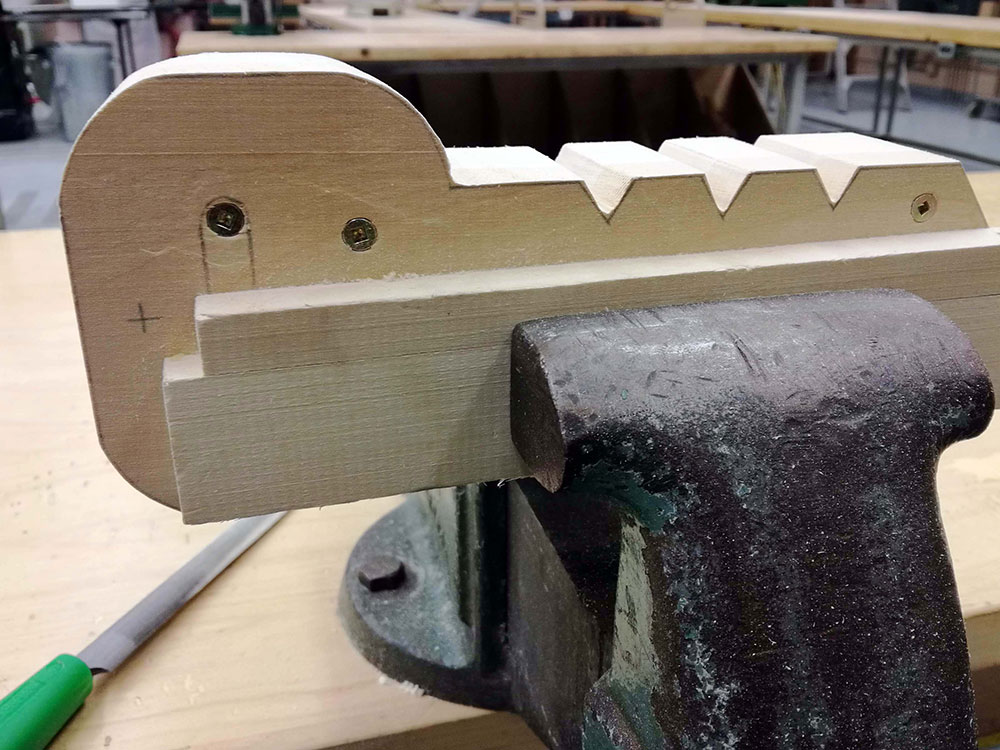
File
File finished
Sanding
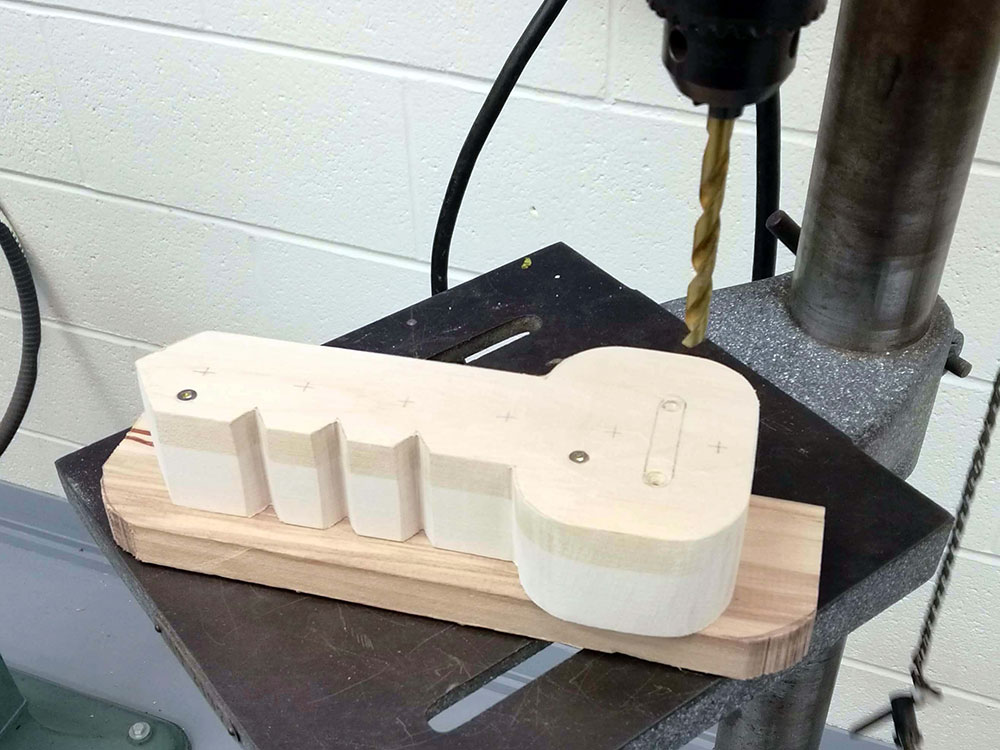
Hole drilled
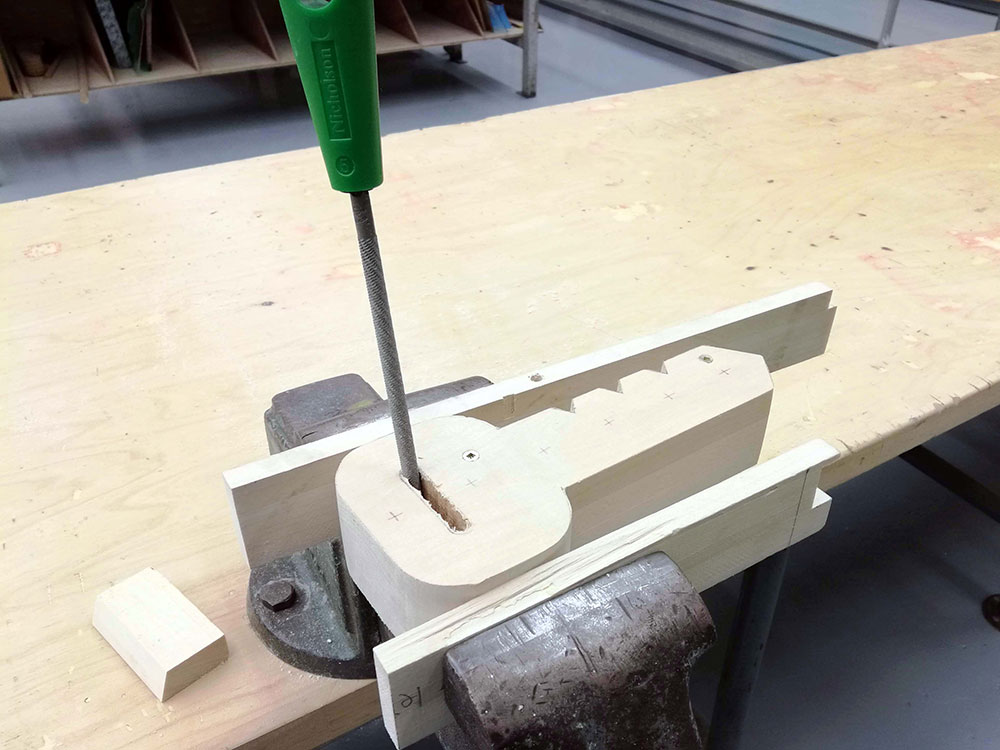
Hole filed
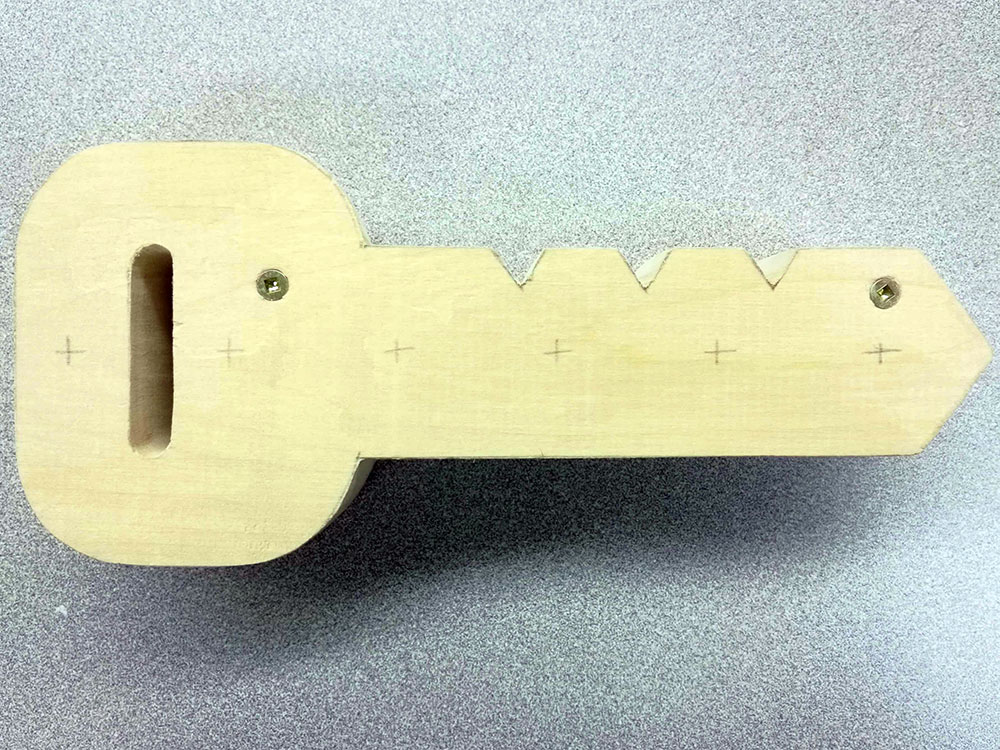
Finished
Finishing Your Key Holder
After cutting out your design, machine sanding down, filing, and hand sanding until really smooth, then you are ready to put a protective and visually appealing coating on your work. Check with your instructor to make sure you are in-fact ready to put a finish on your project. You should know what your finishing (colour, stain, clear coat protection) is, so that you can properly protect your work.
It is important to finish your key holder to:
- Protect and harden your surface
- Make it look attractive
- Seal and preserve the wood
Surface Preparation and Finish Types
There are two major ways to go about finishing the surface of your wood:
- Stain and/or clear coat
- Primer and coloured paint
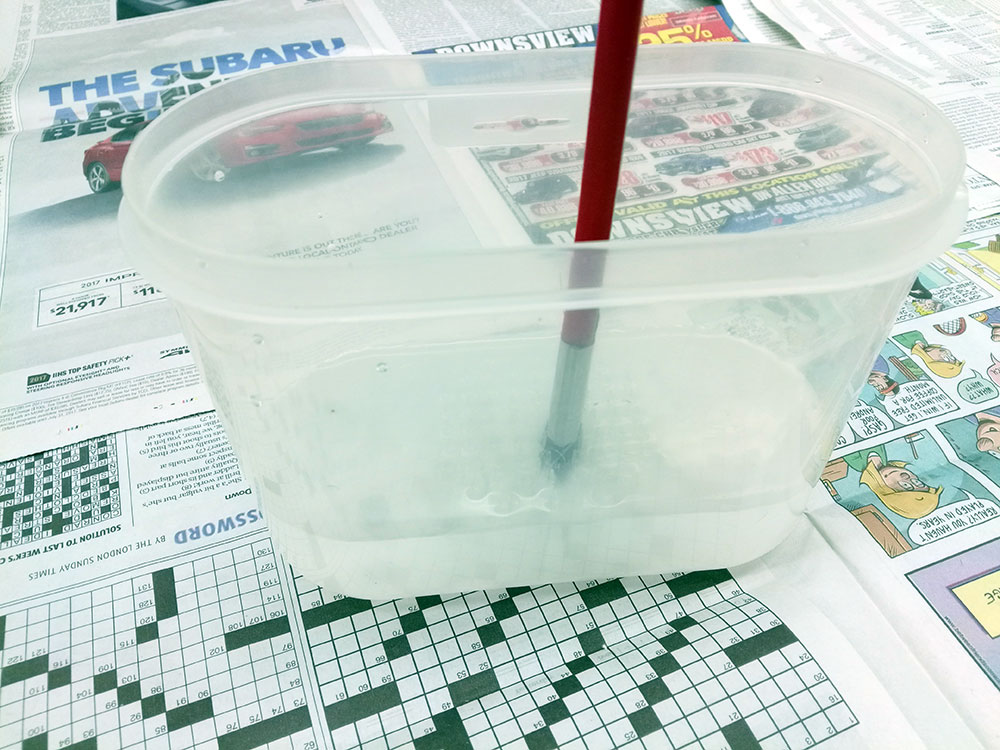
Both are water-base and recommend that shop aprons be worn just in case. Paint brushes and paint area are to be cleaned up after use. Paint brushes are to be returned to the paint bath tubs, once finished. All painting is to be done using Kraft paper and/or newspaper under your work, and paint near the exhaust fan area of the shop. This area is only for students that are completely ready to paint at that time.
Clean-up and Safety
Any paint spills, mess, tools, and equipment need to be taken care of responsibly. Paint spills must be cleaned up right away. Materials left over should be decided if they can still be used, if not then recycled or thrown in the garbage. Equipment must be used safely and kept clean, while the right tools are used safely and put away properly for the next person.
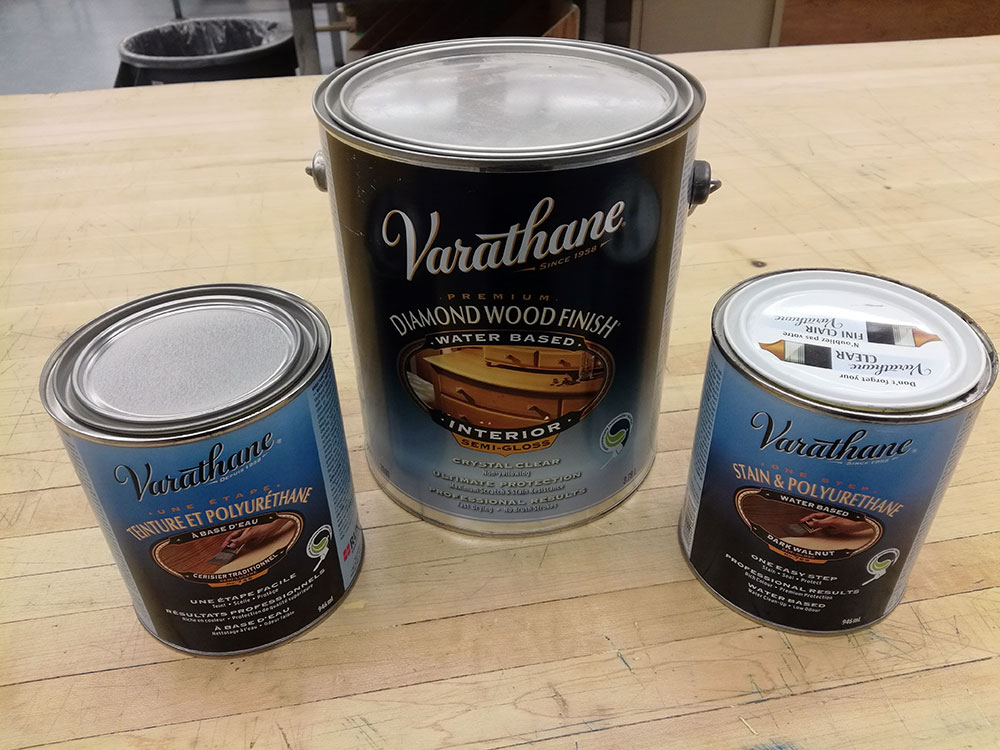
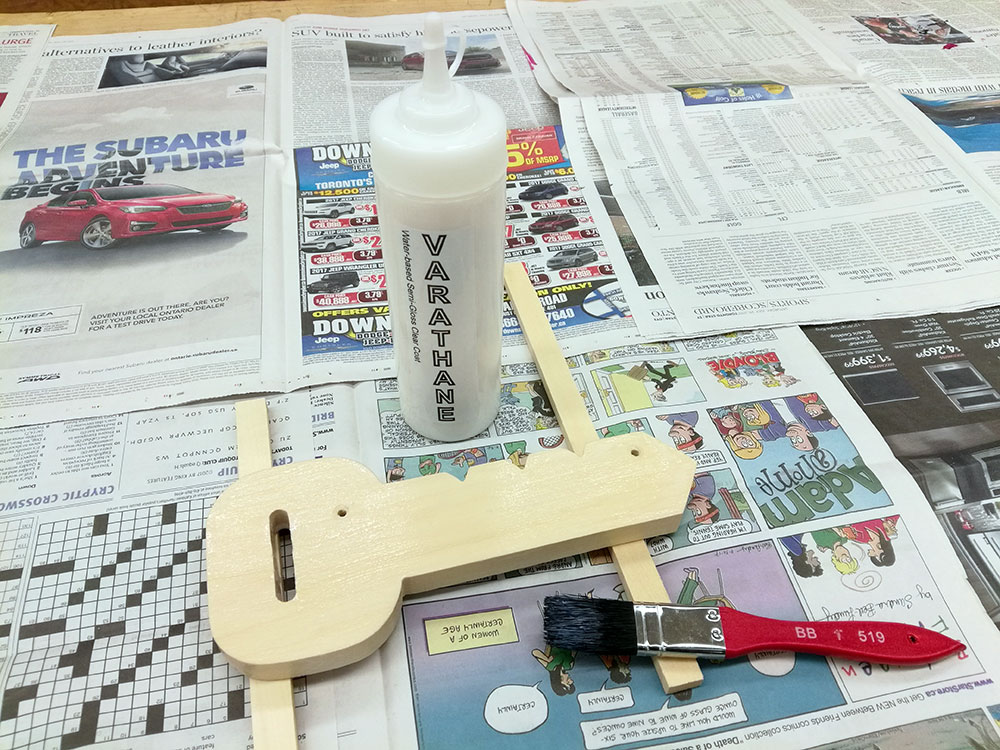
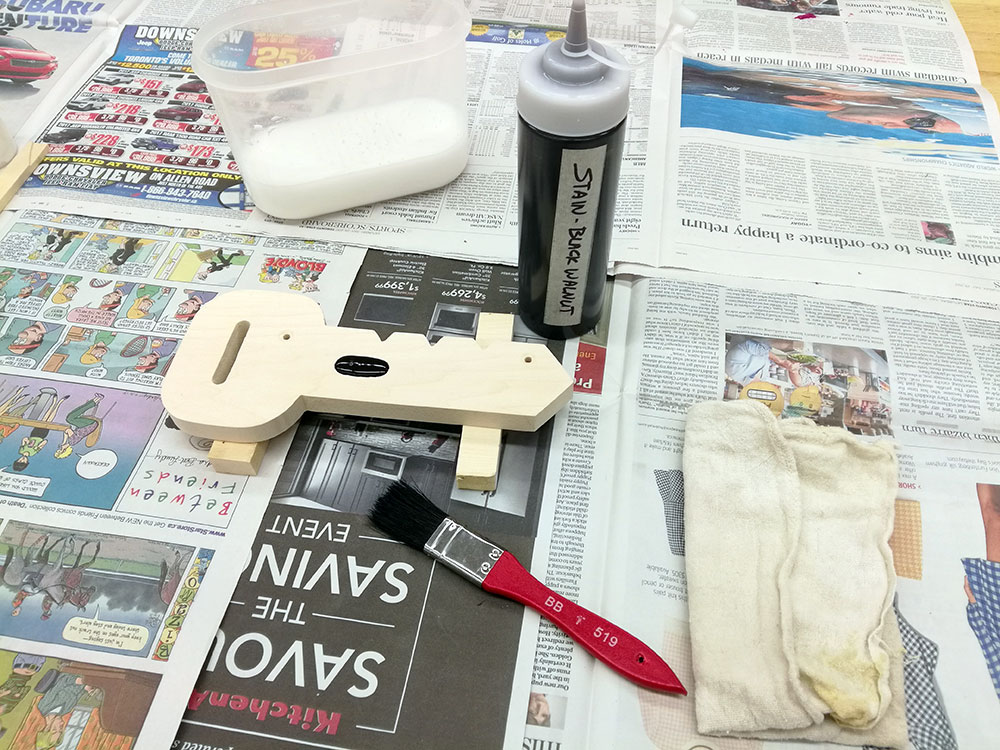
Stain and Clear Coat 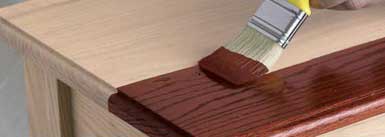
Stains will darken and bring out the grain in the wood in an attractive manner by high-lighting the wood grains and density areas. Stain is just a cosmetic look, but still needs to be coated with at least 2 coats of clear coat of Varathane. After the stain, you must let it dry, then put a first coat of Varathane on, which will soak into the wood leaving a rough some-what flat appearance once dry. A second coat is needed, after a fine sanding with +100 grit sand paper in order complete the seal properly. If you wish to put more coats on, you may do so as to make a finer and smoother finish.
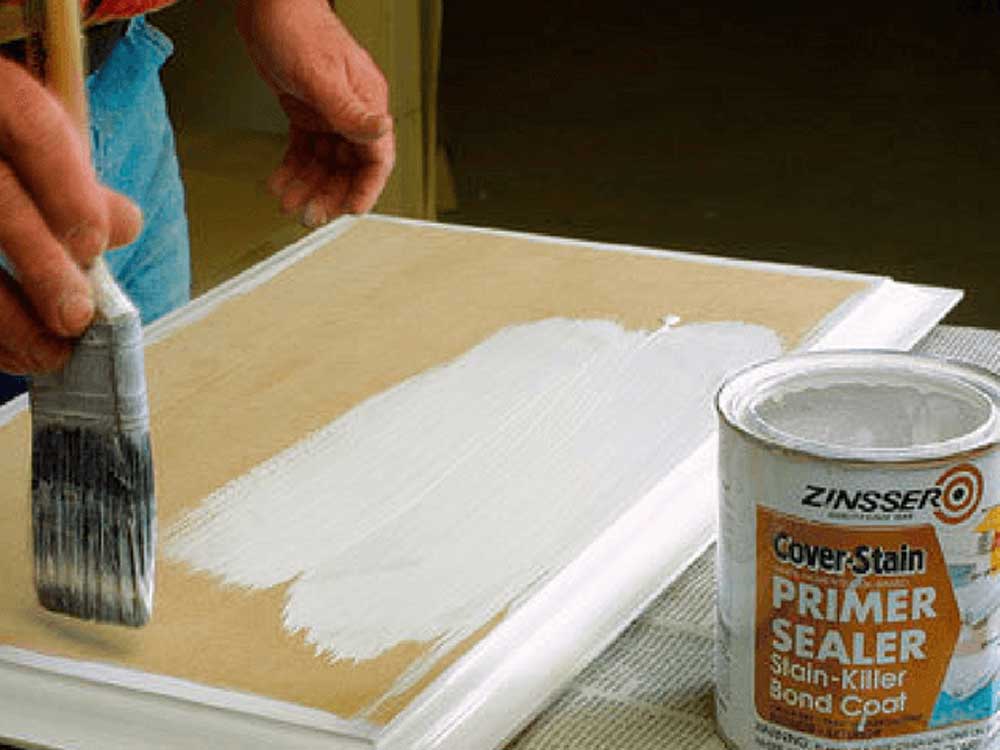
Primer and Coloured Paint
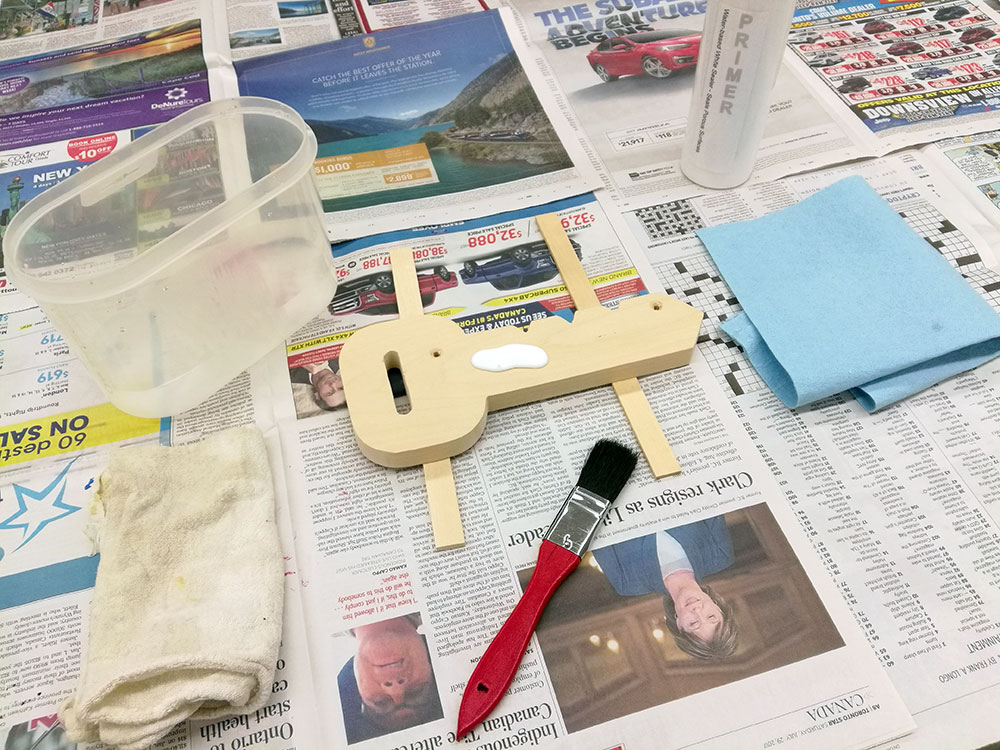
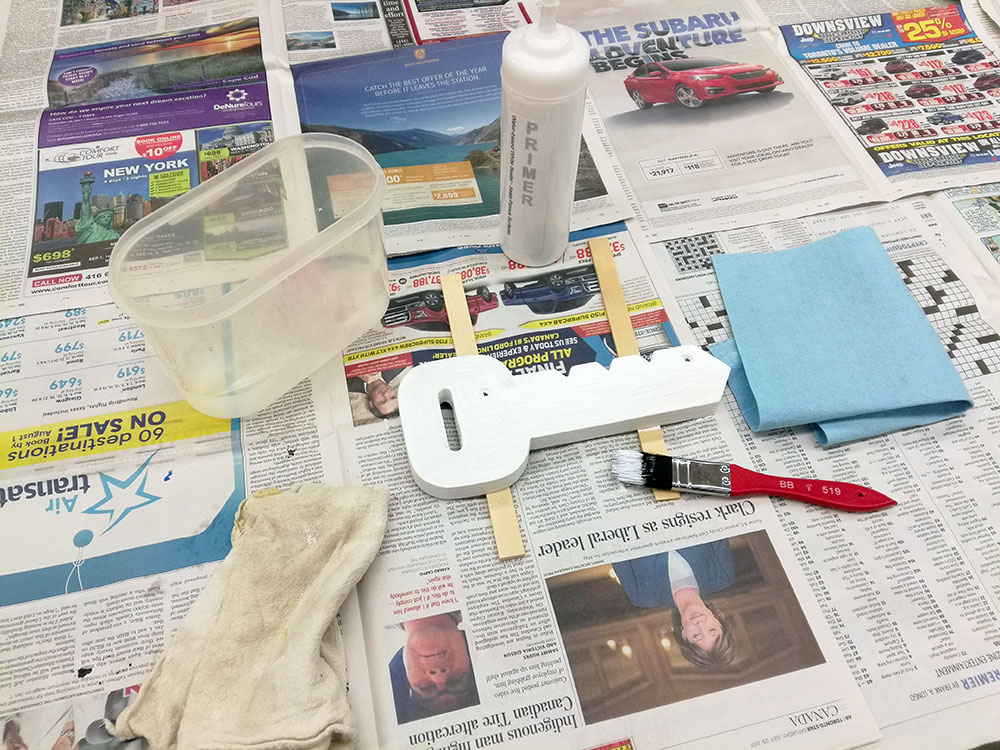
The object must have a minimum of one coat of primer for the following reasons:
- Prepare surface for colour coat to stick to
- Seal in small holes and
- Minimize surface absorption
Once this is done and primer is dry, it needs to be sanded lightly. Note: if wood was poorly prepared, you will most likely have to put another coat of primer on, as you do not want any wood showing through the primer.
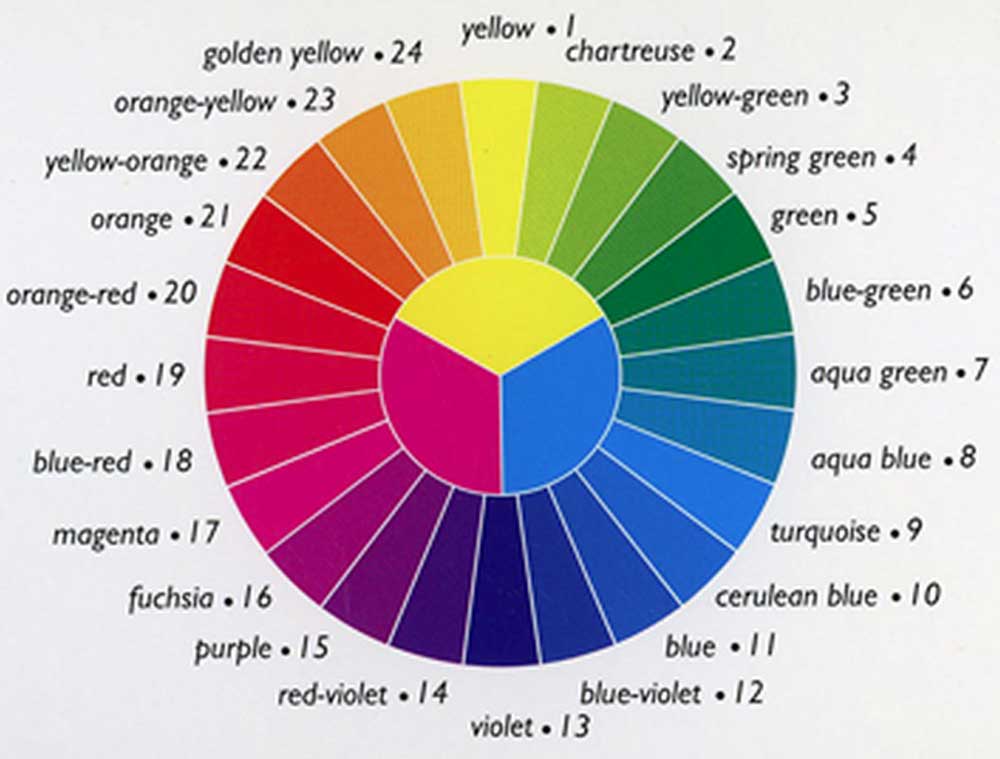
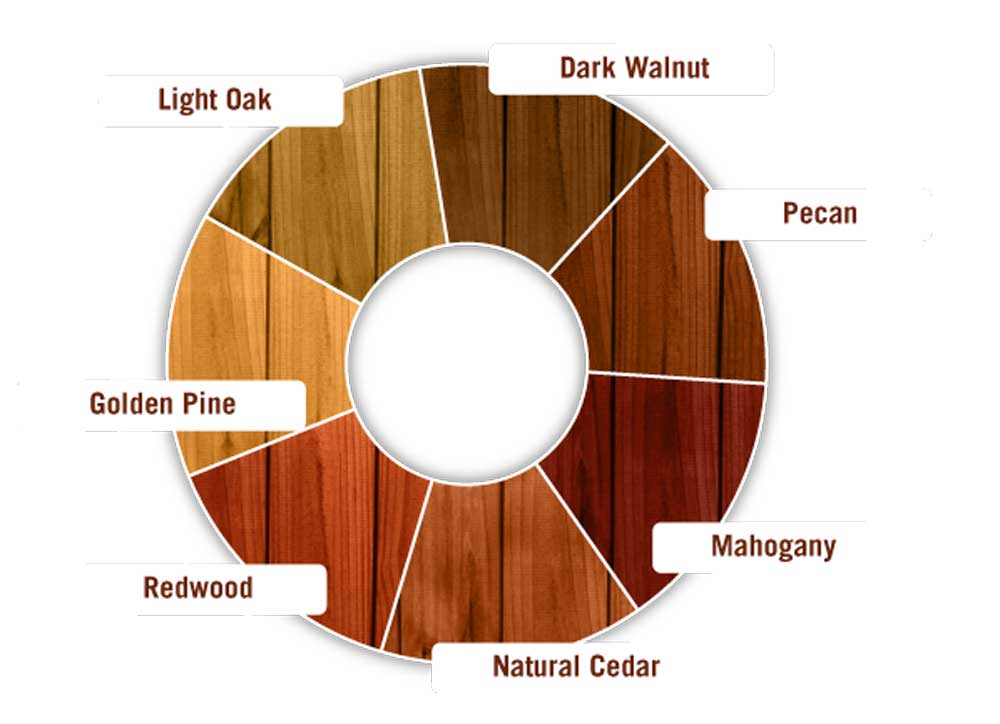
A Little Colour Theory
Colour can be described through the one of the most common models, the HSB model which includes
- Hue (the actual color)
- Saturation (the strength or how far its away from gray)
- Brightness (how dark or light)
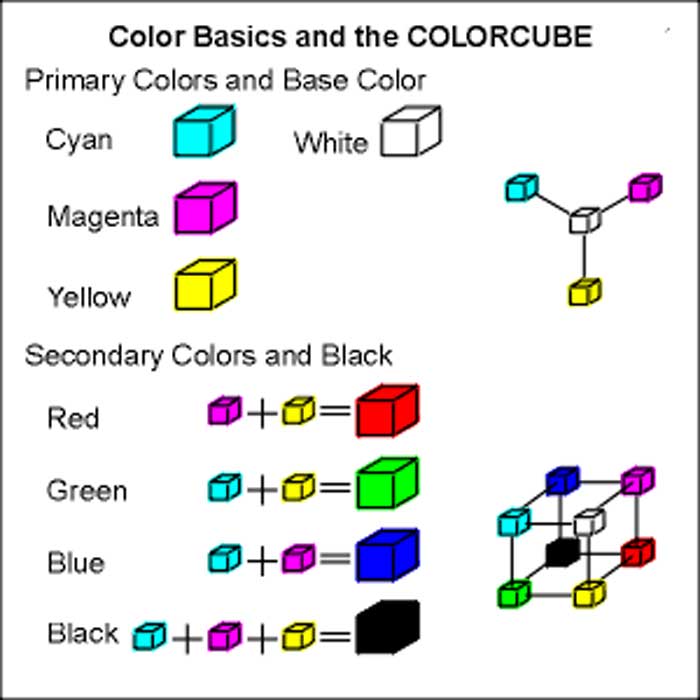
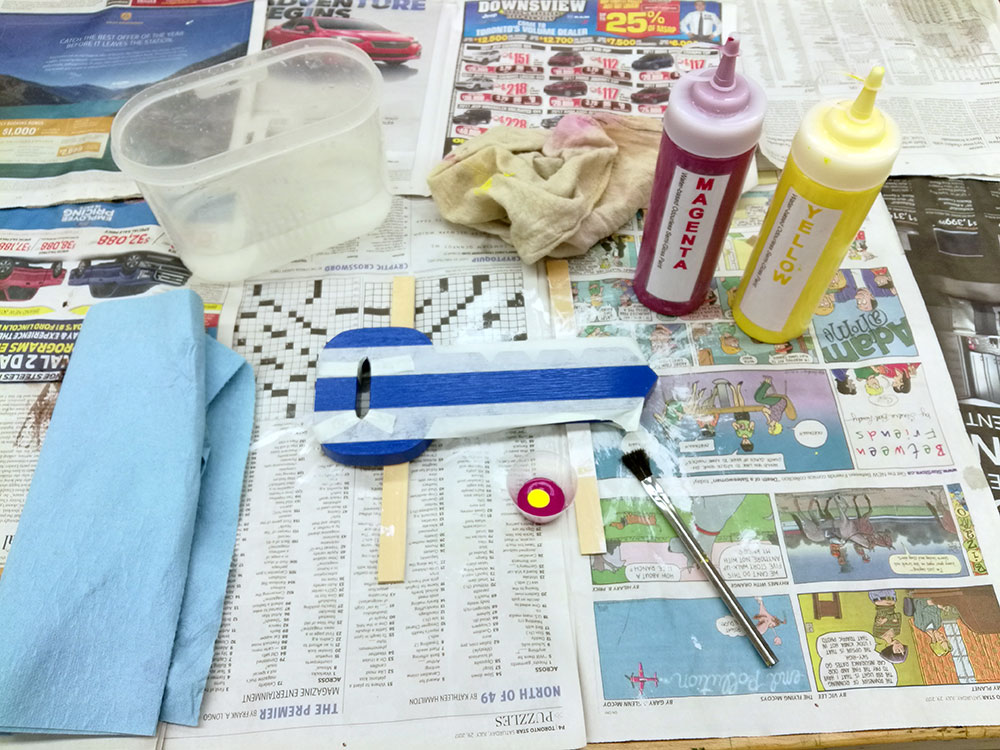
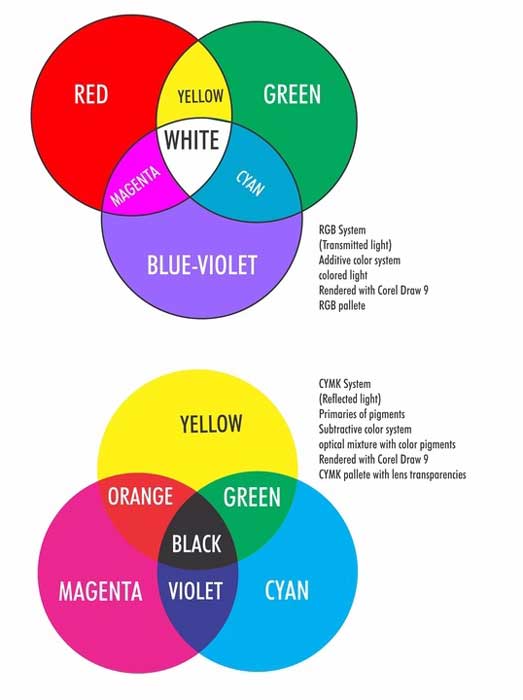
Colour can also be described by it's mode: additive (RGB) or subtractive (CMYK). Additive colour is the color system used for computer graphics, TV and lighting. It's additive because lights are mixed or combined to make the various colors. The RGB stands for red, green, and blue and if you mix these colour light sources all together, you get white. Subtractive colour mode is used for printing most of the time. Think of these as paint or ink and the CMYK stands for cyan, magenta, yellow, and black (Key colour, or last letter of black). Actually mixing them all together, you will end up more with a dark murky brown, so that is why black is usually supplied separately. Think of laser or ink jet printers.
Colour Mixing
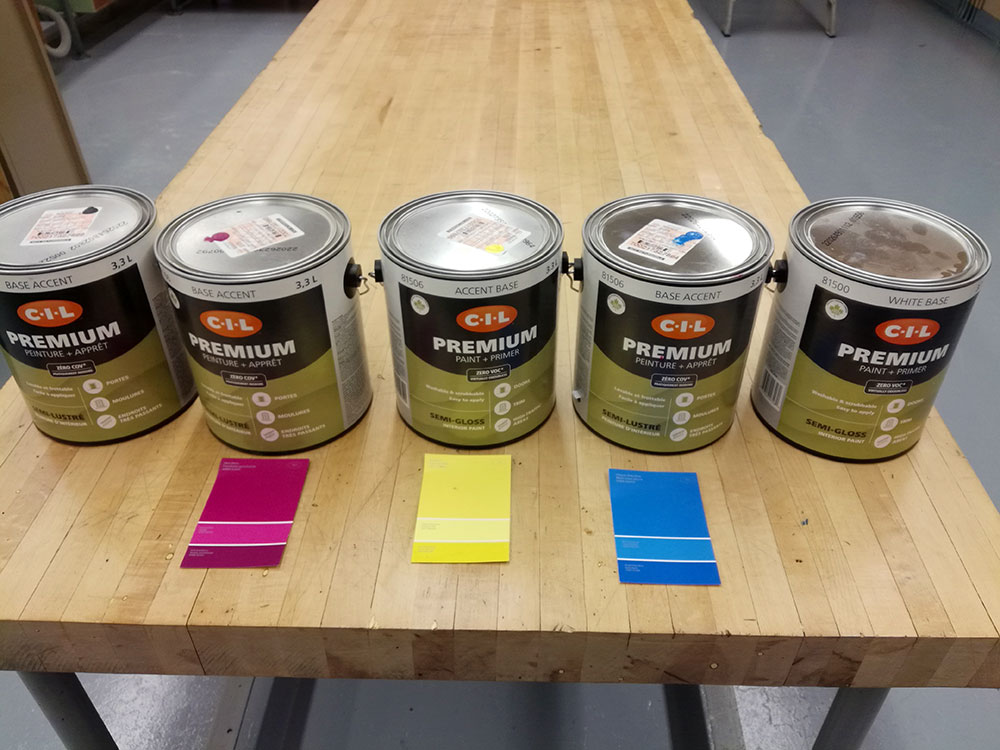
Colours will have to be mixed from primary paint colours provided, mainly:
- Cyan
- Magenta
- Yellow
- White to lighten
- Black to darken
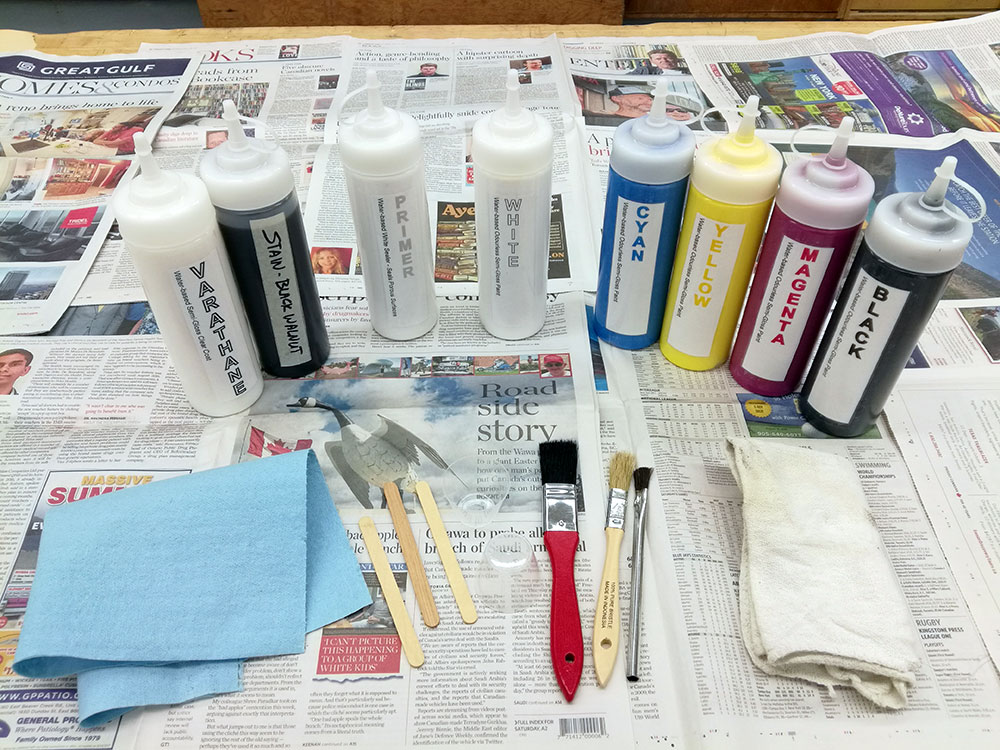
By using a small mixing cup, you can use the cyan, magenta, and yellow to get your primary and secondary colour match, then if you need to darken, lighten or tint, you can use a bit of the white or black. Mix only what you need and base that on how much you used when you primed your key holder with primer paint.
If you are planning on multiple colours, then you will require more time and have to plan your painting. You probably will go with your base colour first, then your secondary colour(s) after. Painters tape can assist with controlling where the paint is going and give a nice clean and sharp professional edge. Remember this will require more drying time to accomplish this.
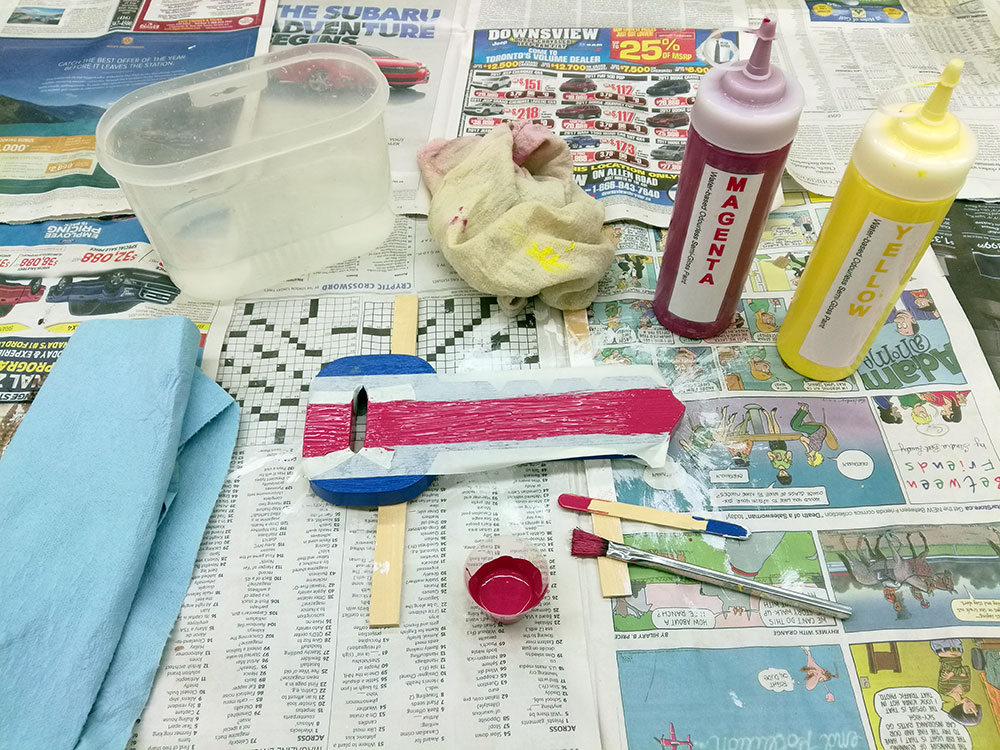
Painting Your Key Holder
Images in this section show project support process steps and related information to be discussed with your instructor. Mouse over each image/step shown for more related and detailed information. Below is a little about the paints you will be using:

Clear Coat
Clear Coat
Clear Coat
Clear Coat
The primer, paint colours, stain, and clear coat have all been put into squeeze bottles to allow you easy application with little, if not no mess because of this added convenience. Kraft or newspaper is to be used to protect table you are working on to prevent paint getting on table. As all paints are water based, this allows for easy clean-up of brushes, your hands, etc. All paints are relatively odorless, allowing you to paint just about anywhere, but you want to keep your freshly painted project away from dust created from the wood machines in the shop.
Set-up
Primer
Brush Cleaning
Clear Coat
Stain Puddle

Stain Covered

Stain Wiped

All Three

2nd-3rd Coats
Tape Prep.
Red Stripe
Hook Locations
Hook Holes
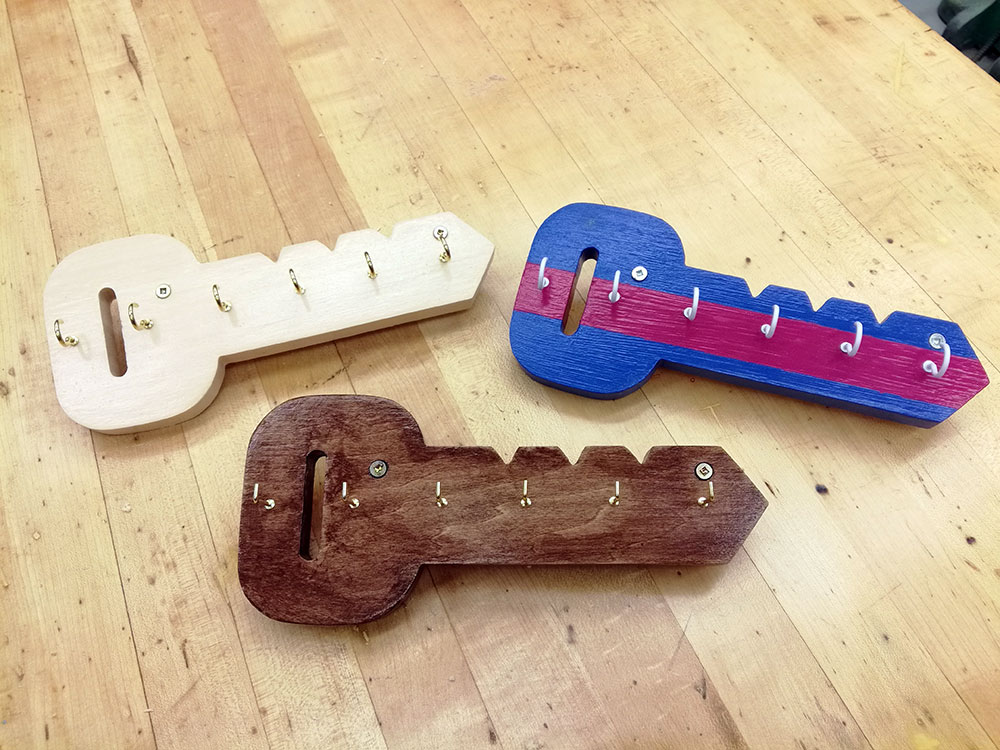
Finished
Backs
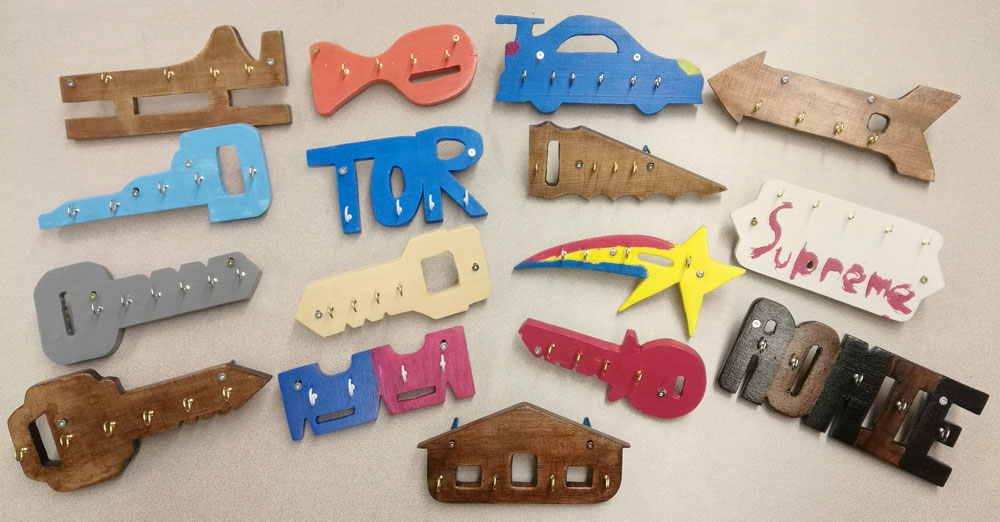
Student Samples
Web Resources
- Wooden key holder ideas
- DIY key holder ideas (Pintrest)
- Woodworking general
- General safety resource site
 Compound slide miter saw
- Combo sander
- Oscillating Spindle Sander
- Drill press
- Band saw
- 3 reasons wood finishing works
- Wood finishing
- Surface preparation
- Preparation, stain, and clear coat
- Wood surface preparation guide
- Prepare surface for paint or stain
 Intro to colour, 28s
- Modern color theory(main page)
- Colour basic theory, 5.0
- Paint, 19s
- All about paint, 29s
- Red Blue Yellow vs Magenta Cyan Yellow, 21.16
- Color theory and mixing, 13.51
- How to Make Paint Colors
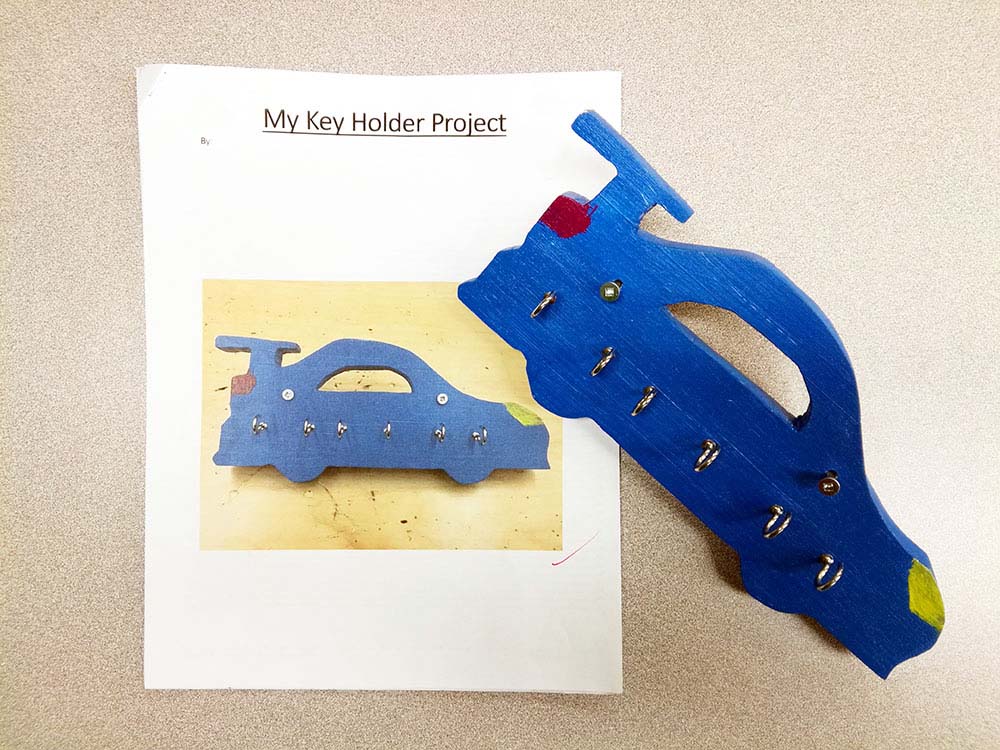
Create/Construct:

Your ![]() Key Holder handout will have information supporting project steps and similar to resources on web site. It also includes machine safety, parts, operation, and contract sheets for each machine you will be using to create your key holder project.
Key Holder handout will have information supporting project steps and similar to resources on web site. It also includes machine safety, parts, operation, and contract sheets for each machine you will be using to create your key holder project.
Time lines:
 You have about two weeks to complete this project. Below is a breakdown of time-lines that you must adhere to, to finish the key holder project. If you fall behind and need more time, then you must take extra time outside of class time. This may mean some homework, or coming in before school to complete the work. Some of the work can overlap, so you may advance to the next step, but check with instructor along the way.
- Thumbnails - 1 day
- Orthographic - 1 day
- Oblique - 1 day
- Key holder cut out and smooth - 3 days
- 2 coats of finish - 2 days
- Report - 2 days
Resources and Materials
- You will receive one piece of wood measuring ~ 10 cm * 25 cm * 1.3 cm
- 4-6 hooks to hang keys with 1 or 2 mounting eyelets if required (when complete)
- Shop hand tools, equipment: Miter and band saw, combination sander, and drill press
- Sand paper, paint bush, CMYK colours of paint, mixing cups, stain, and Varathane
Steps to Start
- First thing to do is review the
 Key Holder handout and find 10 new terms/phrases to fill in
 - Answer the Key Holder review questions which will be taken-up in class the next day
- Review the safety machine contracts, follow lessons on each, and demonstrate your safe operation of the machines
Information and Planning
Each task or activity is going to follow the SPICE pattern, but different products will follow different processes. Keep in mind that you should put your name permanently into wood once you get it on the back and keep in your box. The following is a 3-step outline:
Initial Design Stage
- Five Detailed thumbnails, with labels and legend showing symbolic requirements
- Orthographic at a reduced scale of 1:2 with overall and detail dimensions
- Final idea showing a full 1:1 scale oblique sketch showing requirements in detail, colour, hook locations
Construction and Wood Working Stage
- All students must complete their safety contracts on shop machines first
- Practice with all machines prior to cutting your good piece, new pieces will cost you marks if you mess up your piece
- Miter cut your length needed for your key holder length
- Transfer your design using your oblique to your wood (carbon paper), remember that your finished design is to match exactly what you designed, your size and finish are, and put your name permanently on the back of key holder, 20 mm Gothic font style
- Drill your hole first if possible; as there is more wood to hold onto, also a rasp or file might come in handy at this point
- Cut out around the outline of your design leaving at least 3 mm clearance
- Use the disk sander to take it down to about 1 mm to your design, then use sand paper to refine edges
- Rasp (rough) and/or file (fine) can also be used to shape edges effectively by hand
- Use a course grade of sand paper first such as 60 grit, then move up to a 80 grit for fine smooth edges and top surface result
Painting/finishing Stage

Process
- Once everything is smooth and accurate you are ready to apply finish
- Pick your paint colour or possible stain and clear coat (Varathane)
- When painting make sure to not put too much paint on in one coat, as it will run afterward, take a very long time to dry and leave a poor finish
- After it has dried overnight, you sand down with fine sand paper 220-320 grit and put a second coat to create a smoother finer finish
Evaluation:
Remember to objectively evaluate the work to maximize your self and peer evaluation mark when filling out the check list and evaluation sheet. Ensure you have all of your rough work to include with your self/peer evaluation.
| Evaluation Breakdown for Project Support Tasks to complete | |
|---|---|
| Key Terms - 10 new terms listed and defined | 10 |
| Rev Questions - 7 questions answered on handout | 17 |
| Safety Contracts - Mitre saw, band saw, combo and spindle sander, and drill press | 50 |
| Evaluation Breakdown for Key Holder Project and Report | Marks |
| Always double check that you have completed all components for full marks. | |
| Requirements - direction and requirements met | 20 |
| Research - evidence of new info and support resources | 10 |
| Ideas and Designs - lots of great ideas and designs (thumbnails) | 10 |
| Workmanship & Build - quality, accuracy, and finish | 40 |
| Finished Key Holder- Shape, size, and finished look | 20 |
| Total (including Paperwork) - checklist and self/peer eval. sheet | 100 |

Conclusion
If this project was skipped to go straight to the Co2 dragster project, then this ![]() Shop Tools/Machines should be looked at first to properly support the Cow Dragster project in next unit.
Shop Tools/Machines should be looked at first to properly support the Cow Dragster project in next unit.
Most likely if you successfully completed the Key Holder project, using your own pattern design, learning how to safety work with common wood machines and tools, completing your wood finishing and sealing with a protective surface, you have learned some valuable skills to use in the future for your own projects such as the Co2 Dragster and also support future tech related projects.