Unit 2: Grade 09 Exploring Technologies - Design Process - SPICE
This unit focuses on the design process, communications technology, and use of basic tools for hands-on projects.
Faulty Towers allows you to apply the design process to figure out a solution with limited resources - time and materials to get to your goal with this project.
Logo design allows you the opportunity to come up with your own student professional logo and use it in four specific mediums all the while experiencing a little of what graphic communications is using an illustration program commonly used in senior classes and in real world industry.
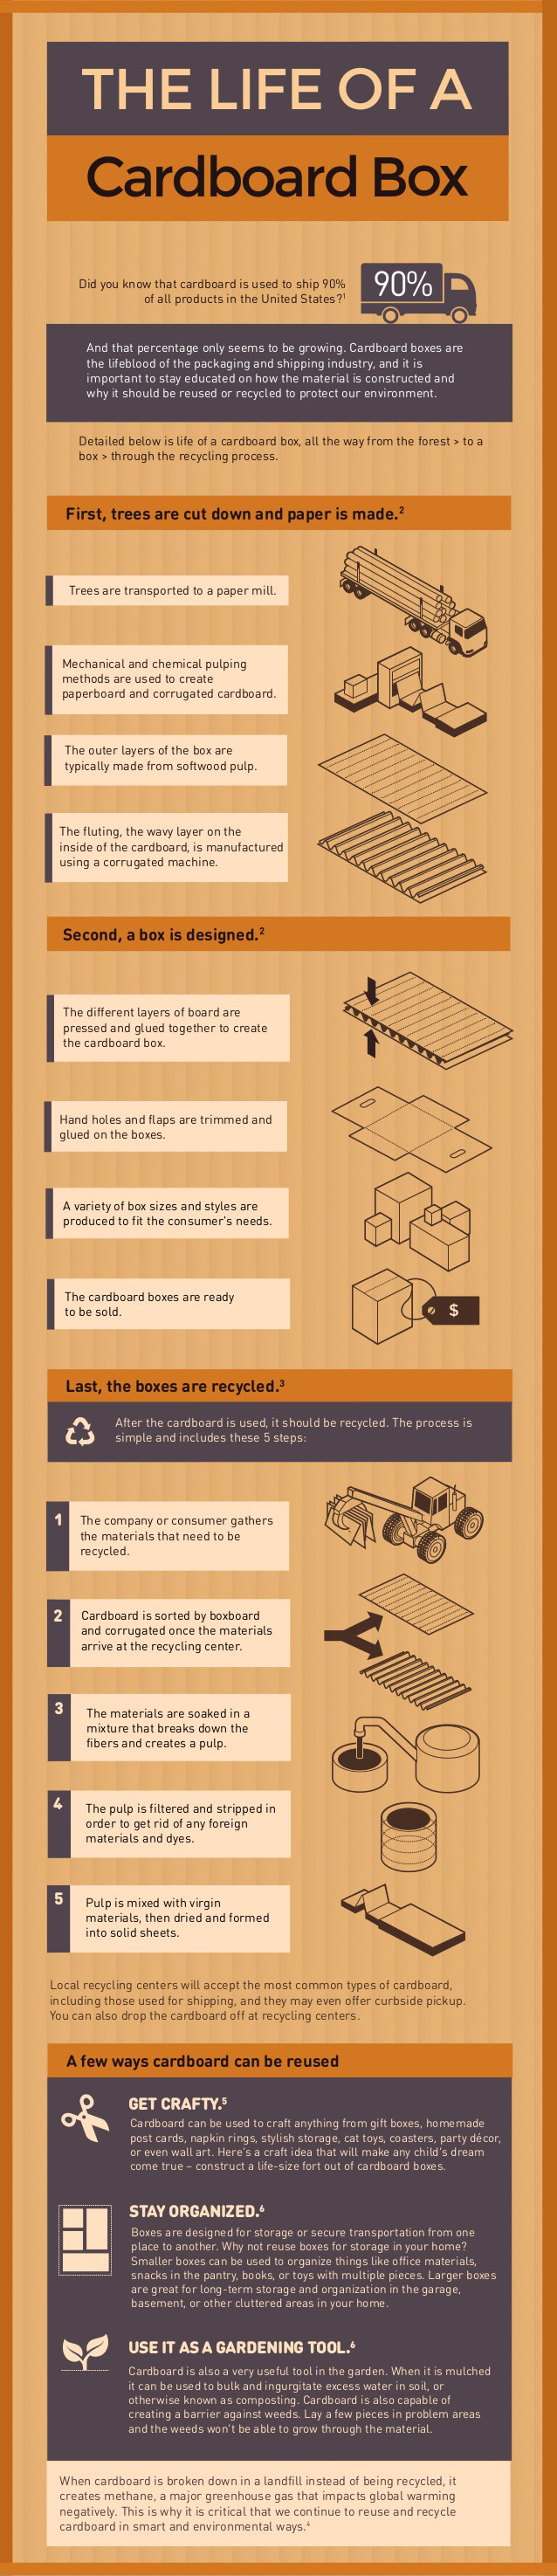
For the final project, students will be introduced to packaging and pattern making, a very important part of understanding a sector, packaging design. Students will use a per-existing pattern to create a project box with their own marketing around it and keep their future Exploring Technology projects in. Yet another double barreled project that helps students be organized and learn at the same time.
Course Units and Descriptions
| Unit | Description |
|---|---|
| Review course outline for more details | |
| 1 | Careers & Safety- Intro, computers, organization, safety, and careers |
| 2 | Design Process - SPICE- Faulty towers, logo design, and project box |
| 3 | Materials, Machines, Tools, & Process- Acubend, key ring holder, key ring accessory |
| 4 | Project Research, Design, & Build- Bridge/tower, mag-lev, co2 dragster |
| 5 | Web Portfolio- Showcase course work, projects, and understanding with web portfolio and presentation |
Unit Content Activity Quick Links, Click to Jump to Specific Activity!
- Unit 2, Act. 1: Faulty Towers - The Technological Design Process
- Unit 2, Act. 2: Graphic Logos - Make an Image for Yourself
- Illustrator, Files, Apps, Elements, Logos, Headers, Steps, and Evaluation
- Unit 2, Act. 3: Project Box - Store Your Stuff
- Safety, Packaging, Resource links, Steps, Evaluation, and E-inst.
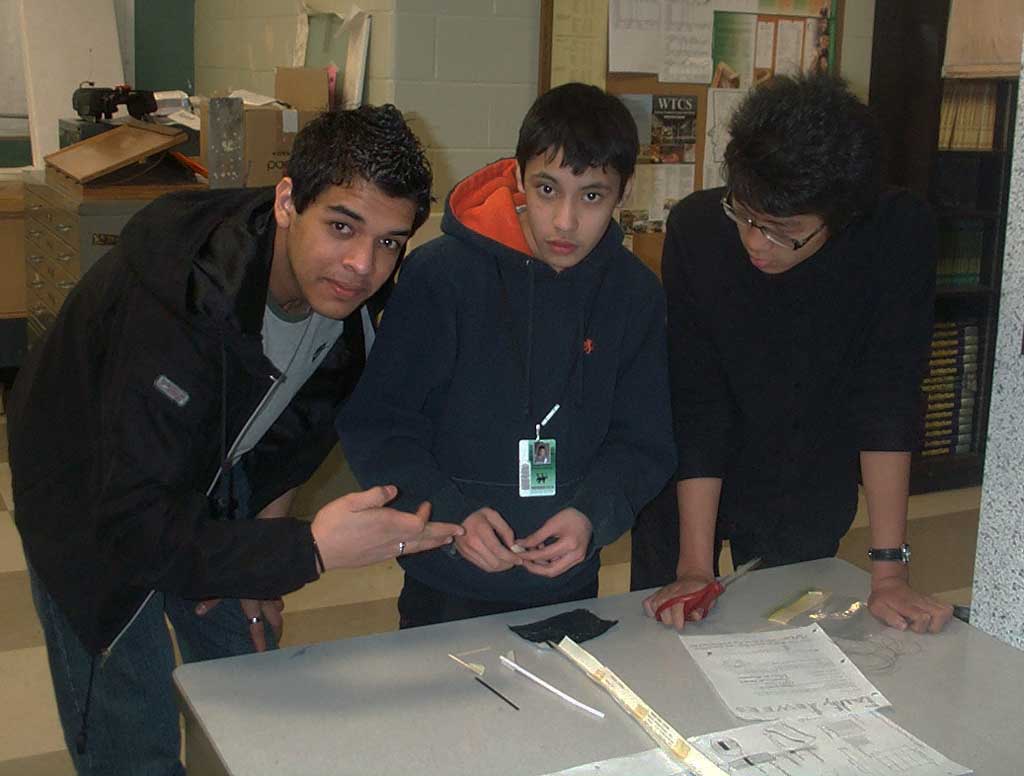
 Unit 2, Act. 1: Faulty Towers - The Technological Design Process
 Situation:

A class of students interested in tech have taken this course, Exploring Technologies, to learn and experience several different related courses that lead to related technical careers. One of the major principles of this course/field is the "Design Process", and is applied in all of these technical areas. For this activity we are going to use this "Design Process" and apply it to this tower project:
It involves being ship wrecked on a small deserted island and you and your partner need to be saved as you have limited food, island resources, and know you need to be rescued to get back to civilization. As your position is likely away from the shipping lanes your best hope is a radar beacon held as high as possible. The highest tower will be the team that will be rescued first and get offered the new positions.
Problem/Challenge:
You and your partner must design a prototype radar beacon to be seen from all directions and must be mounted on top of a tower, also designed to be as high as possible with island available equivalent materials to create a prototyped solution which will include:
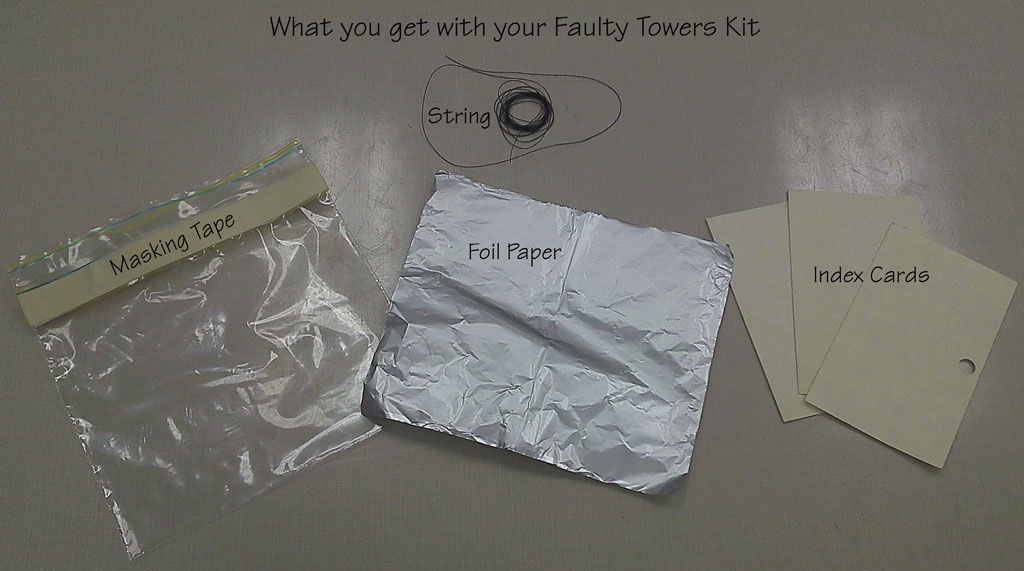
- 3 sheets of composite board material (in class 3 index cards)
- 1 old saw (in class 1 pair of scissors)
- 1 meter of seaweed (in class 1 meter of 3/4" wide masking tape)
- 2 meters of rope (in class 2 meters of thin string)
- 1 sheet of shiny aluminum (in class 15*12 cm of aluminum foil)
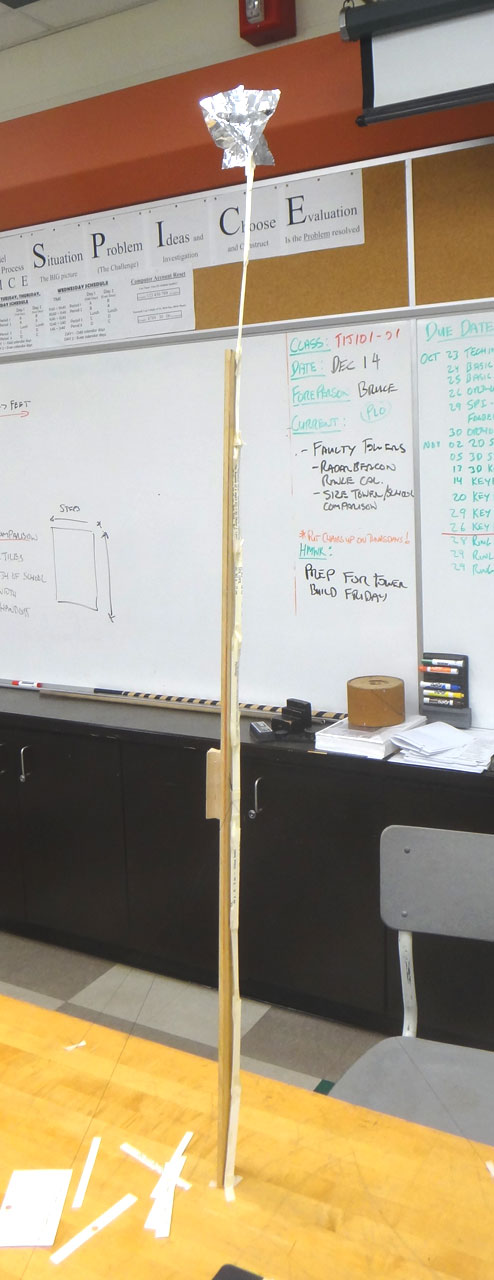
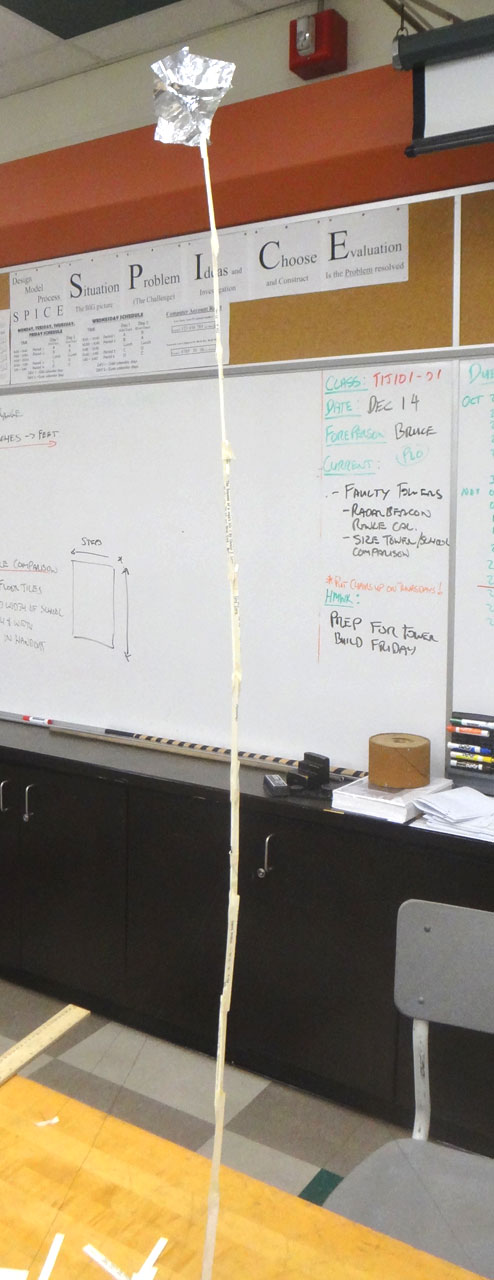
The prototype tower design build must be; as high as possible, stable, look like it will work, have great joints, securely hold the radar beacon, and with-stand those tropical storms.
Investigation/Ideas:
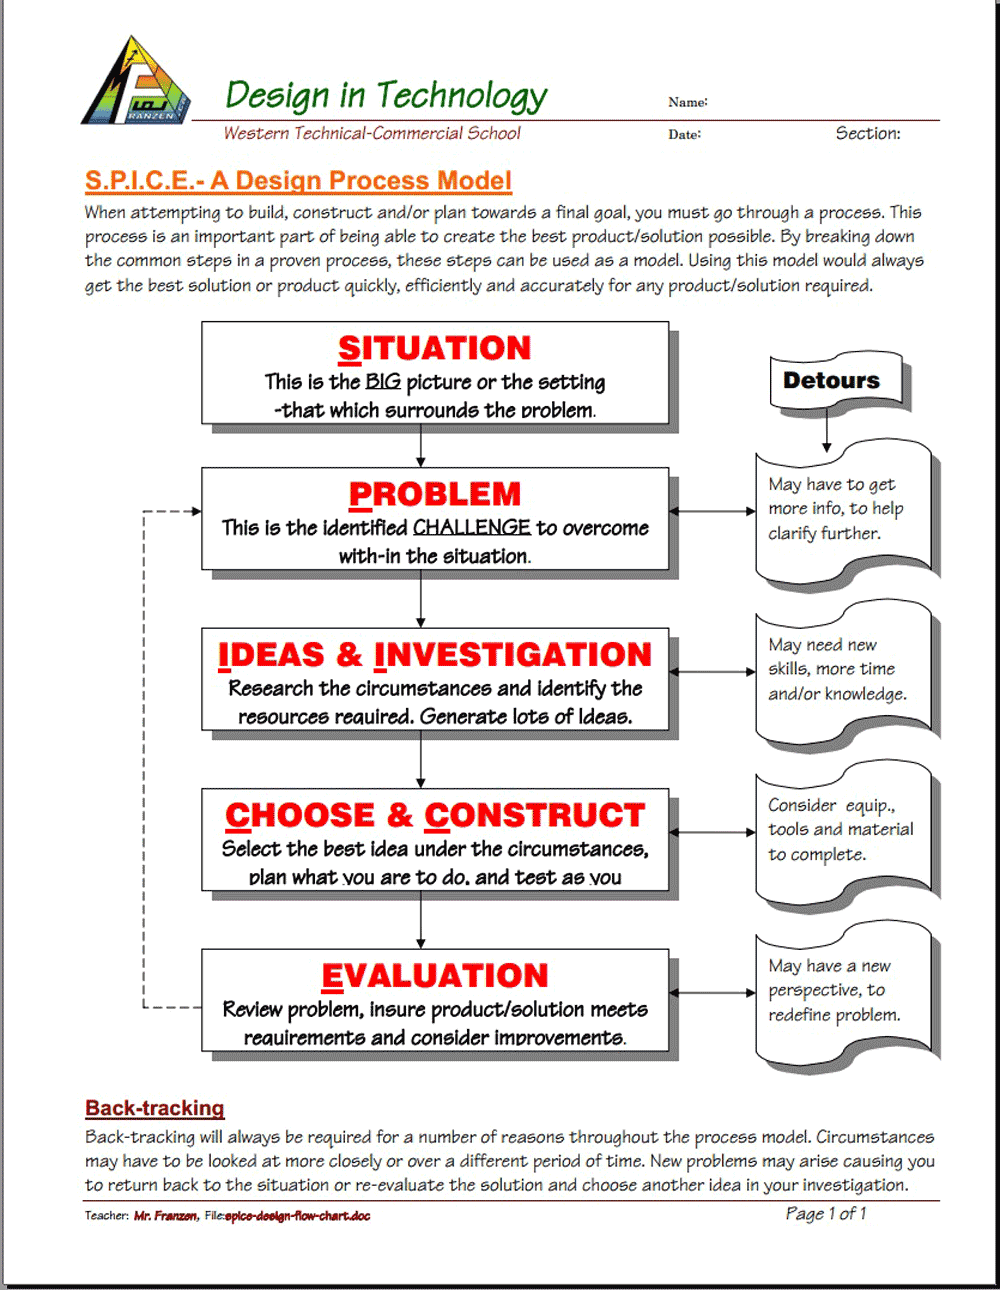
SPICE Model
In this section, we will investigate more background information to support this project and focus on the project process so that it can be applied to other future projects done in this course. Design process, radar design and build, tower build ideas and comparisons, further design sketching techniques, safety, and build techniques.
Design Process SPICE
There are many design process models out there. We will look at a simple model called SPICE to show how the technical design process works. This model can be applied to almost anything to get to your goals. Below are some further related resource links:
 SPICE Design Process Model (We will be using this model)
- A detailed look on each stage of designing
- Six Models of the Design Process
- More on Design Process Models
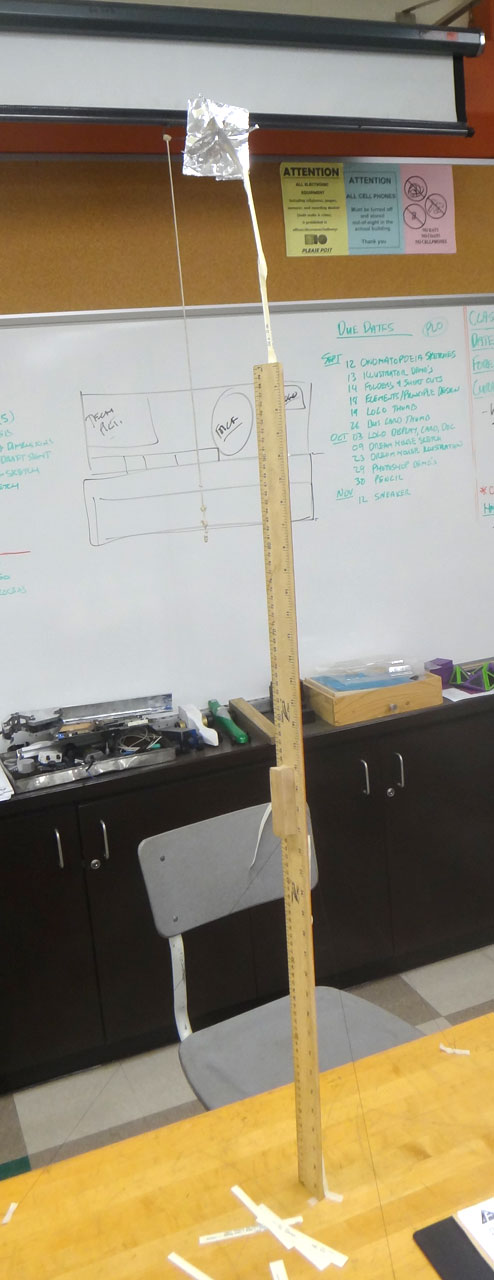
Radar Beacon and Tower
![]() As your position is likely away from the shipping lanes your best hope is
As your position is likely away from the shipping lanes your best hope is 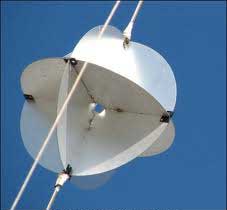 to design and create a radar beacon,held as high as possible. Two important facts will help you understand why this is important. A high reflective return radar shape that has 90-degree surfaces in all directions will have a better possibility to be picked up by local ships with radar emitters. Also true is the higher you can locate the beacon, the further distance away, the ship can pick-up your signal. This is explained in more detail here. The formula for figuring out how far your tower range will be is as follows:
You and your partner will need to design a radar beacon to be seen from all directions mounted on top of a tower, that you will have to also design to make it as high as possible. The tower must be stable and hold the radar beacon securely. The higher the tower the better chance you will get rescued (and rewarded with better marks).
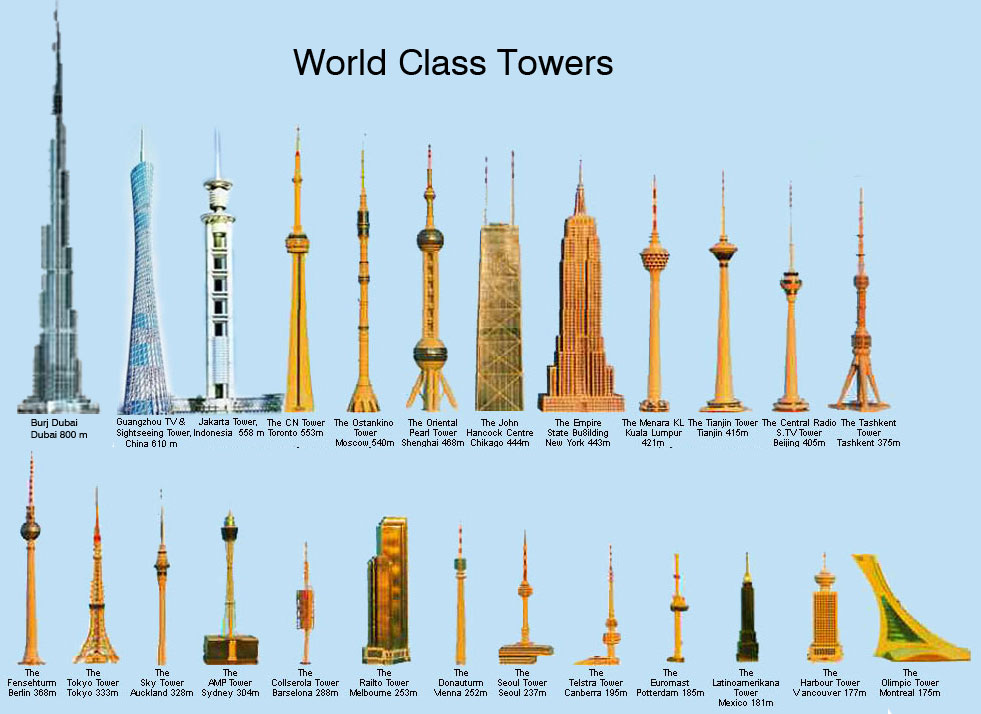
Real Tower Designs to Check-out
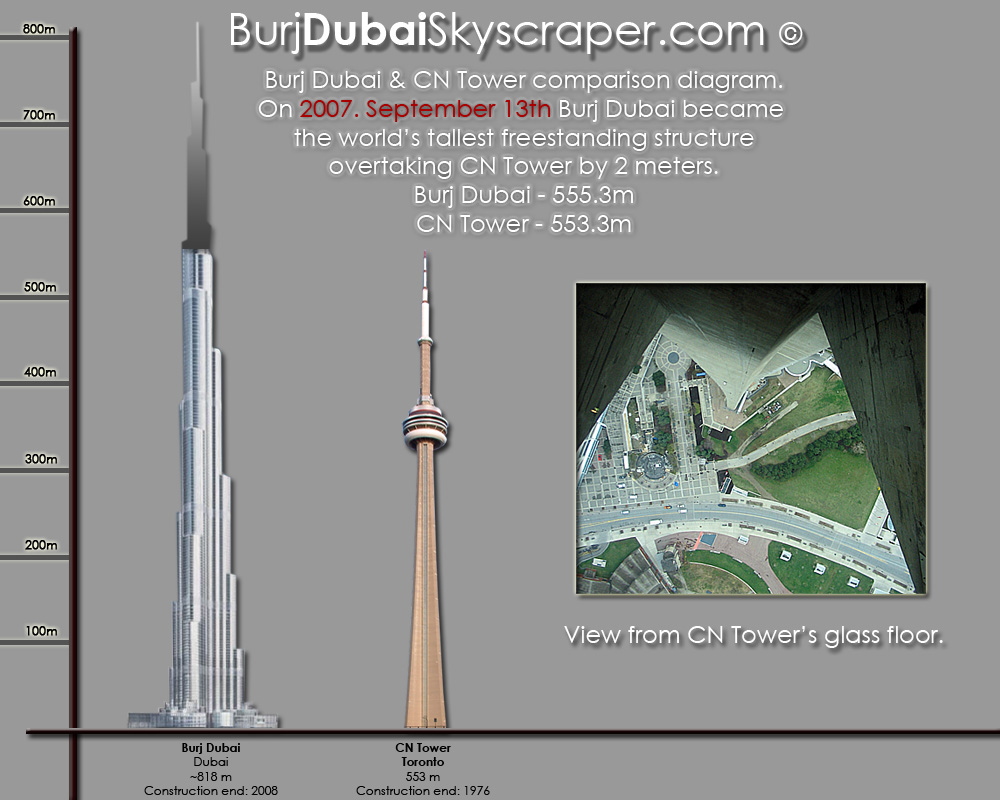 You will find great towers all over the world. We have our CN Tower right here in Toronto. Building one with limited materials will require knowledge and skills to build it right for height and support. Looking at current designs may help you with your design with available prototype materials.
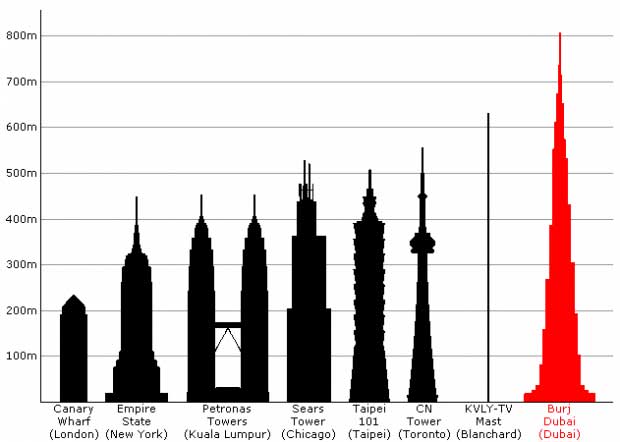
Radar Beacon Reflector
You will need to think of the best way to design your radar beacon to get maximum detection from ships radar scanners and stable enough to last for the duration of time needed for the rescue. For that you will need to think of different patterns that could work.
- Creating a radar beacon
- Intructables - radar reflector build
- All about Radar Beacon Reflectors
- How to Calculate the Distance to the Horizon
- Duck Works Magazine - Radar Beacon Reflectors
- Google image search for radar beacons
- Binnacle passive radar reflector distributor
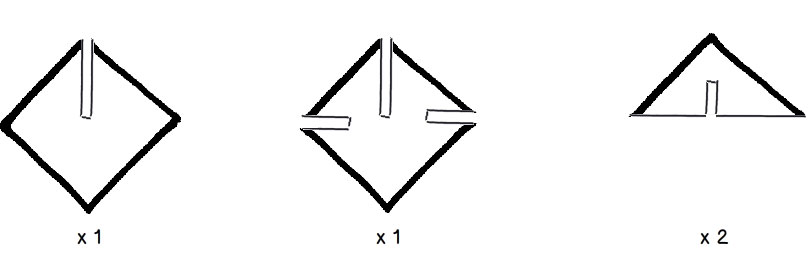
Tower Prototype Material Building Tips
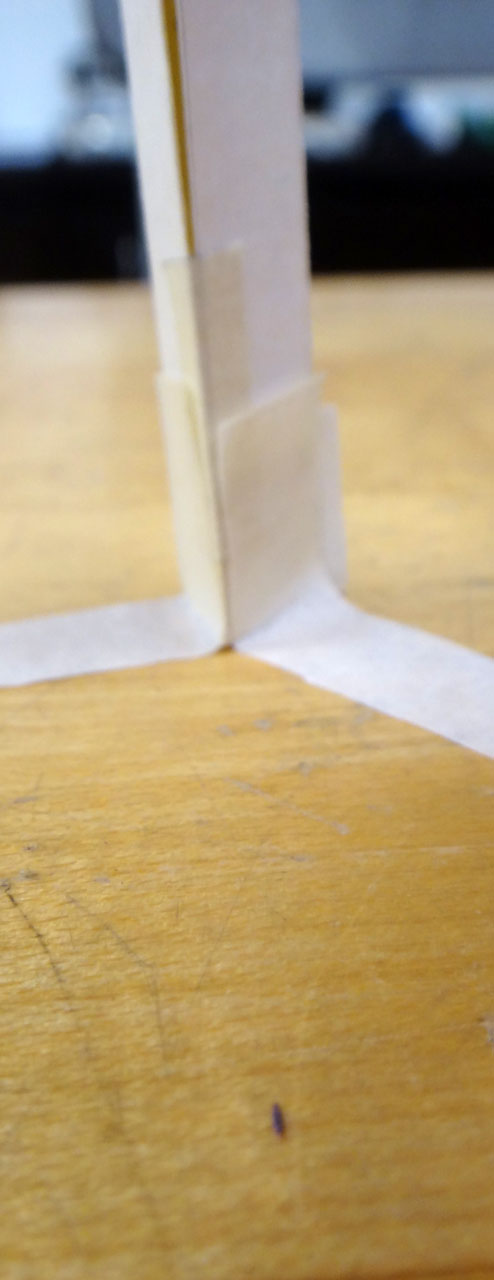
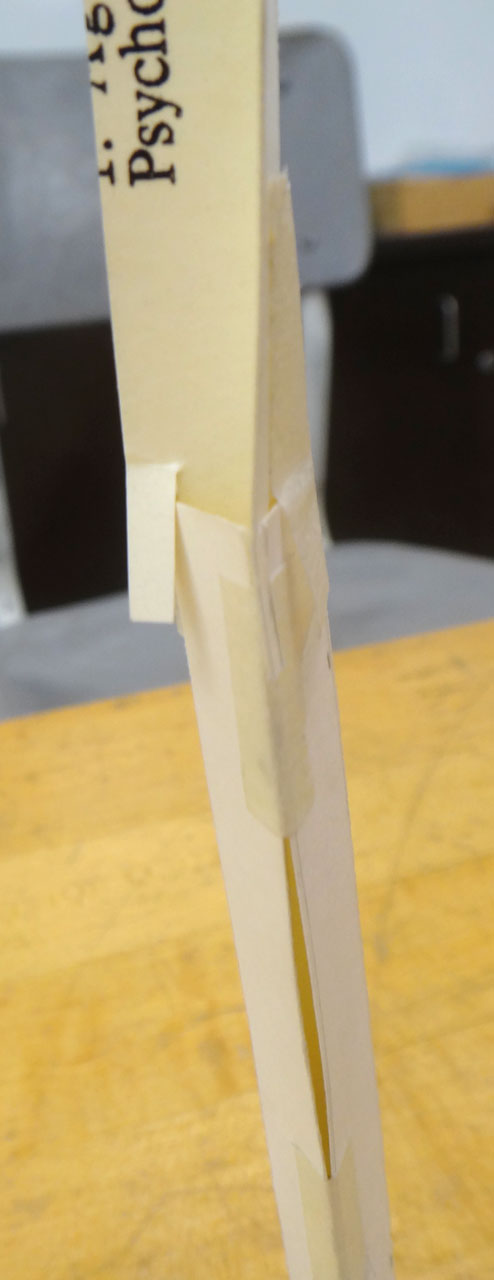
The following shows how scoring before bending can very helpful and also sample shapes:
There are many types of joints that can be made with or with-out tape. Here is one example joint without using tape to hold it together:

How High Can You Go?
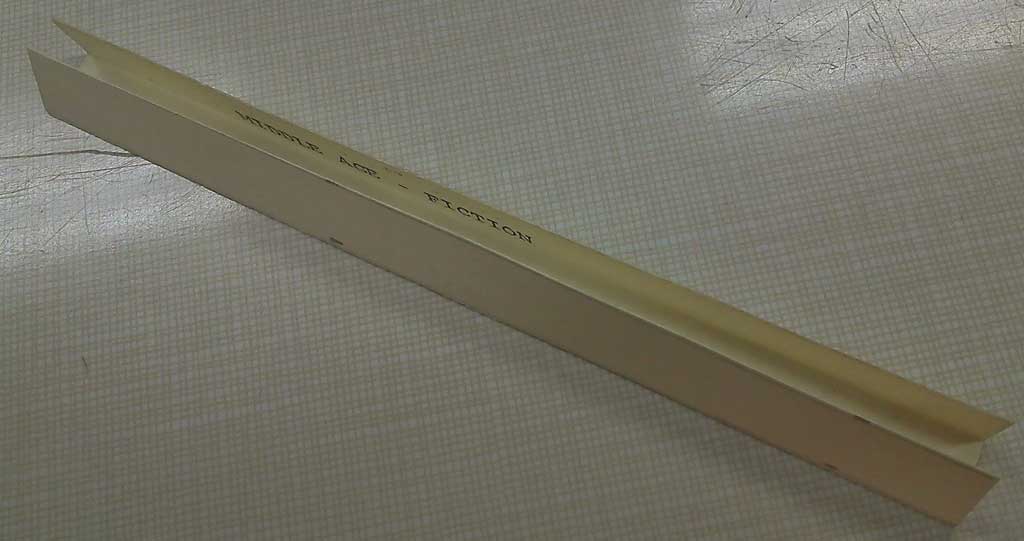
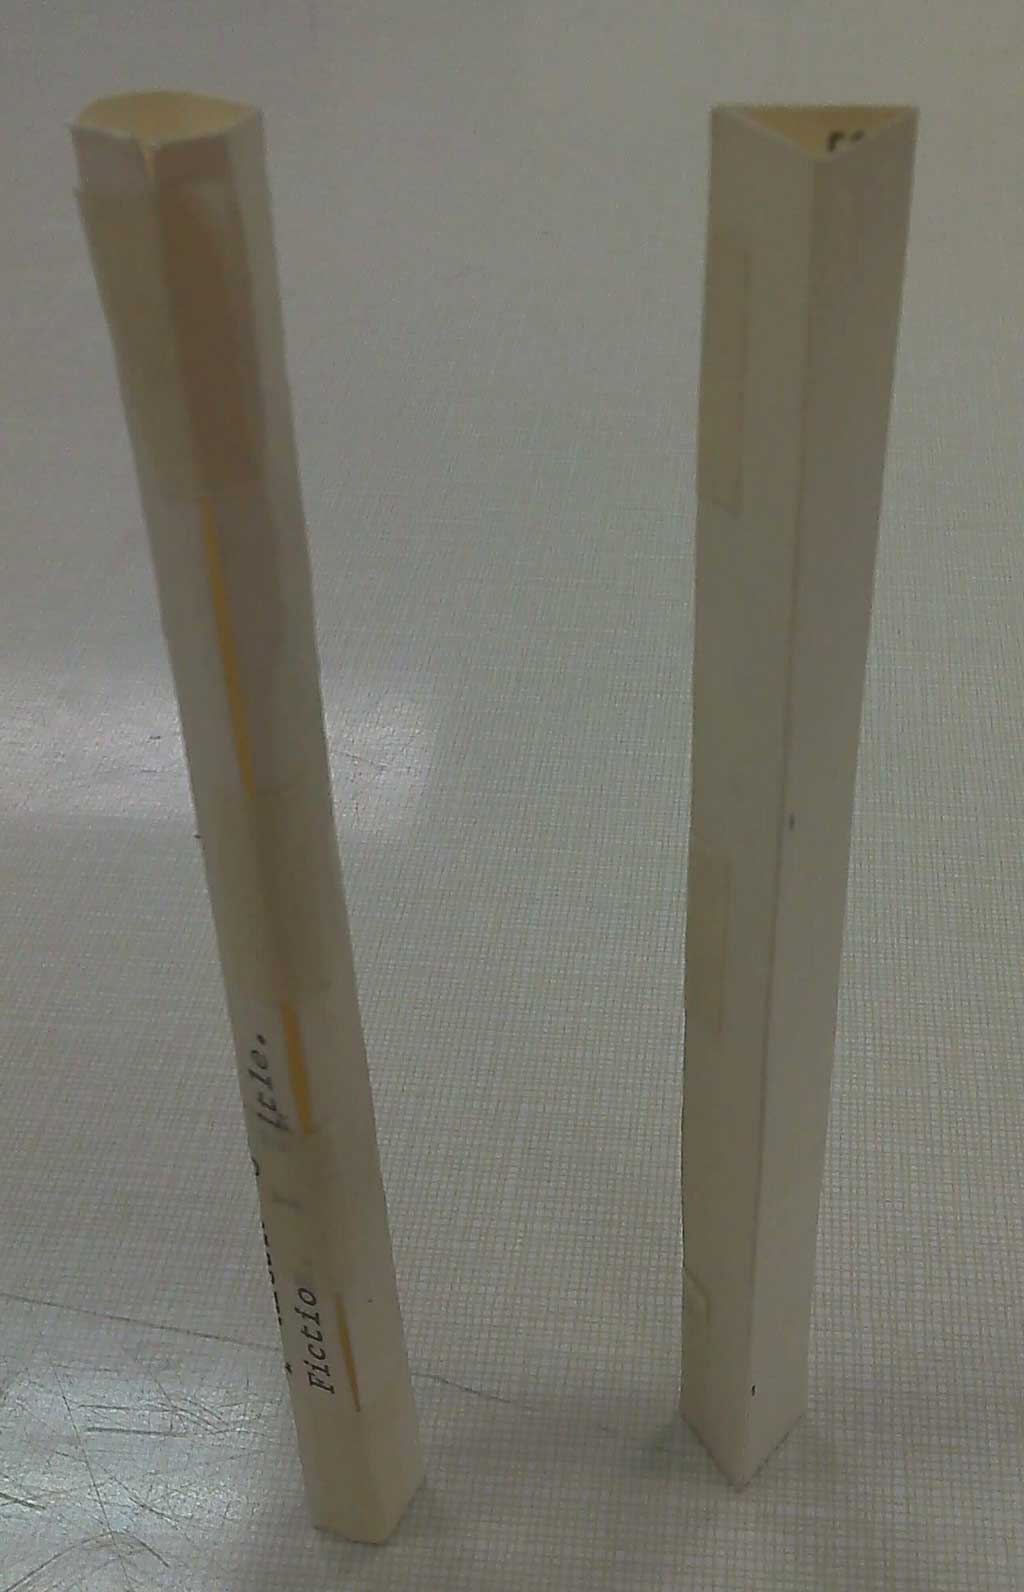
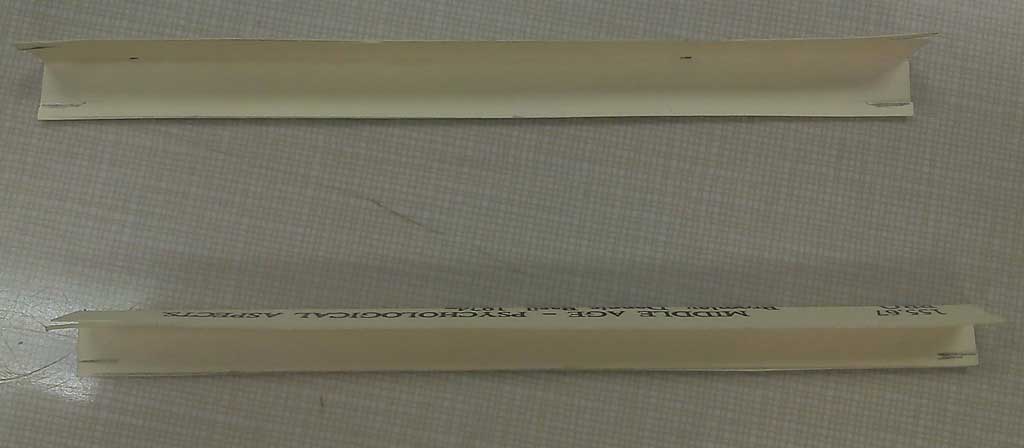
Well you have heard the old saying the sky is the limit? Well the limit is based on how well your design is. Joints need to be strong, stiff, and straight. The higher you go, the better chance you have to be rescued, but as you get real high, stability becomes a problem. If you cut your index cards too small, you will end up with a tower that may not even stay standing up. If you cut your index cards too wide, then you compromise height. Remember your tower's primary purpose is to hold the radar beacon securely, second priority is to be as tall as possible to maximize beacon range, so make sure you keep those priorities in mind when designing. Below is some pictures showing a tower built well over a meter high and still has extra tape, index card left over:
Sample 1
Sample 2
Sample 3
Sample 4
Sample 5
Create/Construct:
Project Process
On the Faulty Towers Handout you need to fill out all the design steps of the tower project as needed. Investigation Ideas will include research, notes, and sketches. Initial steps can be filled out right away, while others will have to be filled out as you work through your project. The SPICE design process includes the following steps
- Situation
- Problem/Challenge
- Investigation/Ideas
- Create and Construct
- Evaluation
Research and Lots of Idea Generation

The "Investigation and Ideas" step is very important. It could mean whether you are very successful, semi-successful or not. Take time to gather all the information you need (research) and then come up with many ideas.
There are several different research methods that you can use to find more information. You can use the Internet, library, videos, etc and you also do some testing yourself. For example, knowing what materials you have you can test different build techniques and scenarios that may work better then others.
Do not fall into the trap of taking the first good idea that pops into your head and not continuing to look for alternative and possibly better ideas. Engineers will research and build several ideas, then pick the best one based on goals or the solution to their challenge. Remember the best chance of getting rescued is to make the tower as tall as possible with the largest multi-directional reflector, that of course is stable enough not to fall in a wind storm.
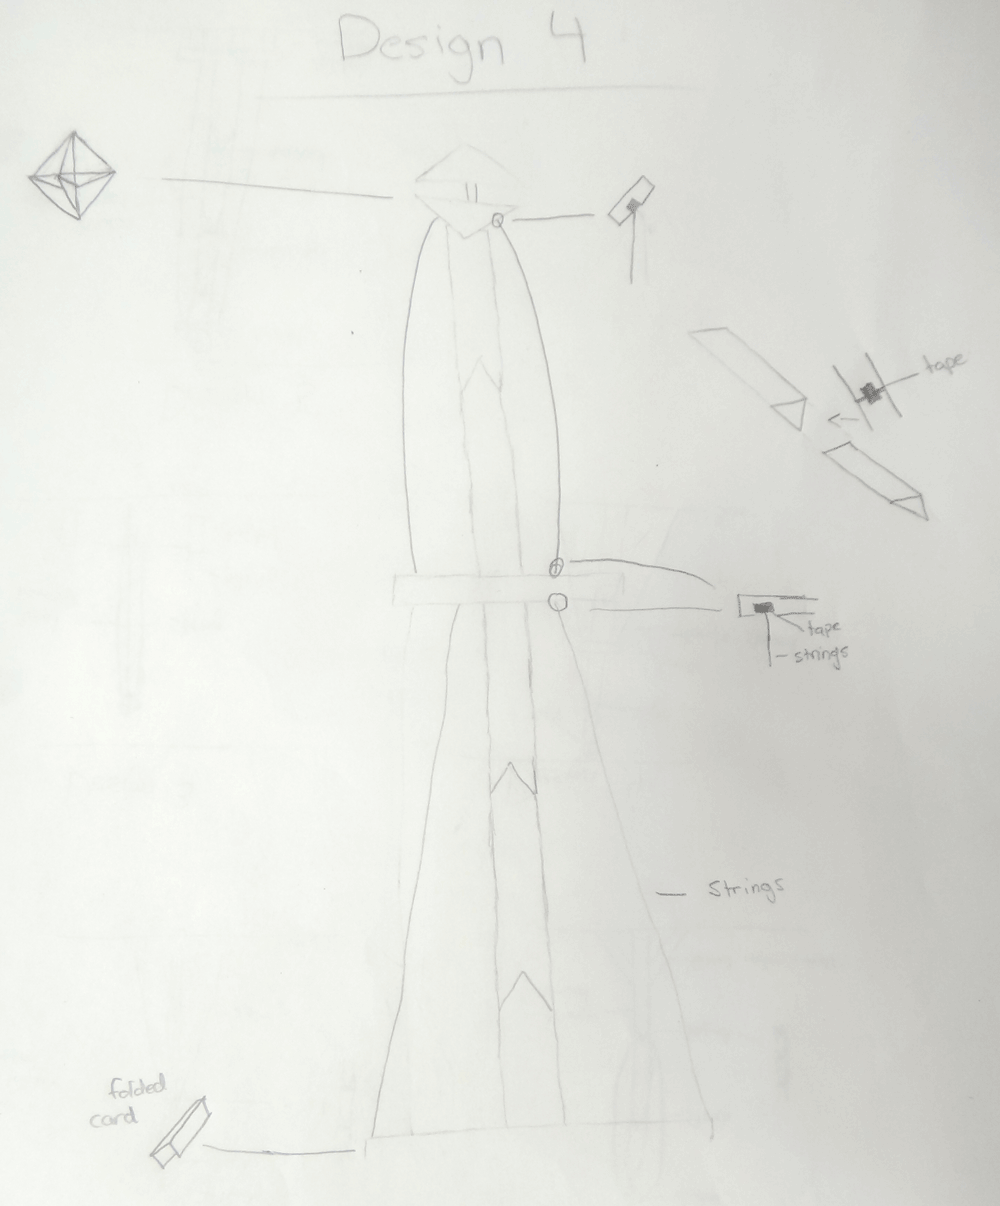
Prototype Sketch Ideas

Sample
Thumbnails 1
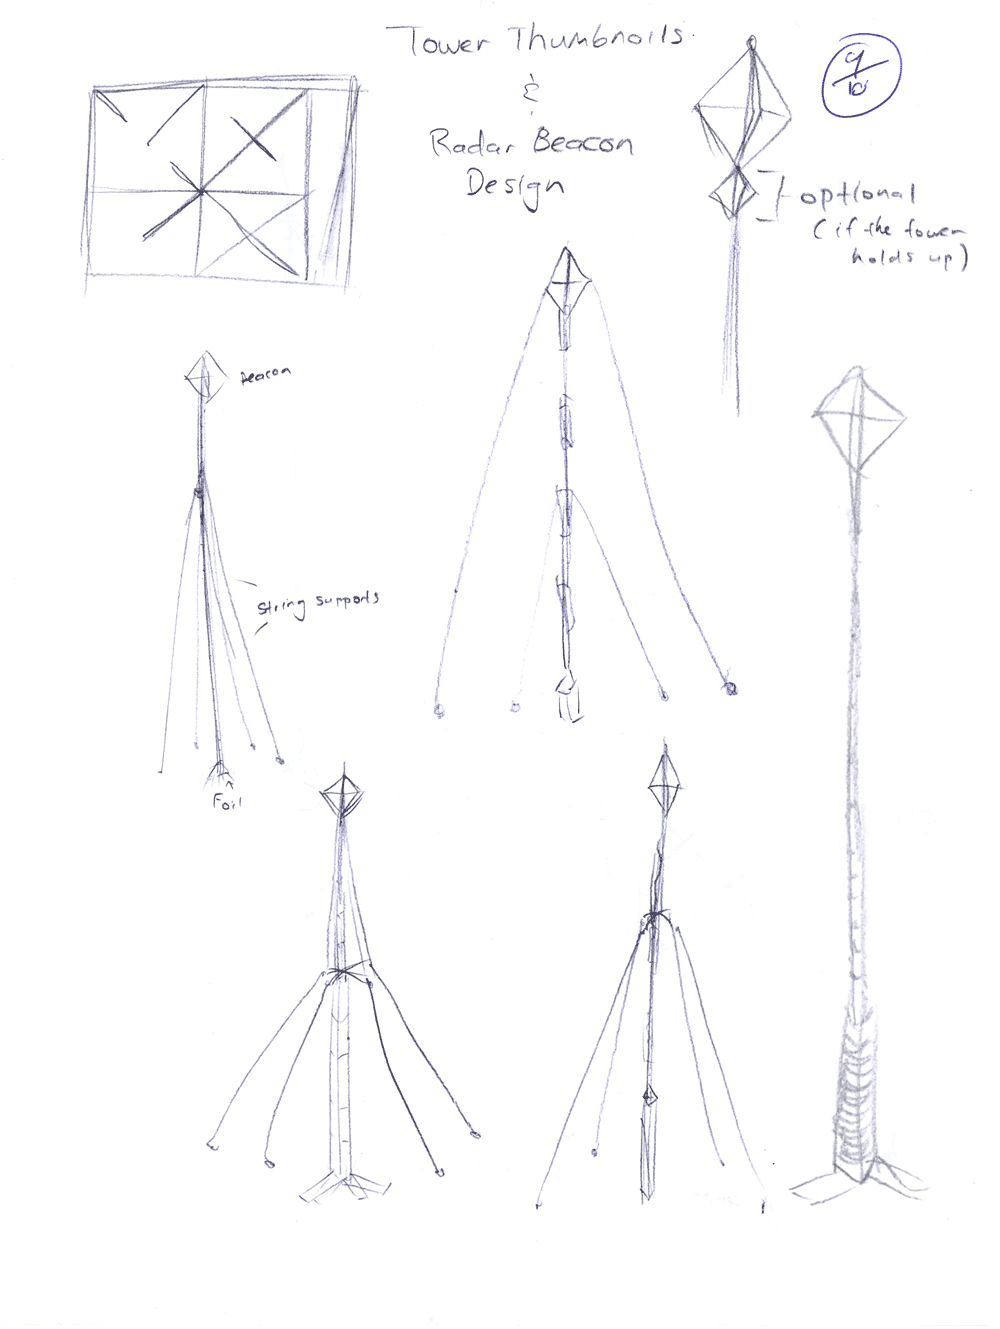
Sample
Thumbnails 2
Sample
Final Design 1
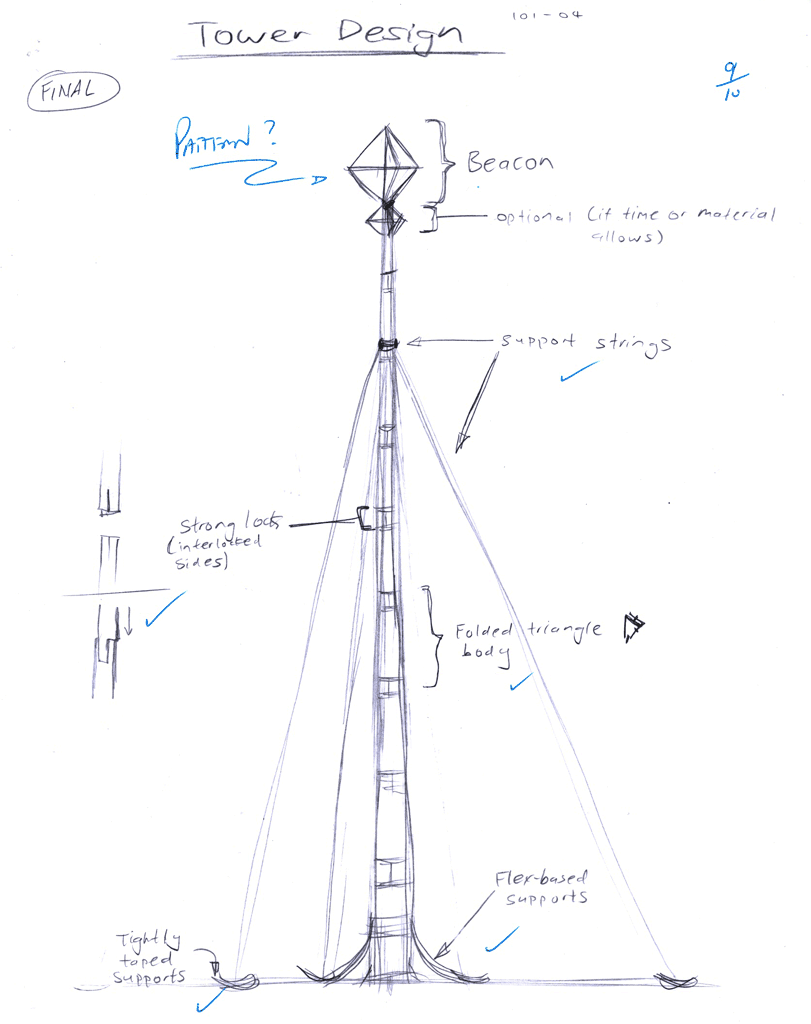
Sample
Final Design 2

Steps to Complete
- Fill in the materials you will be using for this project on the handout
- Calculate the beacon range problem, showing all formula's, rough work, calculation steps, units, and solution
- Compare tower vs school sizes and complete tower chart showing number of steps, your calculations, length of school comparison chart drawn in
- Objectively come-up with at least 5 ideas and sketch those thumbnails along with related labels and notes
- You will also need to think up or research two possible radar beacon designs, half a page each and show on page the finished product via sketch and a related scaled pattern
- With several ideas of a tower build and radar beacon, you need to select what you think are the best ideas and expand on it. Sketch a full size page showing your main idea with different views if necessary. The tower and radar reflector should have related notes and close up details on joints, tape, support, radar beacon, etc. Your ideas on how you plan to accomplish each joint, connect them, and how you plan to make your radar reflector must be done prior to the build day
- Between your partner and yourself, you will have to objectively decide on which tower and/or reflector design will work the best to get rescued
- Build day, ensure you have checked your material supply for your group, and start your build
- Instructor will come by to inspect and measure once you are done or the 50 minutes are up
- You will be required to total up tower report evaluation points instructor has written down, be prepared to notify instructor on amount of work each did in the group
- Submit all paper work for final evaluation
- Clean up your area, recycle your materials
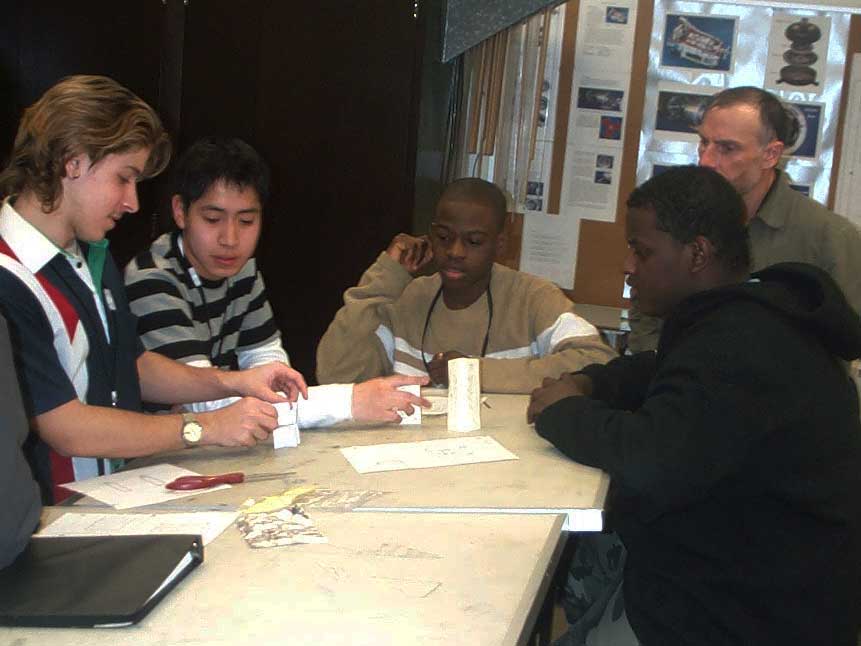
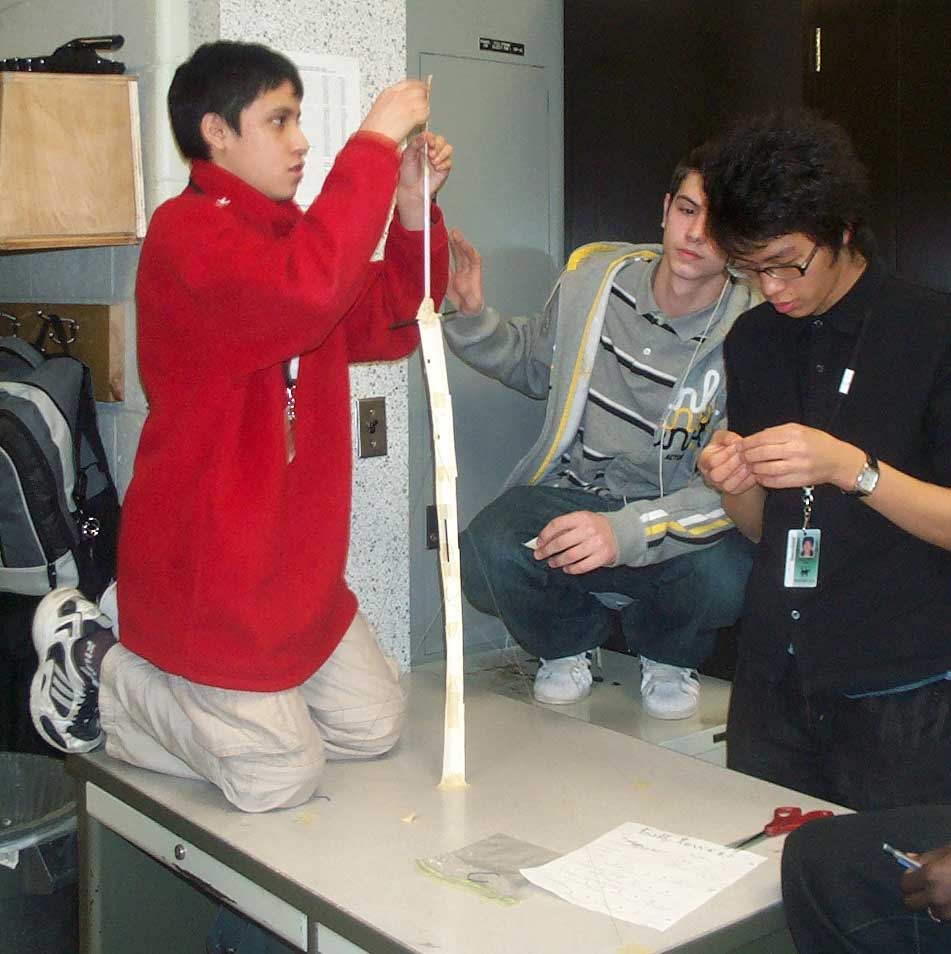
Tower Build
The build process must be done in 50 minutes, so one of your major limitations is time. Make sure you have everything you need prior to starting so that you do not waist time during the build. Here are some sample pictures of students in the build process from a previous class:
Evaluation:
You will be evaluated based on your SPICE explanation, thumbnails, final design, build, and team work. See handout for related project components that are listed below.

| Evaluation Breakdown Component Descriptions | Marks |
|---|---|
| TBE= Tower Build Evaluation, Always double check that you have completed all components for full marks. | |
| Thumbnails - full page of five thumbnails with details and pic of testing | 20 |
| Rough Radar Beacon - Two designs - pattern, final shape, and pic of testing | 15 |
| Final Design - full page sketch showing final tower/beacon design and notes | 10 |
| TBE-Height - 1 Point per centimeter | ? |
| TBE-Stability - from weeping willow to hurricane proof, how strong is it? | 5 |
| TBE-Ingenuity of joinery - from tape all over to super lock, are your joints amazing? | 5 |
| TBE-Aesthetics - from not working to excellent structure , does it look like it will work? | 5 |
| TBE-Radar Reflector - from stealth to 747, large enough with all angles and sides covered? | 5 |
| Handout -S-I-C-E spice steps filled out | 5 |
| Handout - Radar beacon calculation - show work | 10 |
| Handout - school size and comparison calculation - show work | 10 |
Your final mark on your tower build will depend on the average tower height of tower heights in class that day and the time/effort each partner puts into the project.
Unit 2, Act. 2: Graphic Logos - Make an Image for Yourself
Situation:

You are in school and you want a to market your hand-in work in an efficient and organized manner. You have access to computers and would like to use them to your advantage to save time and assist in organization with your different assignments.
Problem/Challenge:
By creating a personal/technological logo, 4 pre-made headers in common computer programs, will result in a customized student self-image easily recognized and support all future computer class work. The challenge is to learn how to use the basic features of Illustrator in order to create a logo and transfer and use with other common applications such as MS Word, Excel, Power Point, and Dreamweaver to create ready-made custom headers. A quick review of these additional applications including Photoshop will need to be introduced .
Logo and headers ideas must show idea generation process through thumbnails, full-page drawings, and colour schemes. Each logo must include some text; graphics using geometric shapes, related to Exploring Technologies and yourself, have a complimentary colour scheme, and both a colour & black & white logo version. There are some samples shown on page nine in this handout. In order to do this, there will be some small assignments, checklist, and some due-dates that will assist you in keeping on track and completing this communications project activity.
With any digital work, remember to have a convenient main place to save (flash drive) and to back-up your work regularly (end of period to H drive). You alone, are responsible for taking precautions for your digital files.
Investigation/Ideas:

General Information
Types of Graphic Drawing Files
Vector or line type is composed of lines and fills. The lines are created by mathematical formulas, making it easily scalable without quality loss and little memory space required.
Bit map or raster type is composed of many dots or pixels, which in a full picture can take up a lot of memory depending on the resolution of the image.
Intro to Illustrator
Illustrator is a program that creates those vector type files as talked about above. This is a very powerful application as it's greatest strength is scalable graphics with very small file sizes. You will get an opportunity to try out a lot of the different tools that Illustrator has to offer through the Vector Drawing Basics and Vector Colour Basics projects. When later working on your logo design keep it simple as it will commonly be used at a maximum of one inch high. Below are a bunch of links supporting the use of Illustrator, some of which may be helpful in your situation:
- Intro to Illustrator
- Vector Tutorials
- Bézier online practice tool
 Comic Lettering 1, 9.06
- Comic Lettering 2, 16.03
- Bazinga!
- Text Effects 1
- Text Effects 2
- How to design a crest logo
- Tools and resources
- Tutorials for beginners
- 15 great logo tutorials
- Vector Cove tutorials
- 101 Tips & Tricks
- InkScape Alternate, 13.39
- InkScape Grid, 2.55
InkScape text underline
File Saving Format/Convention and Backup

To keep organized, create a sub-folder with-in your main class folder to save all related files to with the appropriate filename convention as previously learned. For example: main folder tij, sub folder logo and then your files related to that project for example: tij101-01_d-joe_vector-dwg-basics.xxx with xxx representing your file extension used by the program that created it.
Save your work to a flash drive for portability and speed using the common key strokes for most programs: CTRL + S whenever you have completed a chunk of work that you are not prepared to save. Some programs have an auto save, but it is good habit to manually save your work as you go and not wait till you are finished or the end of period.
Backup should be done daily when you finish at the end of the period to an alternate storage location such a H drive for example if you are at the school and if at home then on your computers storage drive.
Saving Your Logo to Bit Map/Raster Image
Once you have created your vector logo it will have to be saved as a bit map raster image, so that you may easily import it into your template headers of major programs that you may use later. You should be aware of the differences between a raster vs vector, so that you understand why you use each in situations. In this case saving a raster an appropriate size we can use in different applications. There are several ways, but the best way is to go to File: Export, select file type jpg (a common standard, but white background), gif or png (allows you to save with invisible background), etc. that you want and file location which will most likely be your logo folder that you recently created for this project. When you need that image in another program, just import the image into whatever project you need it for, for example your word header template.
Common Applications
Software Programs Introduced
- MS Word is a word processing program used mainly for text or written work
- MS Excel is a spreadsheet program which uses rows and columns to organize information, usually numbers with each boxed area known as a cell
- MS Power Point is a slide show presentation software program used to present information in a pleasing and practical medium for others
- Adobe Illustrator is a line/vector drawing program that can create shapes with fills and text based illustrations.
- Adobe Photoshop is a bit map/raster image editing program that can edit, modify pictures
- Adobe Dreamweaver is a combination of word processing, presentation, and tables using HTML code to create web pages and links to other resources
Common Applications
Resources to use may also include; mf web site, videos, school library, home computer, public library computers, computer tutorials, application help files, the Internet, commercial products around the house. Below are some support web links for each of the applications we will be using that you may find helpful when creating your own header/footer designs in each of the applications.
- MS Word, 10.29
- MS Excel, 14.14
- MS Power Point, 9.13
- Adobe Dreamweaver, 9.33
- Adobe Illustrator, 6.49
- InkScape alternate, 13.39
Elements and Principles of Design
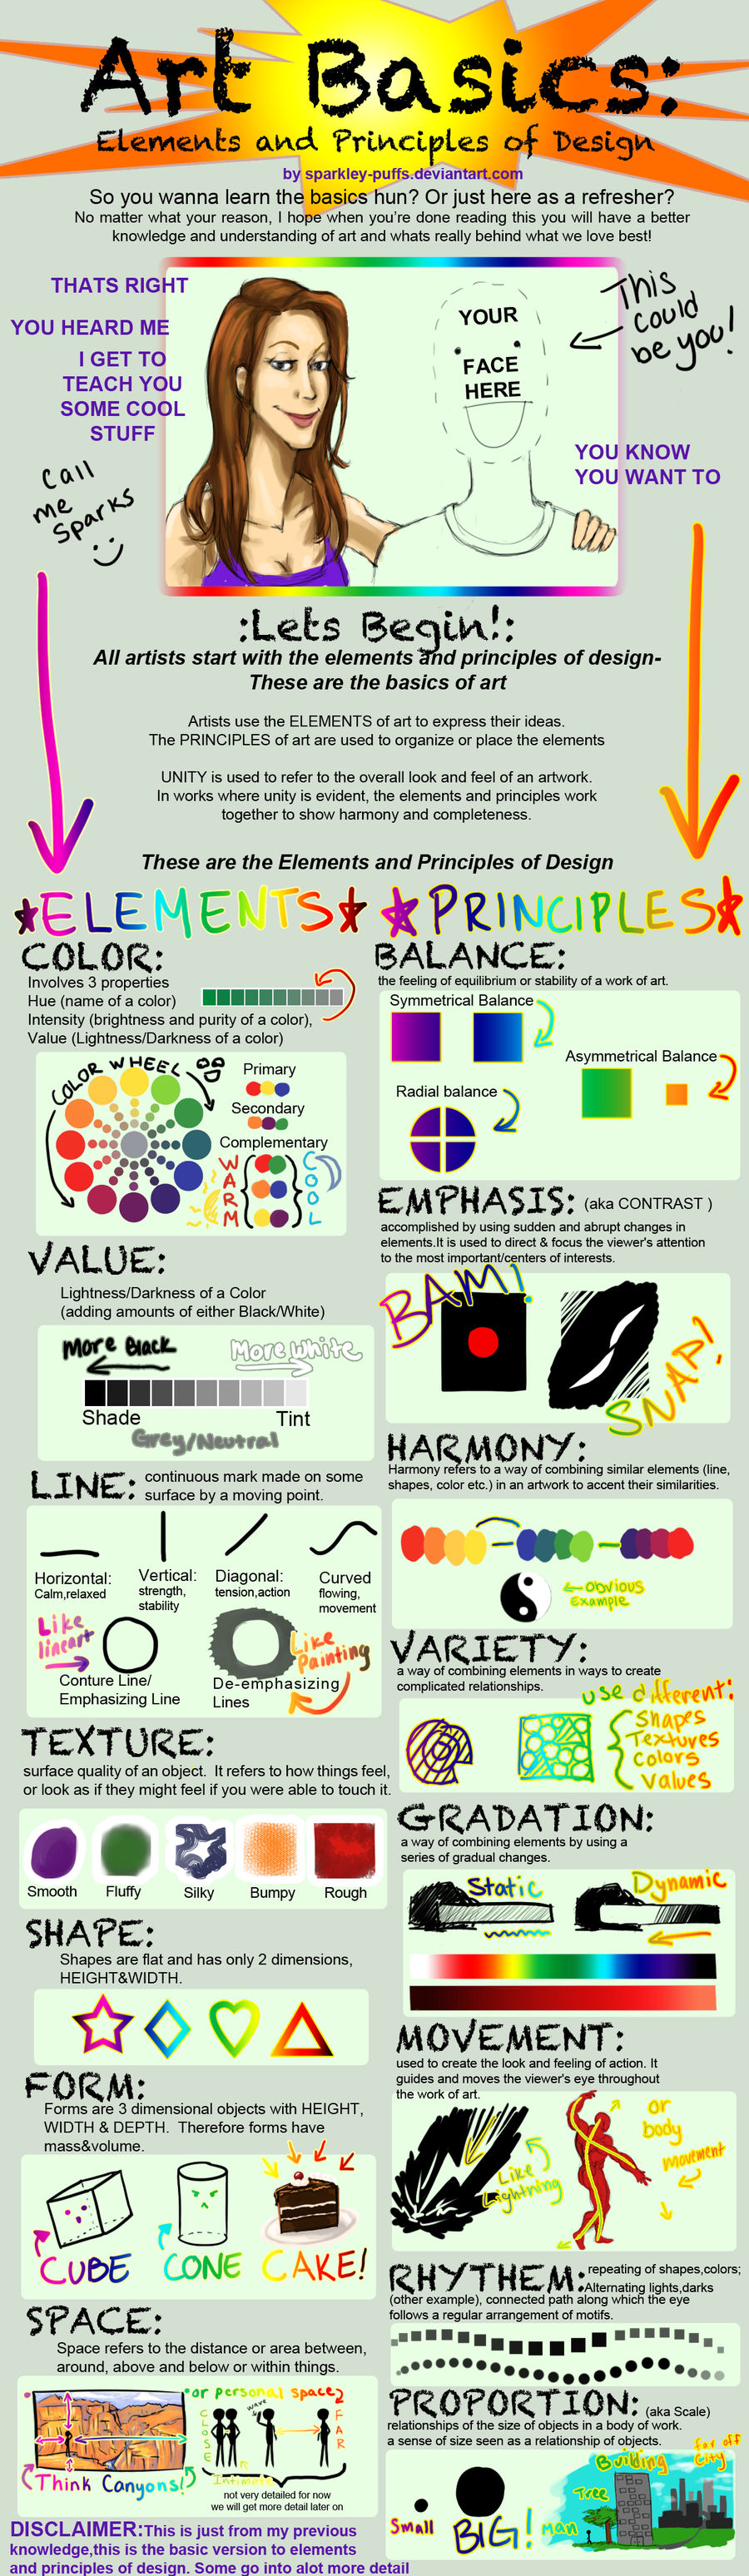
The principles and elements of design are an important part of understanding the technical concepts of graphical design. Understanding this will help you with graphical-design related work. Check out matrix 1 and matrix 2 to see different samples of each and here is a handout ![]() PDF summary review note. The following links will give you more information on this key topic:
PDF summary review note. The following links will give you more information on this key topic:
 Elements and Principles of Design, 31s
- Elements & Principles of Art /Design, 6.24+20s
- Elements & Principles of Design and Art, 82s
 Elements and Principles of Design
- Elements and Principles of Design, 14.20
- Online art museum collections Minneapolis Institute of Art and Walker Art Centre
Logo Design and Application
Important Concept
Designing and creating a brand for yourself as a professional student that supports this projects requirements will take some effort to identify your key components of your logo. In order to do that some research should be done to help you with the graphic imagery. As logo's are usually seen as a small visual, they need to be simple, eye catching and memorable. Looking at samples, a lot of the corporate logo's just use lettering to a great degree with graphics as a secondary. Your direction is quite the opposite, which is to prioritize the graphics.
Logo Design
Here are some links to give you some more information on what a logo is, logo design process, and converting from an image to logo:
- Zero to Logo
- Designing a Logo
- Picture to symbol/logo 1
- Picture to symbol/logo 2
- Logo Design Tips
- 65 expert logo design tips
- 10 Tips for Designing Logos That Dont Suck
- Logo design related articles
- Logo samples
Page Headers and Footers
Headers and footers include critical information that is required on each page of your document. Images above and below this section show an example of both used in a Word document for a student handout. You can see particular pieces of information which you will find on each of the pages of the handout, giving the reader and the owner of the document information as to its membership with the body of the document.
Different programs will require a different design on how the critical information for the reader and owner is displayed. For example, in a spreadsheet generally there are some pre-set and custom options for the header and footer which are designed to be practical being that it is showing table related information. For a presentation slide show program, you want to get a little creative showing your common information, so that the reader is not over powered by it, i.e. it must not overpower the body of presentation.
Lastly, headers and templates play a big role in web page design and must be given careful and serious consideration on how you plan on placing your critical information so that it looks good, is practical, and uses space effectively. If you have multiple pages to a web site, then your menu system must also be included in your template also.
Header and Footer Resources
Below are some related resources to create header/footers for different applications:
- Headers and footers in general
- Excel header. wiki, Images, header/footer, Setup, custom
- Word header, using tables, wiki, custom, custom 2
- Power Point header, wiki, header/footers
- Sample graphic headers, school header samples
- Crazy/Beautiful Letterhead Logo Designs
- Create a Word letterhead example 1, 13.04
- Create a Word letterhead example 2, 12.31
- G Docs: Headers and Footers, 1:50
- G Docs: logo into header, 3.00
![]() Get your logo out of Illustrator by turning off all layers except the your the graphic element (logo) you want to export and use File>Export as a PNG. This will give you a transparent background for you to use with your header/footers eliminating that white box around your image.
Get your logo out of Illustrator by turning off all layers except the your the graphic element (logo) you want to export and use File>Export as a PNG. This will give you a transparent background for you to use with your header/footers eliminating that white box around your image.
Template Files
Template files allow you to save and keep the original to continue to reuse later, i.e. you would not have to keep starting from scratch and/or saving a new copy of your original file you want to re-use. Once you have designed a decent header that you are satisfied with, you must save it as a template in the File menu: Save As command box. Generally, just below the file name, there is a drop-down-window where you can select the template file type.
Application Header Access and Creation
For each program you will need to access the header/footer menu to make changes. Below are some quick reminders of class demonstration on how to access and create you header and footer of each of the applications that you are required to use:
- Microsoft Word - you select Insert tab, then select the Header icon tool, then select Edit Header. This will give you access to your header on current page and also the Header Ribbon tool bar above. Using the tools above you can add your logo by selecting the Picture icon, add key information with the Quick Parts icon. Footer access is also on the header Ribbon tool bar.
- Microsoft Excel - select the Page Layout tab, then select the small fly out icon bottom right corner of Page Set-up tool area, in new drop-down window select the Header tab and click on Custom Header button to insert your logo image and related text content. Access to the footer is also there.
- Microsoft Power Point: Access the header and footer menu through the Insert tab, and modify to your needs. To include your logo on each of the slides, you will need to access the Slide Master icon by selecting the View tab, then select the slide layout you will be using, and bring your image into that one, then exit out.
Working with Adobe Dreamweaver (your report):
You are provided a blank formatted file for your web page for you to drag and drop your images (work pieces to be 600 pixels wide saved at @ 72 pixels per inch) of work into your web report.
- Fist copy the folder named tij_project-report-tmplate_d-joe (includes STE file, Image folder, and HTML web page file) from the pick-up folder in the school network to your USB flash memory drive in the appropriate location
- Update the folder name, and file names inside to include your name
- Next open Dreamweaver and go to your files pallet and select Managing Sites to import the STE in your new folder and confirm your web page and image folder locations and no server required, This populates your Files pallet with your "Web Site" for your web page report
- Open your web page in Dreamweaver by double clicking it. You should see your web page blank
- If you have not already done so, you need to put your images (600 pixels wide @ 72 pixels per inch) in the image folder
- Select blank image, view lower Properties window and on Scr image name, click and hold Point to File icon to point to the new image you want to put in that location. (Point to File to inside your Image folder to the wanted image)
- Your header for your web page could be created from your Vector Colour by exporting out your 1" logo with a "My Logo Project, by J. Doe" same method as you did with your logo earlier
Create/Construct:

This section will assist you in what you need to do each step of the way. Use the ![]() Graphic Logo module handout as a guide and resource to completing this project activity. Below is an on-track and major steps guide to help you complete this logo project.
Graphic Logo module handout as a guide and resource to completing this project activity. Below is an on-track and major steps guide to help you complete this logo project.
On Track

Keep yourself on track with project components. Some are done on the computer (in-class) while others can be done while at home such as the rough sketches, to maximize the time in the computer lab.
- 2 days for vector drawing page and 5 logo thumbnail sketch designs
- 1 day vector colour page and final color and black & white sketch designs
- 2 days for final logo display and 2 rough headers for each application (MS Word, Excel, Power Point, and Dreamweaver)
- 2 days for finished headers
- 1 days for web page report
Major Steps

Review and Answer Questions
- Read/review chapter from LWT, on Graphic Communications, complete Rev Questions HO
- Fill in key terms in handout and excel sheet (file in pick-up folder ready to fill-in)
Computer Awareness
- Computer use with ergonomics and comfort
- Operating system, key application programs, and file saving and back-up
Adobe Illustrator
- Familiarize yourself with Illustrator resources and explore different drawing techniques
Vector Drawing Basics
- Set-up new Illustrator file and use sample to copy and practice with the tools
- Create a 0.25 margin-guideline for boarder along with appropriate layers
- Use Arial text font and sizes as shown
- Copy Arial font/sizes, note POINT text vs AREA/paragraph text differences
- Make sure your name, class section is included at the bottom
- Have peer partner review your work (double check) before digitally dropping-off
Set-up
Preferences
Margins
Guides/layers
All Layers
Vector Colour Basics
- Choose “Save copy”, change file name and AREA/paragraph text, see sample
- Transform each object with 4 different and separate changes
- Have a peer partner review your work (double check) before digitally dropping-off
VD-Basics
VD-Basics
VD-Colour
VD-Colour
All Layers
Elements and Principles of Design
- Fill in notes on Elements and Principles of Design handout while watching video
- Using magazines create sample colour schemes, font, shapes, and shape-groupings
Logo Display
- Layout and sketch out 5 thumbnail logo ideas based on tech, course, and your interest
- Sketch your final logo design ½ page for each – colour & black/white
- Use full page and follow sample logo display as shown on page 9 of handout
Logo Ideas
Final Logo
Headers
Logo Display
Samples
Template headers
- Layout and sketch thumbnail header/footer designs for each application covered (4)
- Use MS Word, Excel, Power Point, and Dreamweaver (Photoshop) to create headers for each
- MS Word and Excel, just access the header/footer tool and add your logo and info
- Power Point, you need to edit (add logo) the master slide under the view menu, and under insert menu add your footer info
- Dreamweaver, an STE master file needs to be created once you have saved your template in sub-folder for this project file
Word
Word
Excel
Excel
Excel
PPT
PPT
Photoshop
Dreamweaver
HTML
SPICE and Reflection
- Using Word create a ½ page SPICE report related to this project
- On the other half create a ½ page project reflection including highlights, challenges, learning, and conclusion
Final Web Page Report and Resource Image/file Folder for Drop-off
- 1. Using web sample/template, (download a zipped copy) include images of your project work - sketches and digital work
- Use check list to double check work is complete, finish evaluation sheet
Evaluation:
Remember to objectively evaluate the work to maximize your self and peer evaluation mark when filling out the check list and evaluation sheet. Ensure the sheet is handed in before you submit your web report so the instructor can give you feedback on your evaluation sheet about your report and work completed. You may want to view some student logo display samples or check out student logo web page report sample one and/or student logo web page report sample 2.

| Evaluation Breakdown for Project Parts completed | |
|---|---|
| Rev Questions - 10 questions answered on handout | 28 |
| Key Terms - 10 new terms listed and defined | 10 |
| Vector Dwg - Illustrator practice - setup, layers, objects, and text | 15 |
| Colour Dwg - Illustrator practice - 4 modifications to each object | 15 |
| 5 Logo Thumbnails - full page, explanation of tech, you, and interest | 10 |
| Final Logo Design- 1/2 page for each - colour and black & white design | 10 |
| Elements & Principles - Filled in blanks based on video | 17 |
| Logo Display - Illustrator final logo display colour and black/white ver. | 20 |
| Header-Footer Roughs - 4 different ideas, one for each application | 10 |
| App Headers-Footers - logo in header for each app and footer info | 20 |
| Evaluation Breakdown for Logo Process and Report | Marks |
| Always double check that you have completed all components for full marks. | |
| Requirements - Direction and requirements met | 10 |
| Research and Information - evidence of new info in work completed | 15 |
| Ideas and Designs - lots of great ideas and designs | 25 |
| Final Design - well thought out, meets req., and looks great | 10 |
| Process - Steps clearly followed and on-time | 15 |
| Web Report - image sizing consistent, report complete and looks great | 25 |

Conclusion
Now that you have learned how to use Illustrator and created your logo design, you have your own professional student branding. Having put them into four common applications commonly used in school, these will come in handy and look great when you hand in work!
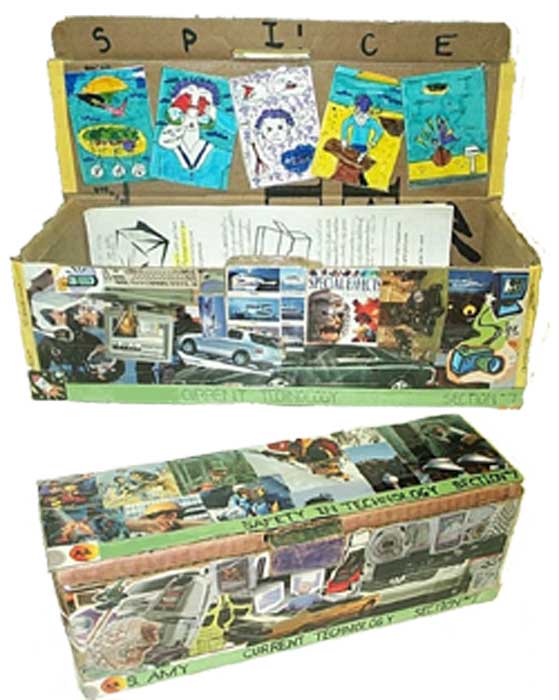
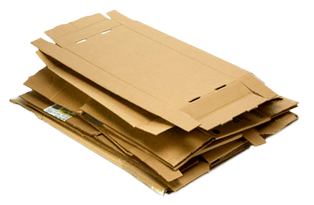
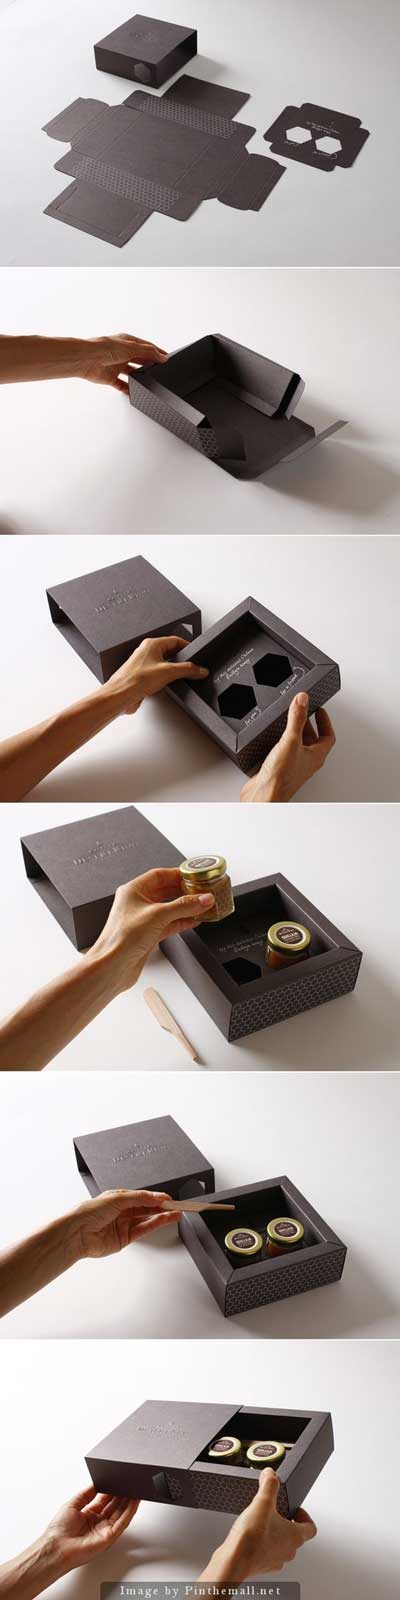
Unit 2, Act. 3: Project Box - Store Your Stuff
Situation:
As we will be making several projects throughout the semester, you will need to have a place to keep your activity project parts until you have completed your project. For this reason, we are going to look at Package design and graphic communication. Package Design will introduce you to some background information to packaging. Graphic communication will be used to promote Technology.
Problem/Challenge:
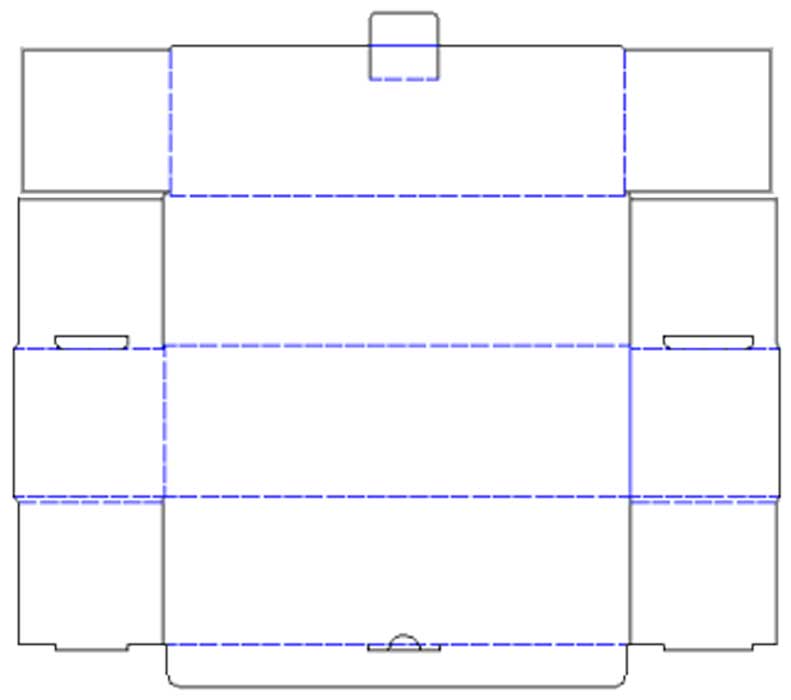
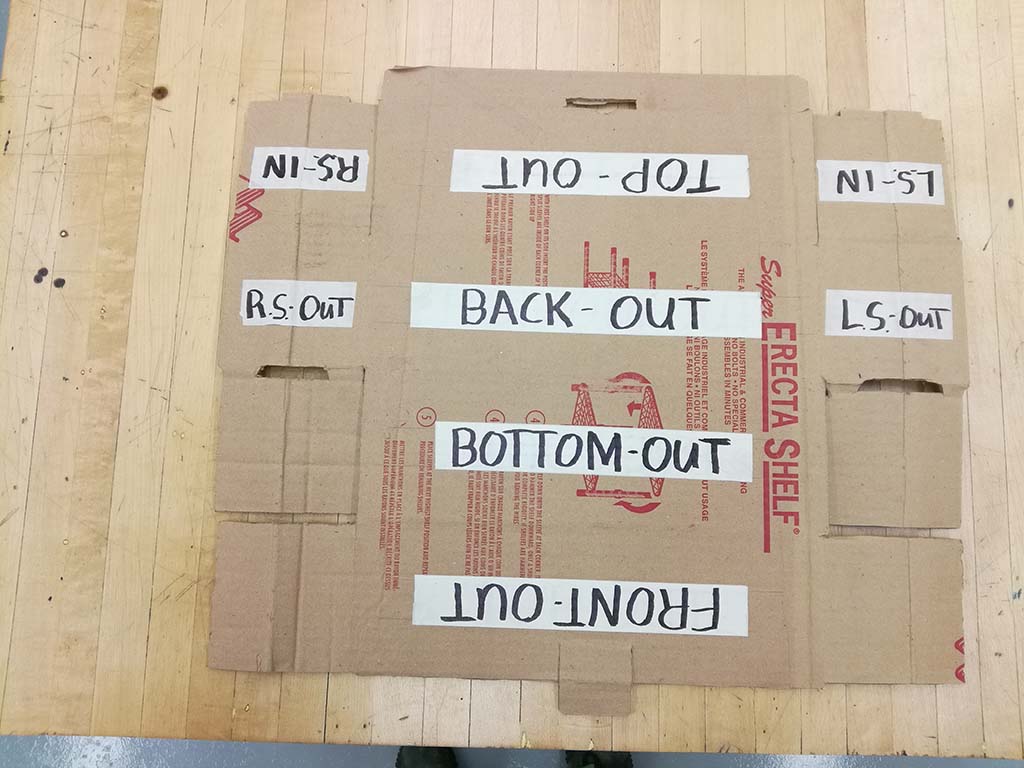
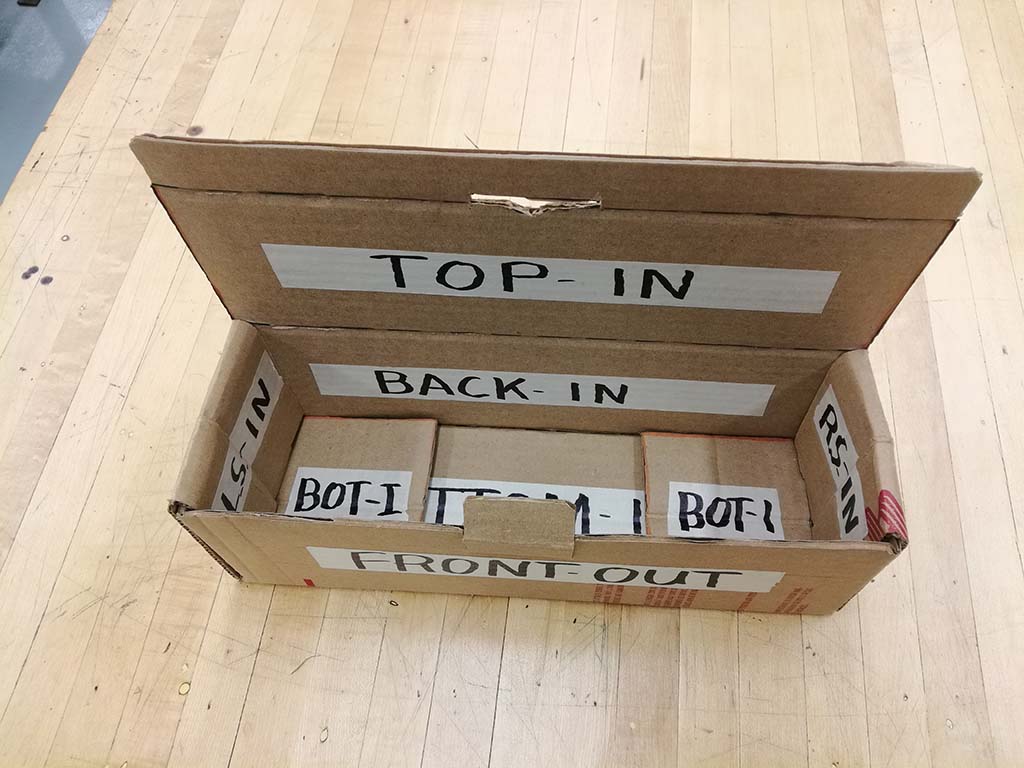
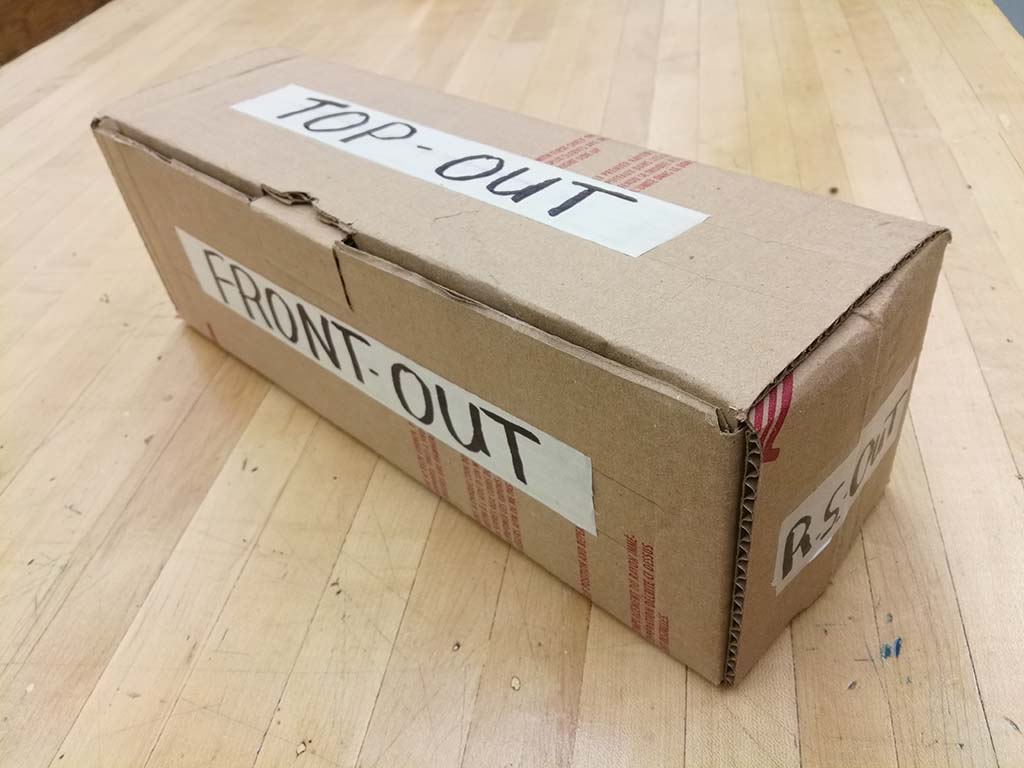
The challenge is to accurately cut, bend and construct a CORRUGATED box using corrugated single flute cardboard from a given pattern and graphically communicate technology through pictures, drawings and sketches (colour), on the outside to show five major themes, which are as follows:
- Area of INTEREST IN TECHnology (back side)
- CURRENT TECHnology used today (front side)
- SAFETY IN TECHnology (both ends)
- FUTURE TECHnology (top side)
- SPICE colour cartoon illustration (Top inside)
Graphics on box must be temporarily glued on. Your name, class section, and THEME on a 15mm class-colour-bar must be placed on the bottom-front, bottom-left, bottom-right, bottom-back side, and top (near front) of your box in 10 mm Gothic font. Using Gothic font, 30 mm, with a black permanent marker, print your name on both sides of the bottom of box. The inside of the top flap must show the problem-solving process steps in colour. Your 1 high logo must accompany the bottom left corner of the colour bar on all sides. Finish box with clear-tape, to prevent graphics from falling off.
![]() Note: on the left and right sides of the box where the mini safety posters are going, the class bar info, will not have room for the THEME.
Note: on the left and right sides of the box where the mini safety posters are going, the class bar info, will not have room for the THEME.
Investigation/Ideas:
General Resources
Main resources offered in this project are as follows
- Recycled single flute cardboard
- Cut out illustrations, drawings, and pictures from old magazines
- Library, Internet links, web site information, and pictures
- Draw, trace, copy from books, clip art, and illustrations
We will also look at sharp tool safety, packaging surface development, and corrugated containers.
Safety
General Safety
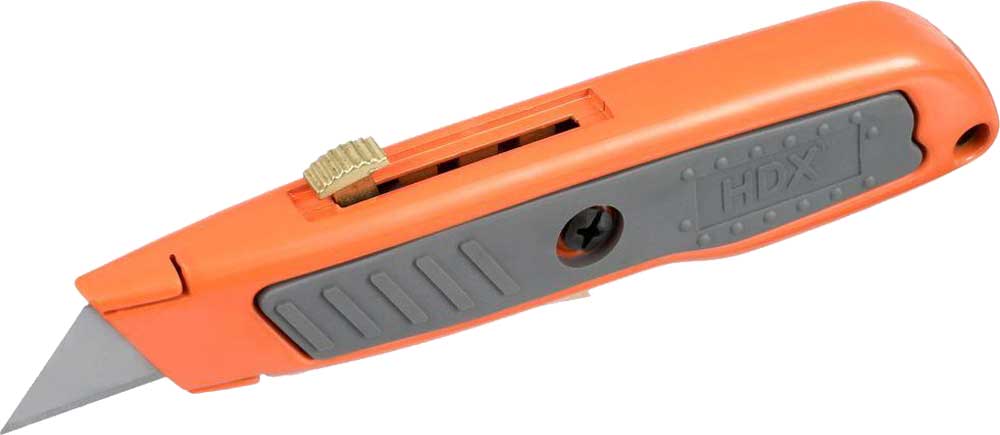
In this project you will be using some tools that are very sharp. These tools must be used carefully and safely. In order to get crisp clean cuts, the x-acto knife will be used to cut out the cardboard on cutting boards. When cutting out pictures from designated magazines, newspaper, etc scissors can be used after which the paper cutter may be used to neatly finish cuts.
 Tool use is allowed only after you have been instructed, understand, and have successfully demonstrated proper and safe use.
General Safety:
Keep the following four points as to why it is important to use the right tool for right job:
- Could damage the tool
- Result in a poor job on your work
- Could ruin your work piece
- Could hurt yourself
- You will lose time
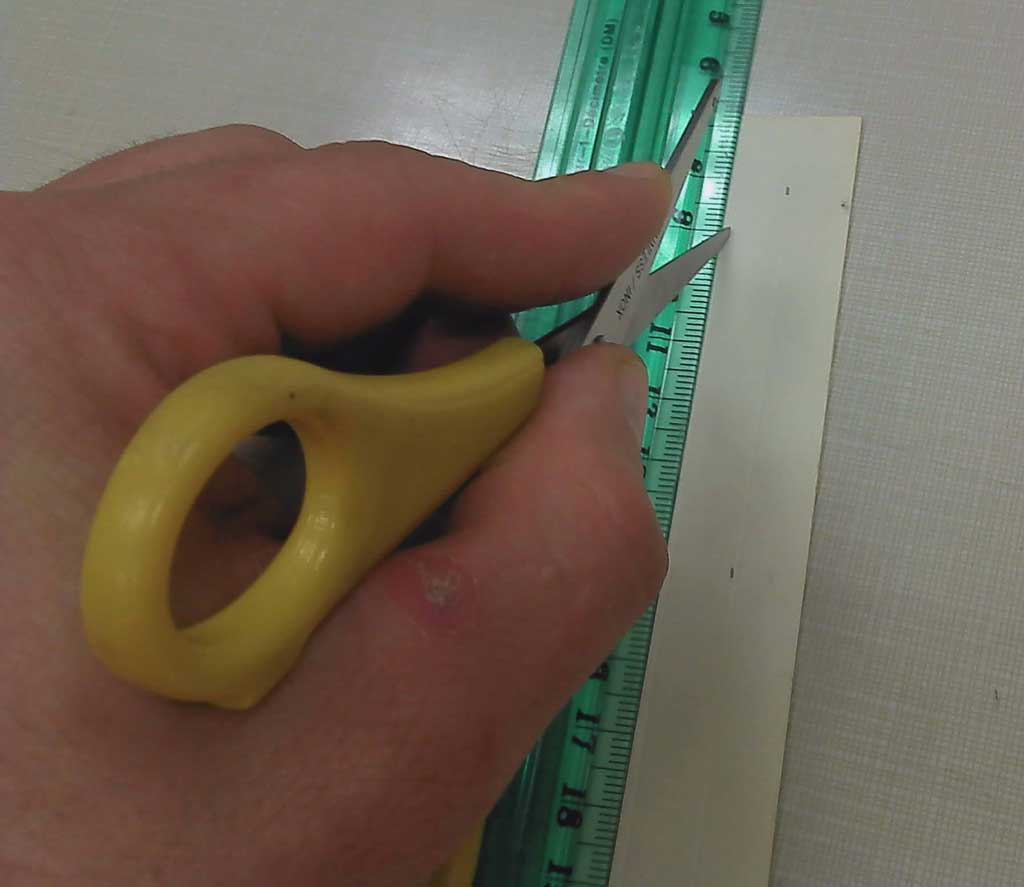
Scissors:

These will be used when you are required to cut out pictures from the magazines. When using scissors keep in mind the following:
- Keep fingers clear of paper and area you are cutting
- When they are not in use, keep them closed
- Carry by handle with the point facing down

X-acto Utility knife:
These knives are very sharp. You will require this knife with the use of a cutting board to cut out corrugated cardboard box and bristle board for 15 mm class colour bar. Keep in mind these points:
- Cut away from any fingers holding work
- Always cut on a cutting board
- Be aware of who is around you, and do not disturb other students while using
- Always retract blade when not using or carrying
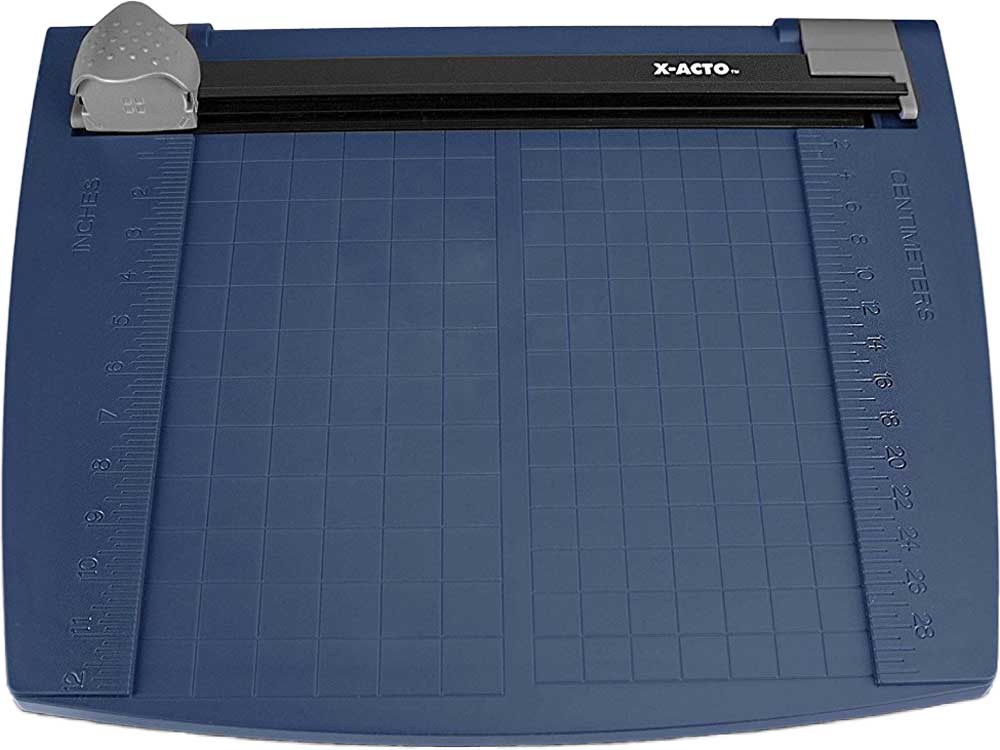
Paper Cutter:
This can be used to trim, square off, or accurately cut straight lines of a picture. Please keep the following in mind:
- Always keep cutting area clean
- When cutting, one stroke one way or the other will work
- Keep fingers away from the sharp round blade under handle
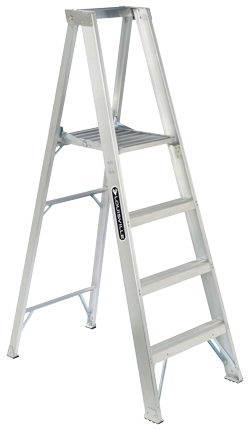
Ladder Safety
We will be storing our project boxes on an upper shelf so you will need to safely use a platform step ladder. This will be demonstrated in class and will need to be properly demonstrated after lesson. Some key things to keep in mind when using a step ladder include:
- Align step ladder with work area, close to location needed
- Ensure feet are flat on ground and spreaders are fully open/locked
- Always face the ladder when climbing up or down while maintaining a firm grip with both hands
- Maintain firm grip
- Do not over-reach
- One person at a time
We will also review the other shop, room 165 as briefly introduced earlier in semester. Students will identify general equipment, work areas, room safety, and procedures.

Always clean up your mess when you are finished and recycle all scrap materials in their respective bins.

Double Flute

Double Flute
Safety Resources
- OLFA safety tips, Related video, 7.51
- Utility Knife
- 7 Safety Tips when using a Utility Knife
- Safe cutting solutions
- X-acto Knife Cutting Practice Sheets
- Utility Knife -- Replacing the Blade 1.25
- Box cutter, rotary cutter, scissors, 7.5
- Occupational Health and Safety on Step Ladders

All About Packaging
Introduction
After final assembly, manufactured products are packaged before reaching the consumer. There are many reasons for packaging products. Products are packaged for protection; they prevent spoilage, spillage, and leakage. Packages also provide a way to store and ship the product as well as display and advertise the product. Proper packaging, which protects and eases distribution, can save companies millions of dollars. The package itself engages the consumer, advertises, and provides product identification and customer loyalty. There are six materials commonly used in packaging: glass, aluminum, plastic, paper and paperboard, steel, and polystyrene.
The package itself engages the consumer, advertises, and provides product identification and customer loyalty. Graphic designers and graphic artists design the packaging that promotes the product and may determine its success or failure.
After a design is developed, graphic artists build a prototype or mock-up and conduct surveys or other types of research to determine its appeal to consumers.
Surface Development
This is a process where different patterns are designed to produce an effective box package from a flat 2-dimensional cardboard material. Depending on the thickness or type of the cardboard material used, this will affect the spacing of the box pattern shape and sizes. Thin cardboard would only need a small clearance, where a thicker corrugated cardboard would need to take into account a larger clearance required.
Area and volume are important concepts, which should be considered when making a package box.
Square Area = Length * Width
Cubed Volume = Length * Width * Height
Since we will be concentrating on using corrugated cardboard a closer look will give us some interesting background information on this popular packaging material.
Corrugated Containers

Double Flute
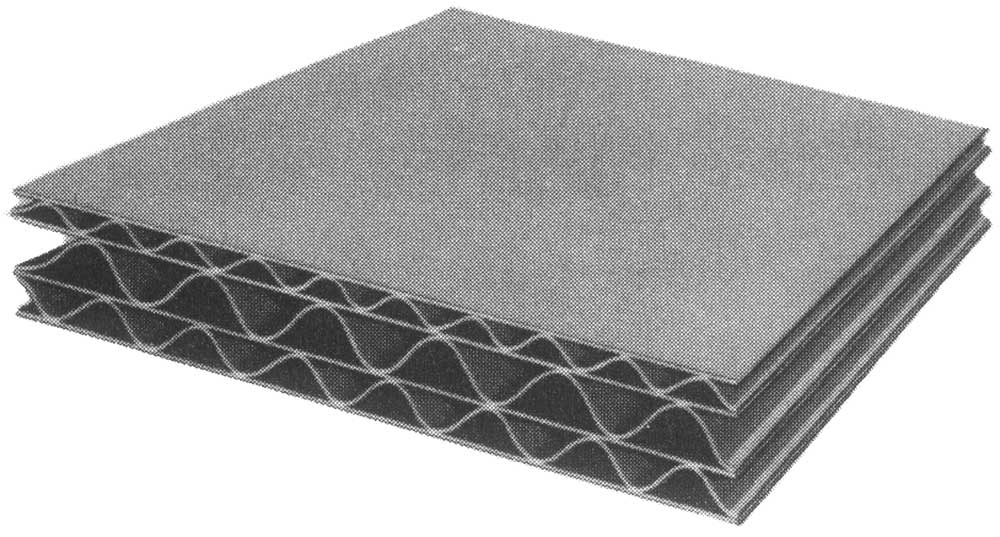
Triple Flute
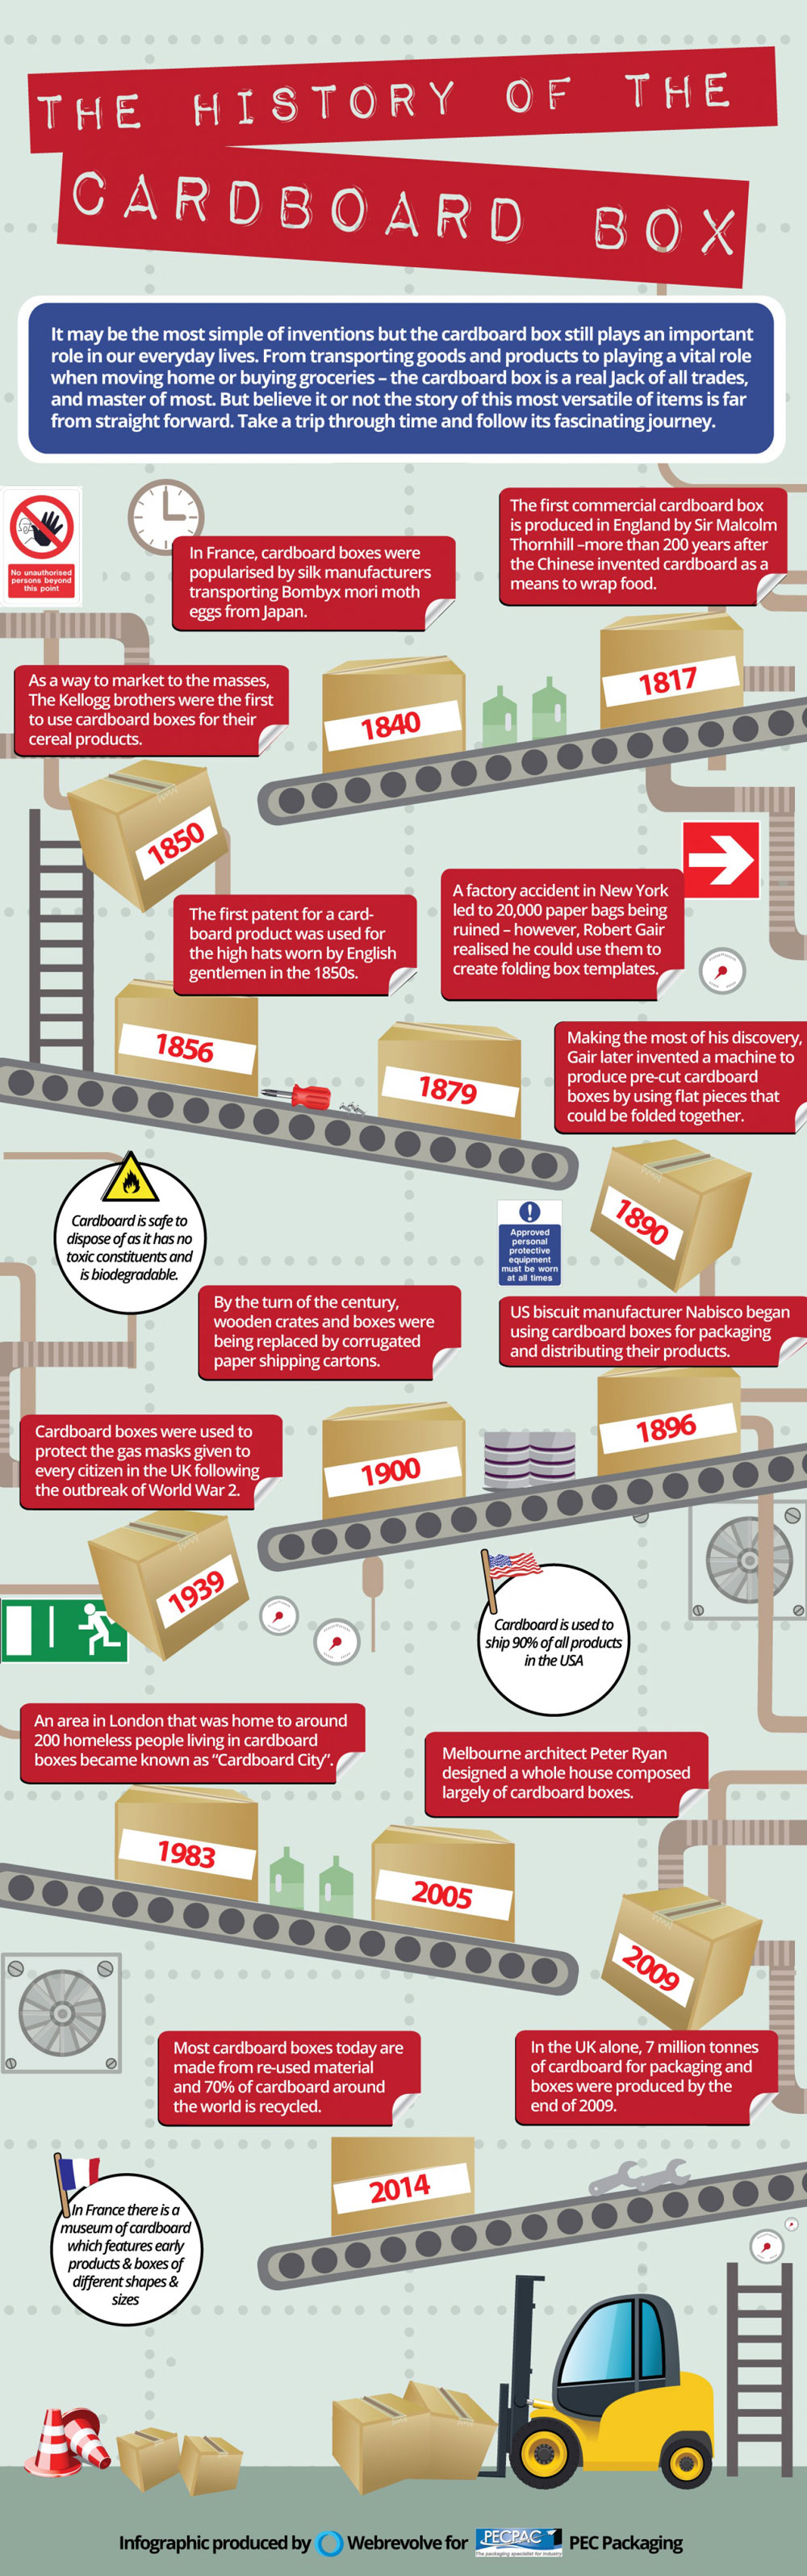
Like most packaging materials, corrugated board (often called fiberboard) has a long and colorful history. When you were a child, corrugated boxes may have been your favorite playthings. As an adult, you probably pack your belongings in them whenever you move. Your TV set, stereo, VCR, and other appliances are shipped in impressively designed corrugated boxes. It may surprise you to learn that this popular packaging medium, the workhorse of the industry, was originally part of an article of clothing. The nineteenth-century gentlemans top hat was fashioned with a sweatband of fluted pa¬per, the precursor to corrugated board.
An American inventor, Albert L. Johnes, patented fluted paper for use in protective containers for bottles in storage and shipment. In 1874 another American, Oliver Long, invented a process for sandwiching the flutes between two sheets of paperboard. This innovation marked the beginning of a new industry - corrugated containers. Today the corrugated container industry is a billion-dollar industry, the largest in the paperboard-packaging field. Its largest single market, representing more than one-third of the industrys output, is food packaging.
Construction of Corrugated Containers
Corrugated containers are constructed from a fluted sheet glued to one or more liners. The structural characteristics of the corrugated medium are governed by four variables:
- The strength of the liners
- The strength of the corrugated medium
- The height and number of flutes per foot
- The type of walls (single, double, triple, etc.)

Four flute structures are available for corrugated containers:
- A-flute, in which wide spacing of flutes results in greater capacity to absorb shock
- B-flute, which has a greater number of flutes per foot, providing maximum crush resistance
- C-flute, which combines the properties of A and B flutes
- E-flute, which is a very thin corrugated board and is perhaps most popular type for large, sturdy displays and packages
Another important element of corrugated boxes is interior protection. A wide range of corrugated partitions, liners, pads, and other devices, including plastics (molded polystyrene foam) are used to provide inner reinforcement, cushioning, bracing, and shock absorption. The most commonly used closure techniques are stitching, stapling, gluing, and taping.
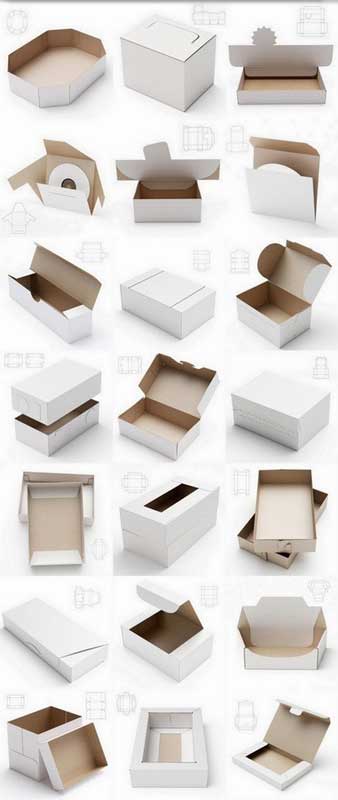
Corrugated Box Types
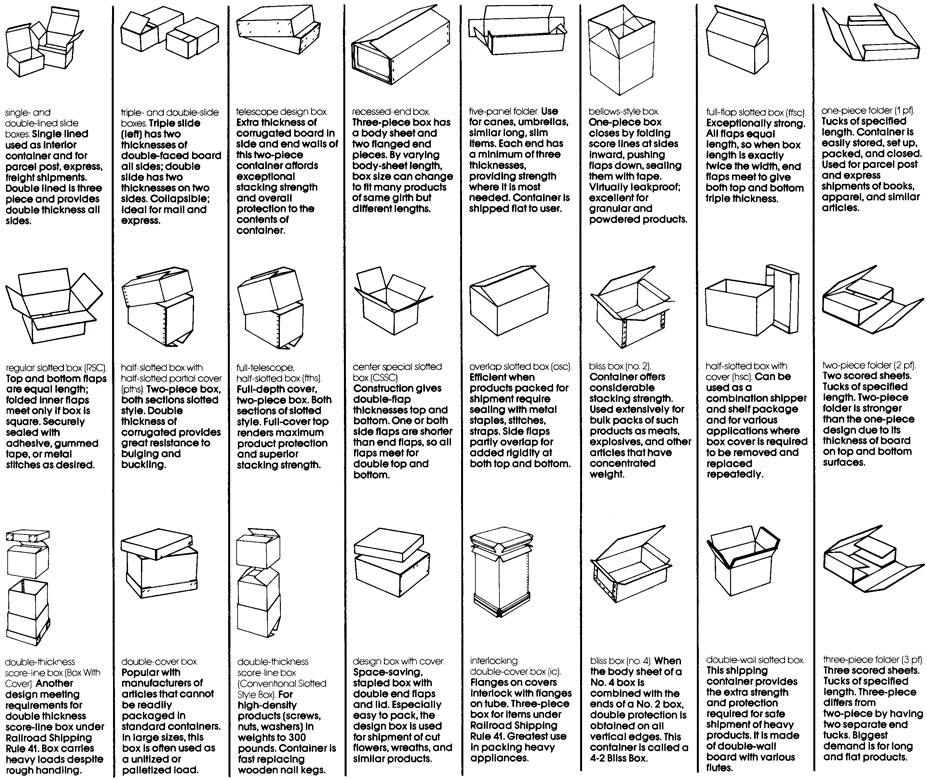

Resource Links
- Cardboard box creation
- Corrugated boxes are important
- Packaging development
- Sustainable development
- AF Packaging development
- Box design and production
- Souvenir packaging project s28
- Package automation machines
- Packages are made by machines
- Sustainable Packaging
- Corp concept design examples
- Box structure patterns
- Box packaging design sample
- Box template design samples
- 5 packaging templates
- Pizza box patterns
- Box templates
- Manufacturer of corrugated box
- Similar project box design
- Corrugated shipping cartons styles
- corrugated cardboard box pattern designs
Create/Construct:
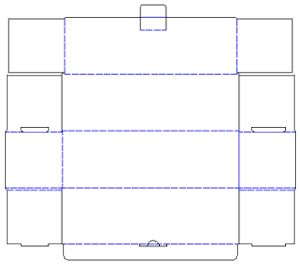
This section will assist you in what you need to do each step of the way. The ![]() Project Box module handout can be used as a guide and additional support resource to assist in completing this project activity.
Project Box module handout can be used as a guide and additional support resource to assist in completing this project activity.
Preparation and Project Steps
 Complete the Key Terms and Phrases page in the Project Box module handout
- Read/review Project Box module handout, and complete the Packaging Rev Questions HO
- Review sharp tools and ladder safety and also famiiarize more with shop 165 details
- Create rough sketch ideas on the 6 sides of what you plan to show based on the requirements
- Refine cartoon imaged SPICE process story on a blank sheet to later attached to inside of project box lid
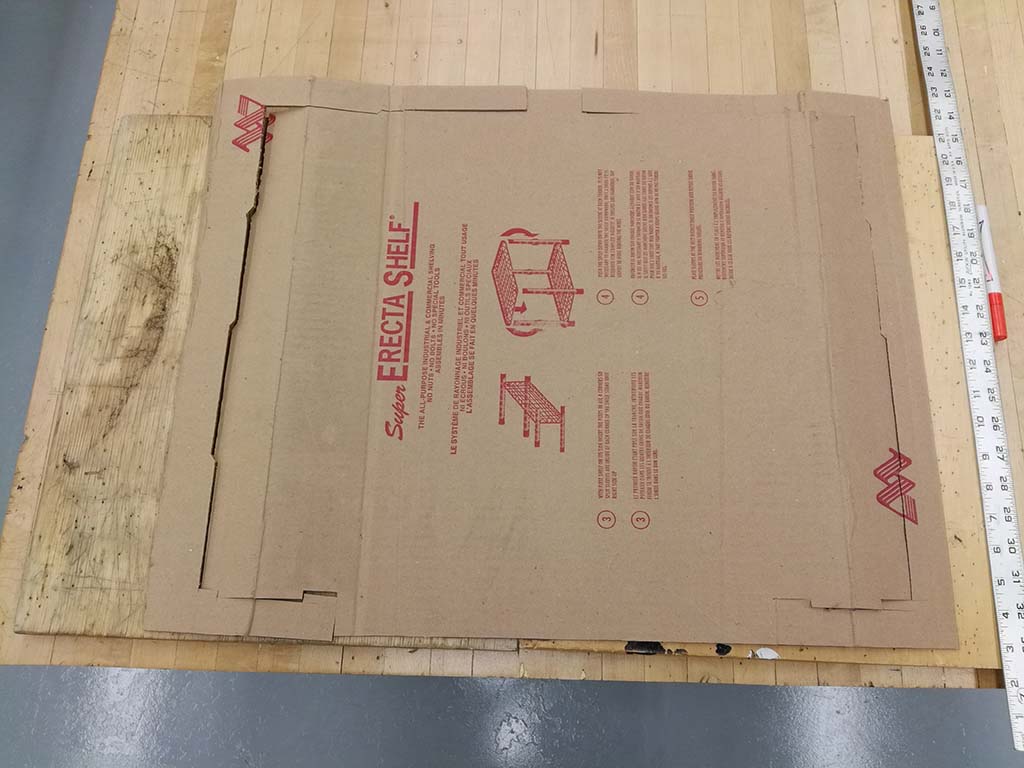
- Get yourself some recycled single flute corrugated cardboard with a minimum size of 55 cm by 60 cm (23" by 21") -any box that folds out without cuts will work
- Using 4 loops of masking tape, attach them to the four corner sections of pattern to hold plastic pattern steady on cardboard
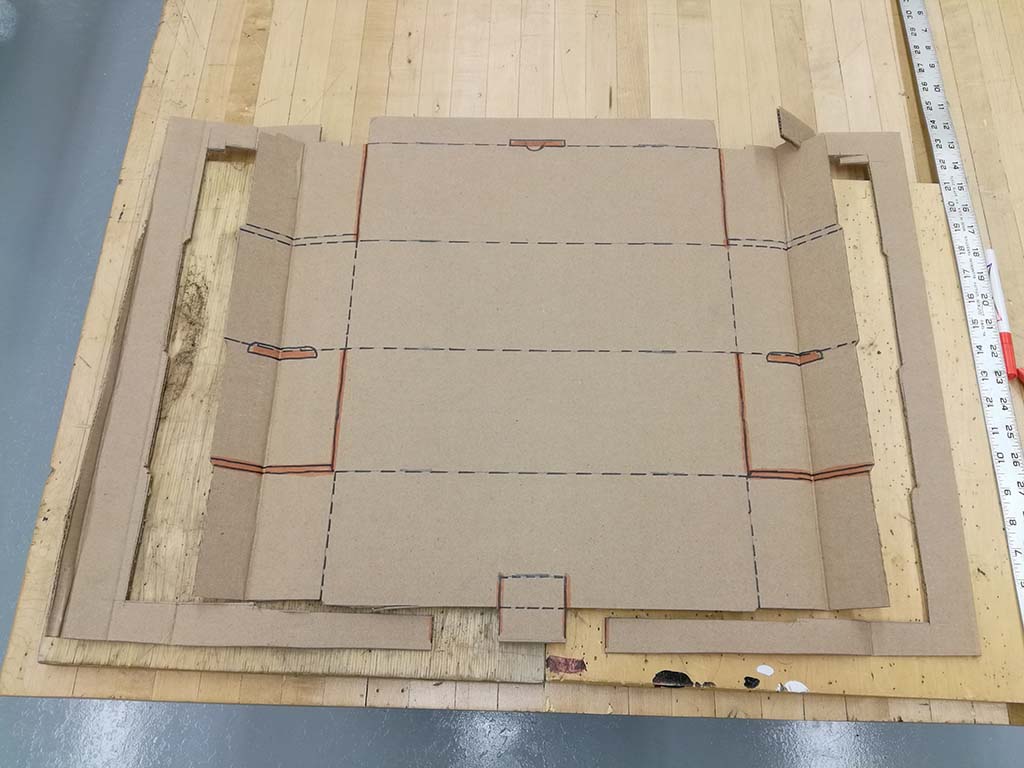
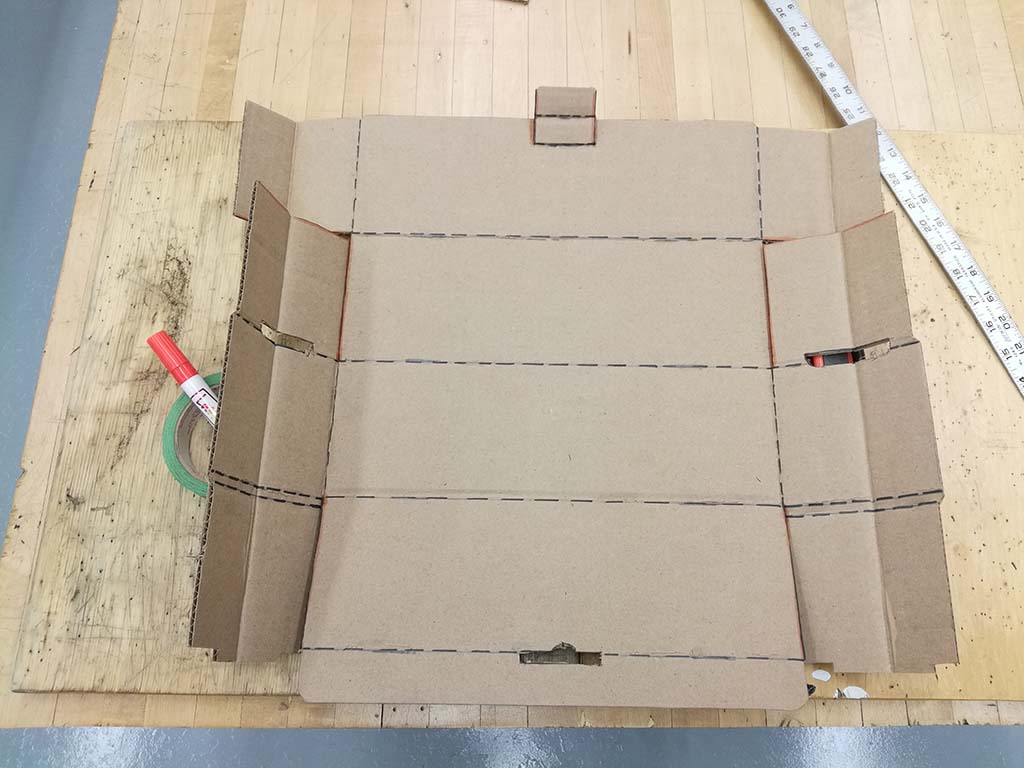
- Outline using a mechanical pencil the pattern outside and then the inside slots
- Before removing pattern, double check that all markings are present by lifting each side carefully up without pattern losing its position
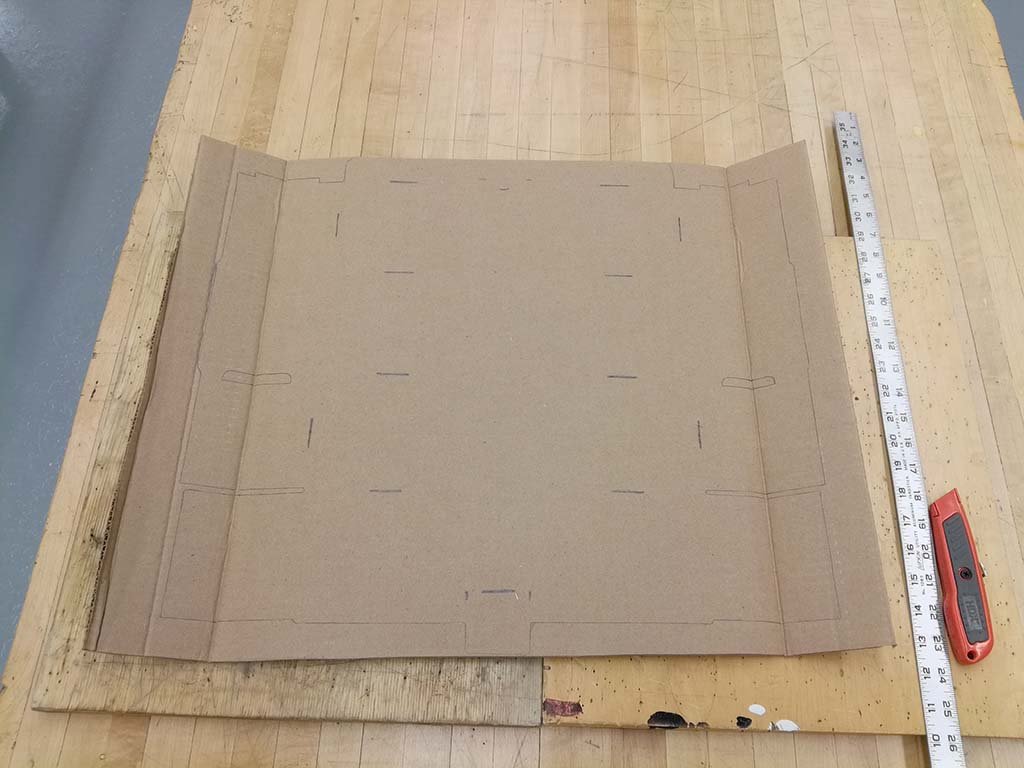
- Remove pattern and mark a D for dashed lines and S for solid lines so that the pattern can be returned so another student may use it
- Using a ruler accurately draw in the fold and cut lines
- With a cutting board, use a utility X-acto knife (not scissors) to cut out the pattern
- Pre-fold fold lines with the dull edge of an object, such as scissors and a straight edge for accurate fold locations
- Carefully bend at pre-folds just completed
- Put box together, no tape is to be used, nor is it required at this point
- Decorate/market tech and add designs to box as required in challenge section
- Once the decorations, class colour strip, and logo are done, wrap with clear packaging tape around the outside with 2 rows around the front, sides and back and an additional two rows for the top
- Complete the check list for the project box to ensure you have completed all requirements
- Complete the self/peer evaluation sheet on the back also, then submit the Project Box module handout inside the completed project box for instructor evaluation
Pictured Steps Showing Box Cut-out and Build Process
Numbers in-front of the pictured steps below refer to the steps above.
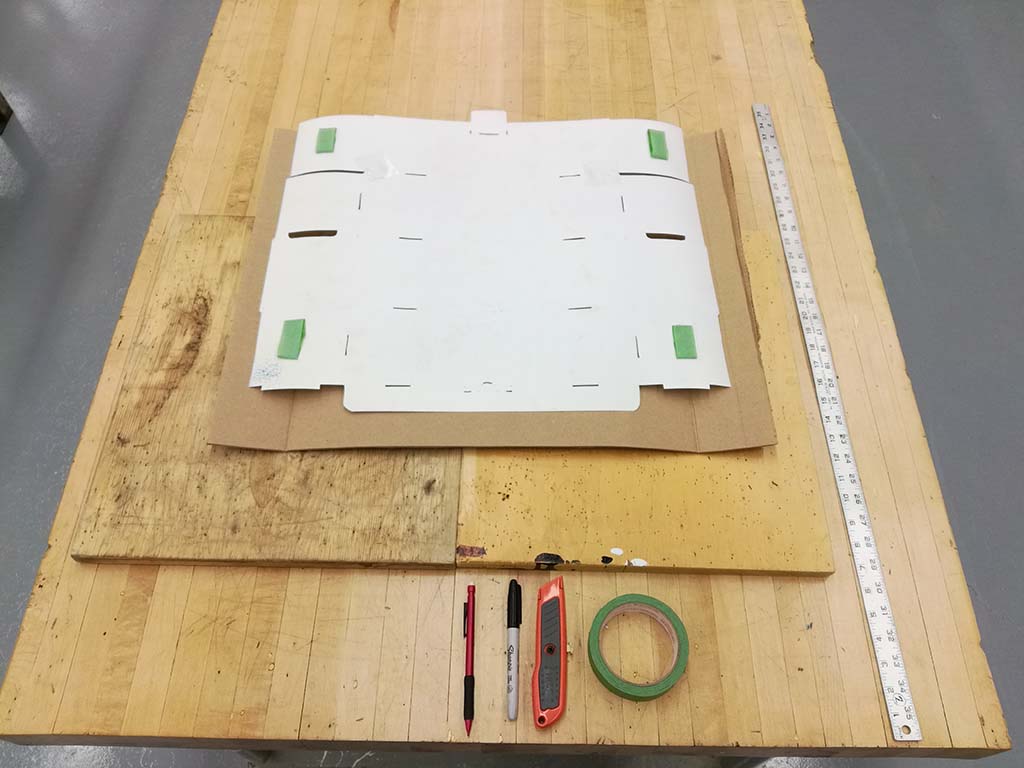
7-Set-up

8-Outline
8-Outlined
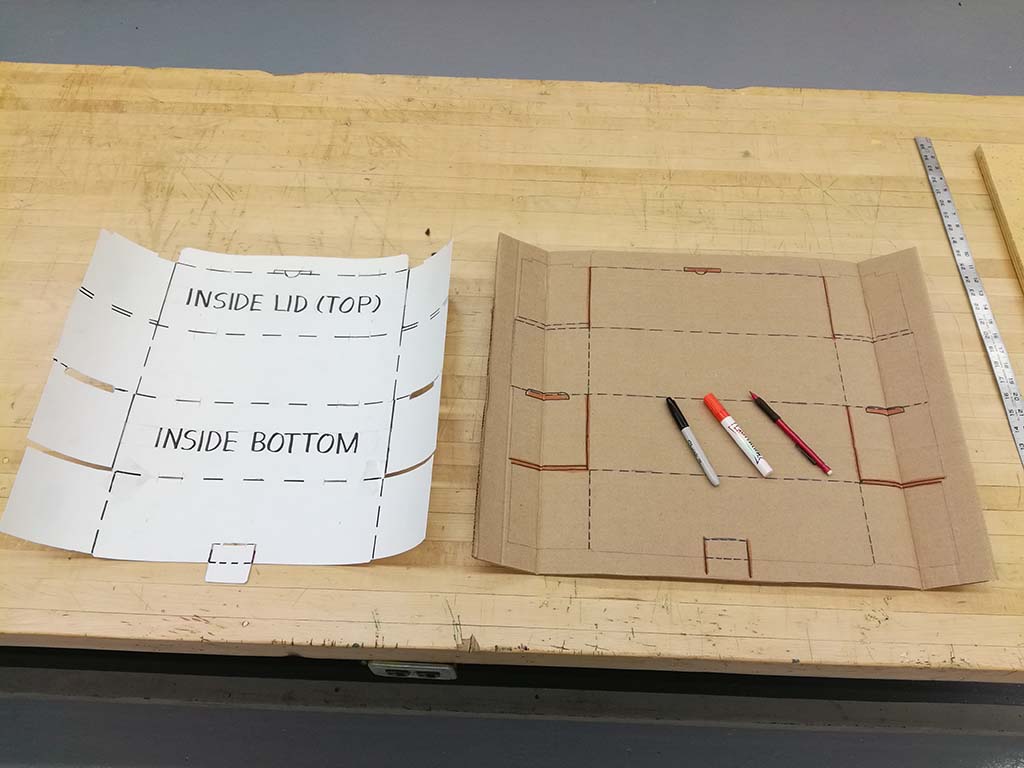
10-11-Lines

Close-up
12-Cut-out
12-Cut-out
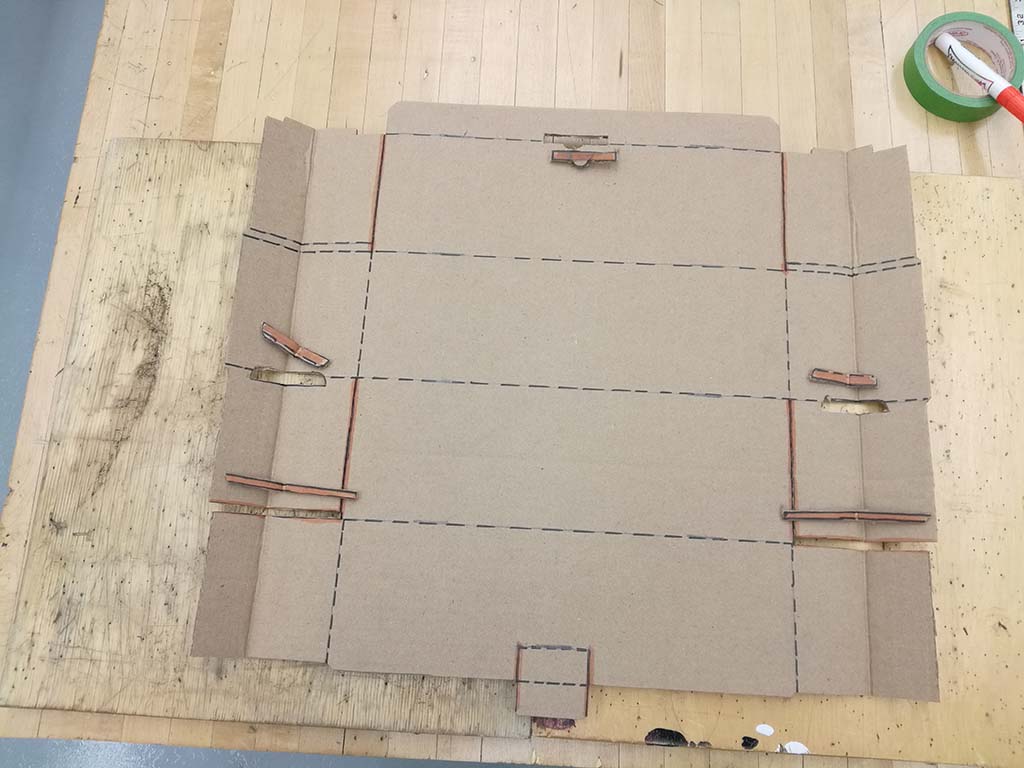
12-Remove
13-Pre-fold
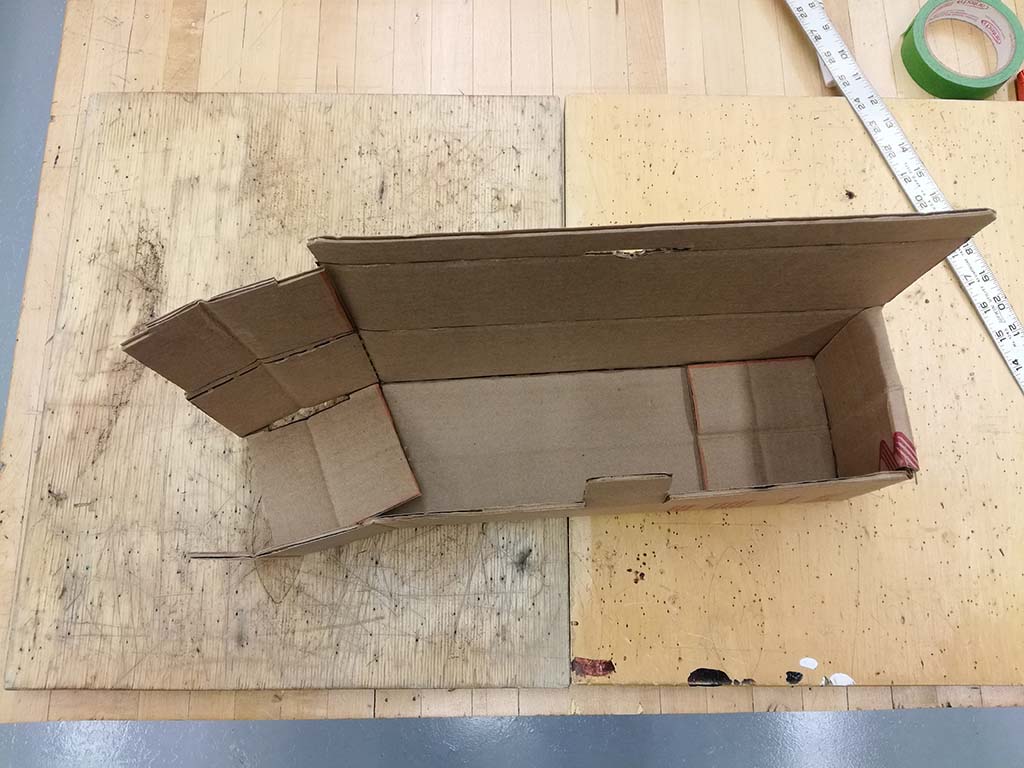
14-Bends
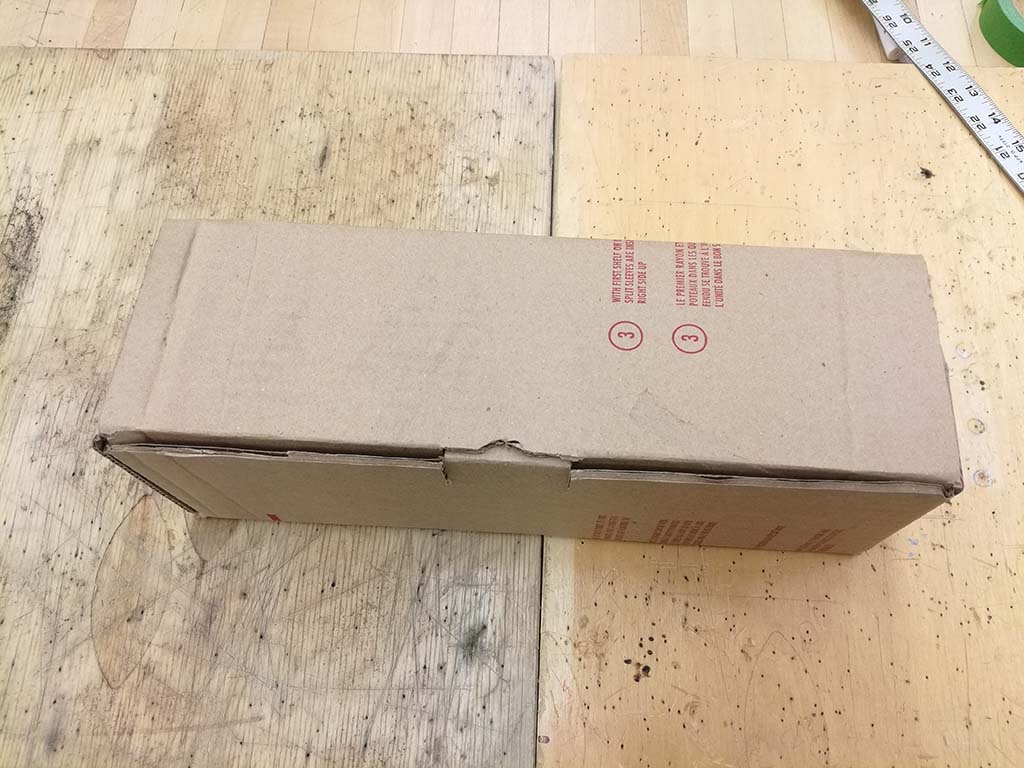
15-Together
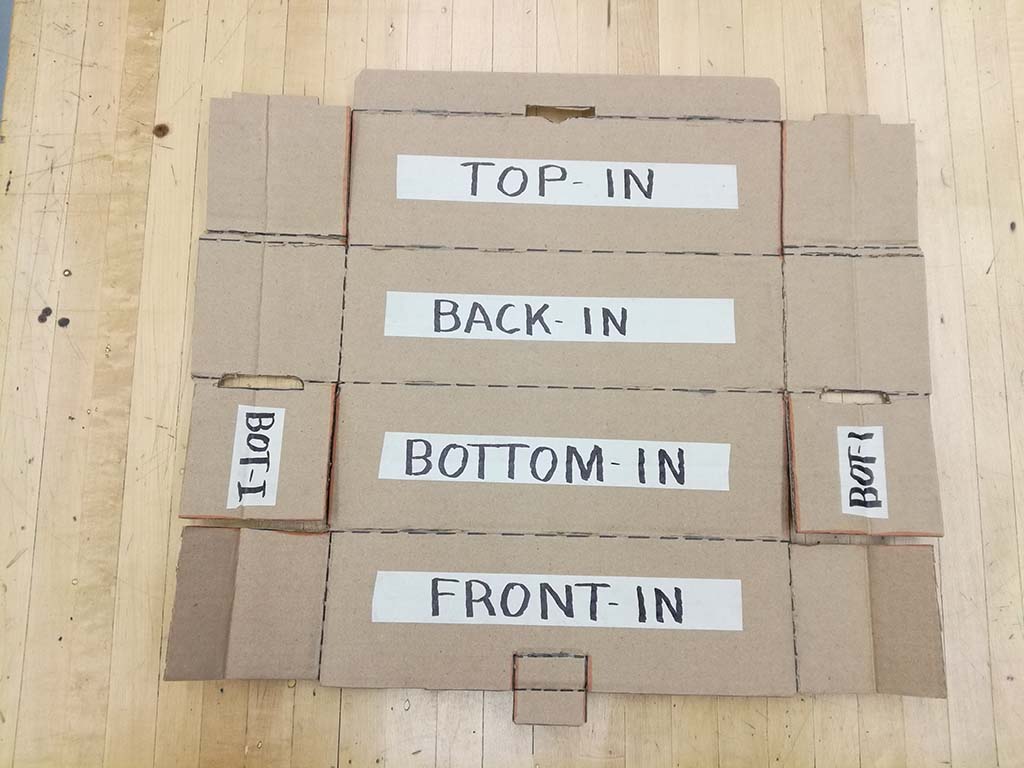
Inside Labels
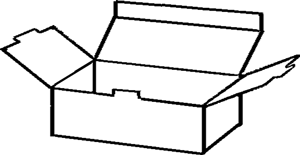
Outside labels
Open Lid
Closed lid
Remember to put your name on your project box with permanent marker on the centre bottom inside and centre bottom outside using a marker with a meter stick thickness/size using Gothic font lettering with your first name, last intial. This will ensure that you box is not accidently lost, miss-placed, or stolen.
Evaluation:
Remember to objectively evaluate the work to maximize your self and peer evaluation mark when filling out the check list and evaluation sheet. Ensure the sheets are handed in with your project box so the instructor can give you feedback on your evaluation sheet about your work completed.

| Evaluation Breakdown - Preparation Components | |
|---|---|
| Key Terms - 10 new terms listed and defined | 10 |
| Rev Questions - 6 questions answered on handout | 22 |
| Safety Sharp Tools Quiz- 6 questions answered correctly | 13 |
| Corrugated Cardboard - recycled single flute sized 21*23" acquired OT | 10 |
| Evaluation Breakdown - Project Box and Paper Work | Marks |
| Always double check that you have completed all components for full marks. | |
| Requirements - direction and requirements met | 20 |
| Research and Information - evidence of new info in work completed | 10 |
| Ideas and Designs - lots of great ideas and designs | 10 |
| Workmanship, Construction, & Build - quality, no tape, and accuracy | 40 |
| Finished Project Box - Shape, size, graphics, and finished look | 20 |
| Total (including Paperwork) - checklist and self/peer eval sheet | 100 |
Conclusion
Now that you have completed your project box using a pattern, learning how to fold and cut safety, you now have an understanding and experience on making your own package. Taking it one step further, you have also taken a theme and used it to market/decorate your project box successfully. This will come in handy to keep future projects built in the shop all in one place safely and securely!
Emergency Supply Teacher Instructions
In case of emergency, students can download the Matching Isometric with Ortho-Graphic View 1 challenge and complete using Adobe Acrobot Reader DC commenting tools (already installed on computers) for 12 marks. Next, they can work on Surface Identification Counter Clamp Bar Challenge again using the Adobe Acrobot DC commenting tools to fil in the answers for 30 marks. Students will be asked next day to submit after take-up and review in class.