Unit 4: Grade 09 Exploring Technologies -Project Research, Design, & Build
This unit looks at taking what has been learned in class up until now and apply it to more challenging projects that require more effort to complete project successfully. You will need to use built up knowledge and skills from previous projects to be able to complete these projects. Research, design, and building is key to these projects.
Course Units and Descriptions
| Unit | Description |
|---|---|
| Review course outline for more details | |
| 1 | Careers & Safety- Intro, computers, organization, safety, and careers |
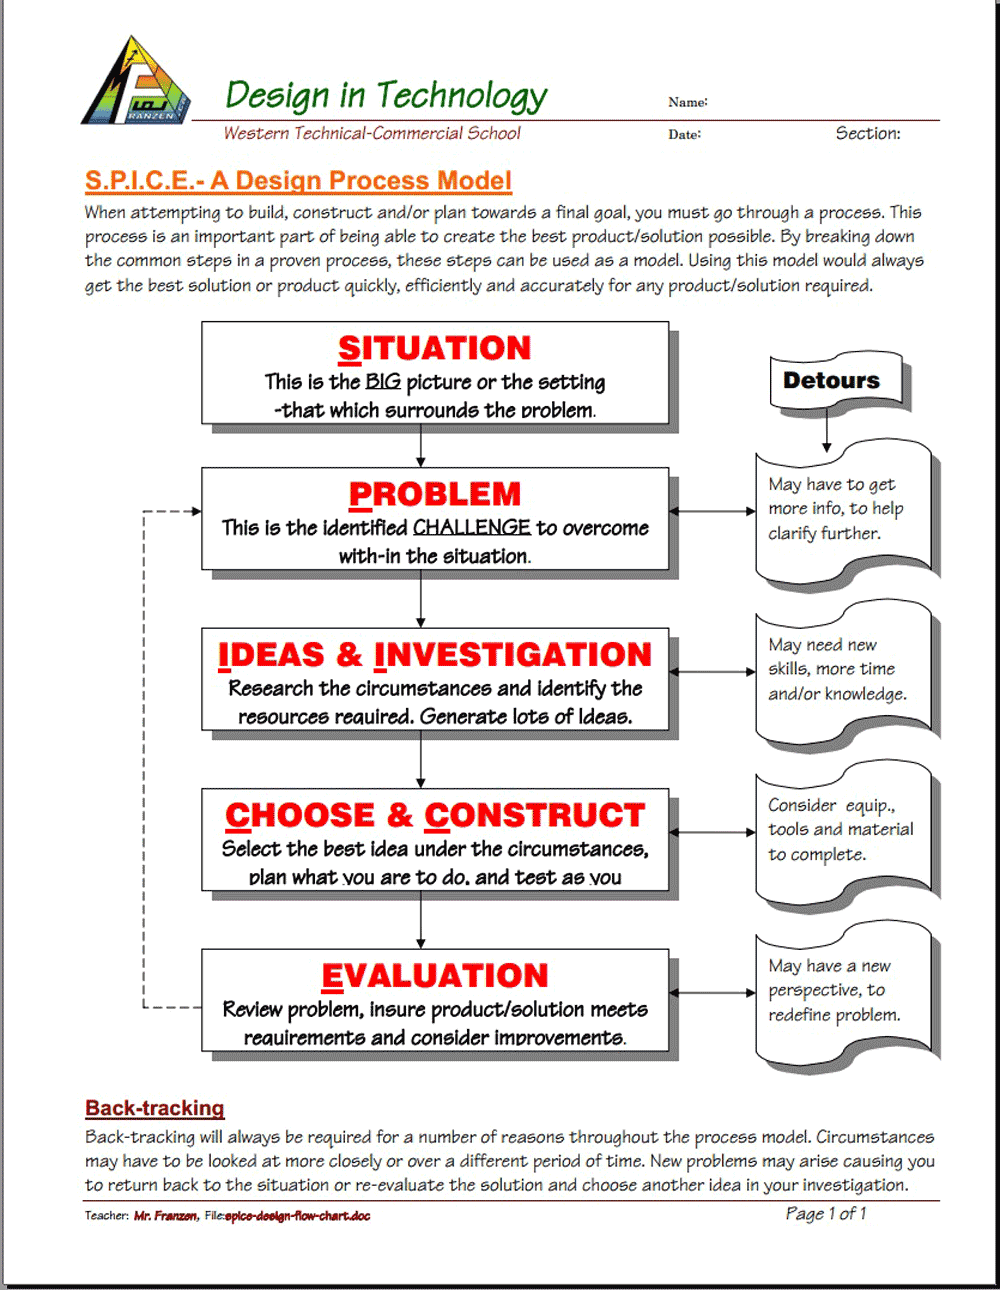
| 2 | Design Process - SPICE- Faulty towers, logo design, and project box |
| 3 | Materials, Machines, Tools, & Process- Acubend, key ring holder, key ring accessory |
| 4 | Project Research, Design, & Build- Bridge/tower, mag-lev, co2 dragster |
| 5 | Web Portfolio- Showcase course work, projects, and understanding with web portfolio and presentation |
Unit Content Activity Quick Links, Click to Jump to Specific Activity!

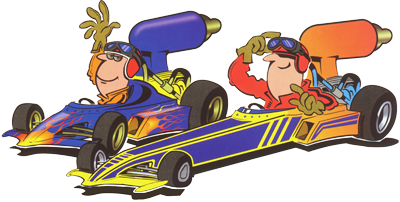
 Unit 4, Act. 1: Co2 Dragster
Situation:
A class of students who have been exploring different related technologies in a tech school will be finishing the course soon and looking for a final challenge to earn some heavy weighted marks by applying all that they have learned to a new project, maximize their learning, and showing off their capabilities.

Problem/Challenge:
You will research; design, prototype, build, finish, and race a dragster based on the Technology Students Association (TSA) Metric 500 Dragster Specifications.
Using the design process, research, create 5 thumbnails, a final ortho/ISO, final full-scale drawing pattern, a prototype for testing, create your final wood design, finish with paint, add hardware, and test in a final qualified racing competition.
You will design a dragster with the given dragster rule limitations based on the Technology Students Association (TSA) Metric 500 Dragster Specifications. Marks are earned following the design process steps to design and build a competitive Co2 Dragster, completing a digital report, and racing your finished dragster to win the best time. The races will be based on the TSA Metric 500 Rules & Specs. Any competitors failing these specs will be disqualified to compete and not earn full marks. Senior peer mentor students will be leading, running, and judging the race, while the rest will be playing a supportive role/task during the competition races.
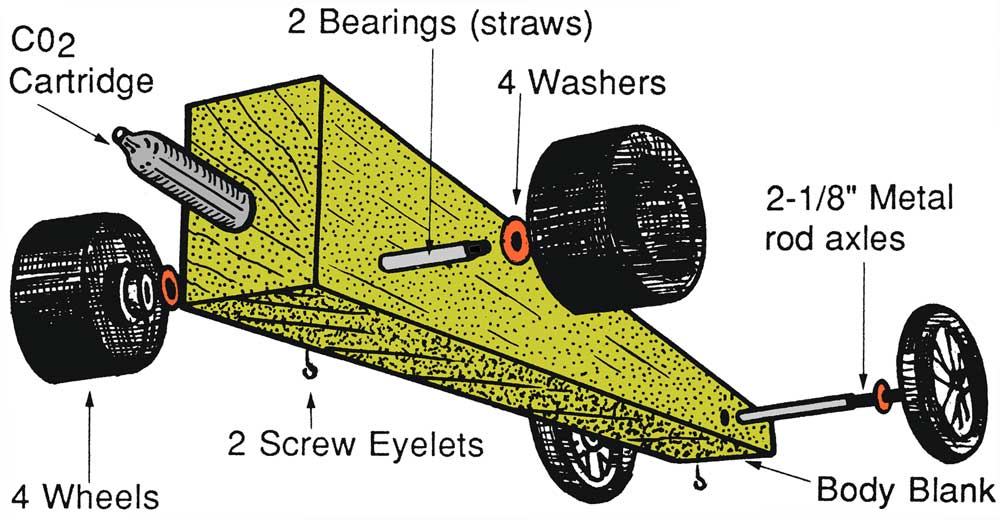
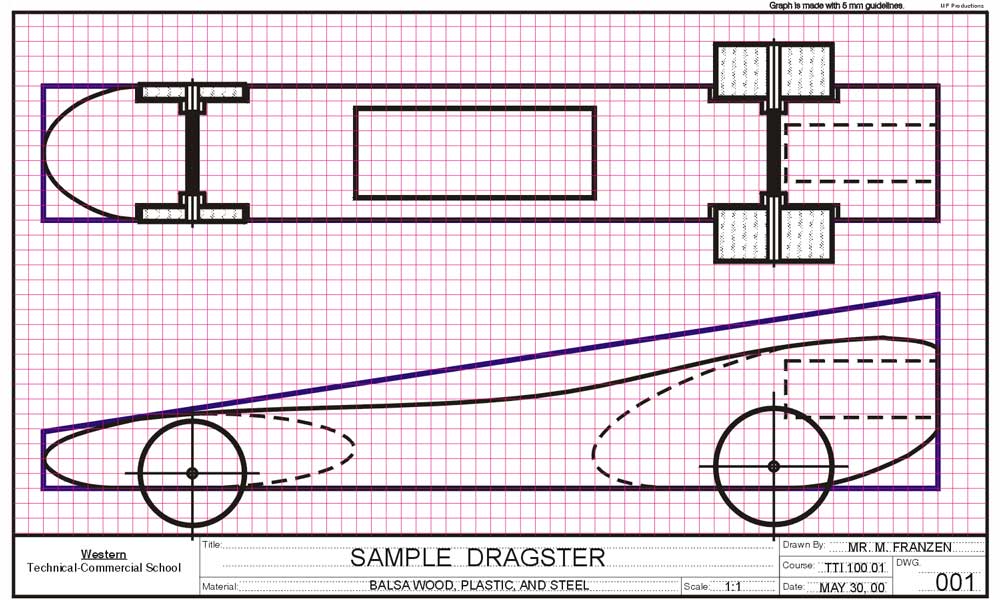
Official dragster materials include: Styrofoam blank, a bass wood blank, molded front and rear wheels, 2 axles, 4 washers, 2 screw eyelets, and one straw are your immediate resources. Available tools and equipment in the shop will be used to design, build, and test your dragster. Competition timed raceway track will be used to race and time qualified competitors.
Report (web or paper) to show title page, contents, new terms, ![]() SPICE process steps, research, thumbnails, ortho, full scale pattern, material/cost, test/tracking, and summary conclusion/reflection.
SPICE process steps, research, thumbnails, ortho, full scale pattern, material/cost, test/tracking, and summary conclusion/reflection.
For the race competition, any competitors falling the TSA Metric 500 Rules & Specs will be disqualified to compete.
Investigation/Ideas:

Resources
 Included in this module is a
 ![]() Co2 Dragster Handout and a Test and Data Tracking Log Sheet for your construction, testing, and reporting records. You will have access to a computer lab to research and design your dragster.
Co2 Dragster Handout and a Test and Data Tracking Log Sheet for your construction, testing, and reporting records. You will have access to a computer lab to research and design your dragster.
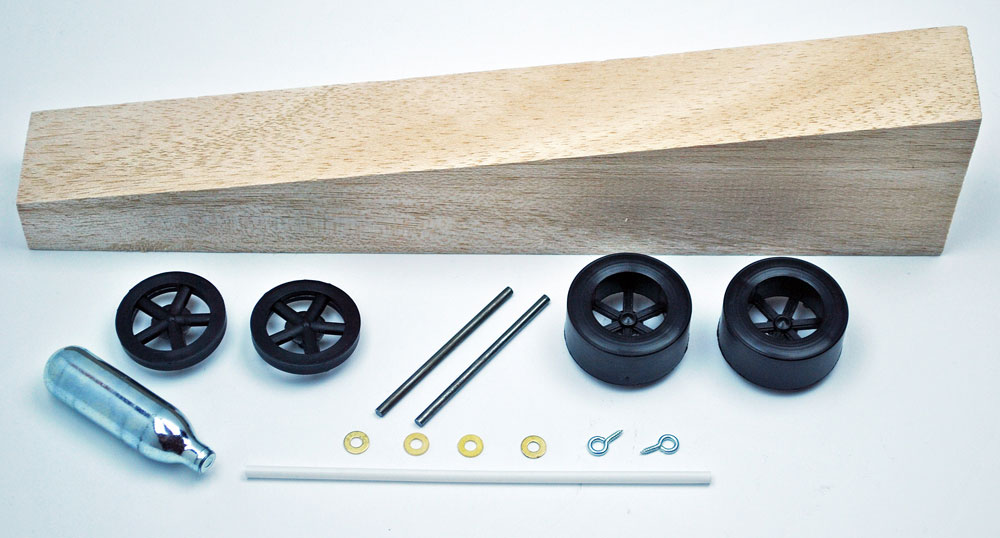
For the dragster you will get a Styrofoam blank ($1.00), a bass wood blank ($5.95), moulded front and rear wheels ($2.00), 2 axles ($0.21), 4 washers ($0.40), 2 screw eyelets ($0.25) and one straw ($0.10) as your immediate resources.
Available equipment and tools in the shop can be used to test, refine, modify your design, build, and race your dragster. Wind tunnel is also a tool that can be used to test dragster characteristics that can be used to help with your design. We also have a per-built double track and digital tracking system to measure the speed of your co2 dragster.
About Research
Here are some suggestions that may be useful to you when research needs to be done. There are basically two types of research namely pure research and existing information search.
Pure Research
You are finding out things that have not been found before and therefore are not available in any books or periodicals. This you do by experimentation and keeping careful notes on what you are doing. This is to make for continuity of your research on a day-to-day basis and also to prove that you actually did it and to validate your findings. Proof is usually your research notes and possibly actual products that you tested (e.g. An example of a new type of airfoil).
Existing Information Search
This type of information, created others can usually be found in books, periodicals, newspapers etc. You are allowed to use this information providing you recognize that this is not your own information. This you do by clearly indicating where you found this information. A reasonable way of doing this is in the following manner. State where you found it (Name of book, Magazine, etc. when it was published and by what organization, and who was the author of this particular article).
Web Resources
- 6-step Guide
- Dragster Glossary
- Design steps Wiki info
- How they work
- Types of CO2 Race Cars
 Design & Construction, 7p
 Design Process PPT
- Design brief
- Construction tips, 11s
- Research Folio or Des-Construct
- Aero & physics PPT, 31s
- Aerodynamics
- Paint a pine wood Derby Car
- Science of Going Fast
- Students process 1
- Students process 2
- Dragster resource site
- Physics of co2 dragster
 Making of a CO2 Car, 9.30
- Cutting the Top View, 5.59
- Cutting out a co2 dragster, 5.52
- Painting the CO2 Car, 4.56
- Dragster assembly 1 2nd ver
- CO2-Dragster Quiz
Design Creation and Transfer
Designing your dragster digitally, there are several ways to do this. Using paper and sketching a 2D full-scale pattern of the side and top is one way. Another way is using a illustration program such as Illustrator or Inkscape to create your 2D side and top view full scale profiles, then print them to ![]() transfer to your prototype and/or wood blank, 2.50. An Illustrator file can be found in the school pick-up folder for you to download and use to create your design digitally.
transfer to your prototype and/or wood blank, 2.50. An Illustrator file can be found in the school pick-up folder for you to download and use to create your design digitally.
An even more advanced method is to create a 3D design using 3D software such as ![]() Sketch-up,
Sketch-up, ![]() Onshape,
Onshape, ![]() Inventor, or
Inventor, or ![]() SolidWorks, then creating drawing views of the side and top of dragster to transfer to the prototype and/or blank. If possible the 3D design can also be exported out to have a multi axis CNC mill (hardware and programing required) to automate the cut out process. Although this process looks the best, it requires a lot of knowledge about 3D software and hardware to be able to complete and is beyond the scope of this course level, but may be possible as a senior class project down the road.
SolidWorks, then creating drawing views of the side and top of dragster to transfer to the prototype and/or blank. If possible the 3D design can also be exported out to have a multi axis CNC mill (hardware and programing required) to automate the cut out process. Although this process looks the best, it requires a lot of knowledge about 3D software and hardware to be able to complete and is beyond the scope of this course level, but may be possible as a senior class project down the road.
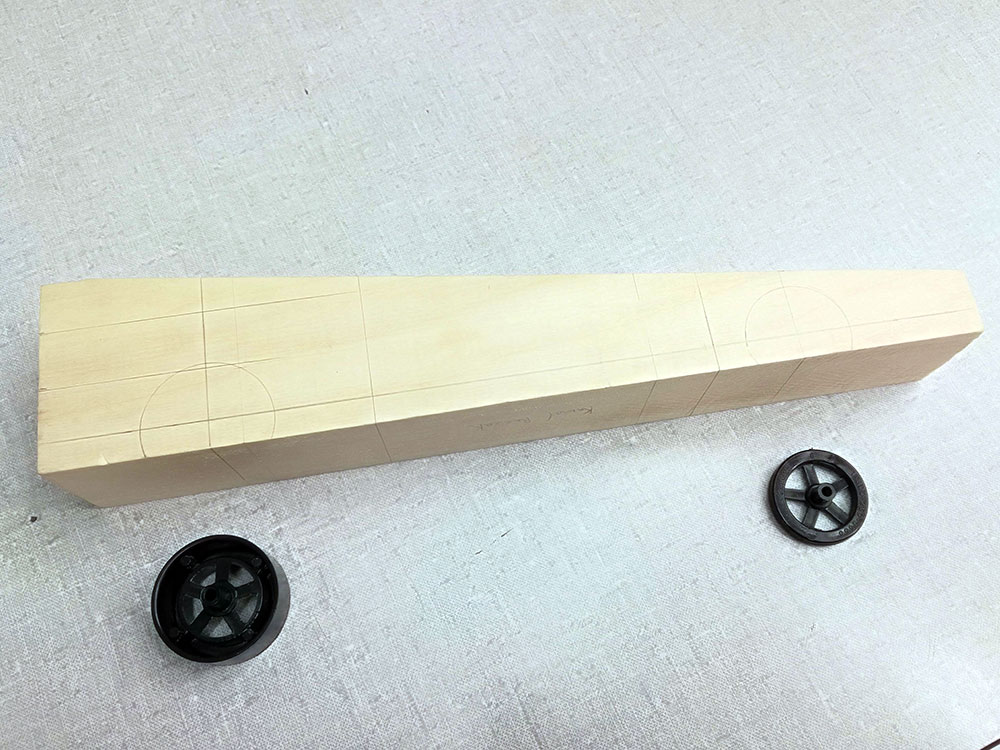
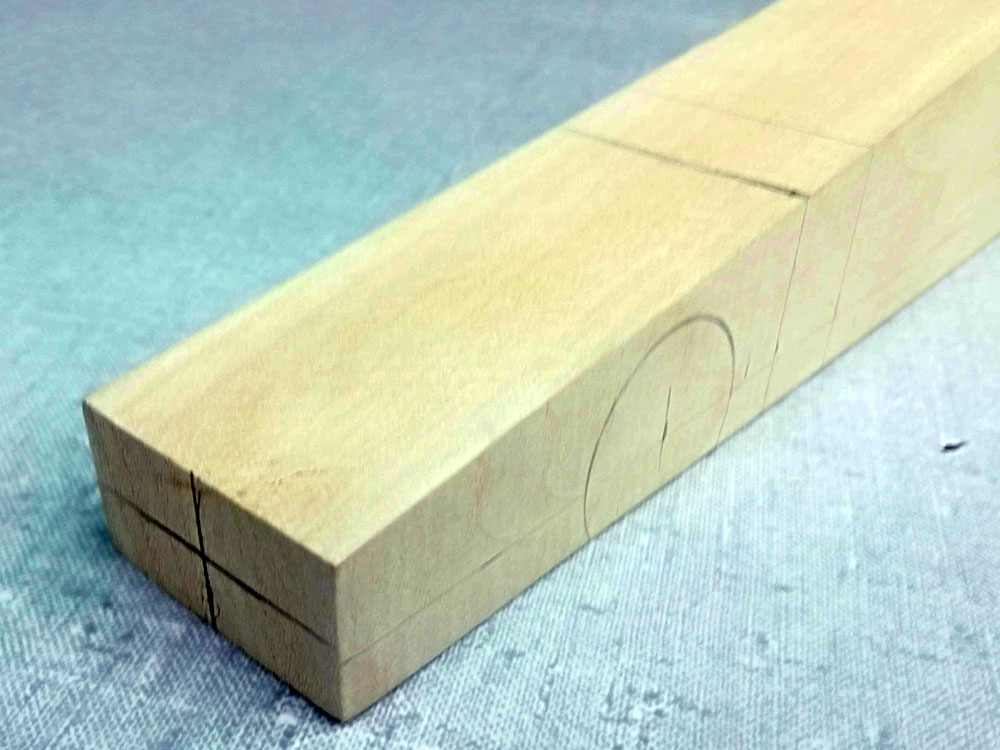
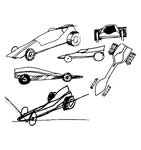
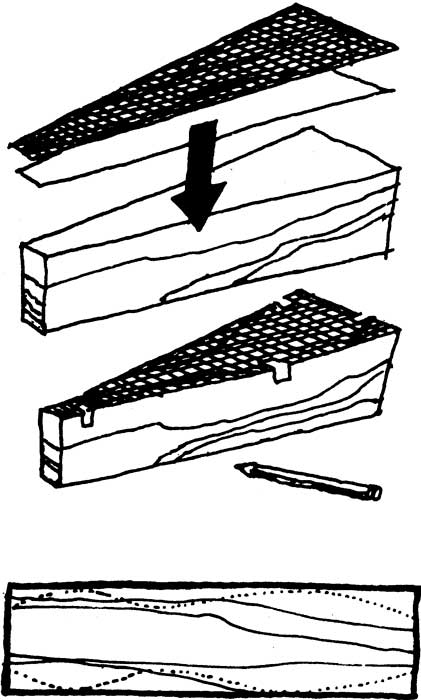
Using your full-scale side and top pattern will allow you to cut out your design when transfered to your wood which can be done two ways, one just cut out and paste on to wood, tape on to wood and trace with pencil, or use carbon paper with pins like you did with the key holder project. Start with drilling the axle holes with 3/16 inch size drill bit on drill press first while you still have straight flat sides, then cut the sides, and last transfer the top pattern (you may need to be careful on transferring this pattern as it will not be flat anymore) so you can cut out it from the top.
Using the Lathe


Although this is not required, another advanced technique is using the lathe to rough out cylindrical-symmetrical shape as part of your design (lathe manual) may be possible after a lesson and ![]() safety and operation sheet is filled out, participated with an instructor demonstration, and safely demonstrated its use. Review and familiarize yourself with related online resources to better familiarize yourself with the lathe and cutting tools needed:
safety and operation sheet is filled out, participated with an instructor demonstration, and safely demonstrated its use. Review and familiarize yourself with related online resources to better familiarize yourself with the lathe and cutting tools needed:
- Lathe Safety Tips
- Lathe Turning
- Spindle Roughing
- Wood Lathe Use
- Using a Lathe, 18.13
- Lathe Chisels, 10.16
Sample Lathe Process
Layout Side

Layout Back
Layout Front

Mount on lathe

Remove material
Create/Construct:

Although your ![]() Co2 Dragster Handout will have information supporting project steps similar to the web site, further resources can be found here on the web site to help with your research and designing of your co2 dragster.
Co2 Dragster Handout will have information supporting project steps similar to the web site, further resources can be found here on the web site to help with your research and designing of your co2 dragster.
Time lines:
 You have about two to three weeks to complete this project. Below is a breakdown of time-lines that you must adhere to, to finish the key holder project. If you fall behind and need more time, then you must take extra time outside of class time. This may mean some homework, or coming in before school to complete the work. Some of the work can overlap, so you may advance to the next step, but check with instructor along the way.
- Research - 1 day
- Five thumbnails - 1 day
- Final ortho - 1 day
- Full scale pattern - 1 day
- Prototype - 1 day
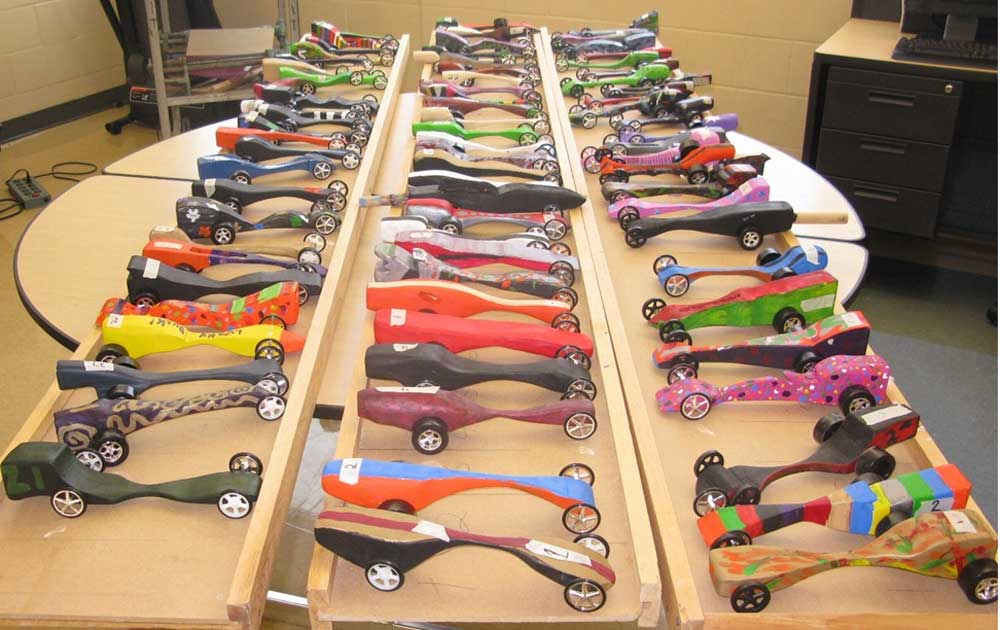
- Production build 5 days
- Report - 1 day
Steps to Start
Step number one should be done when time permits, as it is an outline of what is to be included in your report. Make sure your logo is on all of your work. The rest of the steps should be followed in the order that they come and checked with teacher before moving to the next step as to confirm that you are on the right track.

1) Report
Build your report using Google doc, then convert to PDF and combine this completed PDF (9 and on with highlighting, notes, etc.). Prior to handing in Report, go through and double check instructions, review steps, and check off ? using checklist in your PDF Dragster Project module.
Report Requirements
- Graphic title page showing your face and your finished Co2 Dragster
- Table of contents auto generated with page header titles
- * Related topic research, plus screen captures of 2 partners research
- * Five detailed isometric thumbnails and labels
- * An orthographic sketch - 3 views: front, side, & top
- * Full size top and front Ortho view of final design
- Table/sheet, showing of ALL your Parts/materials, Amount/number, & ~cost
- Full page of pics showing your prototype, wood cut out, sanded, & finished steps
- SPICE step breakdown with 2-3 points per step what you did
- Reflection page of project highlights, learning, challenges, & accomplishments
- PDF Dragster doc with highlighting, notes and Key terms filled out
- PDF Dragster doc Test and Data Tracking sheet filled in with your test and specs
- PDF Dragster doc Check list showing items completed and checked off
- PDF Dragster doc Final self and peer SPICE evaluation completed
*You are responsible to get the teachers initial with a plus #, OT, or minus # showing if they were completed Early, On-time, or Late based on due dates. These positive and negatives will directly affect your mark, so plan ahead.
Report Details
Title page, and table of contents is pretty straight forward. ![]() SPICE summary should combine situation/challenge outlined in this package with your custom steps you took or went through in the Ideas/investigation and create/construct stages of this activity. The research section which is part of the Ideas/investigation section looks at possible related topics to the Co2 dragster.
SPICE summary should combine situation/challenge outlined in this package with your custom steps you took or went through in the Ideas/investigation and create/construct stages of this activity. The research section which is part of the Ideas/investigation section looks at possible related topics to the Co2 dragster.

Research Topics
No two topics can be the same when each ![]() student signs-up for your topic area to research. You will have the opportunity to trade off with a minimum of two peers interested in your topic. Research must be a full page with about half text and half illustration, with your header information on it and bibliography showing your source of information on the back of your sheet in proper format. See library for outline, and/or check the back of a book for examples. Topics must be focused on a specific area of the C02 Dragster project that will help peers understand more about the technical side to this project. Topic areas are as follows:
student signs-up for your topic area to research. You will have the opportunity to trade off with a minimum of two peers interested in your topic. Research must be a full page with about half text and half illustration, with your header information on it and bibliography showing your source of information on the back of your sheet in proper format. See library for outline, and/or check the back of a book for examples. Topics must be focused on a specific area of the C02 Dragster project that will help peers understand more about the technical side to this project. Topic areas are as follows:
- Aerodynamics how it will help
- Advanced painting techniques
- Wind tunnel testing & different shapes
- Advanced C02 dragster tips
- Advanced Illustrator techniques
- Plastic injection moulds (wheels)
- C02 Dragster operation
- Competition race details
- Low moving fast objects
- Advanced wood working techniques
- Rules to watch out for - explained
- Real Dragsters differences/similarities
- Maximizing dragster speed
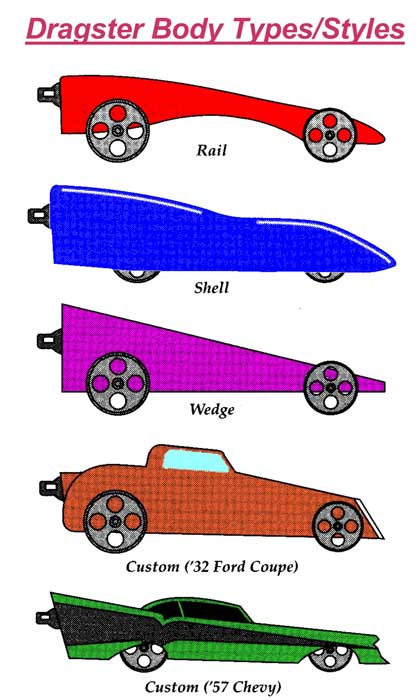
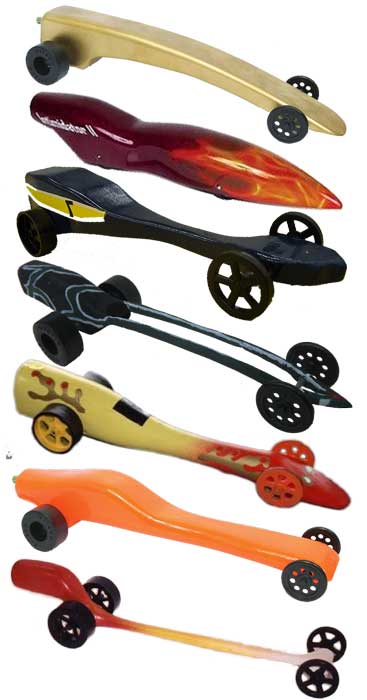
- Dragster body types & styles
- Prototypes and how best to use
- Keys to smooth running wheels
- Best way to market your Dragster
- Great dragster colour schemes
- How to put a good report together
- Research sources for the dragster
- Dragster weight lighter vs heavier
- Physics of the co2 dragster
- Common design and build mistakes
- Crazy designs that might work & why
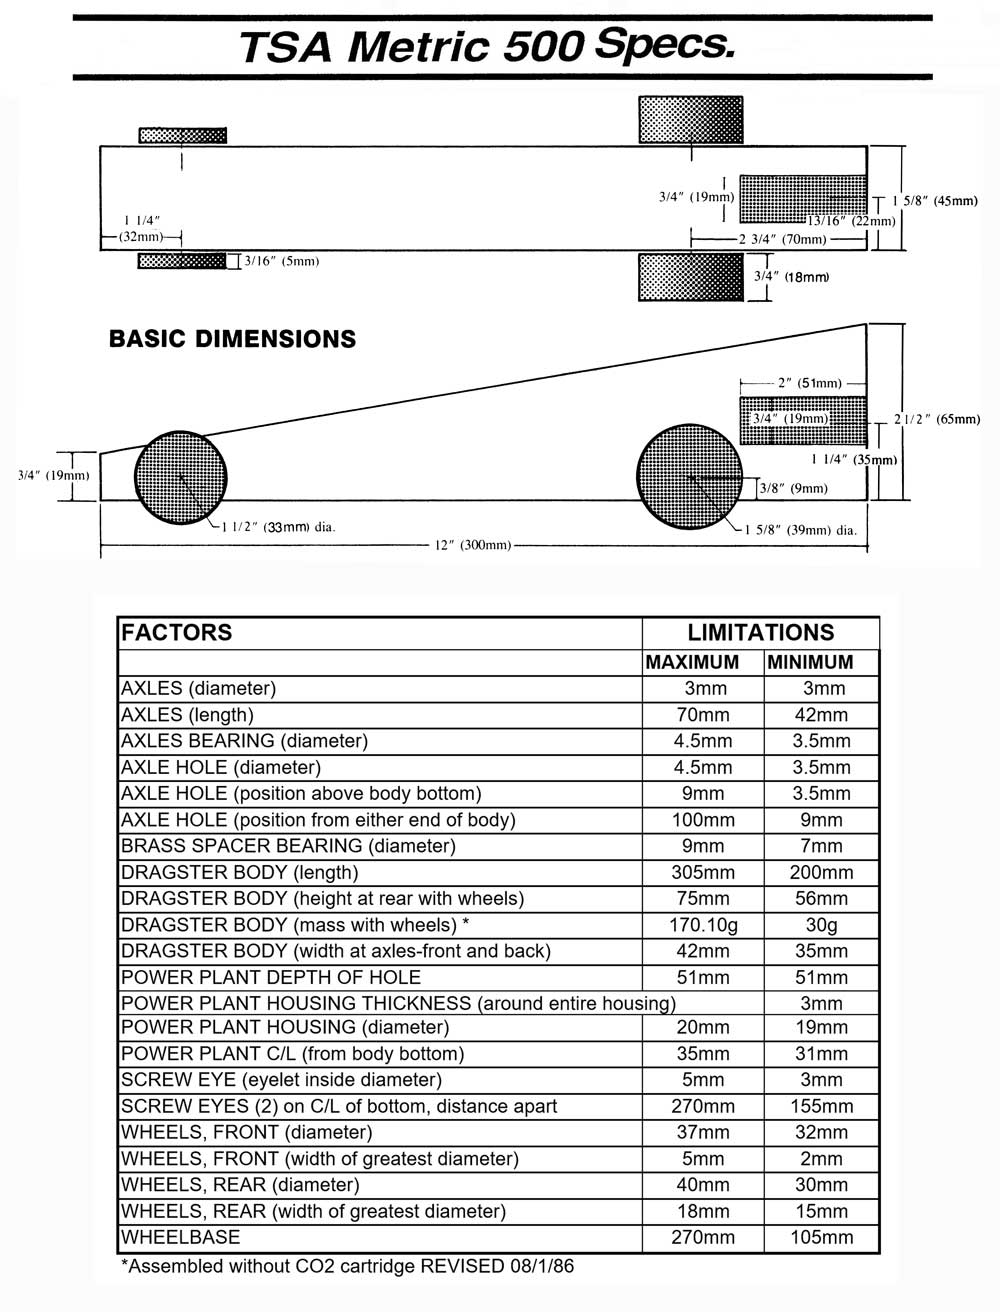
2) The Specs & Rules: TSA Metric 500 Basic Dimensions and Specifications
Study the TSA Basic Dimensions and Specification Factors and Limitations carefully to have a clear understanding on limitations on dragster design and construction. The official TSA Metric Rules and Specs follow on the next two pages, which must be followed to qualify for the race competition. Dragster cannot be longer or wider then measurements shown.
Specs
Rules & Specs 1

Rules & Specs 2
3) Thumbnail Sketches
A minimum of five detailed isometric thumbnails showing different dragster shapes, styles and sizes keeping in mind the dragster limitations set by TSA. Keep in mind to layout of sketches as learned in class, label each of your ideas, put your header information in for full marks for all sketches. Thumbnails to be done in isometric views and may add other 2D views if wanted to support your idea.

4) Ortho Sketches
One neat orthographic full-page, landscape format sketch showing your final idea in three views and ISO. Remember these are just sketches, no ruler is to be used. If you wish you may use graph paper to help lining up views and view features. The ISO is usually smaller as the focus is the three main ortho views as large as possible. Keep in mind relative sizing and proportions for each of your views.
5) Finished Drawing
Make a top and front view ortho drawing using the ![]() Blank for design on paper or the digital Illustrator blank template file in the drop-off folder provided, showing one or a combination of your proposals, that you feel will be most suitable for a single final working design. This will be used as a template for your prototype. Be aware that you may want to make design changes as you further develop and test your prototype, as it is rarely working perfectly the first time and with further research and testing, design can be improved significantly.
Blank for design on paper or the digital Illustrator blank template file in the drop-off folder provided, showing one or a combination of your proposals, that you feel will be most suitable for a single final working design. This will be used as a template for your prototype. Be aware that you may want to make design changes as you further develop and test your prototype, as it is rarely working perfectly the first time and with further research and testing, design can be improved significantly.
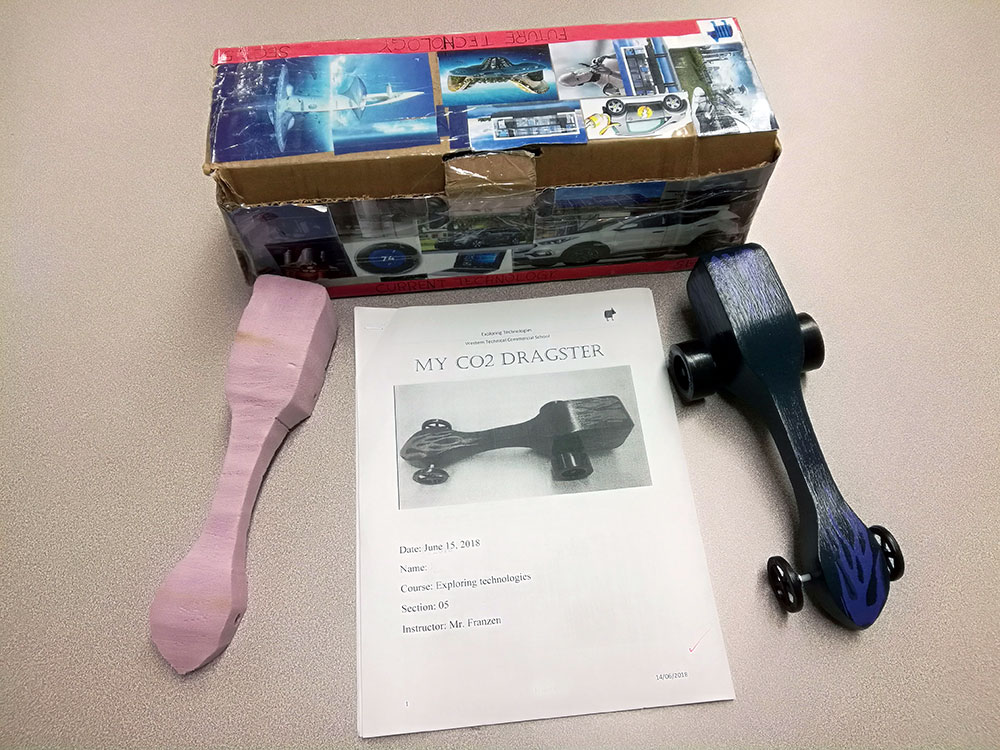
6) Prototype
Using your top and front view template you can then transfer your working design pattern to the Styrofoam blank to create a working prototype. This will help you visualize and test for possible improvements and modifications. You must have at least one Styrofoam prototype showing final shape, size, and colour with accommodating orthographic drawing showing top and front orthographic view, either on the computer or on graph paper. Further Styrofoam blanks can be acquired by coming in early to help out with shop, to try new ideas/investigation for further testing.
Points to consider:
- Double check that your front and rear axle are with-in the limitations set by TSA
- Check C02 housing thickness in order to safely launch Dragster (3mm minimum)
- Drill your axle holes first prior to cutting out vehicle in order to keep axles straight
- Transfer the pattern with the least number of curves, usually the front ortho view, onto the Styrofoam blank and cut out, then transfer the other ortho view pattern to finish, usually the top view to cut
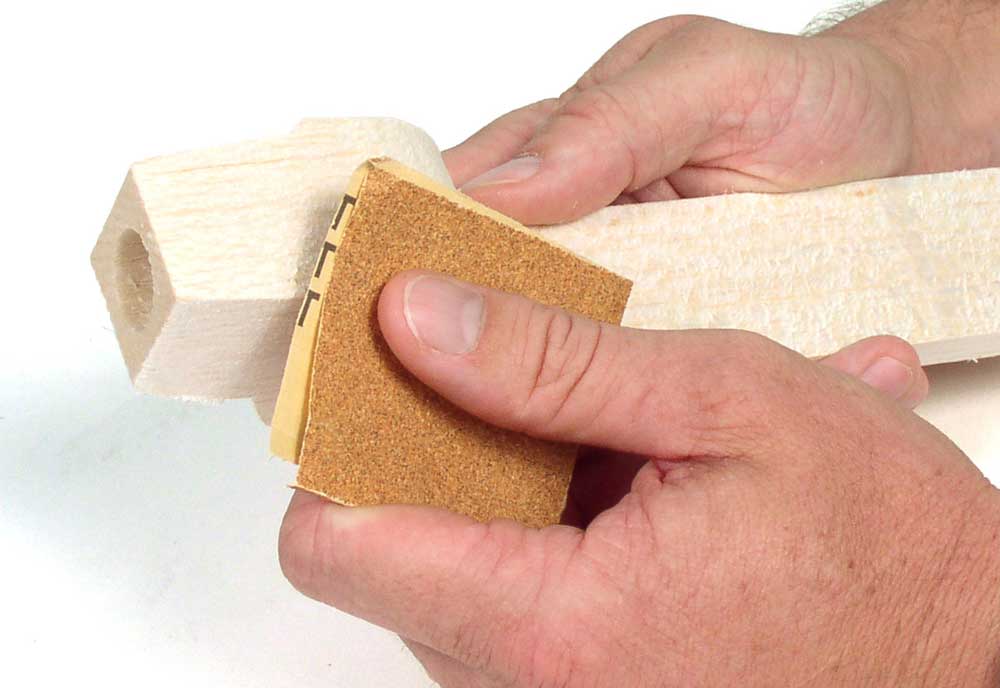
- File/sand down roughed shape to working design dimensions sketched in orthographic / isometric design sketch
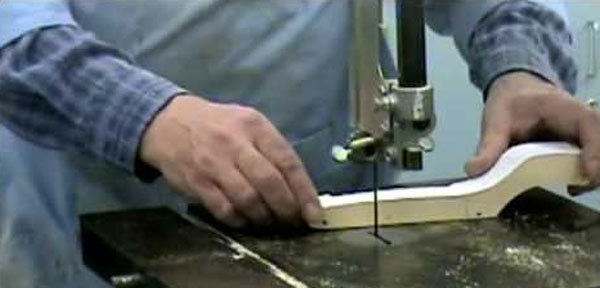
7) Production
Once you have a prototype working design that you feel will work, take your latest top and front view orthographic template design and cut out your wooden dragster. Keep in mind the steps you followed to cut out the Styrofoam prototype. Remember measure twice, cut once! Sand down to a smooth finish to prepare for a final finish as done in the past projects.
8) Finishing Vehicle
Finish with a primer and coloured paint, or natural with or without a stain including a minimum of two coats of Varathane. Advanced painting techniques with colour schemes may be possible. Your logo must be either painted or marked on to identify your vehicle quickly and easily. Allow at least three days to complete painting process with night drying recommended.
9) Testing Vehicle
Testing should be done after the dragster is put together and record test information in the Test and Data Tracking Log Sheet. Several tests can be done including:
Weight Test
Use digital scale to weight dragster
Ramp Test
- The degree of friction in the axles and bearings by recording distance traveled
- How straight the wheels are aligned and how far off centre at 1 meter from edge of ramp
- Time it takes to get to the 1-meter mark
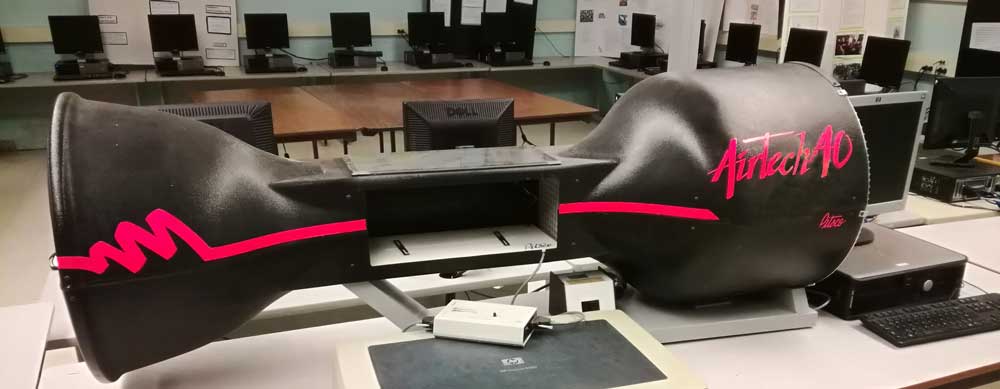
Wind Tunnel Test

It is important to be familiar with the Airtech 40ic wind tunnel system before using. A manual is located beside unit so that you may follow instructions on proper use. Normally wind speed, drag, front axle and rear axle force senors will be already calibrated and ready to use. If wind speed measured is not around 40 miles per hour, the computer interface sensitivity adjustment has been tampered with. To get accurate readings it may be necessary to re-calibrate all of the elements. The key message here is: DO NOT TOUCH THE COMPUTER INTERFACE SENSITIVITY DIAL.
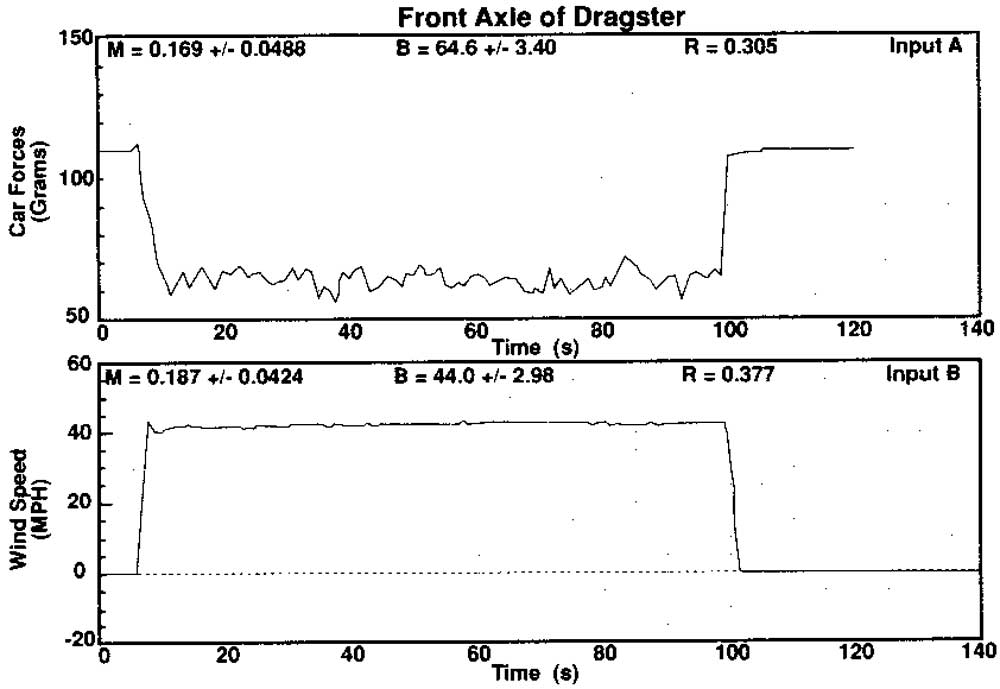
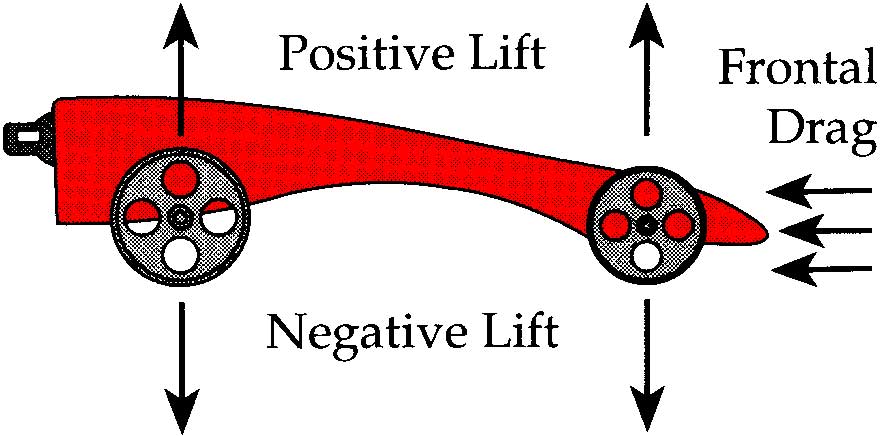
The following four forces should be measured and recorded:
- Wind Speed
- Drag Force
- Front Axle Force
- Rear Axle Force
With this information, you can compare your numbers with your peers, collaborate on how to improve those numbers which will in-turn result in a faster Co2 dragster.
Graph Results
It is a good idea to get a real time graph showing the different elements that you want to observe, and then print up the graph.
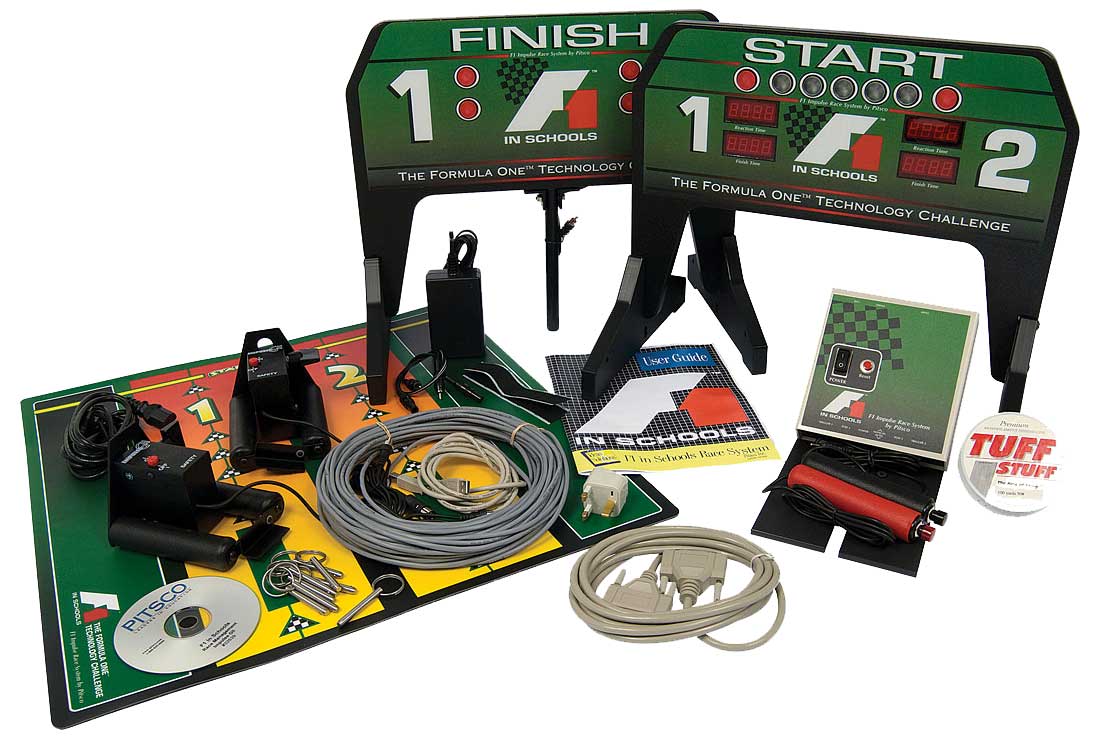
10) The Race
Once testing and final dragster is built, you are ready to race your dragster. The race will start by racing each dragster individually. Each dragster will be given a rank according to speeds ranging from fastest to slowest times. The Test and Data Tracking Sheet must have a different peer marker than the final evaluation sheet.
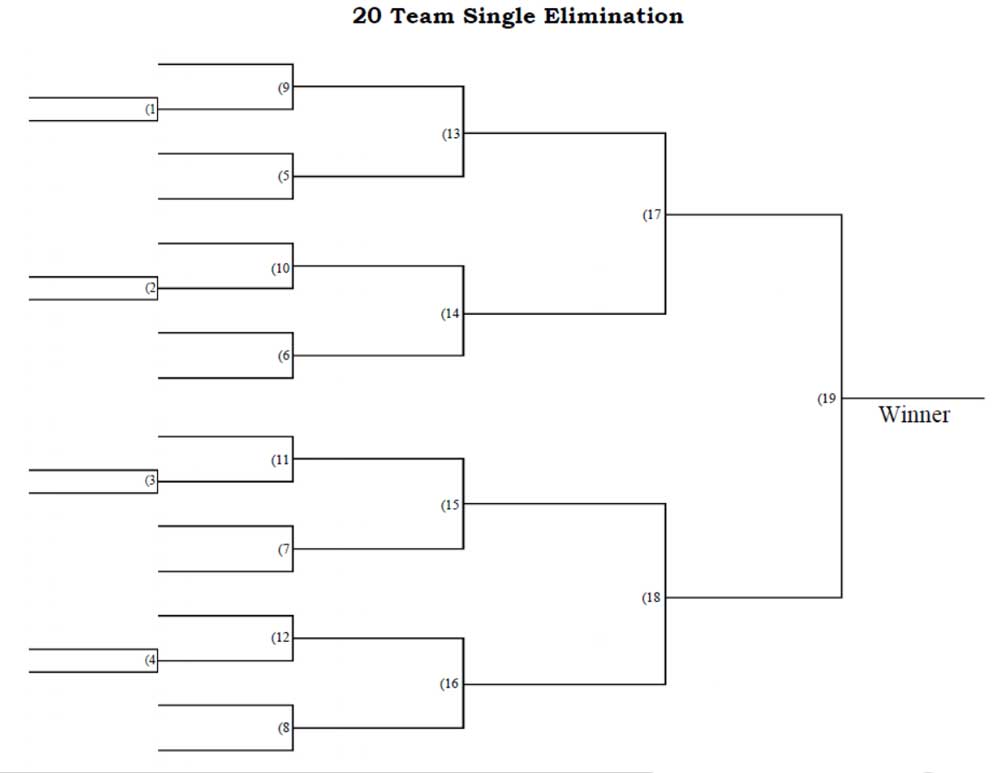
Once everyone has their race data and rank, one final race for class competition will be held based on speed/rank to determine the fastest dragster. A single bracket race sheet will be used from printyourbrackts will be used to track who the winners of each race are.
Evaluation:
Major project components will be checked along the way for consistent feedback throughout dragster research, design, prototype/testing, building, etc. Working with your partner, you should expect each to be supportive and objective with critical positive feedback to maximize competitive dragsters. Remember to keep all of your rough work as evidence of your depth of work and steps you took to complete your dragster and include with your final report. -![]() Past student sample report 1.
Past student sample report 1.

| Evaluation Breakdown for Finished Dragster, Race, and Report | |
|---|---|
| Always double check that you have completed all components for full marks. | |
| Situation - background, understanding the project | 5 |
| Problem/Challenge - Reviewing requirements, terms, due dates, resources | 5 |
| Ideas/Investigation - Research & Info, BoM, lots of ideas/designs, thumbnails | 20 |
| Create/Construct - final idea ortho/pattern, prototype, wood build, finish, testing | 50 |
| Evaluation- All req. done/met, final look, report, SPICE, reflection, checklist, s/p eval. | 20 |
| Total | 100 |

Conclusion
Now that you have completed your Co2 Dragster using resource support from this activity and your new knowledge, skills, and experience built up throughout the course, you can recognize and appreciate how much you have learned and are now ready to take on new and bigger challenges. Take a look at your daily journal and review all the practical hands-on projects completed to see that you have gained some valuable knowledge and skills to use and apply to future challenges. Congratulations and may you continue to challenge yourself further down the road.