Unit 3: Food Intro, safety, and Prep
Food is fun, you get some people, add some food and you have a social party. Food is used in all kinds of important occasions such as Birthdays, Weddings, BBQ's, etc. Learning about cooking with food is a life long skill that you can use throughout your life and build on. You have to eat every day so why not learn, enjoy, and have fun.
Course Units and Descriptions
Use this table for an overview and navigate to each of the course unit pages.
| Unit | Description |
|---|---|
| Review course outline for more details | |
| 1 | Intro & Photo Editing - intro, routines, pictures, and photo editing |
| 2 | Graphic Communications - graphic editing and manipulation |
| 3 | Food Intro, safety, & Prep - intro to industry, safety, food prep and practice |
| 4 | More Foods - different food preps and methods practiced |
| 5 | Portfolio - web page creation and culminating work to showcase |
| 6 | Tourism - select a location to market using a brochure |
Unit Activity Quick Links, Click to Jump to the Specific Activity!
- Unit 3, Act. 1: A Tasty, Safe Introduction to the Kitchen
- Unit 3, Act. 2: Cutting into the Greens
- Unit 3, Act. 3: Measuring Great Taste in Pizza
 Unit 3, Act. 1: A Tasty, Safe Introduction to the Kitchen
Situation:
A group of students interested in making different food solutions know there is a lot to learn, try and experience. As our school has a great facility in several technical areas including the foods area, we will have the opportunity to explore this area.
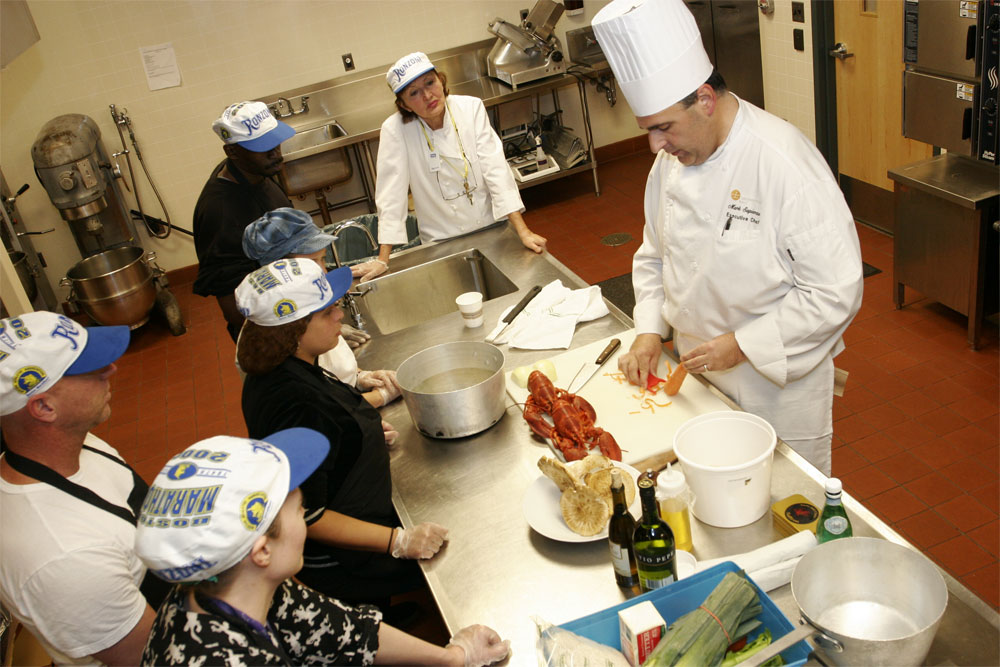
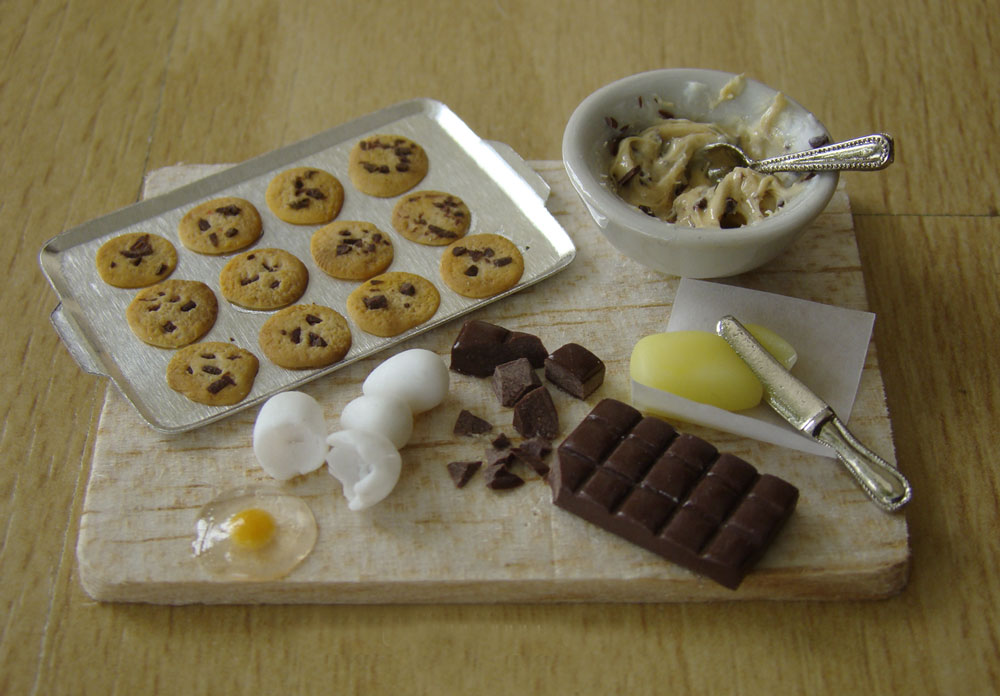
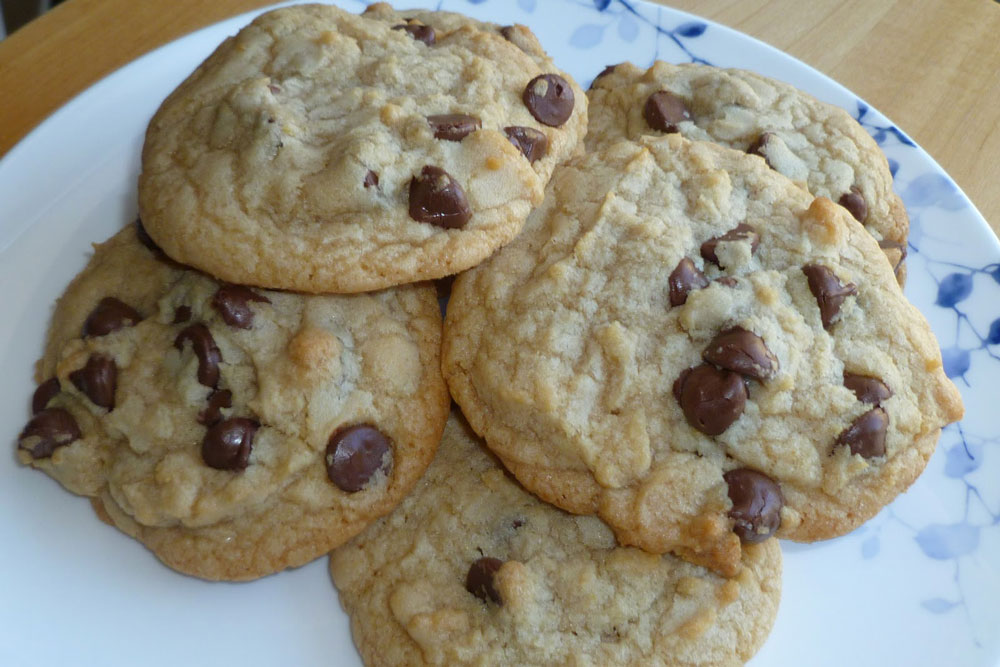
![]() Through a hands-on approach, working in a kitchen can be fun and making different food dishes is very rewarding and tasty.
Through a hands-on approach, working in a kitchen can be fun and making different food dishes is very rewarding and tasty.
Problem/Challenge:
Students will be introduced to the kitchen lab, equipment, utensils, and food preparation process. A focus on safety and procedures will be critical to maximize students safety. Students will participate in the cookie making process, how different ingredients can affect a recipe, practicing safe procedures to prevent any accidents such as falls, burns, electric shock, cuts and/or poisons.
Investigation/Ideas:
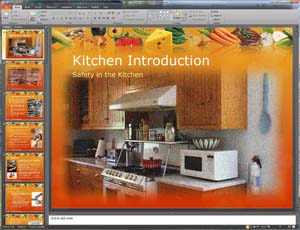
Before actually making the cookies (which is half the fun), we need to familiarize ourselves with the kitchen lab area, the equipment, and process/procedures used. The following Kitchen Introduction presentation (PDF ![]() )will cover the following areas:
)will cover the following areas:
- Familiarize Yourself with Lab
- General Safety Rules
- Cleaning
- Sanitizing
- When To Wash Your Hands
- How To Wash Your Hands
- Personal Cleanliness and Hygiene
- Spot the Hazards
- Laboratory Rules
- Fire Drill
- Grease/Oven Fires
- Precautions
- Be Safety Conscious
- Hazardous Product Symbols
- Procedures & Preventions - Falls
- Procedures & Preventions - Cuts
- Procedures & Preventions - Burns
- Procedures & Preventions - Poisons
- Procedures & Preventions - Shock
- Summary
Kitchen Lab Room Layout
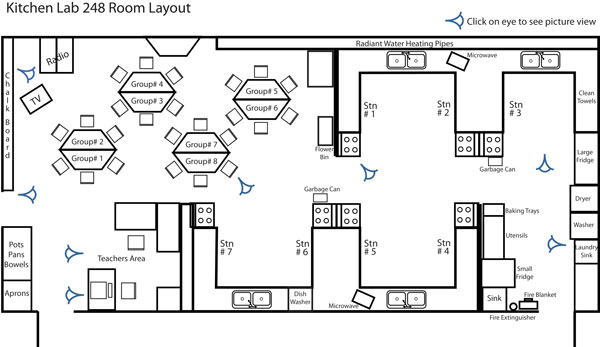
Before working in the kitchen lab, it is important to familiarize yourself with where equipment, utensils, and emergency items are located. Here is a layout map of the room, with PDF. Note where all the key items are in the room.
Throughout the process of making the cookies we will look at not only how to make them, but also practice several parts of food preparation procedures that are critical to know and understand in order to be successful. Some of the process and procedures found in kitchen environments are as follows:
- Preparation and Planning
- Safety and Sanitizing
- Equipment and Techniques
- Teamwork and Cooperation
- Final product
- Chocolate Chip Cookies
Below, will discuss each of the above areas in a little more detail.
Preparation and Planning
When working with food, it is important to be prepared with all your resources organized ahead of time such as
- Equipment
- Utensils
- Measuring tools
- Recipe/Ingredients
- Time - estimate steps and total
- Know-how
Having the above organized, you can then plan your food dish. Like many other projects you may have constructed or built, the recipe tells you what food ingredients you need, and also gives you an outline of steps to follow to be successful. Reading through this process will give you an idea of what equipment, tools, and time is needed to prepare the food. Planning allows you to tweak, modify that process if necessary while you decide how you want your food solution to come out and making sure that you will have enough time to follow through.
Safety and Sanitizing
The kitchen is a place to prepare and work with food. It requires the use of food, tools, equipment, knowledge, and skills combined to ensure your safety and others around you, while preparing food. By following specific safety rules and procedures will maximize student safety for yourself and your peers..
San ita ti zing is a way to disinfect or kill germs, but before you can sanitize you must clean. Clean by definition, is to remove all dirt and bits of food that you can see from dishes, counter tops, cutting boards and other food contact surfaces. Hand washing is the most important step you can take to minimize germs. Bacteria are tiny living things that grow in food, although you can not smell or taste them some bacteria are helpful, while others can cause sickness and known as pathogens or harmful microbes. A virus, the smallest microbe, is usually spread through unwashed hands.
Hands need to be washed often and well, as microbes can spread directly from one person to another, to food or onto surfaces that are touched. How you wash your hands is also important. Using warm water to wet your hands first, then use soap to loosen the dirt on your hands by rubbing your hands together to make a soapy lather for about 20 seconds, then rinse, and dry with a paper 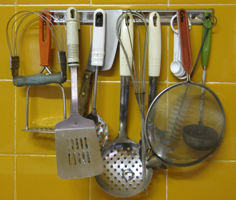 towel.
Equipment and Techniques
Having the right utensils and equipment is needed to create great food dishes. Proper use of these tools, 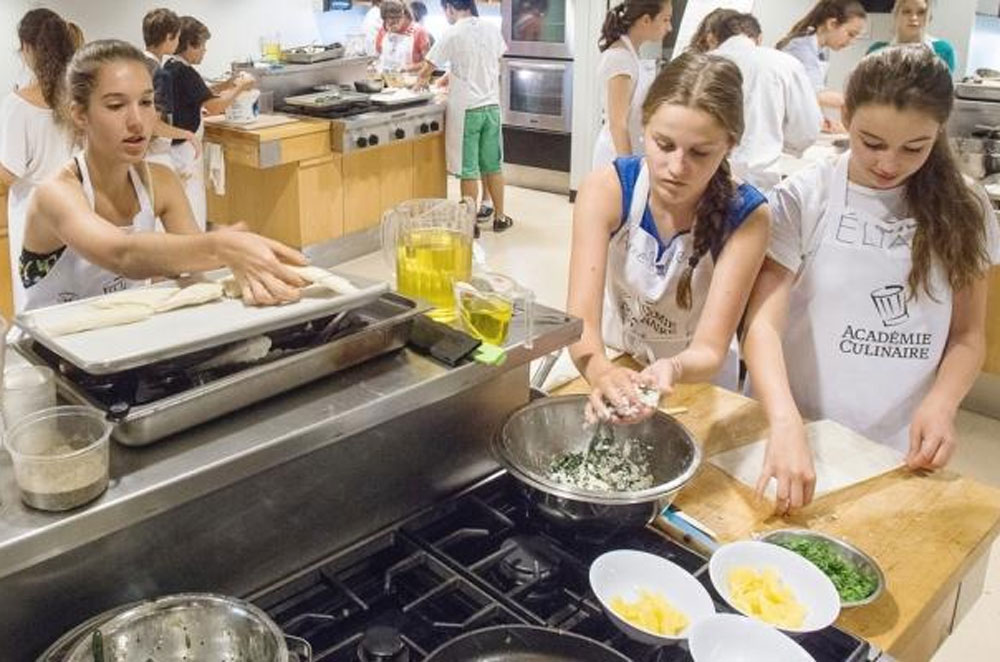 utensils and equipment must be followed at all times because the food preparation can be ruinined and/or someone may get hurt. Specific items related to each of our food projects will be reviewed prior to preparation and cooking of the food. Conversions and measurement is important to follow to be able to make great food dishes. More importantly is to understand why a certain ingredient is used and why will help you be a better cook.
Teamwork and Co-operation
Co-operating and communicating with your partners in a working environment like a kitchen is a big responsibility and must be taken seriously. Taking the time and responsibility to work together safely will ensure no one gets hurt and the cooking task is completed properly.
Product Finished
An amazing finished product is what you are working towards. How does it look, smell, and of course taste. If you can excite all three senses from your food delight, then you have done well. Final product doesn't always turn out so don't expect a perfect tasting dish every time, but do expect to learn from you product so you know what you need to improve for the next time. Every time you cook, you gain experience. The quality and depth of that experience will depend on how much you have gained in knowledge and application of what you learn.
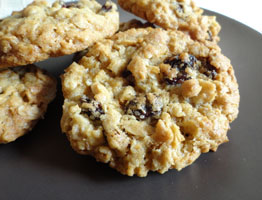
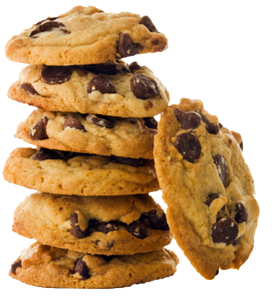
The Art of Chocolate Chip Cookies
Chocolate chip cookies can be made in many different variations. By seeing what ingredients make the cookie taste or look the way it does, will help you understand how each of the ingredients work together. Alton Brown shows us in Three Chips for Sister Marsha how to make thin & crispy, fluffy, and/or chewy chocolate chip cookies , by changing the ingredients to produce different results. Alton Brown, host of the show, suggests using the Toll House Chocolate Chip Cookie recipe by varying ingredients. Listening closely and understanding what and why certain ingredients are used in his video will allow you to create different variations/results of the chocolate chip cookie.
Utensils and equipment needed are a measuring cup, measuring spoons, disher, mixing bowels, baking pan with parchment paper, a cooling rack, along with a stove/oven and electric mixer. Below are the ingredients and some notes from Alton's online video showing ingredients for 5 dozen servings

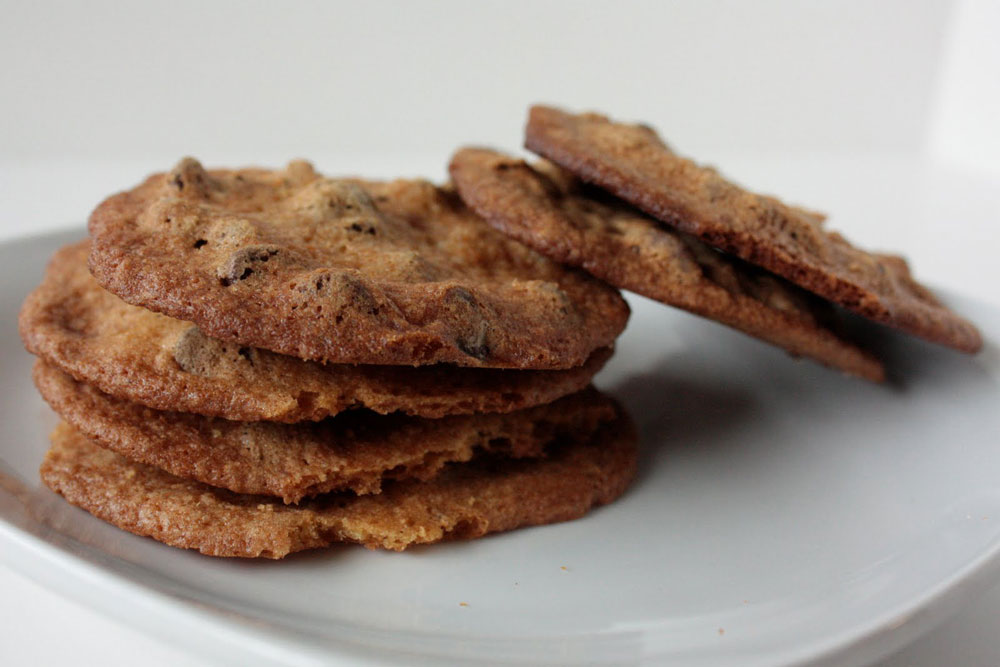
Chocolate Chip Thin and Crispy Cookie:
![]() Thin and Crispy Chocolate Chip Cookie Notes & Tips
Thin and Crispy Chocolate Chip Cookie Notes & Tips
- Sifted flour will give you better leveling later
- Baking soda makes less acid of the batter- equals higher set temperature resulting in a thinner cookie
- Using in milk instead of eggs will give you more spread rather then puff
- Butter has a sharp melting point
- High white to brown sugar ratio adds crispness
- creaming is the process of mixing cold butter with sugar - the tiny sharp sugar crystals cut into the butter creating bubbles resulting in creamy effect
- Parchment paper with silicon is extremely heat resistance and has excellent release characteristics
- Utensils - Measuring cups and spoons, mixing bowls, baking pan, parchment paper, cooling rack, dry nest cups, sifter, #40 disher, oven mitts
- Equipment - hand mixer, oven
This thin and crispy chocolate chip cookie variation should give you a thinner and crispier cookie by adding soda, milk instead of eggs, and a higher ratio of white sugar to add the crispness.
Ingredients:
- Dry Goods
- 2 1/4 cup of sifted all purpose flour
- 1 tsp salt
- 1 tsp baking soda
- Liquid Goods
- 1 egg
- 2 oz. (4 tbsp) whole milk
- 1 1/2 tsp of vanilla extract
- Base Goods
- 2 sticks, 8 oz., 16 tbsp, or 1 cup of unsalted butter
- 1 cup of white sugar
- 1/2 cup brown sugar
- 1 cup of chocolate chips
Preparation/Steps:
- Preheat oven to 375 degrees Fahrenheit.
- Hand mix egg, whole milk, and vanilla and let set to room temperature
- Sift and combine flour, baking soda and salt in small bowl
- In a separate chilled bowl beat room temperature margarine, granulated sugar, brown sugar on low until sugar is mixed into margarine, then medium speed, scraping sides of bowl every minute, until you have a light and fluffy texture
- Add in the egg/milk/vanilla extract mix in to get a creamy batter, then add gradually add flour mixture in three stages each time beating on low then to medium to allow flour/margarine to combine to a nice thick batter mix. Do not over beat
- Fold-in chocolate chip morsels
- Using a #40 disher, scoop onto cookie pan with parchment paper lightly dusted with leftover flour
- Put in oven centre rack for 8-12 minutes, checking every 4-5 minutes for uneven browning. If browning uneven, turn pan around and take out when golden brown
- Immediately put on cooling rack to prevent anymore cooking or bottom burning and let cool
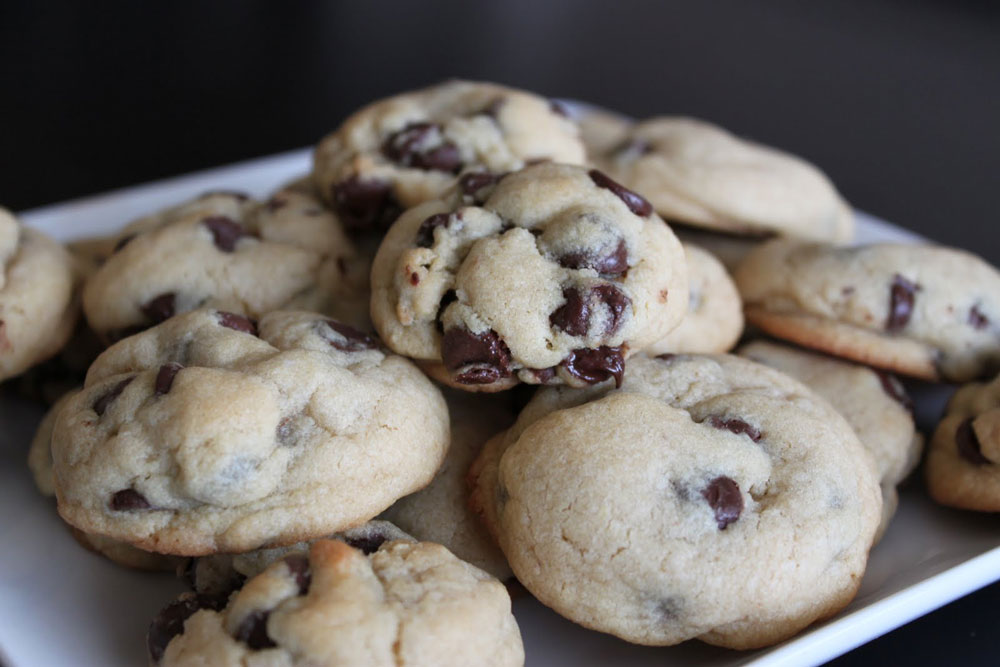
Chocolate Chip Puffy Cookie:
![]() Puffy Chocolate Chip Cookie Notes & Tips
Puffy Chocolate Chip Cookie Notes & Tips
- Shortening has a higher melting point so it is solid longer, giving the batter more time to rise and set before it spreads
- Changing baking soda to baking powder will increase acidity in the batter, creating more air bubbles and fluff after the temperature increases in the oven
- More brown to white sugar will give you a more tender cookie
- Using a lower protein flour soaks up less moisture leaving extra moisture for steam during baking which improves puff
- When you add dry goods, do it in 3 installments on a slow speed as the flower absorbs liquid slowly
- Chill to spread slowly giving the cookie batter time to climb before setting
- Smaller the scoop the more puff you will have
- Utensils - Measuring cups and spoons, mixing bowls, baking pan, parchment paper, cooling rack, dry nest cups, sifter, oven mits
- Equipment - hand mixer, oven
This puffy chocolate chip cookie variation should give you a thicker puffier cookie by using cake flower, baking powder rather then soda, shortening rather than butter, chilling batter before putting in oven, and using smaller scoops.
Ingredients:
- Dry Goods
- 2 1/4 cups of cake flower
- 1 tsp kosher salt
- 1 1/2 tsp baking powder
- Liquid Goods
- 2 eggs
- 1 1/2 tsp of vanilla extract
- Base Goods
- 1 cup butter flavoured shortening
- 3/4 cup of white sugar
- 1 cup of brown sugar
- 1 cup of chocolate chips
Preparation/Steps:
- Preheat oven to 375 degrees Fahrenheit.
- Hand mix eggs and vanilla and let set to room temperature
- Sift and combine flour, baking soda and salt in small bowl
- In a separate chilled bowl beat room temperature shortening, granulated sugar, brown sugar on low until sugar is mixed into shortening, then medium speed, scraping sides of bowl every minute, until you have a light and fluffy texture
- Add in the egg/vanilla extract mix in to get a creamy batter, then add gradually add flour mixture in three stages each time beating on low then to medium to allow flour/shortening to combine to a nice thick batter mix. Do not over beat
- Fold-in chocolate chip morsels
- Using a #40 disher, scoop onto cookie pan with parchment paper lightly dusted with leftover flour
- Put in oven centre rack for 8-12 minutes, checking every 4-5 minutes for uneven browning. If browning uneven, turn pan around and take out when golden brown
- Immediately put on cooling rack to prevent anymore cooking or bottom burning and let cool
Chocolate Chip Chewy Cookie:
![]() Chewy Chocolate Chip Cookie Notes & Tips
Chewy Chocolate Chip Cookie Notes & Tips
- The agitation of the butter, produces more water with the higher wheat protein in the bread flour creating = gluten which gives your that chewy cookie
- bread flower will absorb much more liquid then all purpose flower, more moisture will stay in the cookie
- Brown sugar is coated in molasses which is the liquid that remains after sugar crystals have been extracted from concentrated cane juice, this will attract moisture from the air keeping the cookie moist and chewy
- vanilla is produced from macerating chopped beans alcohol and water
- real pure vanilla extract must have 35% alcohol to 13.35 oz. of bean per gallon Double strength vanilla have twice the amount of beans, same alcohol amount
- imitation Vanilla is made from wood and other stuff
- Vanilla flavouring is a combination of imitation and pure vanilla extract
- Utensils - Measuring cups and spoons, mixing bowls, baking pan, parchment paper, cooling rack, dry nest cups, sifter, oven mits
- Equipment - hand mixer, oven
This chewy chocolate chip cookie variation will result in a softer moist chewy cookie by using melted butter, holding back on the egg whites, and using a lot more brown sugar.
Ingredients:
- Dry Goods
- 2 1/4 cup of sifted bread flour
- 1 tsp kosher salt
- 1 1/2 tsp baking powder
- Liquid Goods
- 1 egg
- 1 egg yoke
- 1 oz. (2 tbsp) of milk
- 1 1/2 tsp of vanilla extract
- Base Goods
- 2 sticks, 8 oz., or 16 tbsp of unsalted butter melted
- 1/4 cup of white sugar
- 1 1/4 cup of brown sugar
- 1 cup of chocolate chips
Preparation/Steps:
- Preheat oven to 375 degrees Fahrenheit
- Sift and combine flour, baking soda and salt in small bowl
- Melt margarine in sauce pan on low heat
- In chilled mixing bowl, pour melted margarine in along with your sugar, eggs, yoke, milk, and vanilla extract to mix together till creamy
- Gradually add flour mixture in three stages each time beating on low then to medium to allow flour/shortening to combine to a nice thick batter mix. Do not over beat
- Fold-in chocolate chip morsels
- Using a #40 disher, scoop onto cookie pan with parchment paper lightly dusted with leftover flour
- Put in oven centre rack for 8-12 minutes, checking every 4-5 minutes for uneven browning. If browning uneven, turn pan around and take out when golden brown
- Immediately put on cooling rack to prevent anymore cooking or bottom burning and let cool
For printer friendly version of the above recipes already sized down for your group with a serving size of 18 cookies, click here ![]() .
.

Resource Links
Links below are great resources to support introduction to working in the kitchen and kitchen safety.
- Food Prep
- Baking Act

- Adding Ingredients Act
- Measure Act
- Food hygiene Act
- About Food Safety Act
- Be Food Safe
- Know your cleaners
- Food Safety

- Safe Food Handling
- Food safety tips
- What's Wrong Here!
- Safety Poster
- Kitchen Safety
- Kitchen Tips
- Kitchen Food Safety

- Online Quiz
- Food Safety @ Home
- Food Safety FAQ's
- Hand Washing Poster
- ESFI -Electrical Safety
- Baking Facts
- Cookie Tips
- Creaming butter/sugar
- Food Safety/Hygiene

- What Not To Do
- Food Standards Agency
- All the Cooks

- Big Oven
- Utensils and equipment
- Kitchen Conversion Chart
- Flour Measuring
- Baking 101 FAQ
- Science of baking
- Baking Terms-Technique
Kitchen Responsibilities
Working in the kitchen, depending on the size will deterring the number of positions, but you will commonly find a food service manager, chef, cook, and a helper. All four of these positions have specific responsibilities. Follow their links to see what those responsibilities are, as this will help you when you are in your groups to decide on who is doing what. In our kitchen, duties and responsibilities will need to be aligned to the food preparation we are working on. In this case chocolate chip cookies.
![]() Take pictures of your process and product as you make your food dishes for use in your web portfolio. In this case some great picture ideas would include a picture of you in action, the ingredients, the cookie batter, the pre-pan oven cookie clumps, the post-pan cookie baked, a final cookie display, and you enjoying the cookie. It would also be great when taking pictures to show safe procedures and lab area, so remember to keep your work area clean and organized as you cook. Finding nutrient information to fill in, you can find similar recipes or use online calculators such as this Calorie Counter.
Take pictures of your process and product as you make your food dishes for use in your web portfolio. In this case some great picture ideas would include a picture of you in action, the ingredients, the cookie batter, the pre-pan oven cookie clumps, the post-pan cookie baked, a final cookie display, and you enjoying the cookie. It would also be great when taking pictures to show safe procedures and lab area, so remember to keep your work area clean and organized as you cook. Finding nutrient information to fill in, you can find similar recipes or use online calculators such as this Calorie Counter.
![]() Check the online recipe calculators links to find out what nutrition each of your recipes are!
Check the online recipe calculators links to find out what nutrition each of your recipes are!
Here is an online recipe Puffy, Chewy Chocolate Chip Cookies that incorporates all three types of cookies into one, compare the ingredients carefully and see if you can spot what or why this cookie will come out the way it is intended, then check out The Ultimate Guide to Chocolate Chip Cookies which compares several different types of chocolate chip cookies, all with pictures and variations of recipe..
Create/Construct:

As we go through the process of making cookies, group and individual pictures will be taken to document for portfolios. Three main sections/focus will include safety, cooking tools, and cookie making process. The following are the steps you will be taking:
- Career related video to watch on people in the industry and their experiences
- In-Class presentation slide show on Kitchen Introduction presentation
- Watch Good Eats Video on Sanitation
- Watch An Introduction to Food Safety and Hygiene in the Kitchen
- Video on Kitchen Safety Fundamentals - Common Tools & Terms, fill in support worksheet
- Hmwk: Explore the Caring About Food Safety Activity , then try their quiz to see what you learned.
- Moodle Safety quiz
 on kitchen Introduction, sanitation, food safety/hygiene, common tools & terms
 - Review Hands-on Practical Foods Analytic Rubric
- Watch Good Eats on chocolate chip cookies titled Three Chips for Sister Marsha
- Review cookie recipe, ingredients, mixing techniques, and baking process
- Kitchen area/room walk-through - where equipment and utensils are, safety resources, and routines
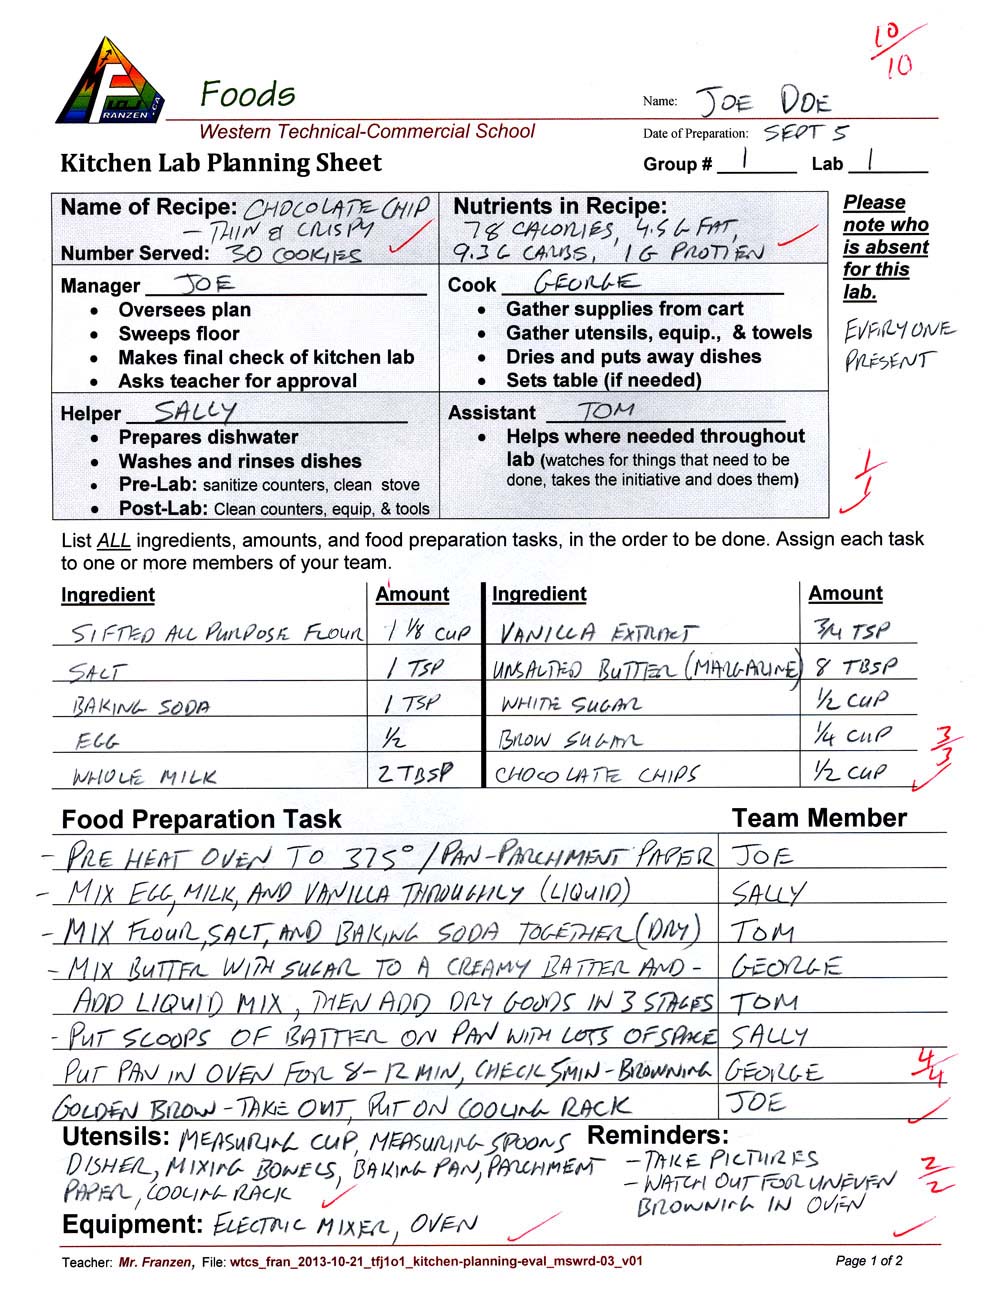
- Fill out Kitchen lab sample starter sheet for group, nutrition info such as calories, fat, carbohydrates, and protein, name individual rolls and responsibilities, list ingredients and amounts, food preparation tasks, utensils and equipment needed
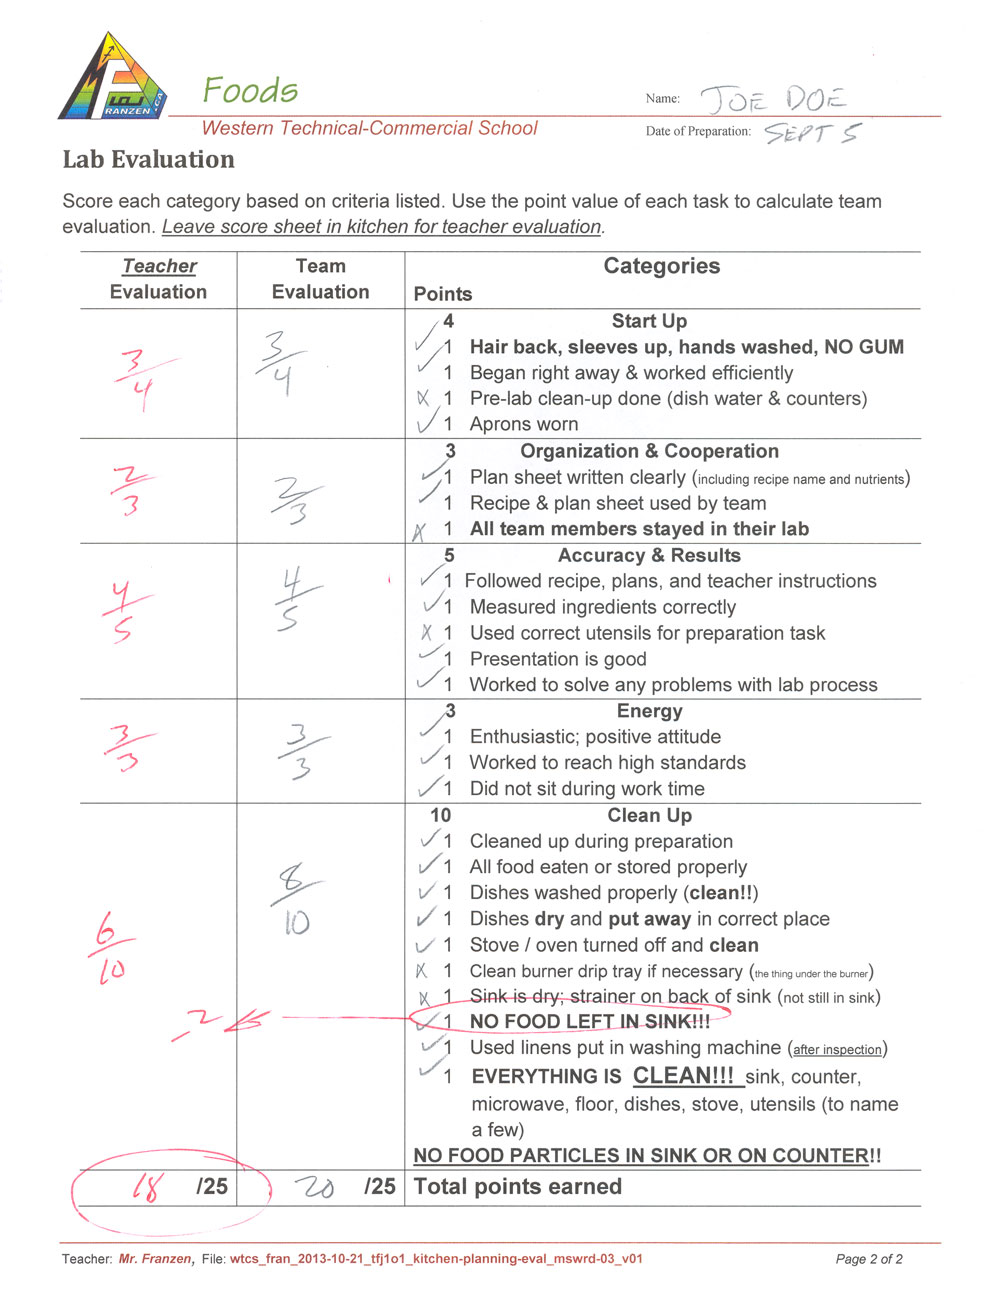
- Thin and crispy cookie demonstration, then make your own cookies, fill-in Lab Evaluation for group and hand in
- Make the puffy or chewy cookie type, fill out Lab Evaluation for group, to be handed in
- Pictures and information to be organized for student portfolio
![]() Remember you are making cookies enough for your group and for sharing with others, so you would need 1/2 the recipe ingredients listed above when filling out your lab planning sheet ingredient amounts, or use the Detailed Recipe
Remember you are making cookies enough for your group and for sharing with others, so you would need 1/2 the recipe ingredients listed above when filling out your lab planning sheet ingredient amounts, or use the Detailed Recipe ![]() If you find that your cookies are somewhat flat, then check out The Perfect Cookie for some more tips.
If you find that your cookies are somewhat flat, then check out The Perfect Cookie for some more tips.
Evaluation:
Ensure you hand your work into the appropriate hand-in folder as reviewed in the last activity with the correct file naming convention in both PSD and JPG formats.

| Mark Breakdown on Food Introduction | Marks |
|---|---|
| Always double check that you have completed all components for full marks. | |
| Kitchen Fundamentals -fill in the blanks, #1/ worth 1.5, #2 worth 1, 1/2 mark per blank | 30 |
| Kitchen Lab Planning- Thin & crispy chocolate chip cookie - Lab Planning Sheet |
10 |
| Cooking Process- Thin & crispy chocolate chip cookie creation - see Rubric & Lab Eval |
25 |
| Kitchen Lab Planning- puffy or chewy chocolate chip cookie - Lab Planning Sheet |
10 |
| Cooking Process - puffy or chewy cookie creation - see Rubric & Lab Eval |
25 |
| What Did you Learn - Test your knowledge here: | |
| 30 | |
| Total Marks | 148 |
Unit 3, Act. 2: Cutting into the Greens

Situation:
As fun and tasty as is making cookies, it is important to be able to make healthy nutritious food. Eating nutritious food gives our bodies the nutrients it needs to stay healthy and energized to live well. A lot of greens are very healthy and fresh way to enjoy nutritious food dishes.
Problem/Challenge:
Create two vegetable dishes. One being, a tossed mango salad with a balsamic vinaigrette and the second being, a steamed broccoli-carrot dish with lemon garlic. Both of these recipes require extensive use of a common kitchen tool, the knife, therefore you will be learning about knives and how to use them.
Investigation/Ideas:
The Knife

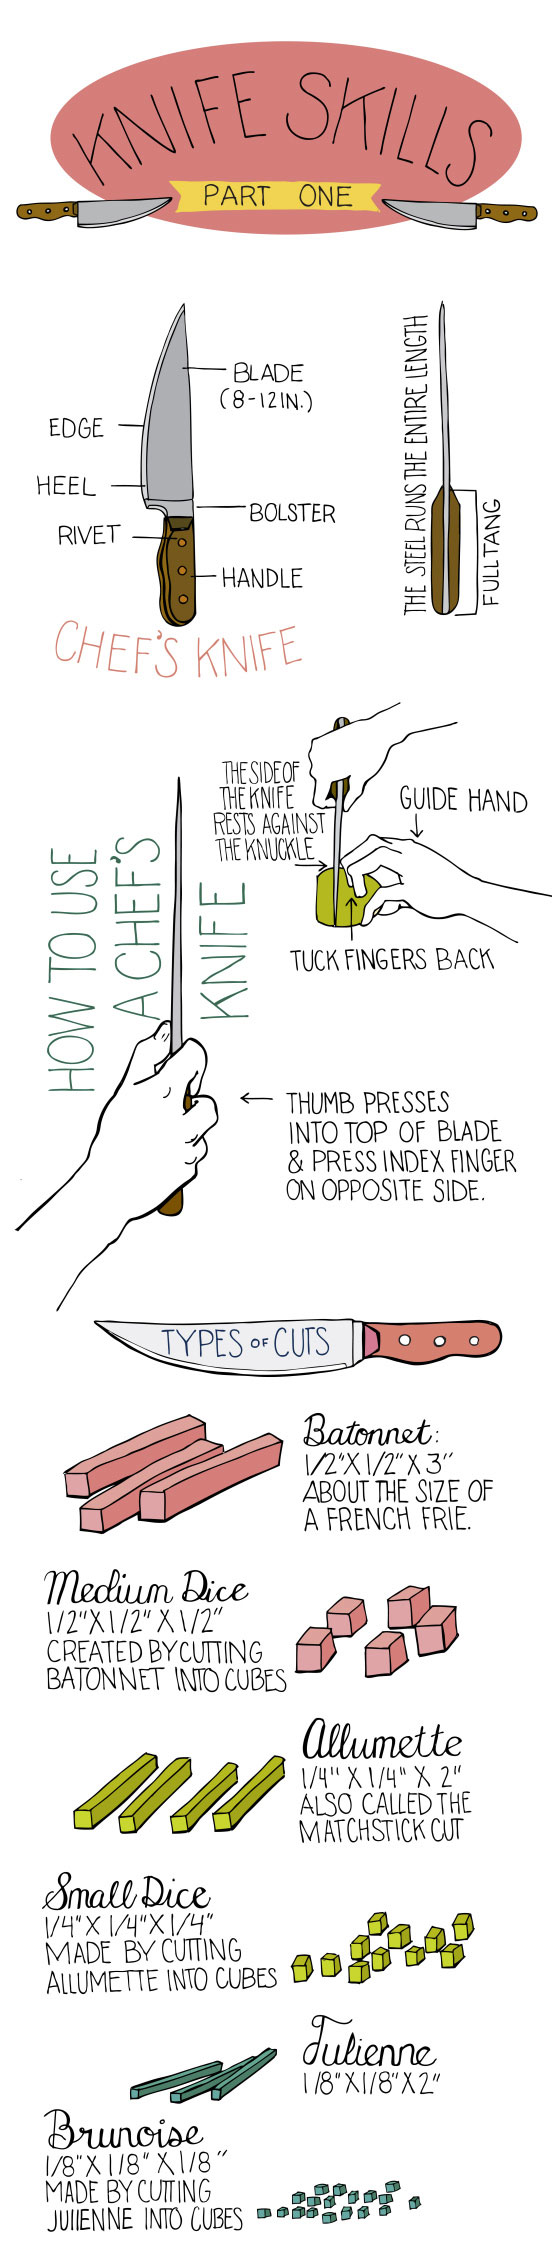
The knife is one of the most common kitchen tools used in the kitchen and is important to know how to use it properly. Check out the long Chops image to the right for a general visual overview of knife info. There are many types, but the most common is the chef knife, the paring knife, and the bread knife. With the most common knife, the chef knife, there are three types of cuts, the draw, the chop, and the slice. Safety is key to preventing injuries by using proper techniques.
Below are some slide-shows ![]() , showing information on safety, types, and techniques and one showing some common kitchen hand tools also.
, showing information on safety, types, and techniques and one showing some common kitchen hand tools also.
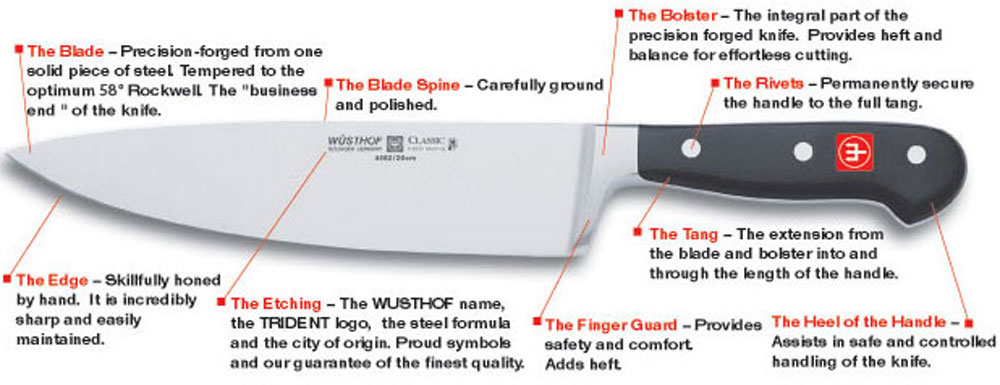
- The Anatomy of the knife
- Knife Skills. Kitchen Safety And Simpler Cooking
- Knife and Cutting Techniques
- Knives and Hand Tools
The following are some great video's ![]() showing how to use knives safely, different kinds of cuts, sharpening and techniques on cutting different vegetables:
showing how to use knives safely, different kinds of cuts, sharpening and techniques on cutting different vegetables:
- Knife Skills Series
- Basic Knife Skills
- How to sharpen knives
- Types of Cuts with Vegetables
- The best knives? Think Shun
- Choosing the right kitchen knife
- How To Cut And Dice A Mango
- How To chop an onion
- How to slice a pepper
- How to Chop a Tomato
- How To Use A Sharpening Steel in Detail
Here are some web page links ![]() related to the knife where you will find additional information on the knife:
related to the knife where you will find additional information on the knife:
- Kitchen 101: Knives and basic cuts
- 8 Knife safety tips
- 13 Things You Didnt Know About Kitchen Knives
- Basic Knife Skills 1
- Basic Knife Skills 2
- Knife Skills 101
- Cookery Online Knife and Cutters Page
- House of Knives Resource Pages
- Kitchen Knife Basics
- Know Your Knife type
The above resources will help you with understanding how to use knives in the kitchen. Take some time and review the side shows and videos to reinforce information learned during your class demonstrations. Most important is to keep your fingers away from the blade, cut at a comfortable pace for you, always concentrate on what you are doing, and be safe.
Knowing your kitchen utensils is also important, so check out the followig links for more information on different kitchen tools and utensils used in the kitchen:
- Visual Dictionary
- Utensils and equipment
- Use and Maintain Kitchen Tools and Equipment
- Kitchen Hand Tools - Part 1
- Kitchen Hand Tools - Part 2
- Cooking Coarse - Kitchen Utensils
- Essential Cooking Tools by Chef Jean Pierre
Greens
Greens are the number one food you can eat regularly to help improve your health. This is because leafy vegetables are full of fiber along with vitamins, minerals, and plant-based substances that may help protect you from heart disease, diabetes, and perhaps even cancer. Links below show you some of the breakdown of nutrients in each of the main ingredients, and a couple of videos detailing more in-depth information on the dishes you will create.
- Romaine lettuce Nutrients
- Broccoli Nutrients
- Carrot Nutrients
- Salad Nutrients Calculator
- Pinch (cooking)
- Salad Daze
- Broccoli Dishes
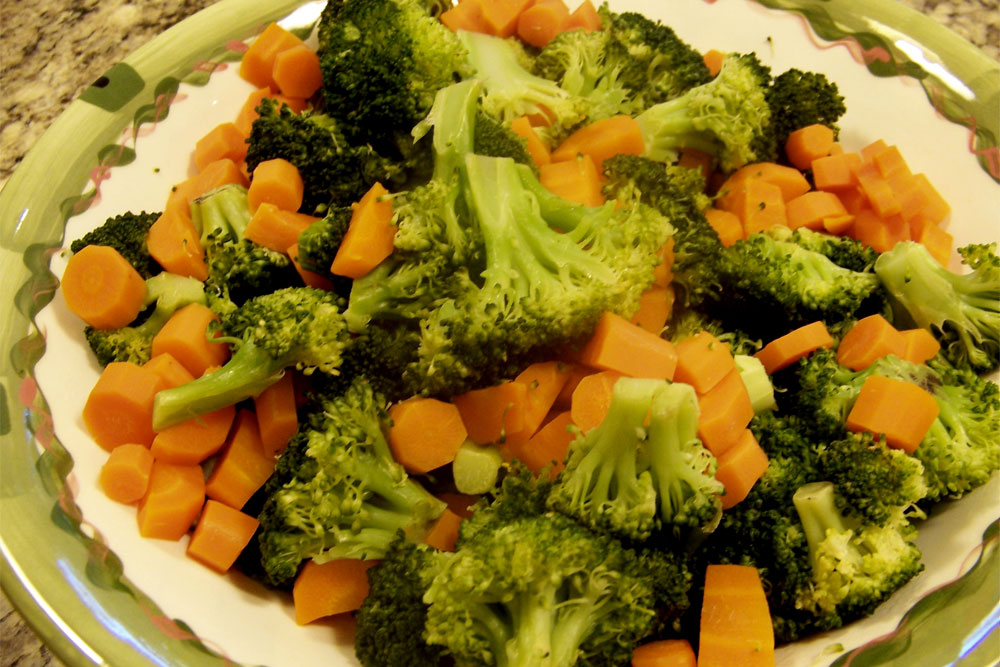
Steamed broccoli-carrot with Lemon Garlic
![]() Notes & Tips
Notes & Tips
- Florets cook faster than the stock
- Boiling tends to over-soften the walls of plant loosing nutrients and colour
- Batonnet is 1/4" * 1/4" * 2" size cut shape
- TipNote4
- TipNote5
- Utensils - steamer pot, chef knife, cutting board and anti slip pad, bowl, measuring spoons, small sauce pan, wood mixing spoon
- Equipment - stove
This is a quick nutritious greens vegetable dish with a nice lemon sauce. Best served hot, but can be served cold also. The broccoli and carrots give a nice contrast with dish setting and tastes delicious.
Ingredients:
- Base Vegetables
- 1 small head of broccoli (1/2 pound)
- 1 large carrot
- 1/2 onion
- Sauce
- 2 tbsp. lemon juice
- 2 tbsp. extra virgin olive oil
- 1 tbsp. margarine
- 1 garlic clove
- 1 pinch of salt
- 2 pinches of black pepper
Preparation/Steps:
- Prepare a steamer pot with water and fill with 3/4" of water and set to boil
- Wash your broccoli, and then cut the florets off the top into bite size pieces. Slice up the stem into 1/4" planks
- Peel your carrot by skinning off the outer sides, cut the ends off, then cut 2" half rounds
- Onion - remove each of the ends, cut in half and remove the skin, then slice your 1/2 red onion into 1/4" inch slices
- Put in already boiling steamer for 6-8 minutes, until soft to poke
- Start on sauce
- Crush your garlic clove, then mince, then add a pinch of salt and grind into a paste with your knife
- In a small sauce pan, add your lemon juice, extra virgin olive oil, margarine, garlic paste, and pepper, on a medium heat for a minute, then let simmer
- Once broccoli and carrots are soft, put in serving dish/bowl and pour lemon sauce on top
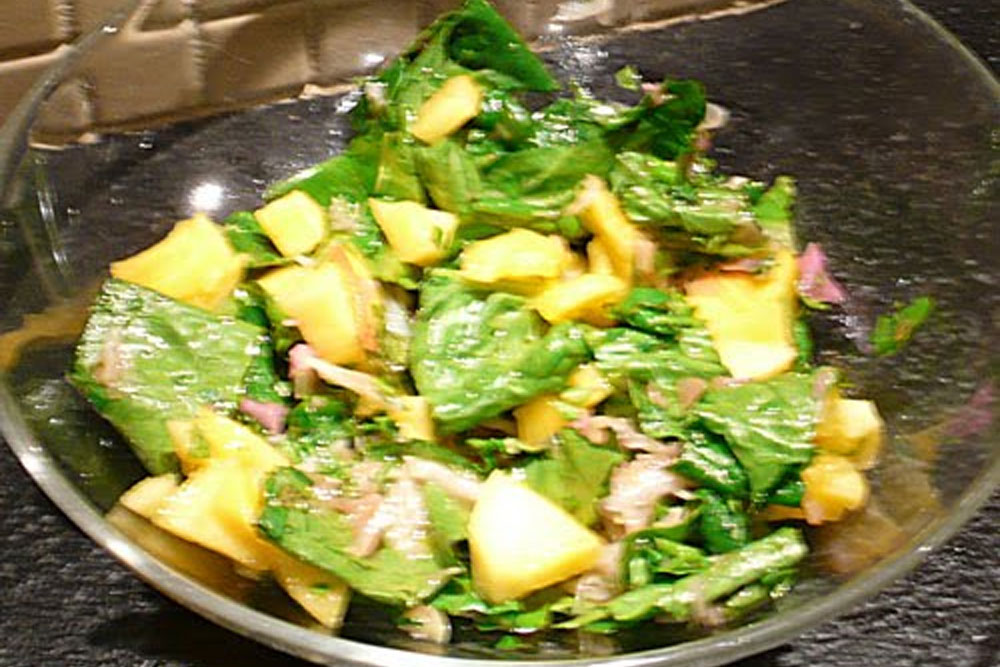
Tossed Mango Salad with a Balsamic Vinaigrette
![]() Notes & Tips
Notes & Tips
- The darker the leaf, the more nutritious
- Possible to rejuvenate salad by soaking in cold water for 20 minutes
- Use glass to mix dressing for maximum flavoring
- 3:1 oil to vinegar ratio is common, and always mix in the oil last
- Pinch is about 1/16 of a teaspoon
- Dressing will stick to dry leaves better than wet
- Utensils - chef and paring knife, cutting board and anti-slip pad, bowl, glass with lid, measuring spoons
- Equipment - salad spinner
This nutrient rich tossed salad is easy to make and healthy to eat. With the balsamic dressing, it makes this a very light meal with relatively low calories compared to some of those rich calorie dressing, keeping the salad light and tasty.
Ingredients:
- Base Salad
- 1/4 head of romaine lettuce
- 1/2 mango
- 1 large carrot
- 1/2 cup chick peas
- 1/2 tomato
- 1/2 red onion
- 2 mushrooms
- Balsamic Vinaigrette
- 1 tbsp. red wine vinegar
- 1/2 tsp. Dijon mustard
- 1 pinch of kosher salt
- 1/2 clove of garlic
- 1 pinch of black pepper
- 3 Tbsp. extra virgin olive oil
Preparation/Steps:
- Soak and wash your salad in cold water to ensure you get all dirty and sand off of lettuce
- Use salad spinner to remove loose water and put into mixing bowl
- Wash all of your vegetables and shake dry. All your vegetables can be put on top of your lettuce base
- Carrot - Peel by skinning off the outer sides and cut off ends, then slice your carrot into 1/4" bias-rounds
- Tomato -cut out the base of your tomato, then slice your 1/2 tomato into 1/8 wedges
- Onion - remove each of the ends, cut in half and remove the skin, then slice your 1/2 red onion into 1/4" inch slices
- Cut your mango in half leaving skin on, then cut the inside into medium cubes, careful not to cut through the skin, then bend skin in, and cut cubes off
- Slice your mushrooms into vertical 1/8" slices and put all the above on top of your lettuce
- Start on dressing
- Crush your 1/2 garlic clove, then mince, then add a pinch of salt and grind into a paste with your knife
- In a glass container with lid add your red wine vinegar, Dijon mustard, garlic, and black pepper together and shake to mix together
- Add your extra virgin olive oil to the mix and then shake again to mix
- Pour your dressing over top of salad; mix the salad with the dressing, then serve
For printer friendly version of the above recipes click here. ![]()
Create/Construct:
- Review knife slide shows and videos, and ensure you know the safety, types, and techniques used along with the different cuts
- Identify utensils and equipment on the Kitchen Utensil & Equipment Identifications sheet
- Fill out Group Kitchen lab sheet for Tossed Mango Salad with a Balsamic Vinaigrette, showing nutrition info such as calories, fat, carbohydrates, and protein, fiber, name individual rolls and responsibilities, list ingredients and amounts, food preparation tasks, utensils and equipment needed
- Watch demo of salad creation, then create with your group, present- taste test, clean-up, and hand in lab sheet completed with evaluation
- Fill out Group Kitchen lab sheet for Steamed broccoli-carrot with Lemon Garlic, showing nutrition info such as calories, fat, carbohydrates, and protein, fiber, name individual rolls and responsibilities, list ingredients and amounts, food preparation tasks, utensils and equipment needed
- Watch demo of salad creation, then make, present - taste test, clean-up, and hand in lab sheet completed with evaluation
Evaluation:
Ensure you hand your work into the appropriate hand-in folder as reviewed in the last activity with the correct file naming convention in both PSD and JPG formats.

| Mark Breakdown on Food Introduction | Marks |
|---|---|
| Always double check that you have completed all components for full marks. | |
| Utensils & Equipment - fill out all proper names and locations | 30 |
| Kitchen Lab Planning- Tossed Mango Salad - Lab Planning Sheet |
10 |
| Cooking Process- Tossed Mango Salad creation - see Rubric & Lab Eval |
25 |
| Kitchen Lab Planning- Steamed broccoli-carrot - Lab Planning Sheet |
10 |
| Cooking Process - Steamed broccoli-carrot creation - see Rubric & Lab Eval |
25 |
| What Did you Learn - Test your knowledge here: | |
| 15 | |
| Total Marks | 115 |
Unit 3, Act. 3: Measuring Great Taste in Pizza

Situation:

A lot of recipes have ingredients for x number of servings. Most times it is appropriate, but not always. When you need to customize the amount of servings you need, some math is needed to calculate what the precise ingredients will be. In some cases, you may want to comparatively add or subtract some ingredients to change the taste or look of your serving you want to make. By understanding how to measure ingredients, time, and temperature will allow you to take the guesswork out of cooking.
Problem/Challenge:
Review and complete exercises in measuring ingredients, time, and temperatures along with imperial and metric measuring standards. Complete kitchen equivalent amounts commonly used in the kitchen with dry/liquid ingredients, fluids, and weights. Also doubling and halving recipe exercises accurately to create more or less servings as needed. With this focus, we will also make some pizza dough and a tasty tomato sauce to make a simple pizza.
Investigation/Ideas:
Measuring
It is important to understand how to measure, so that your cooking process and results will create accurate tasty results. How to measure using basic measuring utensils with things such as equivalents, different types of foods such as fruits and vegetables, temperatures, techniques, etc comes with knowledge and experience. It is necessary to have some math background in measurement, fractions and geometry when cooking and baking. Chefs need to be able to measure and weigh ingredients, time recipes and adjust and measure cooking temperatures. Below is a whole bunch of online resources to help you with this topic:
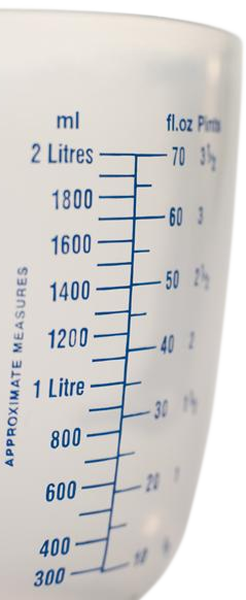
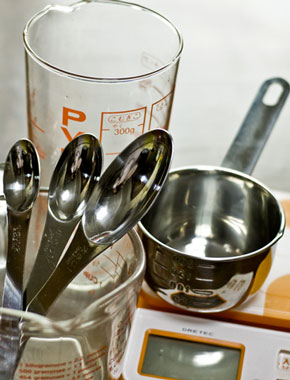
- Measuring Tips And Techniques
- Measuring Different Ingredients in Cooking
- Cooking Measurement Conversion, and Ingredient Substitution
- Cooking with the metric system
- How to Scale a Recipe
- Scaling Your Ingredients
- Kitchen 101: measuring
- Weights & measurement charts
- Instant Cooking Ingredients Conversion
- Conversion tables
- Measuring
- Cooking With Math
- How to ensure that my measurements are accurate?
- How can I cut a recipe in half?
- Tripling a baking recipe
- Visual Dictionary on Measuring Tools
- Measurements, Conversions, Substitutions
- Weights, Measures, Conversion Tables, and Rules of Thumb
- OnlineConversion.com
- Math in the Kitchen
- Culinary Math Deconstructed Part 1
- Culinary Math Deconstructed part 2
- Culinary Arts: How to Teach Math & Measurements
Making Pizza


Pizza making is made up of mixing the dough, then kneading the dough, then letting it rest, then removing large air pockets, letting it rest again, then spreading and shaping the dough. The sauce can be made several different ways to create different flavors, and then add your toppings to your liking. When done at home, if you have a quarry porous stone with a temperature of 4-500 degrees (as high as you can go), you can bake your pizza in your oven with great results.
- Homemade Pizza Dough
- Pizza doughs
- Sauces
- Napoletana Pizza recipe
- Quality Pizza at Home
- Homemade pizza crust
- Knead Bread Dough
- Easy Pizza Dough
- Pizza 101
- Dough Making Process
- How to - Pizza Dough
- Making Pizza Dough
- Basic Pizza Dough
- Throw a pizza dough?
- Mixing and kneading
- Pizza Dough
- Simple Pizza Sauce
- Another Pizza Sauce
- Homemade Pizza Sauce
- Spice Use Chart
- Cheap Pizza Stone
- Pizza Mistakes
Below are the recipes we will be following as our guide, first with the dough, then the tomato sauce.
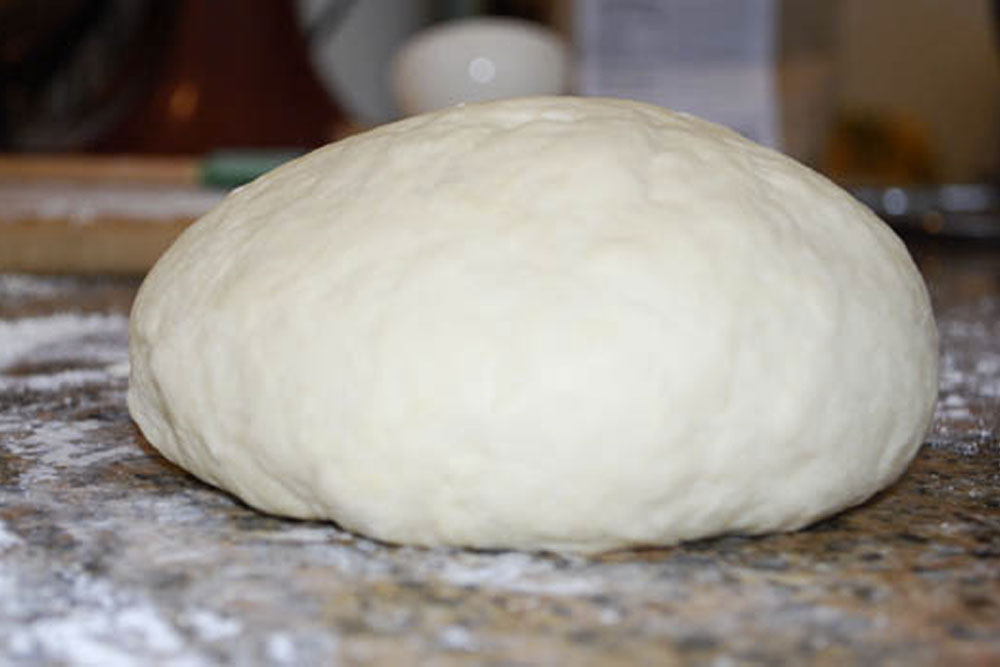
Pizza Dough - Preparation
![]() Notes & Tips
Notes & Tips
- Toppings do not make great pizza
- Perfect crust - crispy and chewy like bubble gum
- More protein, more gluten gives you stretch
- Pizza dough - gets its rise from the billions of cellular fungi called yeast that chomp down on the sugar and flour based doughs which creates gas and makes the bread rise
- Development (Kneading) - not enough, it will tear before you get it out to a pizza shape
- bakers windowpane when dough is spread out should have some light transparency without tearing, holding up to a light source
- Utensils/Tools: pizza pan or stone even better, peel, big spoon/ladle, pizza cutter, bowl, wood spoon, oven mitts
- Equipment: Oven
Great tasting pizza dough is the key to making great pizza. The sauce and toppings help dress it up looks and taste, but remember to focus on you dough first. By allowing the dough to rise over a longer time, will give you more flavor.
Ingredients:
- Dough
- 1tbsp. sugar
- 1 tsp. kosher salt
- 1 1/2 tsp. pure olive oil
- 3/8 cup warm water
- 1 cup bread flour (for bread machines)
- 1/2 tsp. instant yeast
- 1 tsp. olive oil
- Olive oil, for the pizza crust
- Semolina or Flour, for dusting the pizza peel/pan
- Toppings
- 1 1/2 ounces pizza sauce (made on day 2)
- 1/2 teaspoon each chopped fresh herbs such as thyme, oregano, red pepper flakes
- 3 mushrooms sliced
- 1/2 plumb tomato
- 6 slices of pepperoni
- 1/4 green pepper
- 1/4 cup sliced black olives
- 3 grated cheeses mozzarella, Monterey Jack, and provolone
The following recipe for the pizza will take two days.
Pizza Dough - Shape and Dress
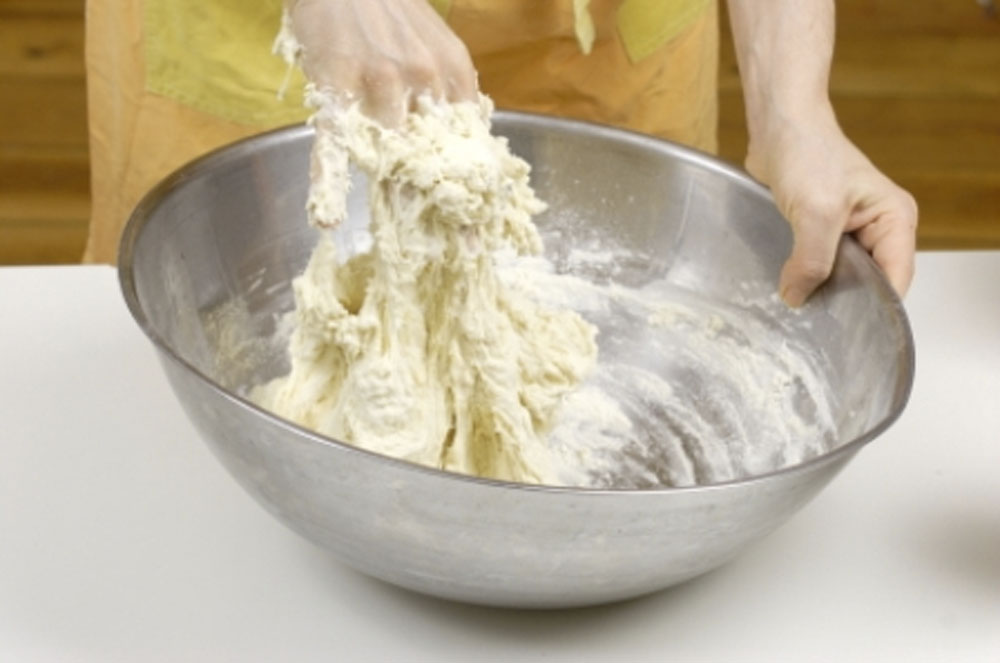
Preparation/Steps - Day 1:
- Mixing Dough: Place the sugar, salt, olive oil, most of the water, 1/2 cup of flour, yeast, and remaining 1/2 cup of flour into mixing bowl. Take your wooden spoon and mix together and add the rest of the water if needed
- Kneading Dough: Sprinkle some semolina or flour on to counter and on your hands, place dough on top of counter, sprinkle semolina/flour also on top and knead the dough using the heel of your hand to stretch and flip back over top, rotate, and redo. Add more semolina/flour as needed and continue to knead for about 10 minutes until dough tightens up and shows some elasticity
- Checking Dough: Tear off a small piece of dough and flatten into a disc. Stretch the dough until thin. Hold it up to the light and look to see if the baker's windowpane, or taut membrane, has formed. If the dough tears before it forms, knead the dough the dough a little longer and check again.
- Dough Rest Prep: Create a solid outside skin membrane by folding into it's self, the on counter roll the pizza dough into a smooth ball on the counter top. Place into a stainless steel or glass bowl or a large zip lock bag. Add 2 teaspoons of olive oil to the bowl and toss to coat to prevent the dough drying out. Cover with plastic wrap or if zip lock but don't close all the way, to allow gasses to escape and refrigerate for 18 to 24 hours.
 Put your groups name on it!
Preparation/Steps - Day 2:
- Pizza Pan/Stone: Place the pizza stone or tile onto the bottom of a cold oven and turn the oven to its highest temperature, about 500 degrees F. If the oven has coils on the oven floor, place the tile onto the lowest rack of the oven.
- Bring to Room Temp: Flatten into a disk onto the counter top and then fold the dough into a ball. Wet hands a little with water and rub them onto the counter top to dampen the surface. Roll the dough on the counter until it tightens. Cover one ball with a tea towel and rest for 30 minutes.
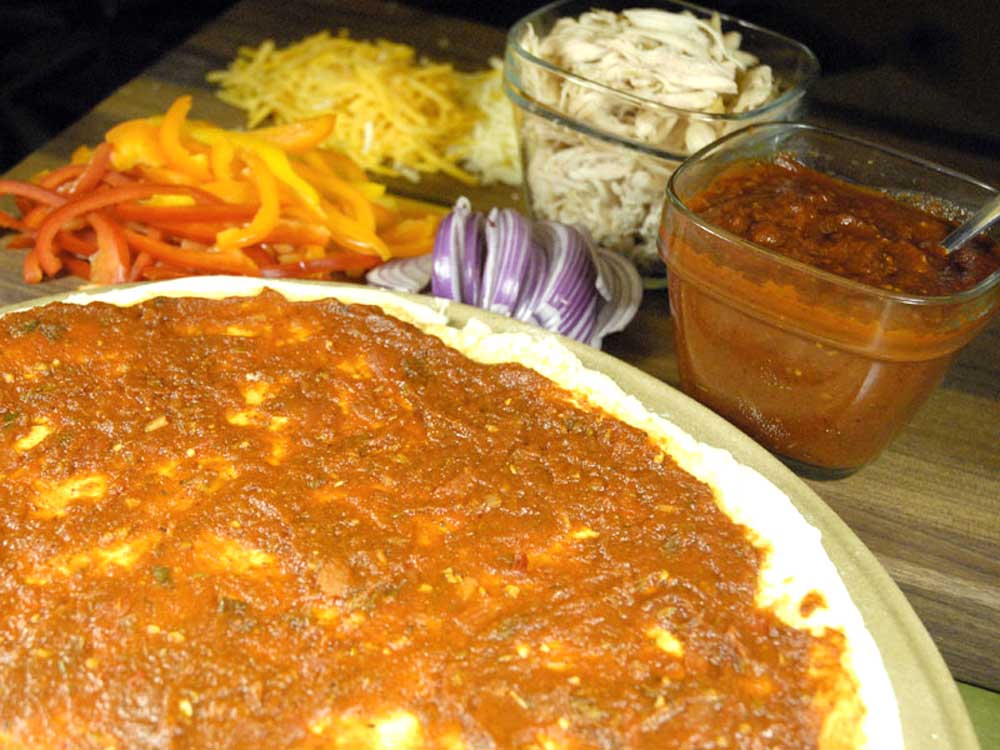
- Shape Pizza: Sprinkle the flour onto the peel, or your pan and place the dough onto the peel/pan. Using your hands, form a lip around the edges of the pizza. Stretch the dough into a round disc, rotating after each stretch. Toss the dough in the air if you dare. Shake the pizza on the peel/pan to be sure that it will slide onto the pizza stone or tile, if you are using one (Dress and bake the pizza immediately for a crisp crust or rest the dough for 30 minutes if you want a chewy thicker texture.)
- Dressing and Toppings: Use a fork to poke some holes to minimize air bubbles while baking then brush the rim of the pizza with olive oil. Spread the pizza sauce evenly onto the pizza. Sprinkle the herbs onto the pizza and any other finely chopped/sliced toppings (dry such as tomatoes and/or sauté mushrooms if necessary, to keep water content down) you may have decided to include then finish with the grated cheese
- Slide the pizza onto the tile/oven and bake for about 7 to 10 minutes, or until bubbly and golden brown.
- Put on serving board/plate and wait for 3-4 minutes before slicing and serving
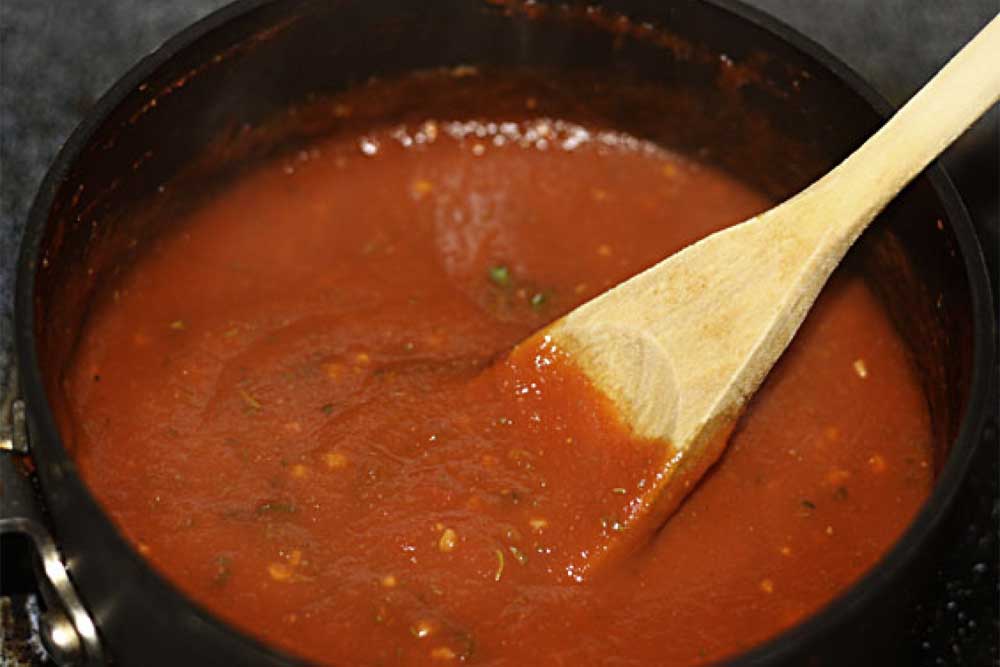
Pizza Sauce
![]() Notes & Tips
Notes & Tips
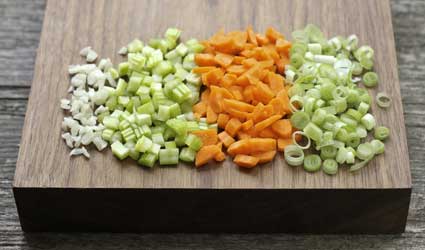
- mirepoix is a mixture of chopped celery, onions, and carrots. There are many variants, which may include just one of these ingredients, or include additional aromatics.
- Sweating should not brown food, food is cooked over low to medium heat and should sizzle very gently so that the food (usually vegetables) can release it's liquid and flavours into the pan without colouring
- When broiling, you leave the oven door ajar to allow heat to escape during this cooking process
- Utensils: Sauce pan, wooden spoon, deep bowel, measuring cup,
- Equipment: oven/stove, hand blender
This pizza tomato sauce uses a sweat method to access the flavor from the ingredients without burning them. This sauce can be used towards not just pizza, but a number of other dishes such as pasta,
Ingredients:
- 1 canned whole, peeled tomato
- 1 tsp. sherry vinegar
- 1 tsp. sugar
- 1 pinch of red pepper flakes
- 1 pinch of dried oregano
- 1 pinch of dried basil
- 1/4 onion
- 1/2 chive
- 1/4 carrot
- 1/4 stalk celery
- 1 tsp. olive oil
- 1/2 clove garlic, minced
- 1 tsp. white wine
- Kosher salt and black pepper, to taste
Preparation/Steps:
- In a sieve over a small sauce pot, strain the tomatoes of their juice into the sauce pot
- Reduced Tomato Juice: Add sherry vinegar, sugar, red pepper flakes, oregano, and basil to the tomato juice, stir and cook over high heat. Once bubbles begin to form on the surface, reduce to a simmer. Allow liquid to reduce by 1/2 or until liquid has thickened to a loose syrup consistency.
- Seed Separation: Squeeze each tomato thoroughly to ensure most seeds are removed. Set the tomatoes aside.
- Sweat the veggies: Cut carrots, onions, and celery into small 1/4" uniform sizes and combine with olive oil and garlic in a metal handle pan over low heat. Sweat the mirepoix until the carrots are tender and the onion becomes translucent, 15 to 20 minutes. Add the tomatoes and capers to the roasting pan.
- Broiling: Place metal handle pan on the middle rack of the oven and broil for 15 to 20 minutes, stirring every 5 minutes. Tomatoes should start to brown slightly on edges with light caramelization. Remove the pan from the broiler. Place the pan on a burner on the stove and add the white wine to the tomatoes and cook for 2 to 3 more minutes over medium heat.
- Put the tomatoes into a deep pot or bowl and add the reduced tomato liquid to the tomatoes. Blend to fine consistency and adjust seasoning if needed.
Here you can download the printer friendly versions of the above recipes ![]()
Create/Construct:
This unit activity includes activities related to kitchen math, measurements, equivalents, recipe doubling and making a 12 inch pizza.:
- Review ideas section resources above, to ensure you are familiar with kitchen math, equivalents, doubling recipes, and pizza dough/sauce making
- Kitchen math video to watch then complete Kitchen Math Measuring, Kitchen Equivalents, and Doubling Recipes exercises
- Fill out Group Kitchen lab sheet for pizza dough only for day one ingredients and steps
- Watch demo for making pizza dough, then make your own with your group. Ensure your group name is on your dough container
- Fill out Group Kitchen lab sheet for pizza dough shaping for day two along with toppings and also pizza sauce - Remember that you are only putting a summary of showing the steps to take
- Watch demo for making pizza dough shaping, and the sauce making process and then work on your own. Have one person on the sauce, one on the dough at the same time and watch your time
Evaluation:
Ensure you hand your work into the appropriate hand-in folder as reviewed in the last activity with the correct file naming convention in both PSD and JPG formats.
| Mark Breakdown on Food Introduction | Marks |
|---|---|
| Always double check that you have completed all components for full marks. | |
| Kitchen Math Measuring - fill the blanks, 1/2 mark for each blank answer | 18.5 |
| Kitchen Equivalents - fill the blanks, 1/2 mark for each blank answer | 9 |
| Doubling Recipes - fill the blanks, 1/2 mark for each blank answer | 5.5 |
| Kitchen Lab Planning- Pizza dough kneading - Lab Planning Sheet |
10 |
| Cooking Process- Pizza dough kneading- see Rubric & Lab Eval |
25 |
| Kitchen Lab Planning- Pizza dough shaping & sauce- Lab Planning Sheet |
10 |
| Cooking Process - Pizza dough shaping & sauce- see Rubric & Lab Eval |
25 |
| What Did you Learn - Test your knowledge here: | |
| 15 | |
| Total Marks | 103 |