Unit 2: Intro to Graphic Communications
Advanced photo editing and manipulation of graphics will practiced through creative custom background and a movie poster where you are the star of the show.
Course Units and Descriptions
Use this table for an overview and navigate to each of the course unit pages.
| Unit | Description |
|---|---|
| Review course outline for more details | |
| 1 | Intro & Photo Editing - intro, routines, pictures, and photo editing |
| 2 | Graphic Communications - graphic editing and manipulation |
| 3 | Food Intro, safety, & Prep - intro to industry, safety, food prep and practice |
| 4 | More Foods - different food preps and methods practiced |
| 5 | Portfolio - web page creation and culminating work to showcase |
| 6 | Tourism - select a location to market using a brochure |
Unit Activity Quick Links, Click to Jump to the Specific Activity!
- Unit 2, Act. 1: Web Page Background Design
- Unit 2, Act. 2: DVD Movie Poster
- Unit 2, Act. 3: Custom Western Tech Collage T-shirt
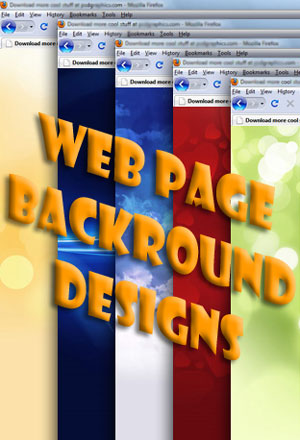
 Unit 2, Act. 1: Web Page Background Design
Situation:
Using Photoshop to create your own graphics using graphic manipulation tools is a great way to make up your own custom graphics. Photoshop has many tools in order to do this. Looking at some of these tools will help you understand the power and infinite possibilities of what you can do with this program.
Problem/Challenge:
Create a web page background from scratch that can be later used to display work done in this class as a digital web portfolio. It will require the following:
- A standard web Setup with a size of 1024 * 768 pixels
- Minimum of two course related images with a theme in mind, the rest is from scratch
- Colour combinations to suit contrast of text
- Background fill with either a colour or gradient
- Use of one or more filters and blending to achieve background effects
- Use of type, to create a "Tech" title with blending and filters with-in top 100 pixels
- Centre design consistency/repetition for web page body expansion if necessary
- Show sample text colour(s) for header 1 and 2 and normal text, using Ariel font 18, 22, and 24 point starting at pixel co-ordinates 40x, 120y.
- Accessory created using the pen tool in combination with brush or pencil tool (10% of page minimum)
Investigation/Ideas:
Similar to the course logo, you will need to think about the three areas of the course, and come up with two images that interest you and can be tied into a theme direction that shows your interest. It is always important to frame in your body by creating subtle image highlights outside the body. This way whatever is being presented in the body does not get distracted from the background, yet the background will support or enhance your work in the body.
Some more tools will be reviewed for use with this project which are as follows:

- Pen tool
- Pencil and Brushes
- Type text tool
- Layer Styles and Effects
- Filter Effects
- Fill and Opacity
There are lots of ideas you can find on the internet, although this project is specific to our course, you will need to create this project from scratch. Below are some linked resources that will help with this project.
Resource Links

- Sample Backgrounds
- Text Effects
- All About Brushes
- Filter Gallery
- Opacity vs Fill
- Layers Tutorial
- Layers Styles
- Layers Panel Essentials
- Pen tool
- Pen Tutorial
TIP: Ensure that your design allows for expansion in the centre just in case you need to lengthen you web page. Web programing code can allow a cut image across the centre to be repeated as many times as necessary to lengthen the background graphics as long as needed to accommodate the information on that page. Each of the samples below when clicked go to a larger image showing guide lines as to where the expansion would be used.
Create/Construct:
Below is the suggested steps you should take to complete this project in a timely manner.
- Get a minimum of two images from the course sections.
- Open each image separately and separate from backgrounds and size appropriately to bring into web background page
- Create standard web setup with a size of 1024 * 768 pixels for your web background page
- Place images in, naming each additional layer appropriately
- Create your background colour fill, filter effects, and layer styles
- Insert your page "Tech" title and work on font, size, layer blending options, and possible filters
- Decide on how to incorporate your pen/brush tool component and add
- Add guide lines to show where you would cut out the centre for expanding the page lengthwise
- Add header and text samples with appropriate contrasting colour
- Save as a both a PSD and JPG file for hand-in
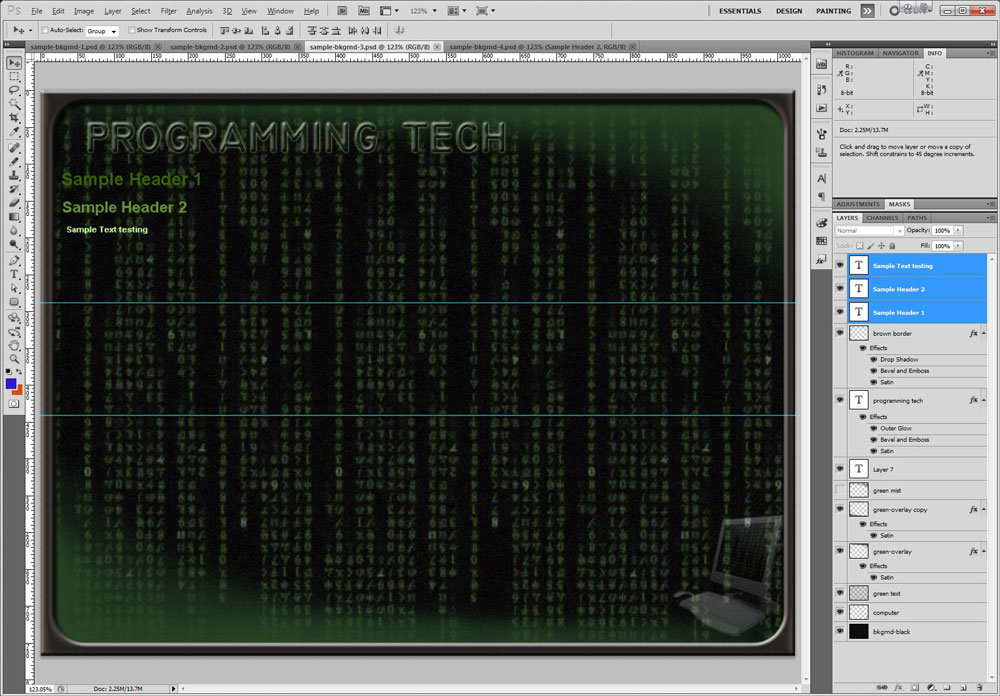
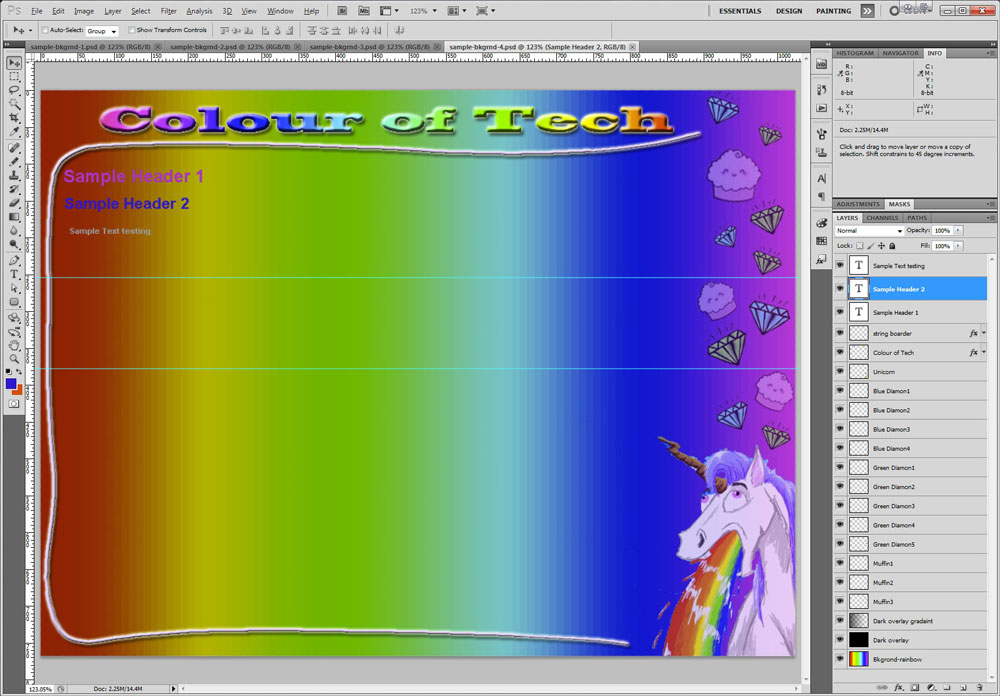
Here are some samples of past student work:
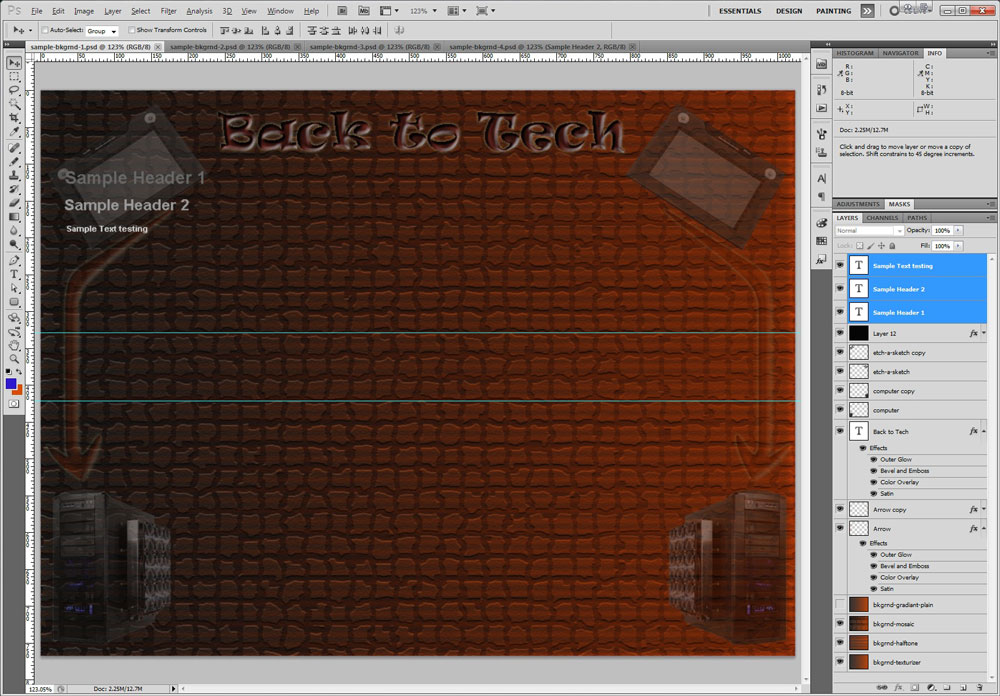
Sample 1

Sample 2
Sample 3
Sample 4
Evaluation:

Ensure you hand your work into the appropriate hand-in folder as reviewed in the last activity with the correct file naming convention in both PSD and JPG formats.
| Photoshop Web Page Background Design | Marks |
|---|---|
| Always double check that you have completed all components for full marks. | |
| Images - Minimum 2 appropriate placed, subtle with pen/brush creations | 10 |
| Background - fill -Pattern, colour, gradient, filter effects, and blending | 10 |
| Text - Title and sample text appropriate font, colour, sizing, blending, and filter effects | 10 |
| Final Image -colours, tech theme, centre expansion, overall look and design, PSD and JPG | 10 |
| What Did you Learn - Test your knowledge here: | |
| Moodle Quiz - Based on above work covered, log-in here, help with quiz access/process | 10 |
| Total Marks | 50 |
Unit 2, Act. 2: DVD Movie Poster
Situation:

Photoshop can be used to do some amazing things. Having some fun using original photos and improving or personalizing can be really fun making them more interesting and personal.
Problem/Challenge:
Find a favorite movie / poster that you can use to make it your own to improve and personalize your name, your face, and two movie related objects inserted. The face is to have at lease one photo touch-up. The movie poster must have the following requirements:
- A standard web setup with a portrait size of 800 wide * 1000 pixels high
- Duplicate layers locked and untouched showing original movie poster background and your face - this is for comparison later
- Must have a face size 20% of page with yours to be put on top
- Face to have minimum of at least two photo touch-ups and match current colour tones
- Adjustment layers to be used for face, objects, and overall picture improvements
- Your name prominently placed and matched with current type style
- Include two objects with a minimum 20% sizing to page, one of which is partially behind part of the background movie poster
- Layers named appropriately with original face and movie poster layers locked
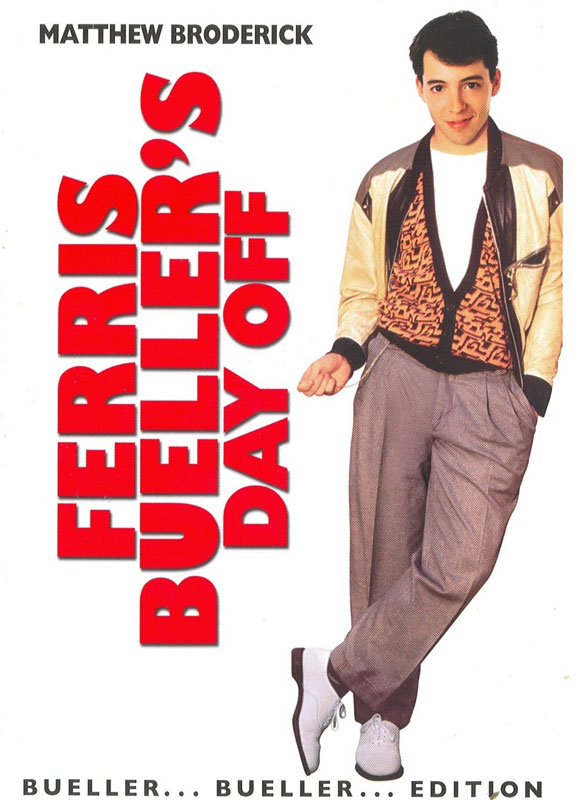
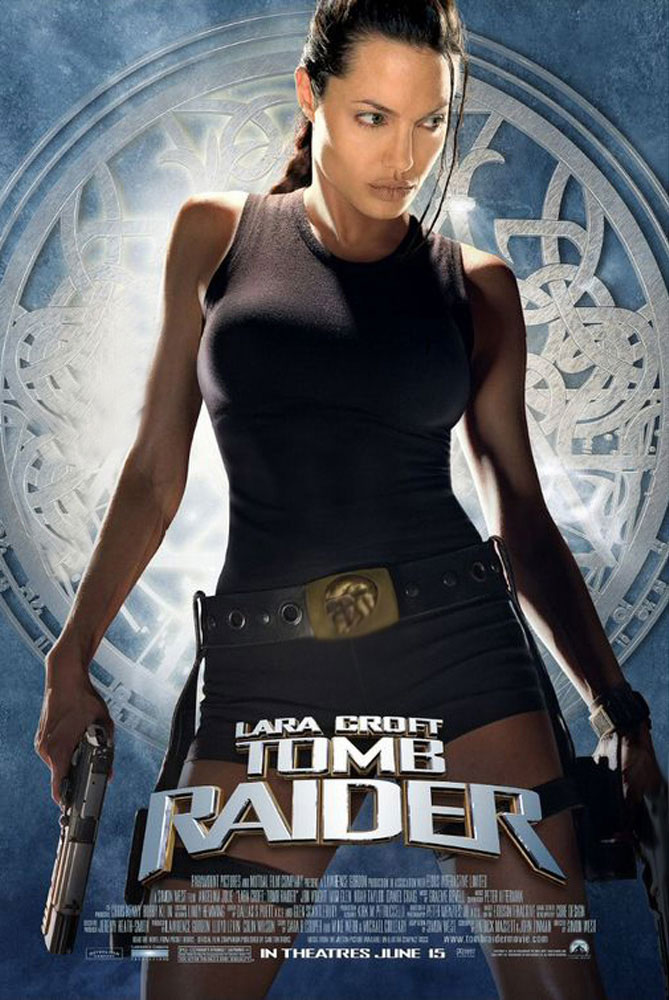
Now that you know what is involved, click on the image on the right titled What's Your Favorite Movie? and see if you can guess which movie posters work and which ones don't. Use the mouse to mouse over to see the answer for each of the movie posters. Check with your teacher prior to working on your poster, to confirm that you are OK, to use that movie poster image.
Investigation/Ideas:

This project is focused on customizing original images with your own face and while improving the original poster graphics. The type tool will be used to get as close to the posters type font/style as you can, to match and blend with posters text. Objects brought into the movie poster are to support and be related to that movie such that you are improving the poster. One of the two minimum objects is expected to be placed in behind current background of the movie poster to give the illusion that it is in the background of the poster.

Adjustments and Presets

Hue/Saturation

Adjustments Layers
Adjustment layers are to be used as one of the major focused tools in this project. The adjustment layer has 10 different types of adjustments you can use to apply to either a selected object, a layer, or the entire poster. What is key with this tool is similar to the Layer Styles tool we looked at last project, is that it is nonvolatile to the image, i.e. you can turn it off any time, or adjust it to suit your image needs without affecting the original image/pixels.
Some more tools will be reviewed for use with this project which are as follows:

- Adjustment Tools
- Spot Healing Brush
- History Brush Tool
- Dodge, Burn Tools
- Blur and sharpen Tools
- Clone Stamp Tool
- Pixel Masks
- Images to Behind Background
It should be easy to find your favorite movie / poster online, just make sure it is has a minimum of the size required for this project. It would also be a good idea to get one with a head shot of an actor with a minimum of 20% of the page size and make sure the text will be relatively easy match using fonts from Photoshop's library. Note, Google search engine has a Find More Sizes feature, so if you don't have a large enough movie poster to start with, you should be able to use this Google feature to find larger sizes. Below are some linked resources that will help with this project.
Resource Links
- Movie Posters
- Adjustment Layers
- Beauty-Retouching
- Teeth Whitening and More
- fonts.com
- Spot Healing Brush
- Blur, Sharpen, and Smudge Tools
- Dodge, Burn, and Sponge Tools
- Clone Stamp and History Brush Tools
- Masks
![]() When you have a brush type tool selected and want to change the size, a quicker way to adjust the size of the brush is to use the left and right brackets by the enter key on your keyboard.
When you have a brush type tool selected and want to change the size, a quicker way to adjust the size of the brush is to use the left and right brackets by the enter key on your keyboard.
Student Samples
Here are some samples of what students selected as their original movie posters selected to work with:
Original Sample 1

Original Sample 2

Original Sample 3
Original Sample 4
Below are some samples of what students did to improve and include themselves in their selected movie posters:

Customized Sample 1
Customized Sample 2

Customized Sample 3

Customized Sample 4
Create/Construct:
Main Steps to Complete
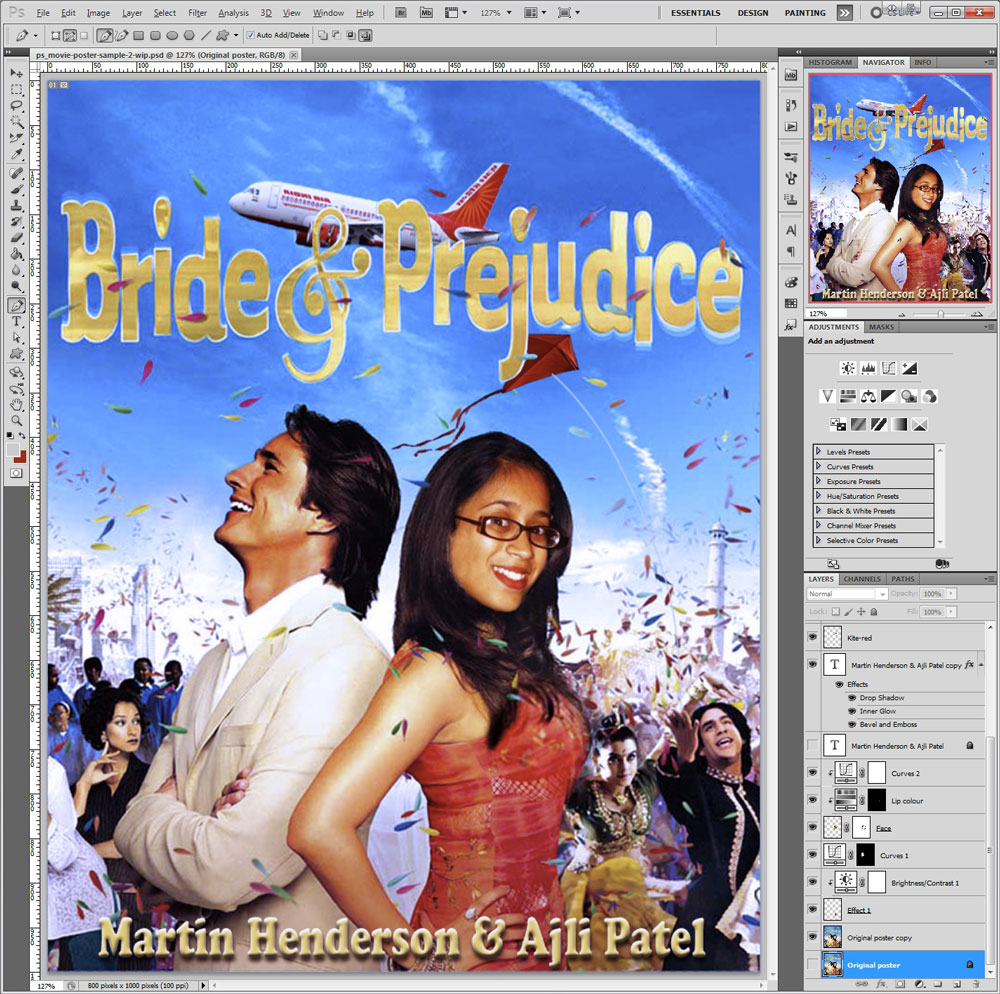
Here is another example showing major steps - Original, Get secondary images including your face, then Blending them into the DVD Movie poster. Look closely at the final image in Photoshop and note all the layer adjustments and masks used in the layer panel

Original

Additional Images

Blended Images
Detailed Steps to Complete
Follow the steps below to complete this project in a timely manner.
- Find a poster with your favorite movie that you want to work with
- Get a minimum of two images that relate to your movie
- Open each image separately and separate from backgrounds and size appropriately to bring into poster
- Create standard web setup with custom 800 wide by 1000 high pixel sized art board for your movie poster
- Duplicate the original movie poster , then lock the original, turn layer eye off, and continue working on duplicate (this is for comparison with your finished version later)
- Place images in, adjust, size, transform if necessary and ensure all your layers are named appropriately
- You may need to duplicate background movie poster layer again to use portions for overlap of your selected image to have it appear behind objects in the background
- Duplicate your original face image , then lock the original, turn layer eye off, and continue working on duplicate (this is for comparison with your finished version later)
- Cut out one of your face shots appropriate for the movie poster, scale, carefully select just the head and neck, move into movie poster
- Fitting your head will require some tools such as scale and rotate to place appropriately.
- Make two photo touch-ups such as teeth whitening, eye colour, blemishes, pimples, etc to fix (see support links above on tutorial steps)
- Use the colour adjustments tool to match skin tone, hue, brightness, and colour levels with the rest of the poster and skin body parts
- Using the type tool, type your name, as one of the actors in relatively large lettering, then match font, style, and colours
- One of the last steps is to use adjustment layer tool to get your overall final effect you want, to improve your movie posters look
- Save as a both a PSD and JPG of your finished movie poster and ensure that you have the original movie poster and your face shot as hidden layers as your top two layers
Evaluation:
Make sure you hand in three files with appropriate file names such as the samples above. Double check that you have named all of your layers for identifying what each is. The original background and original face layers will be compared to your touched-up layers.

| Photoshop Web Page Background Design | Marks |
|---|---|
| Always double check that you have completed all components for full marks. | |
| Minimum of Two Images -appropriately placed, one in behind a background object | 15 |
| Face - (duplicate original) two touch-ups, colour, skin tone matching, scale, and face fit | 15 |
| Text - appropriate font, colour/sizing closely matching current font style | 10 |
| Final Image - (original poster) colours, adjustments, overall look and design, PSD and JPG | 10 |
| What Did you Learn - Test your knowledge here: | |
| Moodle Quiz - Based on above work covered, log-in here, help with quiz access/process | 20 |
| Total Marks | 70 |
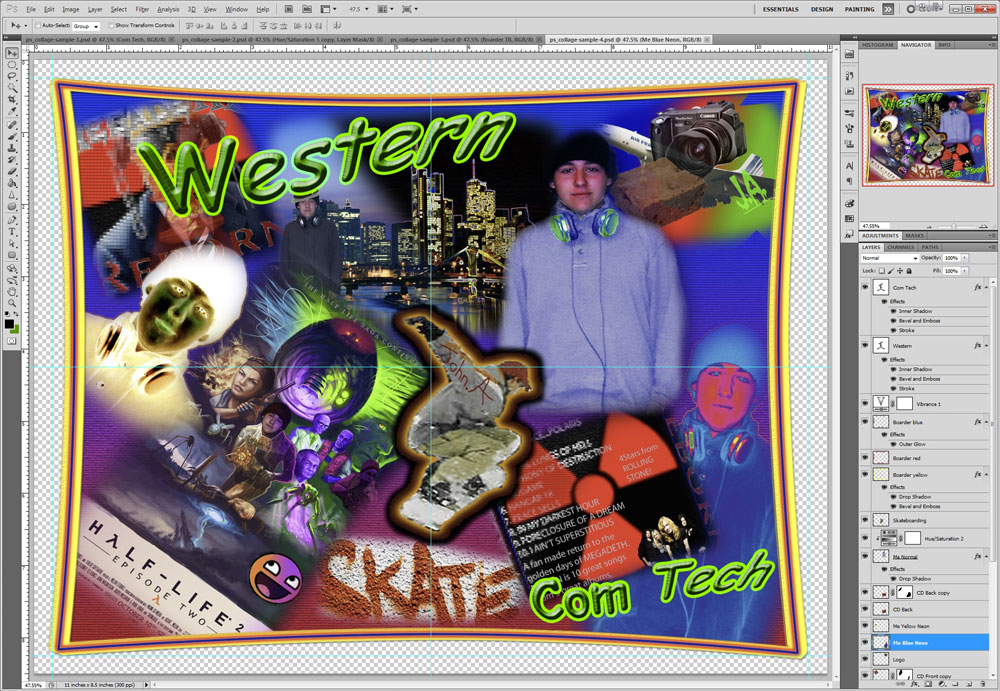
Unit 2, Act. 3: Custom Western Tech Collage T-shirt
Situation:
This project will allow you to showcase all of your knowledge, skills and work in a fun, but skillful level of artistic design. Having a T-shirt clam transfer iron, and some white cotton school-crested T-shirts on hand, we are able to transfer custom graphic designs onto the them for a great product to show off your work or give as a gift to impress your talents.
Problem/Challenge:
Design and create a framed collage using all your completed work from this rotation, a minimum of three images of yourself, and Western and Com Tech text in green. The following details are required to be included:
- Setup with a standard print in landscape 8.5 by 11", 200 pixel resolution, and CMYK colour mode
- Use guides to show 1/4" print margin, and a 1" grid
- All 4 Class Projects 15-20 percent of space
- Three self images, shoulder, waist, and full body height, with face-shoulder image to be your glamor improved shot
- Boarder to frame in collage, to be not to use square/rectangular sharp corners, but take up 90 plus percent of work space
- Text to show "Western" 1 inch high at the top with "Com Tech" 1/2 inch at the bottom both in green (#009900) and your first name
- Masks, adjustments, opacity/fills, brush, pen, and filters to be used in multiple parts of your collage
- Accent graphic accessories to be used to support your collage
- Bring in two personal interest images no more than 10 percent of page to work into your themed collage
The collage to show a consistency of complimentary colours and graphic theme showing your work, you and your interests.
Investigation/Ideas:
You will need to organize and gather all of your graphic projects done throughout the rotation. Hopefully you have kept them organized in appropriate folders to easily find. The following projects will be needed:
- Tourist Brochure
- Course Logo
- Web Page
- Movie Poster
- Full body picture
Making a sketch can help you decide on how, what and where you place your images. Using Photoshop's tools properly can save you time and get excellent results. It is recommended to review the tools we have used to cut out, place, overlay, combine, and blend all of your images together in a consistent designed theme :
Photoshop Tools Used
Being familiar with most of the different tools, using the keyboard shortcuts will allow you to access those tools faster. Here is a graphical view of some of the more common keyboard shortcuts

Below are a list of major tools we have used and their keyboard shortcuts:
- Move Tool (V)
- Marquee Selection (M)
- Transform Selection
- Lasso Selection (L)
- Quick Selection
- Magic Wand (W)
- Crop Tool (C)
- Slice
- Eyedropper(I)
- Color Sampler
- Ruler
- Count
- Healing (J)
- Brush(B)
- Pencil
- Clone Stamp(S)
- History Brush(Y)
- Eraser(E)
- Gradient
- Paint Bucket(G)
- Blur, Sharpen
- Layers
- Blending
- Filters
- Grid
- Guides
- Adjustments
- Transformations
- Masks
- Image size
- Canvas sizing
- Type text (T)
- Pen
Resource Links
Take a look at some samples of collages and different ideas on how you can design your collage:
- Quick-&-Easy Collages
- Create a Collage
- Make a Collage

- Multiple Images
- Framed Collage
- Flickr PS Collage
- Collage Gallery
- PS Collage Gallery
- Memory Collage in PS
- Image Feathering
- Create a Collage
- Collage Effect
- Combining Images
- 45 Collage Tutorials
- Smart Objects
- Basic Heat Transfer
- Detailed Heat Transfer
Tips to Keep in Mind:

- As this will be a cloth print production, ensure that your setup is at 200 dpi, if you are bringing in a lower resolution (most likely 72 dpi) image into a higher resolution image, it will be a lot smaller to compensate for the larger resolution
- Stay away from white in your images if possible, as white gaps (means no colour transfer) will leave a slightly yellow glue residue on your T-shirt in those areas
- Experiment with nonvolatile multiple-layer colour-blend-effects by using the the following shortcut - select your layer (layers below will affect selected layer different ways) have Move tool selected, hold the shift button, then use the + or - tool to rotate through all of the blending modes available
- Focus on three theme colours, a consistent theme look, and layout
- Remember that although you want to make things look a little different and better, don't go too far that you can not recognize the original images
- Create a 1/4" print margin around the outside edges, as printers can not print to the edge of the paper
- First T-shirt wash, wash in cold water only, note this iron-on printing process results in being a little less durable than silk screening - so take care of it
- If you Place images from original PSD Photoshop files, they will be automatically become a smart object by default. Smart objects retain original maximum resolution during re-sizing (advantage), if you want to modify-edit image pixels, you will need to Rasterize the Smart Object in the Layer menu first
Create/Construct:

Follow these steps to create your custom T-shirt collage design:
- Take a look at sample collages, get some ideas on how to make one and different possible layouts
- Open up a new Photoshop file, and set-up for letter sized , landscape, 200 dpi, transparency, select CMYK for print medium, then turn rulers on and set to inches
- Create 1/4" print margin guides, centre guides, set-up grid to inch with subdivisions every 2 (Turn on through menu - Edit >Preferences>Guides, Grids, & Slices, then go to View>Show>Grid)
- Create your required green (#009900) text - Western about 1 inch high at the top and Com Tech about a half of an inch near the bottom of your layout
- Keep your layers organized with appropriate names, duplicate and lock important ones that you will experiment with or need a copy of.
- Get all your project images, and 3 of yourself -shoulder, waist and full body shots into your project image file ensuring appropriate size. Too small will pixilate giving you poor image quality to work with. Standard files in JPG/GIF at 800-1000 pixels@72 dpi will work, or use File > Place for smart object insertion.
- Create a custom unique boarder and background making sure the boarder has no sharp corners, but uses 90% of page set-up. Ensure you use your guidelines and keep a quarter inch print margin
- Reshape, re-size, rotate, overlap, and layout your images as needed
- Mask, soft/hard brushes, use adjustments, filters, layer blend effects, etc on your images/layers to get your desired effect/look
- When close to finish, get peer feedback and make adjustments. Once you are finished check with instructor
- Flip your image horizontally using the transform tool and save in PSD and jpg 72 for hand-in so printing to specialized paper to transfer to T-shirt can be done.

Step 2
Initial Set-up

Step 3
Units and Rulers

Step 3
Guides, Grids, and Slices

Step 3
Set-up done
 text - Western about 1 inch high at the top and Com Tech about a half of an inch near the bottom of your layout")
Step 4
Title Text Entries

Step 6
Projects and Portraits

Step 7
Non-Rectangular Boarder

Step 8-10
Finished Prior to Flip
Student Samples
Below are some student collage samples. You will notice that these collages have a music cd front and back project also included, which we did not complete..
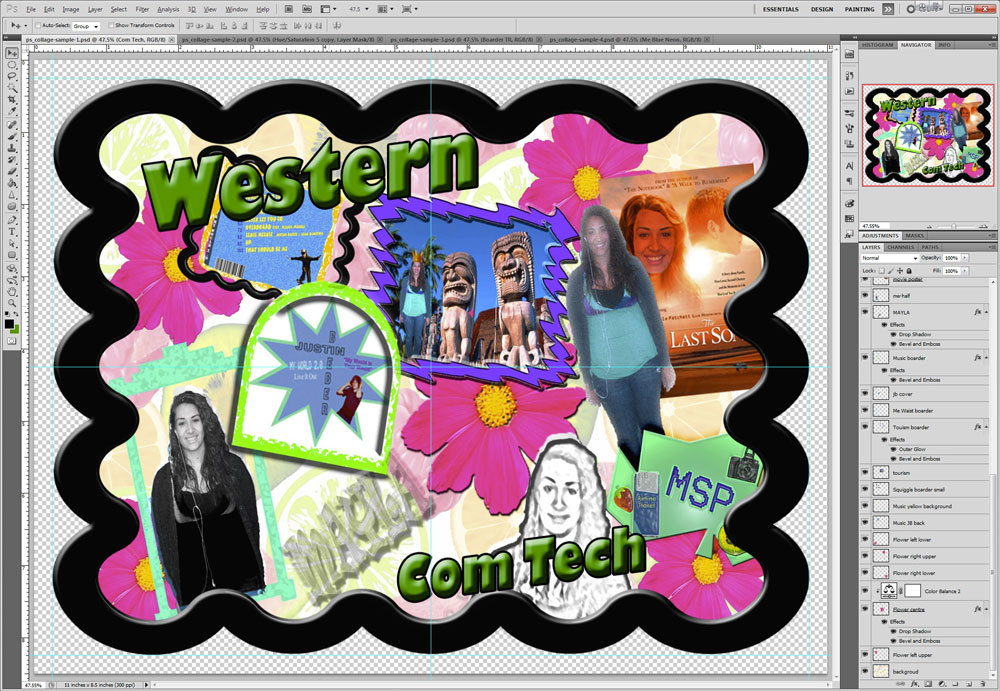
Sample 1
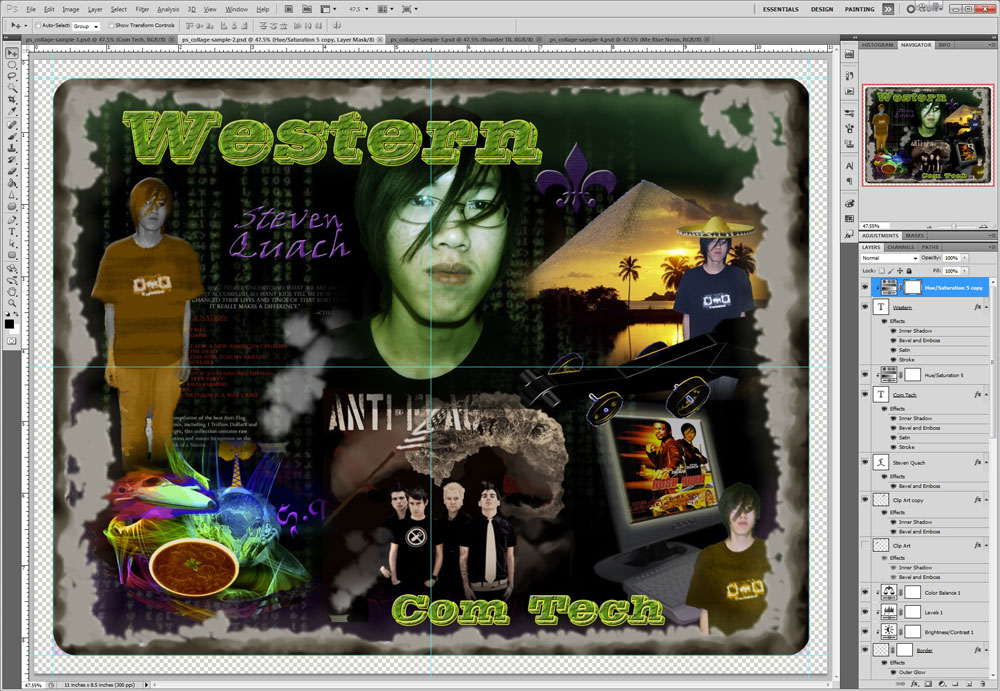
Sample 2
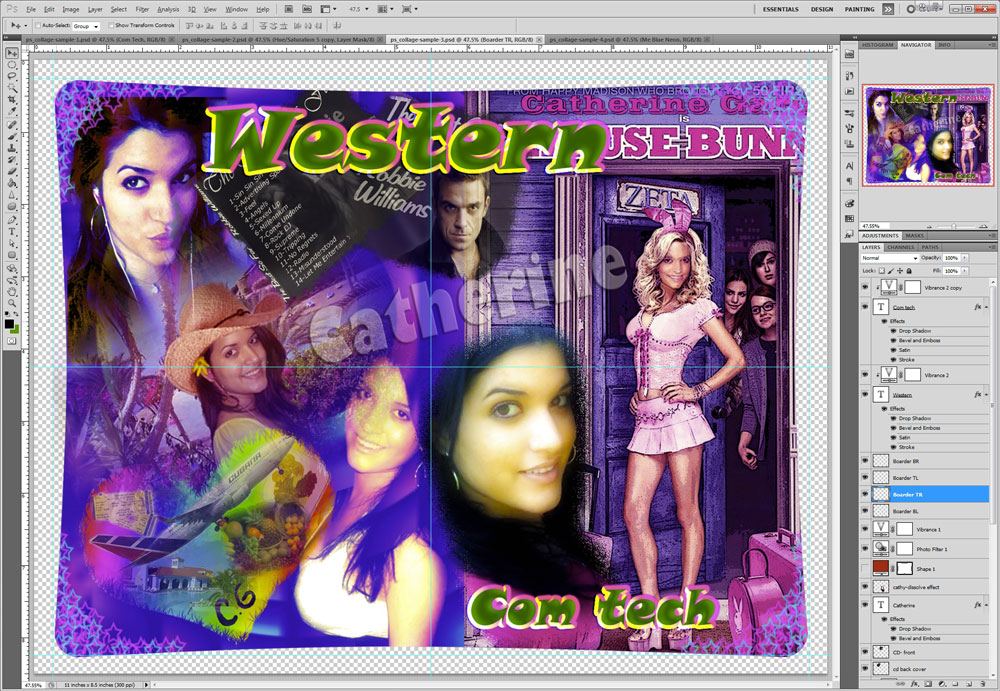
Sample 3
Sample 4
Evaluation:
This project will be evaluated on completion of all steps, and requirements. Final image to be handed in PSD and JPG (200 dpi) formats.

| Evaluation Breakdown Component Descriptions | Marks |
|---|---|
| Always double check that you have completed all components for full marks. | |
| Text - "Western", "Com Tech", and your first name, - size, contrast, colour, and prominence | 5 |
| Images - all project images, self portraits -shoulder, waist, & full body, accents, 2 personal | 20 |
| Boarder - framed in with a themed boarder with no sharp corners, minium 90% of page size | 5 |
| Background - custom, unique, and consistent with theme colours blending all images | 5 |
| Technical- layers named, masks, adjustments, layer styles, filters, complimentary colours | 5 |
| Overall Design - Colour, style, theme, consistency, blending of images, and overall look | 10 |
| What Did you Learn - Test your knowledge here: | |
| Moodle Quiz - Based on above work covered, log-in here, help with quiz access/process | 20 |
| Total Marks | 70 |