
Unit 4: Computer Engineering Technology: Programming and Networking
This unit will focus on computer networks, IP addressing, data routing protocols, services, programming languages, and concepts.
Course Units and Descriptions
Use this table for an overview and navigate to each of the course unit pages.
| Unit | Description |
|---|---|
| Review course outline for more details | |
| 1 | Safety & Career - Intro, computers, organization, safety, careers, and custom proposal |
| 2 | Computers & Components - Electronics, operation, design, troubleshooting, and maintenance |
| 3 | Digital Logic & Circuits - Binary, boolean, logic gates, counters/register ccts., calculations, design, & build |
| 4 | Networking & Programming - IP addressing, data routing protocols, services, languages, and concepts |
| 5 | Hardware Interface & Control - Student designed custom project |
| 6 | Showcase & Web Portfolio - Testing and presentation |
Unit Content Activity Quick Links, Click to Jump to Specific Activity!
- Unit 4, Act. 1: Programming
- Overview, Resources, Safety, Code Std's,
Arduino Intro, Tips, Tinkercad, & Reports,
Python, Local & Online Editors, GitHub, Python Res., & RPi Res.
(Steps): Arduino Basics,Arduino Component Interface Coding, TinkerCAD Projects,
Python Basics, RPi Setup,& Action, Eval - Unit 4, Act. 2: Computer Networks
 Unit 4, Act. 1: Programming

Situation:
Looking at digital logic supports programming languages used with computers. Taking a look at a programming language to create a set of instructions to complete custom tasks, learn more about programming will help students with their Arduino and Raspberry Pi projects.
Problem/Challenge:
Students will familiarize themselves with Arduino and Python language basics, practice some coding, start working with the Arduino, Raspberry Pi, kits along with inputs and outputs devices. The 11's will focus on Arduino while the 12's will focus on Raspberry Pi getting different programming experiences. .
Investigation/Ideas:

General Overview
Computer programming languages begin with the intent to make programming concepts easier for people to learn and write. As we have learned that computers think in binary code, so all instructions have to be broken down into a "yes" or "no" questions. Claude Shannon, known as "the father of information theory" realized that analog radio signals which fade in and out was very unreliable for important information to be stored or processed by a computer. Anything in binary code, for example a simple letter, will take up a byte or 8 bits of binary code, so writing straight binary code for computer programming would take forever and be very boring, hence different programming languages representing binary code. Languages that use a lot of plain English words making it easy to read is know as "verbose." Macros are commonly known as reusable bits of code that save time while objects orientated programming is known for its modularity. Code variations are usually designed to suit the style of the writer and then compiled back to a base code. With a lot happening with "cloud" computing, traditional locally run programs that tend to be static, online web apps run dynamically on a server, use a lot of computing power and bandwidth to deliver "software as a service", and use programming specific to this purpose, for example Node.js
Programming General Resource links

 Computer programming
- Lists of programming languages
- More programming languages?
- TIOBE programming community index
 Top 5 Programming Languages
- Measuring programming language popularity
- Programming languages
- programming languages for beginners
Safety
Safety is always the number one concern and therefore some issues you should keep in mind when working with your controller.
- Static charges from body can kill electronics and controller chips, ground yourself first
- Handle controller board by outside PCB board edges
- Don't place board on metal support
- Turn off power when not in operation
- Do not operate in a wet environment
- Power down when making any hardware changes
- Use caution when working with bare wires, better though is don't use them
- Secure controller, bread board, other electrical components
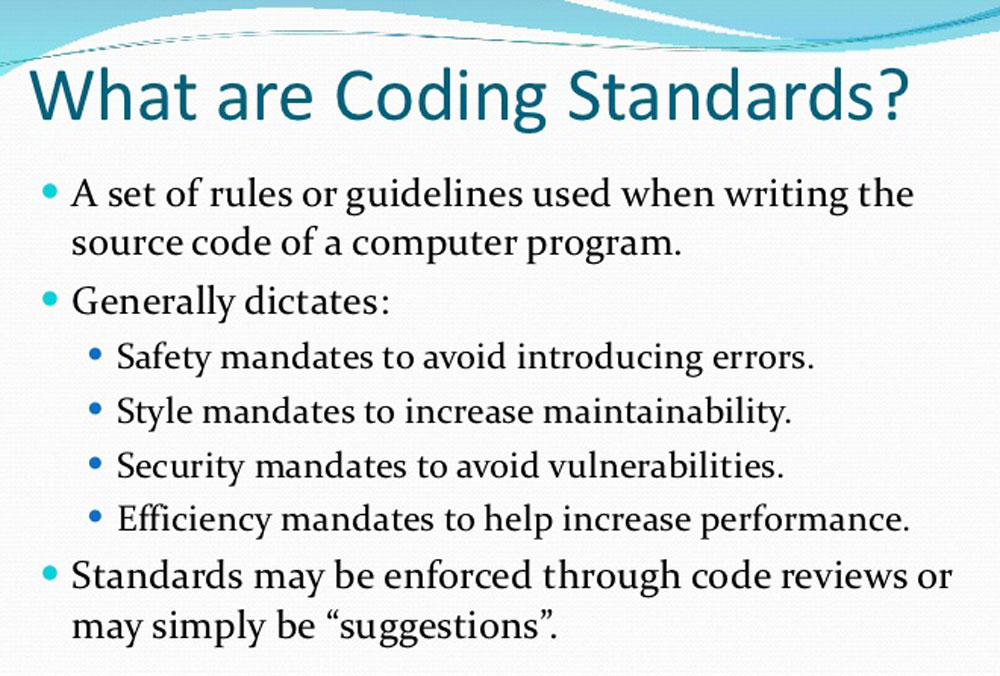
Organization and Coding Standards
The source code for programming Tetrix projects should always be organized and written with the future tasks of testing, debugging and maintenance (possibly by others) kept in mind. These tasks will be easier if the project is well organized and the source code is written in a clear and consistent fashion. It is always good to get into the habit of coding with basic standards in mind. In addition, the future possibility of porting the program to different environments (portability) should be a consideration. Here is a student suggested page on The Zen of Python.
Organization
Each program should be in it's own folder with appropriate file naming convention and include a READ-ME text file representing an overview of the program.
Documentation
The ``public'' documentation of your written source code should inform the reader of who wrote the code and describe what it does. It is common to write these public comments before you write your code. (This also allows you focus and plan your what you really want your program to do.)
/* 2020 Jane Smith (jsmith@tdsb.on.ca) */
/* Hello World - flashing green and red LED */
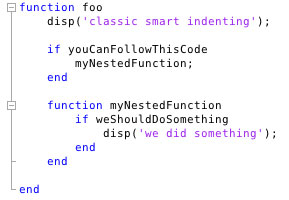
Indentation and Spacing
For all programming languages including C, indentation and spacing is important to apply as a good habit. Source code lines should be longer than 80 characters as a general rule and recommend using spaces, not tabs, for indentation. Generally by using spacing and indentation, it is easier to follow/read the code, easily shows levels of nesting, scope of the code, and it is better programming sense.
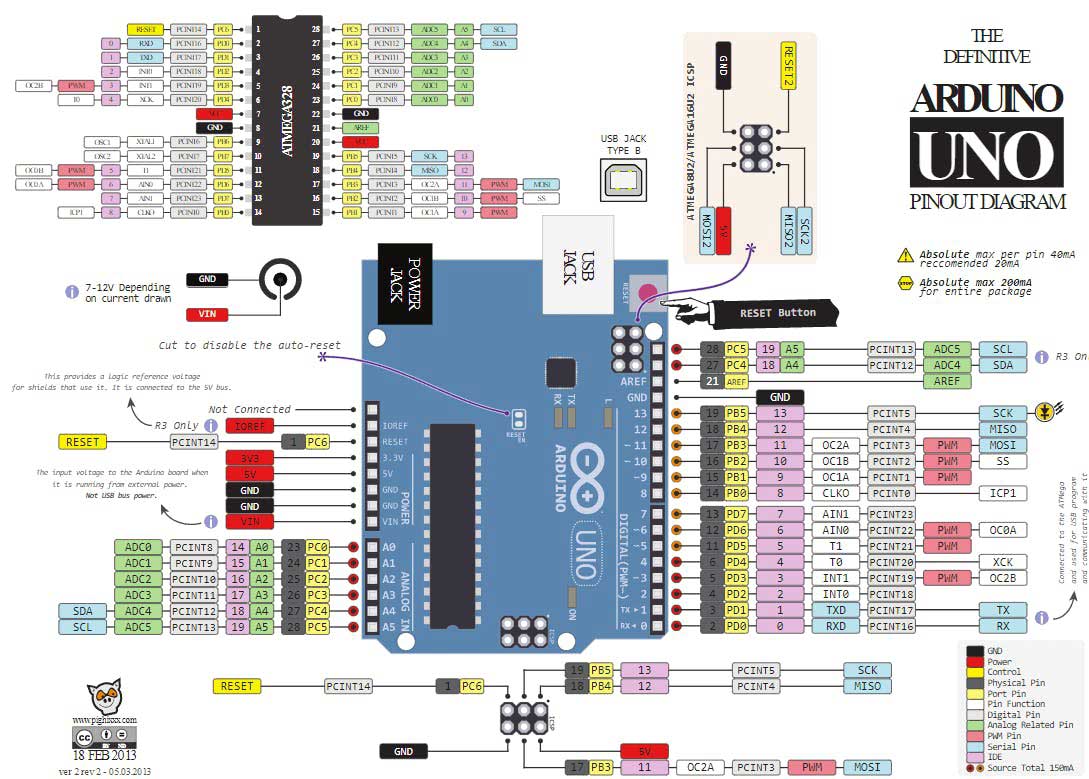
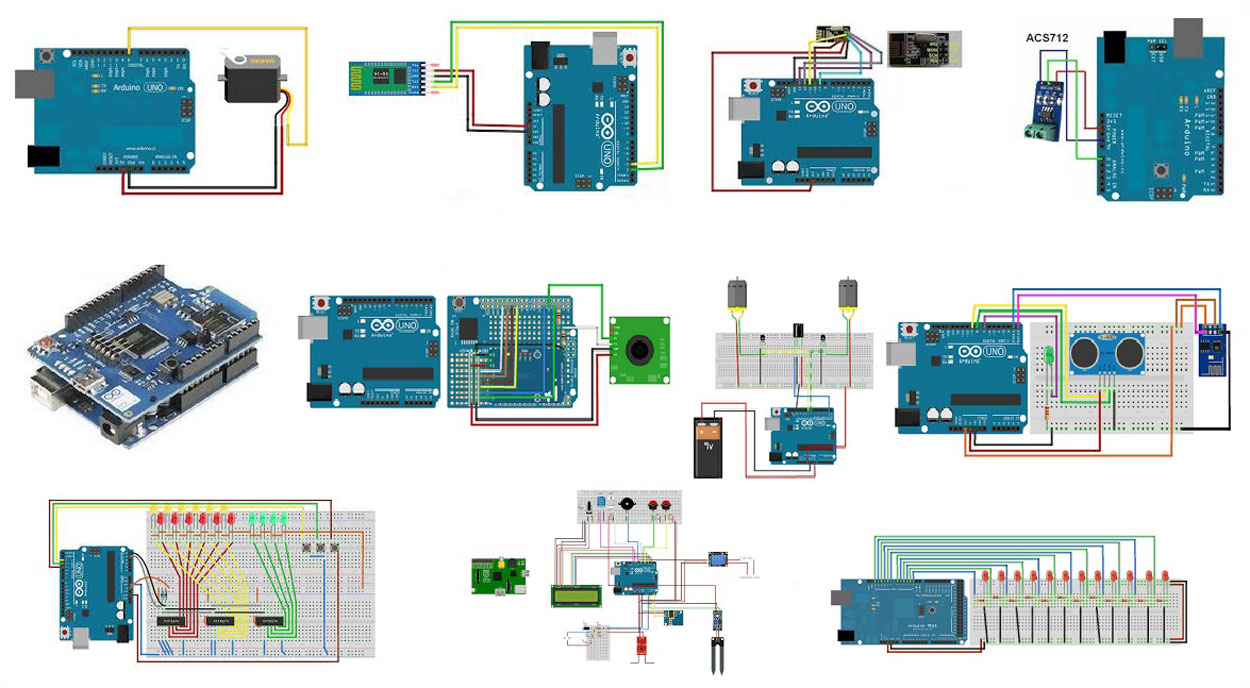
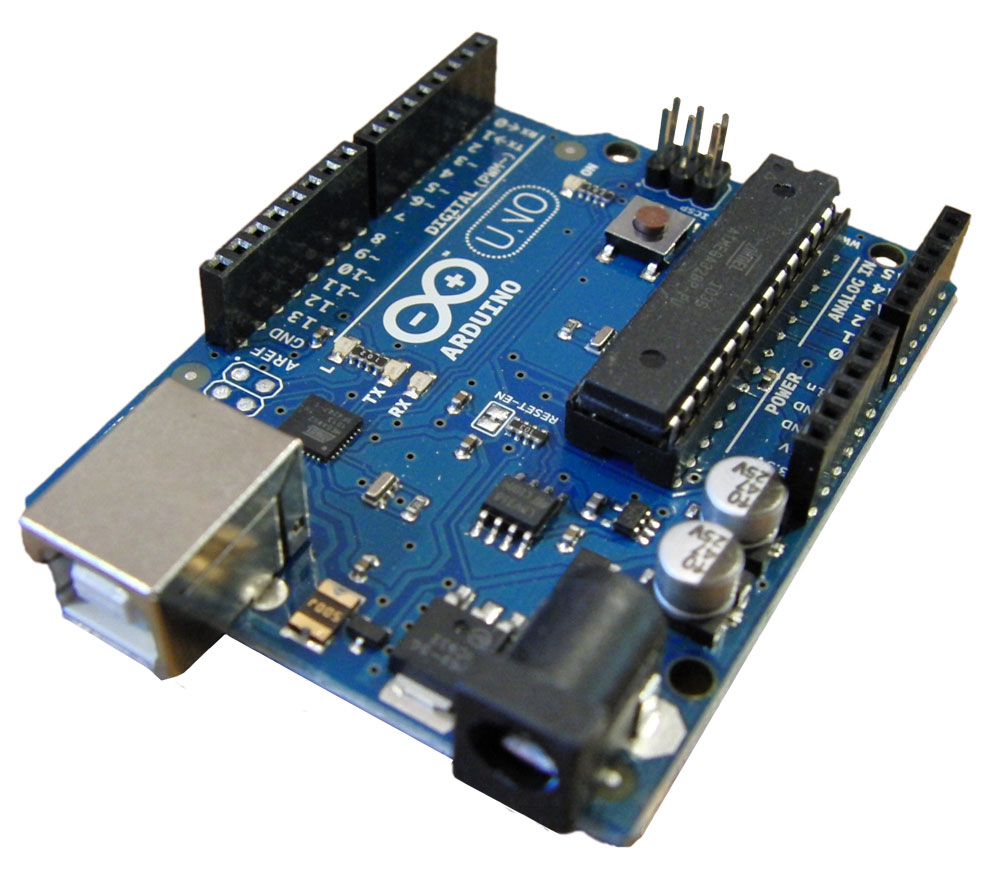
Arduino
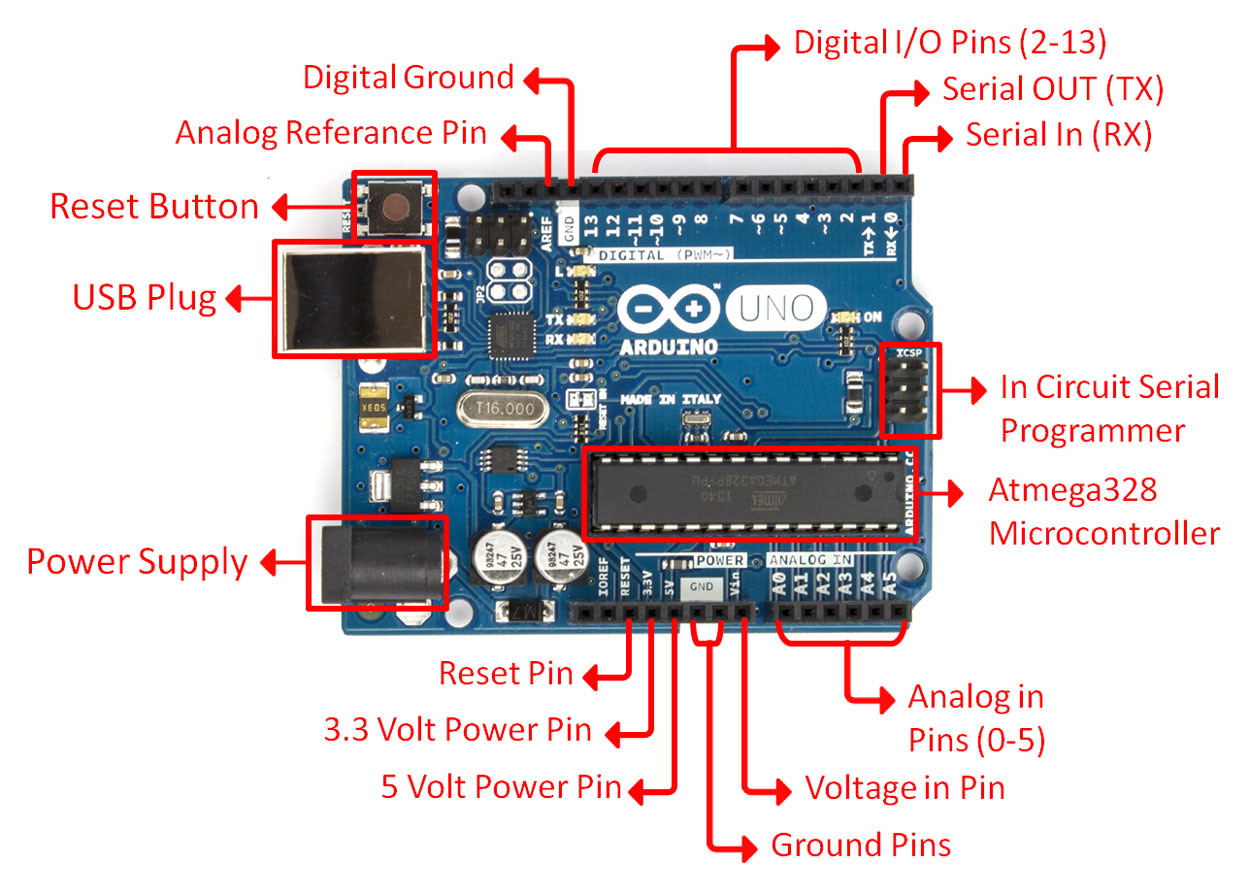
Arduino is an open-source electronics hardware platform with hardware inputs and outputs. Inputs can use a wide range of sensors and switches. Outputs can control LED's, relays, servos, motors, and many more. Whether your a ![]() beginner or advanced user, the microcontroller board offers a nice easy to use package that is inexpensive, works across multiple platforms, simple programming environment, web and IDE, is open sourced and expandable software and hardware wise. Arduino has one of the most common and easy to learn languages (C++). Arduino even offers an exam certification for a small cost that can be done from any computer. Here are some resource links to help you with this hardware.
beginner or advanced user, the microcontroller board offers a nice easy to use package that is inexpensive, works across multiple platforms, simple programming environment, web and IDE, is open sourced and expandable software and hardware wise. Arduino has one of the most common and easy to learn languages (C++). Arduino even offers an exam certification for a small cost that can be done from any computer. Here are some resource links to help you with this hardware.
Arduino General Resources
- Arduino in 100 Seconds, 2.22
- Development-History
- Arduino Software
- Arduino Language Prog.
- Arduino Prog. and Syntax
- https://flaviocopes.com/arduino-programming-language/
- Everything about Arduino Code
- Arduino Playground
- Intro to the Arduino


- Arduino Built-In Examples
- Wikipedia on Arduino/li>
- Site Tutorials
- Site Language Reference
- ladyada Arduino Tutorial
- Flos Science Tutorials
- Arduino Forum
- AdaFruit Forum
- Most Common Boards
- Getting Started, 37.25
- Programming Workshop, 1.25.30
- Xbee Project Blog
Electronics and Arduino Related Project Resources
- Electronics, 38.05
- Basic projects
- Breadboard Projects
- What is Arduino?
- Intro to Arduino
- In put/output Projects
- 20 projects ideas
- 5 projects, 4.44
- Top 12 elect, 42.17
- Connect LED , 24.00
- Tutorials
- Arduino Blog
- Project Hub
Arduino Coding Tips and Info
Ardublockly is a graphical code editor that shows and defines code in a convenient manner which is great for beginners, where Arduino IDE is a strictly a text/syntax coding editor with built in compiler.
Ardublockly
- Entry level basic graphics based coder, IDE suggested below though
- The Ardublockly graphical code editor saves in an .xml file
- To find out what the code is doing in Ardublockly, hover over the coloured graphical coding pieces, and pop-up will show a quick definition
- Because of Ardublockly's graphic coding blocks, it is easy to see how the code interacts and is easy to understand
- Once code is completed, Ardublockly uses Arduino IDE's compiler and loader to upload code to the microcontroller
- Download link: Ardublockly
COM Ports
- The COM port is a open switched connection to communicate to a specific device that needs to be configured prior
- When initially connecting your microcontroller to your computer, you need to check Arduino's com port addresses prior, then once connected, you should see a new COM port open up, and that is the one you need to select/point your Arduino to, for it to be successful, loading your code to your microcontroller
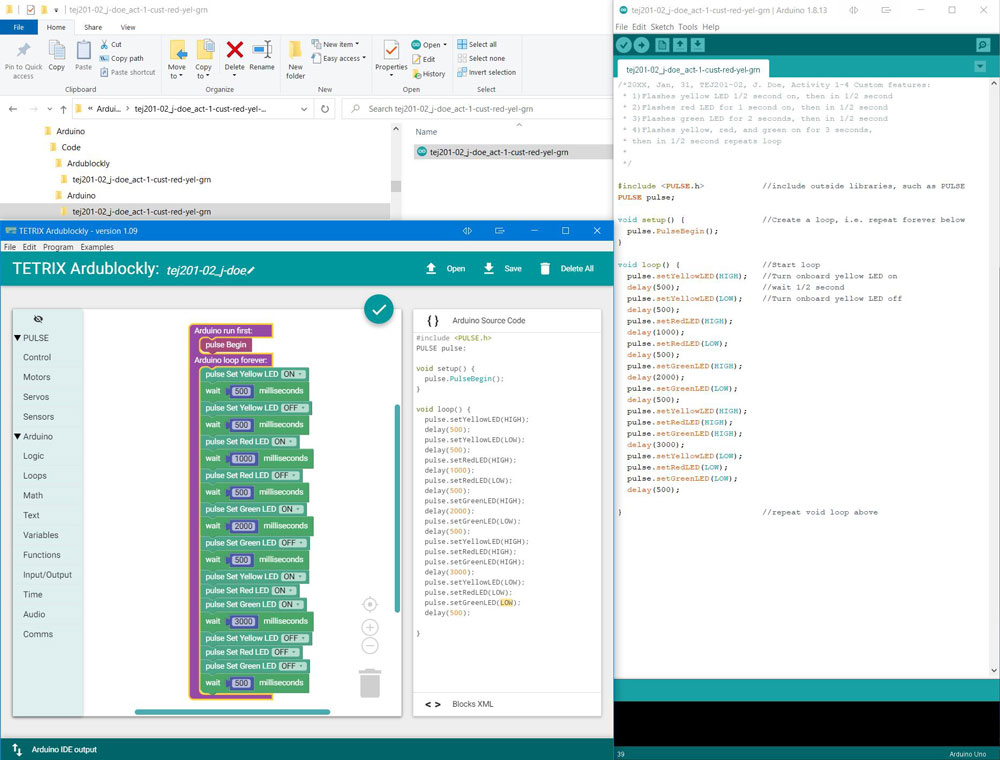
Sample - Folder, Ardublockly, and IDE
Complier
- The Complier is a program that translates one programming language into another lower level machine language to create an executable program
- Low level machine language/code is a set of binary instructions consisting of 1's and 0's called bits, grouped together in 8 bit combinations called bytes, which send various signals to the transistors (millions) containing logic gates in the CPU, opening and closing allowing you to control your computer, or in this case microcontroller
Arduino IDE
- The Arduino IDE text code editor saves a .ino file and wants the coding file saved in a folder named the same
- To find out what the code is doing in Arduino, copy the code command, click on the help menu, for Reference, Ctrl F, paste copied text, will bring up a detailed description
- You can not open an .ino in Ardublockly as it is a different file and needs the .xml structure
- Saving your code in its own folder is a common practice in coding for organization
- Use // two forward slashes to comment after your code, in-line with your code, on the same line - great for defining what that line of code is doing
- Use /* to put multi-line comments, then close with */ - great for beginning documentation for the code creation date, your name, section number and what your code does
- Download link: Arduino IDE
TinkerCAD Introduction
Tinkercad Circuits allows anyone to virtually create and program Arduino projects without the need for physical hardware. This will be used while we are full virtual to simulate hardware and programing for the Arduino controller.
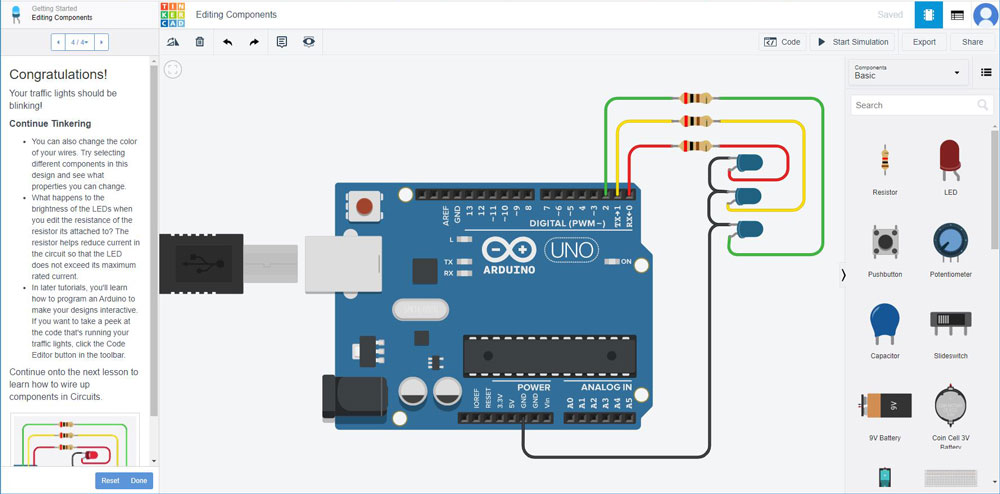
You will have to learn how to use TinkerCAD. It is a virtual online electronics control board and circuit simulator. Instead of doing your programming for the Tetrix prime controller board, you would use the Arduino Uno R3 with a breadboard.You would need to build your circuits (add LED's, servo's, etc and wire them up) virtually before programming them, then write the code.
For our hardware and coding projects, you will have to set-up a new project with the Arduino board with a breadboard, and add your components on the breadboard as needed (you are limited with the components they have, but they have a fair bit), wire up, then write the code, and finally simulate the circuit and coding to see if it works.
Resources

Making a Great Report
Making a great report about a project you completed is all about sharing your experiences, the learning process, the highlights, the challenges, and documenting what you completed and showcasing it in a professional structured format.
- How to Write an Effective Project Report in 7 Steps
- In depth Guide to Technical Report Writing
- Title page will usually include a picture related to project reporting on, a main title, sub-title, report creator name, date, and any other relevant information
- Overview will give the reader a quick simple preview (intro) of the report's contents allowing the reader an understanding of the project, key info, main points and/or components in your report
- Body of the report is where you will show your documentation from your project in a neat organized manner including titles and sub-titles if necessary
- Summary/conclusion talk about what you accomplished, your experiences and highlights, what you found challenging, what you would change if you could do it again, what you liked most, and anything else you feel important to recap
- Resources and references usually are included in the end, crediting information sources, guides, equipment, tools, and support partners arranged in order of importance

Python
Python language is multi-paradigm powerful-high-level, general purpose programming language that is proficient, fast, and broad. It allows for imperative, functional, and object-oriented programming (OOP), along with procedural styles, all-inclusive standard libraries, automatic memory management, and attributes in active type systems. In other words, it is a flexible, easy to learn overall general use programming language with a lot recommending this as a great language to start programming with. When writing code, take some time to get into the habit using the correct conventions and standards. Generally watch your indents with loops - 4 space indents, limit line lengths to 79 characters, comment just above your block of code/statements with a short description.
Local Code Editors/IDE's
Although our focus is using it with the Raspberry Pi, you can learn/practice Python on any system. For quick commands, use the Python shell /terminal, for more substantial coding, the IDLE (Integrated Development Environment or Integrated Development and Learning Environment) and for more editor environments there are several available to review and use such as little known Visual Studio Code, why switch, (best of) and many other popular editors.
Online Coding & Interpreters
For convenience, there are online in-browser editors (not just for Python) that are commonly used in education because they allow you to program interactivity. This can be very valuable when learning code by seeing how it works line by line and allowing you to breakdown the code operation. The following are some related resources that you should check out in helping you understand what is happening as the computer runs each line source of code:
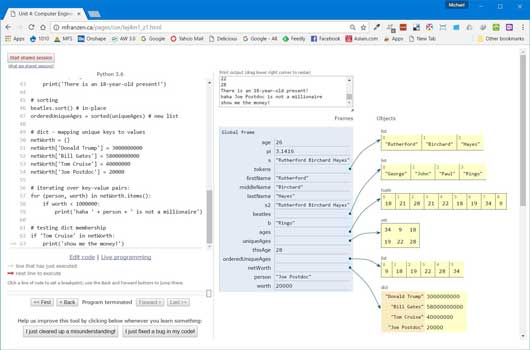
- ** Repl.it is a great online programming solution that is easy to use with programming window and output window on the same page - Sample coding below for assignment done with this.
- Pythontutor will allow you to visualize each of your programming steps, no log-on required - take a look at sample intro program
- Register for a free account at Pythonanywhere.com to get access to multiple console shells and support.
- Trinket also allows you to write, run, and share code on any device.
- Python.org has an interactive online programming shell
- A list of some online linked python interpreters and ** Best Tools with a quick review of each
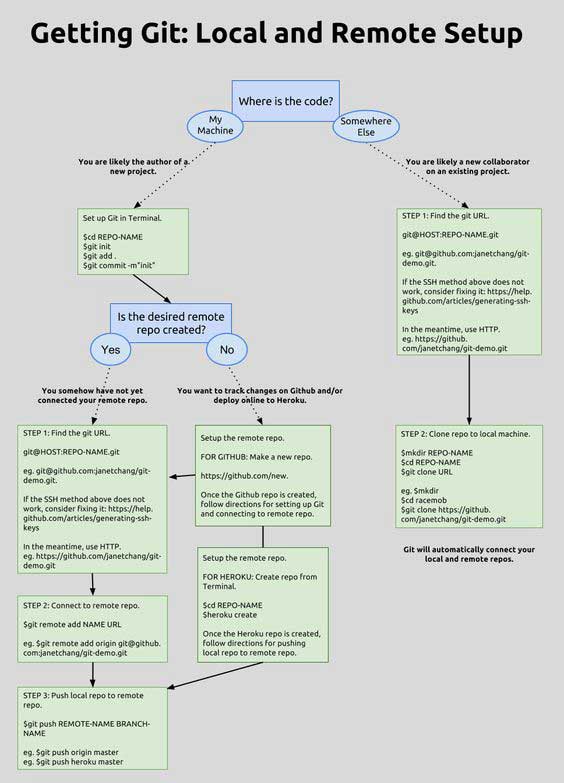
Git Repository Management Services
Git and repository management are tools and part of a code development process to start from scratch and eventually get to an end program/application result. Git is software that keeps track of changes through git commands in your files and folders of your coding project and also known as SCM or Source Code Management, i.e. managing different versions of source code. When ![]() installing Git software, 3.17,
installing Git software, 3.17, ![]() (Learn Git in 20 minutes), 17.52 on your windows PC, you are given three choices to pick a command line tool preference. Git Bash for windows is generally your best option and considered your mainstream option as it is a Unix shell and command language also distributed widely as the default shell on major Linux distros and contains a collection of *nix utilities like ssh, scp, cat, etc that are useful when working with Git.
(Learn Git in 20 minutes), 17.52 on your windows PC, you are given three choices to pick a command line tool preference. Git Bash for windows is generally your best option and considered your mainstream option as it is a Unix shell and command language also distributed widely as the default shell on major Linux distros and contains a collection of *nix utilities like ssh, scp, cat, etc that are useful when working with Git.
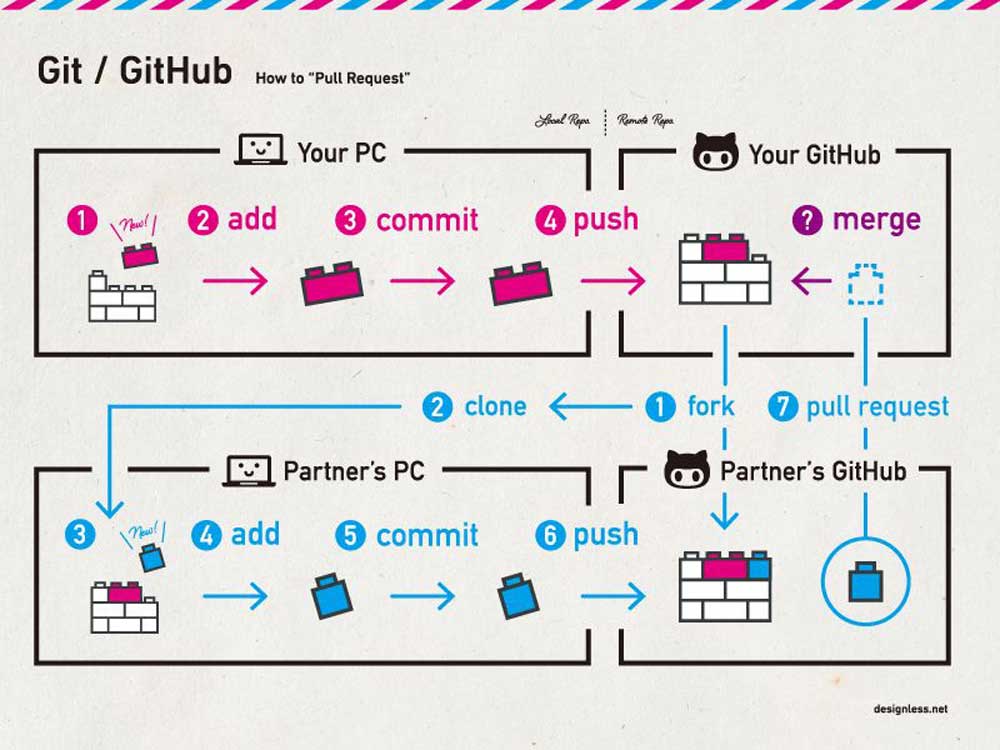
Git repository management services are hosting services that are used to manage projects (repository or repo for short) on the cloud. Because it is on the cloud, it can be worked on from anywhere, have built-in collaboration, and project code tracking, and integrate with your your program editor. Most popular is Github which is a ![]() hosting service, 11.42 with VCS (version control system) and useful functionality such as pull request. A free option is available to
hosting service, 11.42 with VCS (version control system) and useful functionality such as pull request. A free option is available to ![]() install, 21.17 with unlimited users, but all work must be publicly shared. Bitbucket for small teams (also for PC) and GitLab Community Edition (for Linux) are two similar repo management services that can also be used. Bitbucket does allow private repo's but only 5 users, so this may be an option if you are working on some private projects.
install, 21.17 with unlimited users, but all work must be publicly shared. Bitbucket for small teams (also for PC) and GitLab Community Edition (for Linux) are two similar repo management services that can also be used. Bitbucket does allow private repo's but only 5 users, so this may be an option if you are working on some private projects.


Cheat Sheets
Python Resources
There are a lot of resources to use when learning the Python language. Directly below are some related links to help you with learning Python. Remember what to code with will depend on your situation whether it be a local code editor, shell, or an online interpreter. With the Raspberry Pi, it will need to run on a lightweight platform, while a desktop can handle a more robust coding platform.
- How to Learn Code
- Python.org
- Get into Python
- Why learn python?
- Collection of short programs
- Python simple workflow
- Better Python code, 25.38
- Beginner's Guide to Python
- LearnPython.org
- Learn Python the Hard Way
- Python - Tutorial
- Google's Python Class
- W3resource tutorials
- Python course - Code Cademy
- 20 Best Free Tutorials
- Python Programming - 1, 2 ...
- Python 3 Cheat Sheets
- Best Practices
- Conventions & Standards
- Indentation & Comments
- Online Interactive Book
- Invent with Python Book
- GitHub developer pack Uses
- JetBrains Programming pack
- Online Python interpreters
- Stack Overflow community
- Python classes/objects
- Differences of 2.7.x and 3.x
- 90% of Python in 90 Min, 119s
- Python Programming, 99s
- Python - Basic, 87s
- Github awesome-python
- Derek Banas
- Sentdex
- Python Dictionaries
Resources Specific to Raspberry Pi


Raspberry Pi model B - Top and Bottom
Remember there are more links from unit 1 that you can also refer to. Here are some Raspberry Pi set-up and Python code related links:
- Pi as Fast As Possible, 5.22
- Pi Setup-NOOBS, 6.33
- 9 Operating Systems, 2.19
- Python on the Pi, 3.01 +6
- Raspberry Pi with Python
- Programming with Python
- Pi Python doc usage
- Programming for the Pi
- Introduction - Raspberry Pi
Create/Construct:

Students will follow steps based on their grade level to familiarize themselves with their coding language. Grade 11's will focus on Arduino while 12's will focus on Python. Both will start with review questions to complete and later review as a class. Students will practice their coding skills and knowledge with a kit by following tutorials Arduino Uno controller board and create custom functions while 12's will start preparing their Raspberry Pi and code, on a browser based coder to start. See directly below for 11's and further down for the 12's.
A) Arduino Programming Basics (11's)
To get familiar with Arduino, background, and programming code, review the Arduino resources above including Arduino Programming Language and Arduino Programming and Syntax to answer the following review questions: ![]() Arduino Programming Basics.
Arduino Programming Basics.
B) Arduino Component Interface Coding Practice(11's)
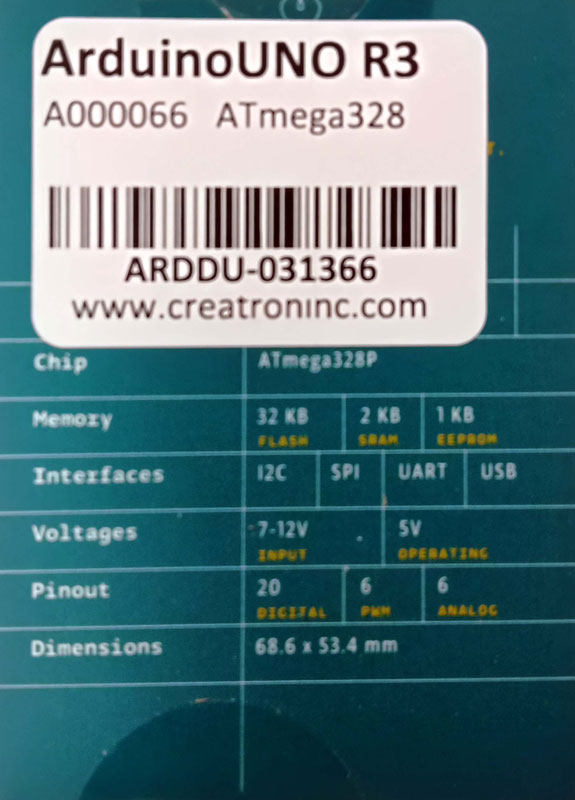
Creatron Arduino Starter Kit
This Arduino Project Kit has several different components ranging from resistors to sensors. It includes the Arduino Uno Rev3 and breadboard compatible components which allows you to prototype hardware components without soldering and practice your programming!
Step 1: Using the Arduino Kit Parts Review, research and fill in what each of the components listed are and their general purpose and/or function.
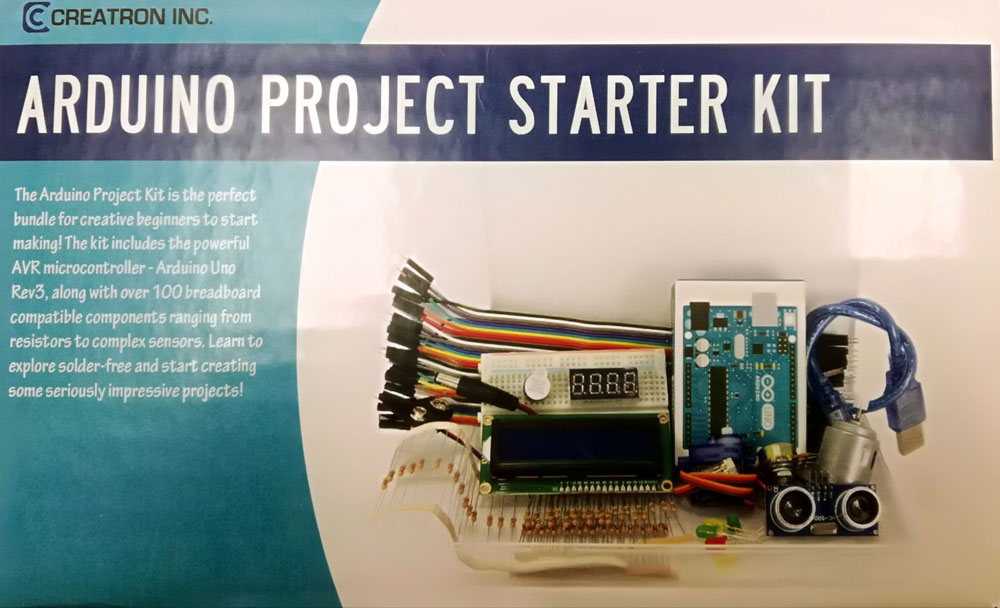
Box Cover
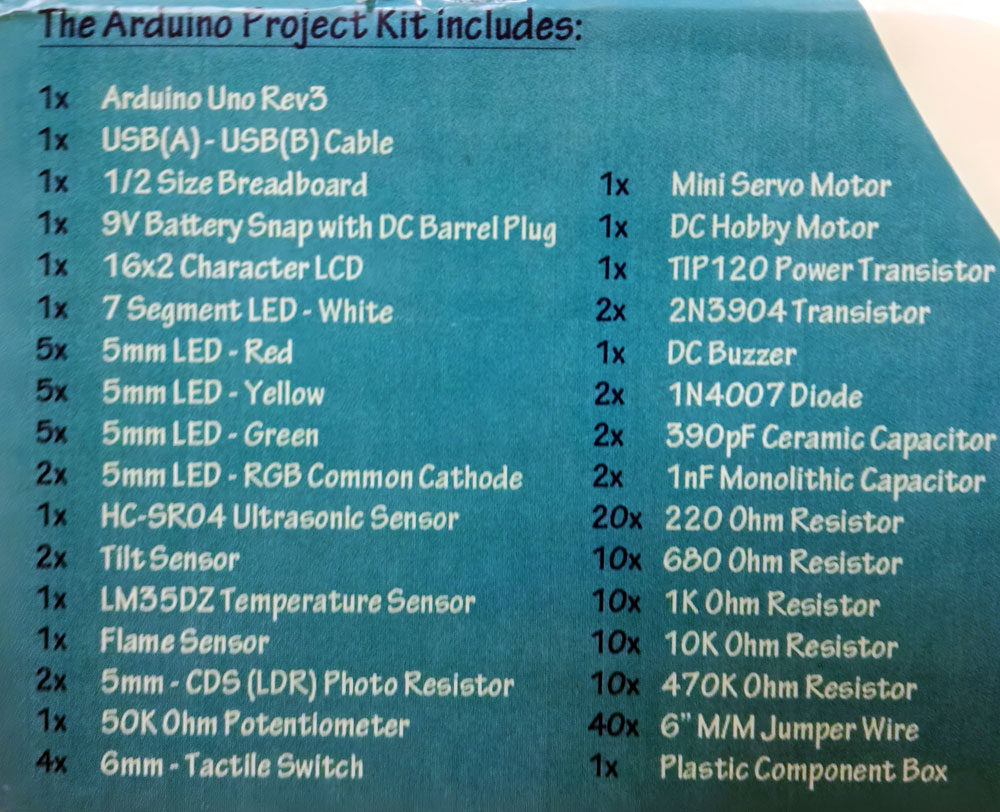
Parts listed
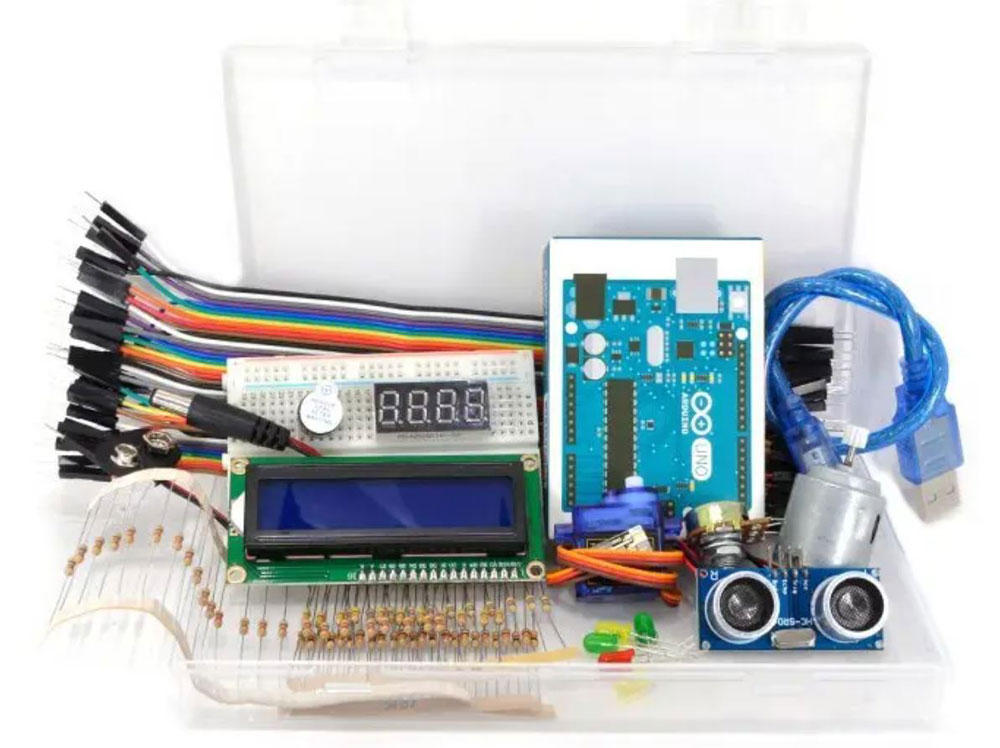
Parts shown
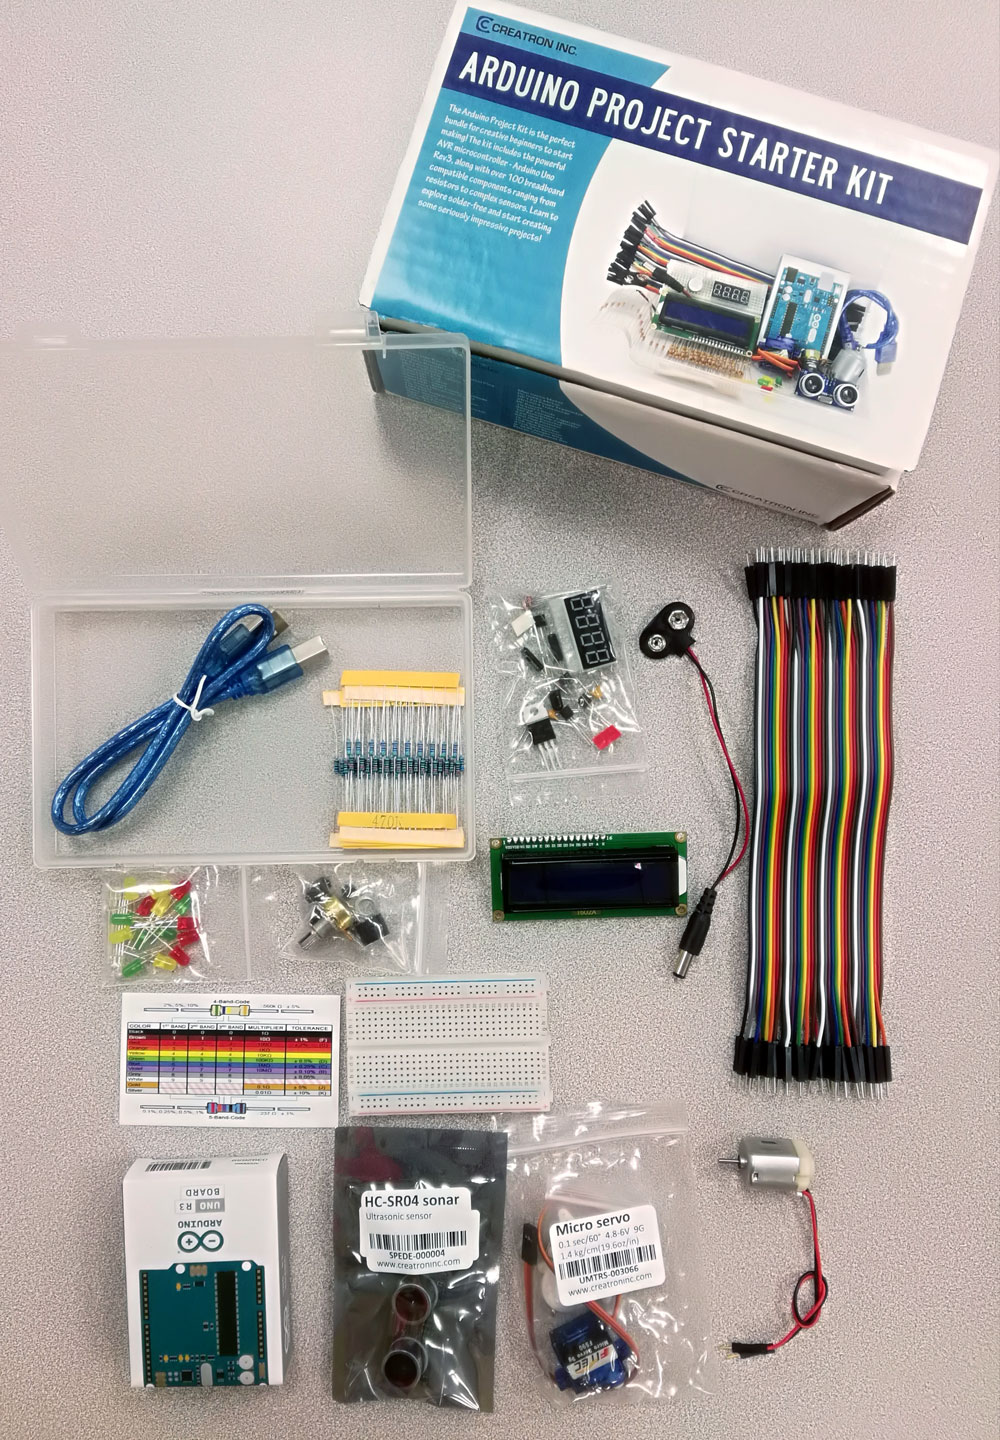
Kit
Back of Box
Step 2: Using the Arduino Inventory sheet, identify and confirm all parts in the kit before you start working with it, then get it checked by your instructor. Ensure larger components are all numbered with box kit number. Be prepared to identify electronic components for full marks on your inventory sheet.
Step 3: Review the Arduino for Beginners page to refresh yourself with the basics, and if more information is needed - support e-book. The Arduino component interface coding project to using the following Arduino tutorial, as a starting place to complete the following projects below. You will need to download the given code, set-up your connections, then customize the code with three additional code functions.

Arduino Board and Sample Project
- Push Button (10)
- Potentiometer (10)
- Fade an LED (10)
- RGB LED (10)
- Photo-resistor (10)
- Temp. Sensor (10)
- Tone Melody (10)
- Servo (10)
You will be responsible to set-up each project, test it, customize with 3 new functions for each, document as you go with picture, code (both given and custom), and learning, to be added to a Google Doc report. Here are some key points to keep in mind when completing this project:
- Report to include your own custom title page, contents (update with refresh before submitting), with each project section to include a related project picture, description, original code, custom code, and 3 learning points
- Each project documentation (10 marks total) requires a title, description, 1/3 page picture (1 mark), given code (1 mark), custom code (5 marks)
- 3 Learning points (3 marks) for each project to be new and detailed in the form of either K,S, or V (ideally one of each in that order) that have had the most impact on you, from that project
- Custom coding to have proper documentation and commenting on all new code added throughout projects
- Custom coding functions you add, to be in the realm/scope of the project itself in terms of the programming and components, up to that project
- Project pictures to be taken with good lighting, in-focus, giving best field of view of connections and components after custom project code has been successfully tested, and sized to fit 1/3 a page in portrait format
- Text sized to 11 point for normal text entries and coding to be 8 font single spaced, no paragraph spacing with an easy to read font like Open Sans, Arial or similar (given in template)
- Ensure overall report feedback is detailed and specific to earn full marks and if your peer feedback is not done will cost you marks and you loose an opportunity to possibly improve your report before submitting
TinkerCAD Virtual Exploring
1) Virtual Intro
Instead of working directly with the Tetrx kit, we will experiment with some virtual electronics and hardware with the built-in coder offered by TinkerCAD. You can get started by following these instructions using your school G mail account and your class link given by your teacher:
- Go to your class link, link attached in the Google Classroom assignment
- Log in using your school email account
When you join up, go to circuits, and you will go through a "Getting Started" set of tutorials (for practice and get familiar with the circuit simulator) to complete. There are 4 tutorials for you to complete that include:
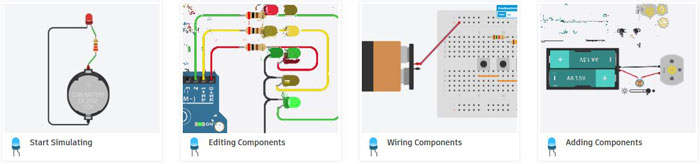
- Start Simulating
- Editing Components
- Wiring Components
- Adding Components
Using a Google doc, you are to create a one page report that includes the following:
- Create a header with title (to the left), name, date, section (right side), then create a page title (header 1) "TinkerCAD Intro" in body
- take a screen-shot of your favorite completed project from the four that you have done, sized to fit about 1/3 of the top of the page (4)
- for the rest of the page, create subtitles (header 2's) for each project
- a short description of each (4*2=8)
- list three things you learned in each tutorial in point form (3 bulleted points, 2*4=8)
2) Virtual Component and Coding
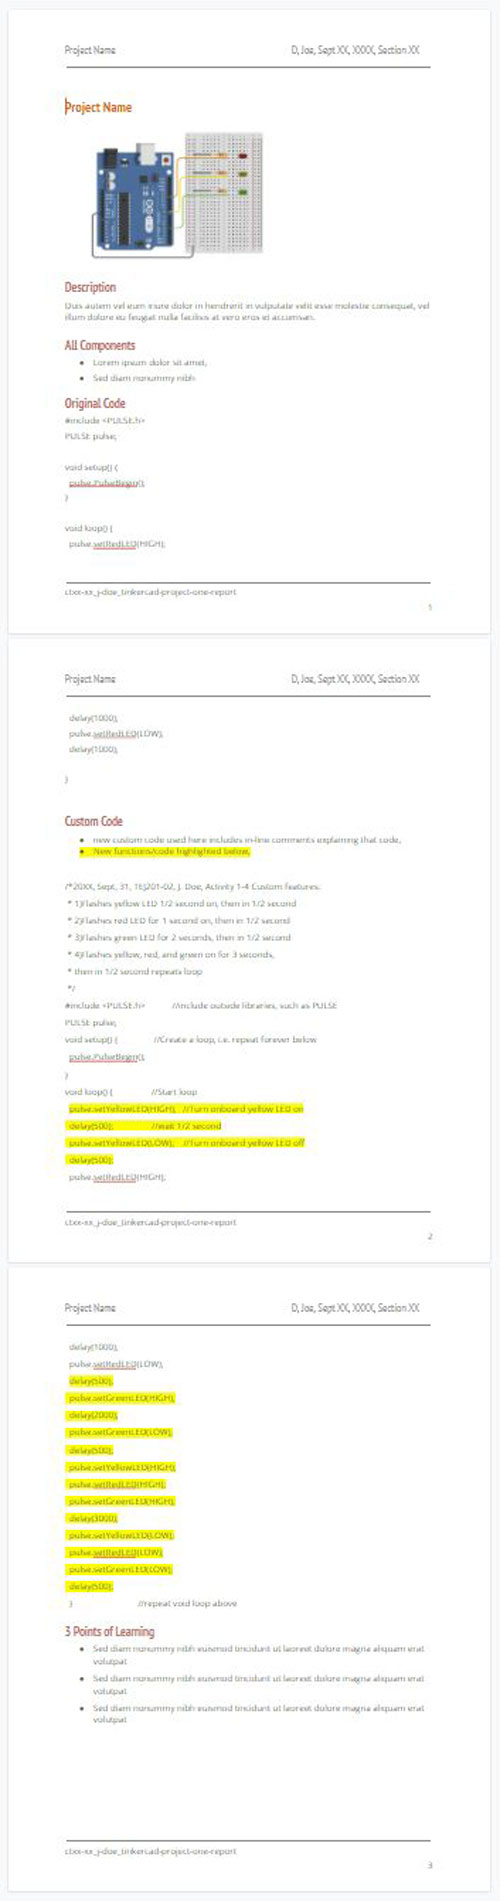
For this project in TinkerCAD, (remember to join your class, class code name was given in email join invite) you will be building a virtual electronic hardware project, adding some code, testing to see if it works, then modifying with 3 new coding functions which may include additional hardware. Each project will require a report showing your final project with new components and coding. Your custom coding will show the coding syntax (text) with multi-line documentation at the beginning and in-line comment explanations for new code not yet used before. Using a Google doc (template supplied in Google Classroom), fill in a report for each project completed, which is to include the following:
- Header with Project name, Your Name, Date, Section & Footer with file name and page number
- Title of your project
- A screen shot of your final custom completed project, sized to fit about 1/3 of the top of the page (6)
- Description of project (2)
- List of the technical names of all electronic hardware components used in project (2)
- Original code used to test initial cct and function (1)
- Custom code with 3 modifications to code and components (highlighted) (6)
- Three bulleted points, detailing what you learned (3)
Below are the projects to be completed in chronological order, once you have finished project, create report and submit for review while you start on the next one. Ensure you check your feedback on your previous project report before submitting your next report.
- Blink an LED rev, Multiple LEDs and Breadboards
- Fading LED
- RGB LED Color Mixing
- Digital Input With a Pushbutton
- Read a Potentiometer (Pot)
- Light Sensor (Photo-resistor) Vid 7.39
- PIR Motion Sensor
- Ultrasonic Distance Sensor Vid 7.55
- TMP36 Temperature Sensor
- Servo Motor, ctrl by Pot
Original Cct Build
Original Cct Code
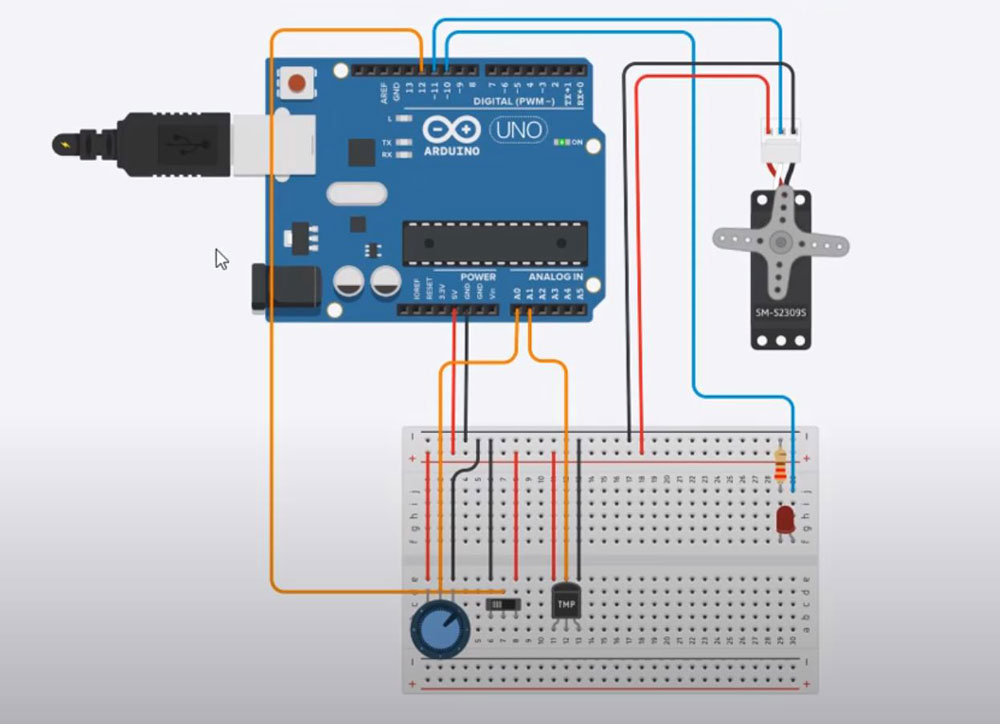
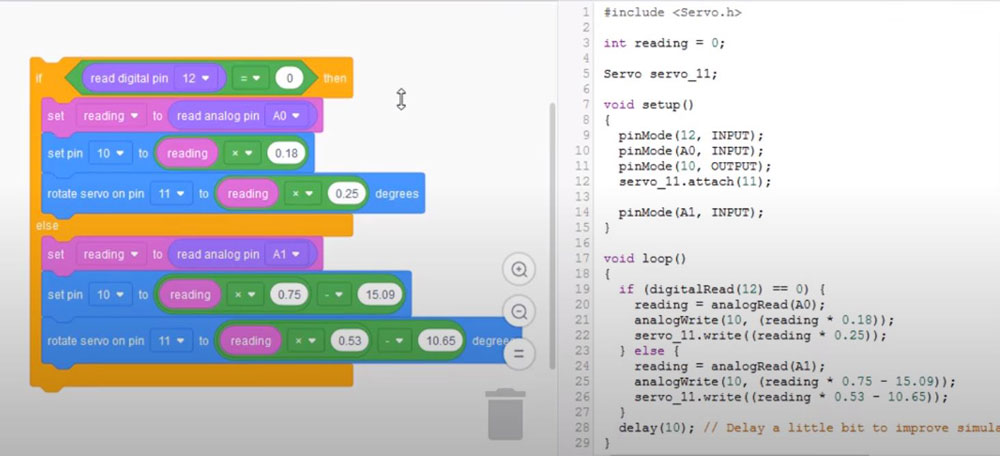
Flex Project - TCAD Sensors and Actuators
For a "Flex" project, you can improve your mark by doing this ![]() TCAD Sensors and Actuators project, but if you don't, it will not count towards your mark. This way students can choose to work on finishing up term work or work on this project to improve mark. This project will be out of 40, to include the usual custom code with 3 function modifications, documentation, highlighting, and 3 detailed learning points. For your convenience, you have images of the original build and code along with the
TCAD Sensors and Actuators project, but if you don't, it will not count towards your mark. This way students can choose to work on finishing up term work or work on this project to improve mark. This project will be out of 40, to include the usual custom code with 3 function modifications, documentation, highlighting, and 3 detailed learning points. For your convenience, you have images of the original build and code along with the ![]() video tutorial provided.
video tutorial provided.
You will be responsible to set-up each project, test it, customize with 3 new functions for each using your Uno and prototyping bread board with project components, document as you go with a picture, code (both given and custom), and new learning, to be added to a Google Doc report. Here are key details to keep in mind when completing this report with your projects::
- Report to include a main title page with a project related image and updated table of contents of whole report(3 marks),
- Each project section (total 10 marks each) to include a picture of finished project clearly showing wiring & components (2), description of finished custom (1), original given test code (1), finished custom code with the 3 new (hardware & coding) functions (4.5), and your detailed learning points/proof (1.5)
- Finished custom project pictures to be taken with good lighting, in-focus, showing wiring and components, cropped and sized to fit maximum 1/3 the page height or 7 cm high and as wide as want to fit width of page
- Text sized to 10 - 12 point for both code and normal text entries with an easy to read font like Arial or similar
- Custom coding to show coding standards including multi-line block comment documentation, and in-line comments for all new code used
- New coding commands and functions to be highlighted and must be with-in the scope of the project itself - components and code
- Overall feedback to include top 2 detailed learning points expanded and 3 overall summary/conclusion points on what you liked, what was the most challenging and why, and if you could do it again what would you do differently (5 marks)
- Overall Peer feedback giving one practical positive comment and one critical point to get a better mark with Peer marker name (2 marks)
A) Python Programming Basics Summary (12's)
You can work with Python from several different systems and editors. As you will be using the Raspberry Pi, your focus is to use it with your programming, but you can program anywhere including home or school using a desktop, laptop, tablet, and/or your Pi to continue working on your code. The focus in this exercise is to familiarize yourself with the code basics, to better prepare you for your custom projects with the GPIO's later. To start, reviewing the basics of Python using ![]() Tutorials Point's Quick Guide with the following key areas below, complete a
Tutorials Point's Quick Guide with the following key areas below, complete a ![]() Python Programming Basics summary sheet stating the key areas with a description/explanation for later review of context, code, and/or operation.
Python Programming Basics summary sheet stating the key areas with a description/explanation for later review of context, code, and/or operation.
- 01) Python Overview
- 02) Identifiers
- 03) Reserved Words
- 04) Lines & Indentation
- 05) Comments
- 06) Variable types
- 07) Standard Data types
- 08) Numbers
- 09) Strings
- 10) Lists
- 11) Dictionaries
- 12) 8 Basic Operators
- 13) Operator Precedence
- 14) If, else, elif
- 15) While & for Loops
- 16) Break/continue/pass
- 17) Functions
- 18) Modules
- 19) Object & classes
- 20) File I/O
B) Raspberry Pi Set-up (12's)
Supplied Materials

Raspberry Pi Poster

Sparkfun Kit
Part of starting to use the Raspberry Pi and components, it does need some initial set-up. This can be done while starting your Part C below on a browser coding platform Replit If you are starting from scratch, you will need to get your Raspberry Pi set-up, otherwise you can use the current set-up done previously. Note a fresh setup will reduce any possible glitches, but you should be fine with a previous set-up in general.
- With your Raspberry Pi Model B, revision 2 board and a the SparkFun kit complete the Part Descriptions Research and Hardware Parts Check sheet
- Download “New Out Of Box Software (NOOBS)”
- You will need to format your SD card you will be using with your unit using for example SD Card Association. By selecting your SD Card drive, options, set "Format Size Adjustment" to ON, then format
- Extract your "NOOBS" zip file onto your formatted SD card
- Insert SD card into your Raspberry Pi
- Plug in your Raspberry Pi into your desktop station area - HDMI, mouse, keyboard, network, and micro power last
- Pi will boot up, give you a list of operating systems (install recommended) you can install
- Once installed, you can access your Python through the shell, IDLE, or just install your own preferred IDE.
You can use Python from both an IDE (Integrated Development Environment) and/or from the terminal, depending on your comfort level. IDLE is the standard Python development environment. Its name is an acronym of "Integrated DeveLopment Environment". It works well on both Unix and Windows platforms. It has a Python shell window, which gives you access to the Python interactive mode. Python 3.x is the latest version recommended by the Raspberry Pi Foundation, although legacy 2.x is still currently also used.
C) Python in Action (12's)

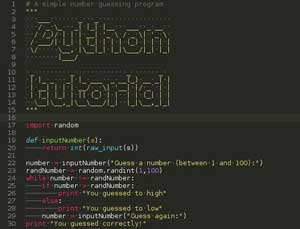
Using the above Python Programming Basics assignment with the key areas (omitting object & classes), write sample code representing each area and use the print to screen command for an output to demonstrate coding areas completed. Each of your blocks of code should represent information from or about Python, related to what you are showing, to show and demonstrate your new knowledge and experience of the code. For example you could:
- make a list of the key features of Python you answered in the first definition, then print them to the screen
- create a separate file of a key Python list, then open that file, read into memory, then print
- show operator precedence of arithmetic using some comparative number calculations
- create a dictionary of the standard data types and/or the different number types in Python, then print
Include a multi-line comment at the beginning with a title project, name, Python version and description - overview of your Python program. Using the hash tag, comment on sections of code representing key areas using the line space above. Although less common and should be generally used sparingly, a short comment on the same line, on the tail end of your statement in this project, is to be used for each "new" code statement with a short explanation/description.
At the end of your program print a columned list, built by appending to a master list each time you have demonstrated a key area, and have it sorted in alphanumeric order with a final total count of entries/areas. Also, you will find yourself using new specific commands not covered directly by the master list, so you will create a secondary append list to keep track of and print as your very last printed list with the same formating as the previous list.
Once program is able to demonstrate all key areas with no errors and includes all required commenting, submit your project folder with files into the drop off folder with tej4_j-joe_python-in-action folder naming convention.
(Sample to view)
Evaluation:
For the Arduino projects, remember to include picture of each project and the given and custom code. If you have not already done so, work on your summary sheet while you are getting your Pi loaded up and running, then you can focus on the Python in Action programming project.

| Evaluation Breakdown Component Descriptions | Marks |
|---|---|
| Always double check that you have completed all components for full marks. | |
| Arduino Basics Rev - Complete questions on Arduino basics | 40 |
| Arduino Kit & Parts- Inventory and part definition and exploration | 30 |
| Arduino CIC - Report with pictures and code of each project | 90 |
| Python Code Rev - Completed Python Programming Basics Review | 40 |
| Pi Kit & Parts - Inventory and part definition and exploration | 30 |
| Pi Set-up - Operational ready for Python programming | 30 |
| Python in Action - Working sample code showing key areas | 60 |

Unit 4, Act. 2: Computer Networks
Situation:
Looking at how computers work, servicing them, how they work with data internally, controlling them using programming leaves one main element which is computer networking or how computers communicate to each other locally or over the Internet.
Problem/Challenge:
Students will look at some key related terms, what computer networks are, network layers, IP addressing, and data routing protocols related to computer networking in general. Using some useful utilities, students will get a chance to view network related information feedback. We will also look at network components and how they are connected to each other. A practical project terminating Cat 5 twisted pair cables for computer to wall jack will be done using appropriate connections, tools, and testing process.
Investigation/Ideas:
Key Terms

Here are some common jargon and terms related to networking that will help with understanding networking concepts:
- Connection is an established link through procedural protocols encapsulating the data that is transfered through a network and reconstructed at the other end
- Packet is the most basic unit (envelopes/pieces of data) that is transfered over the network that include a header of information such as source and destination, timestamps, network hops, etc with the main portion being the data itself.
- Network Interface is any software that works with your networking hardware (physical or virtual)
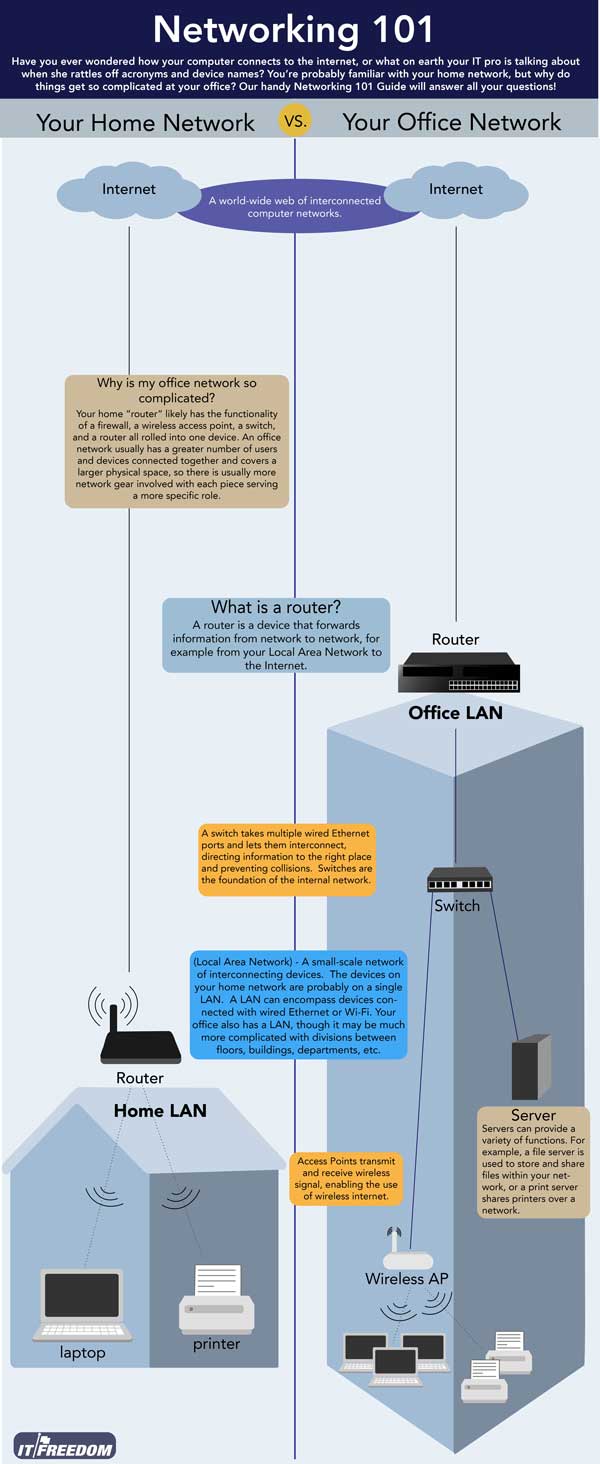
- LAN stands for "local area network" and refers to network or part of a network that is not publicly accessible to the general Internet, for example a home or small office
- WAN stands for a "wide area network" which means a much more extensive, larger, broader span network generally meaning the Internet as a whole and means that you would be reachable through the Internet also
- Protocol is a set of rules and standards that define a language that devices use to communicate. There are many protocols used in networking often implemented in different layers. For example some low-level protocols are TCP, UDP, IP and ICMP with some common application layer protocols built on these lower protocols such as HTTP, SSH, TLS/SSL, and FTP
- Port is an address location on a single computer that is linked to a specific software, i.e. not a physical interface or location that allows your server to communicate using more than one application
- Socket is a IP address and Port used by another computer to send data to one particular computer's specific software, see difference between a Port and a Socket and this quick guide on Ports and Sockets for more info
- Firewall is protection for your computer made up of a program using a previously implemented rules to allow or block data/traffic on specific ports
- NAT stands for "network address translation" which is a way to translate incoming requests to a routing server to the related devices/servers that know about it, usually in the physical LAN (through one IP address to the necessary back-end servers)
- VPN stands for "virtual private network" is like a private security tunnel through the Internet connecting two separate LAN computers often connecting remote systems as if they were on a local network
Computer Networks in General
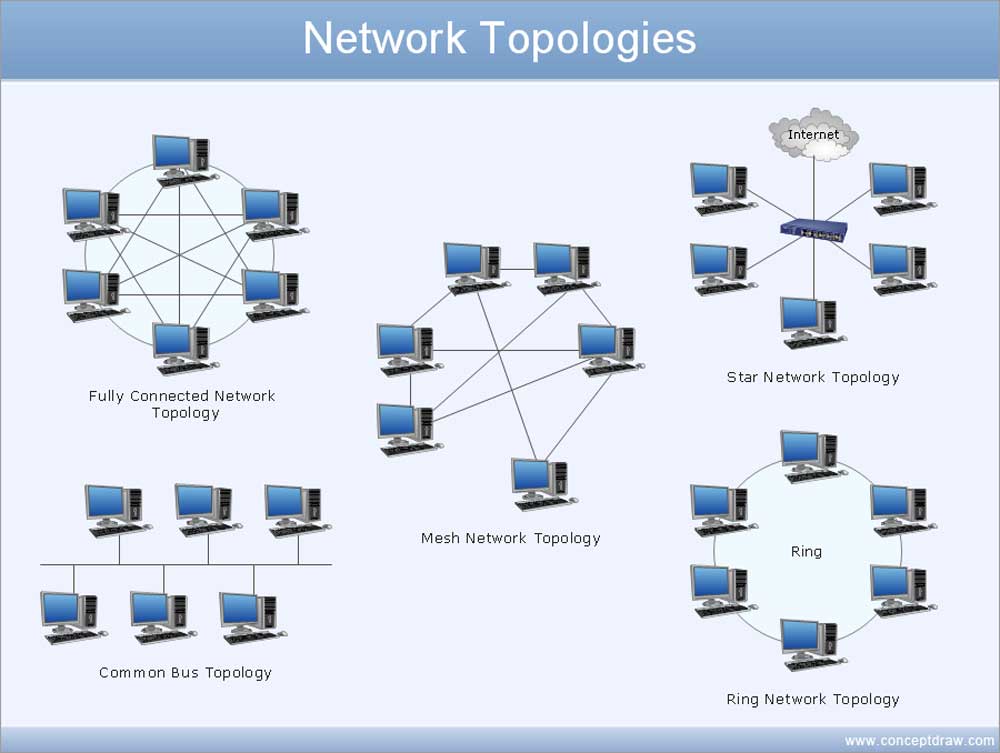
A computer network is an interconnection of nodes either short or long distances between two or more computers that are linked up to sharing resources. Computers can be linked in many ways such as through cables, telephone lines, radio waves, satellites, or infrared beams. There are three basic types of networks: Local Area Networks (LANs), Metropolitan Area Networks (MANs), and Wide Area Networks (WANs). There are many types of configurations of how computer devices are connected to each other called network topologies with some common ones such as Mesh, Star, Ring, Bus, and Fully Connected topologies. Most common is the Star network topology where all devices are connected to central switches.
Advantages of computer networks include:
- File sharing allows for remote access to data from any allowed
- Resource sharing through the network such as modem, printers, cameras, etc
- Increased storage capacity by sharing drive space of individual computers
- Increased cost efficiency again by sharing software and resources
- Security can be used to protect or just share specific resources
- Communication with others through LAN and/or WAN
- Flexible access allows multiple access to data from different lotions
Disadvantages of computer networks include:
- Security issues of unauthorized access by a hacker
- Rapid spread of computer viruses
- Expensive set-up can be initially high
Components of computer networks include:

- Repeater is a device that strengthens the incoming signal and sends it further towards the destination
- Hub is for connecting multiple devices together making them act as a single network segment
- Bridge keeps data free from collision if data is transmitted at the same time such as in a hub
- Switch sometimes called a multi-port bridge is like a hub that extends connection to multiple ports and prevents data collisions
- Network interface card (NIC) is an expansion card that attaches to the computer to connect to your hub or switch
- Router provide a path for data packets from source to destination within LAN and provide connectivity outside the LAN
- Modem (modulator-demodulator) modulates signals to encode digital information and demodulate signals to decode the transmitted data
Network Layer Communication
Networking is often thought of as a direct horizontal connection between hosts, but how it connects is through a number of vertical layers of multiple technologies and protocols is what really happens. Each layer has it's own "wrapper" around the data to help decide what to do with the data going from source to destination.
Open Systems Interconnect model (OSI)
The OSI (Open Systems Interconnect) model shows you seven separate layers of network communication for data transfer:
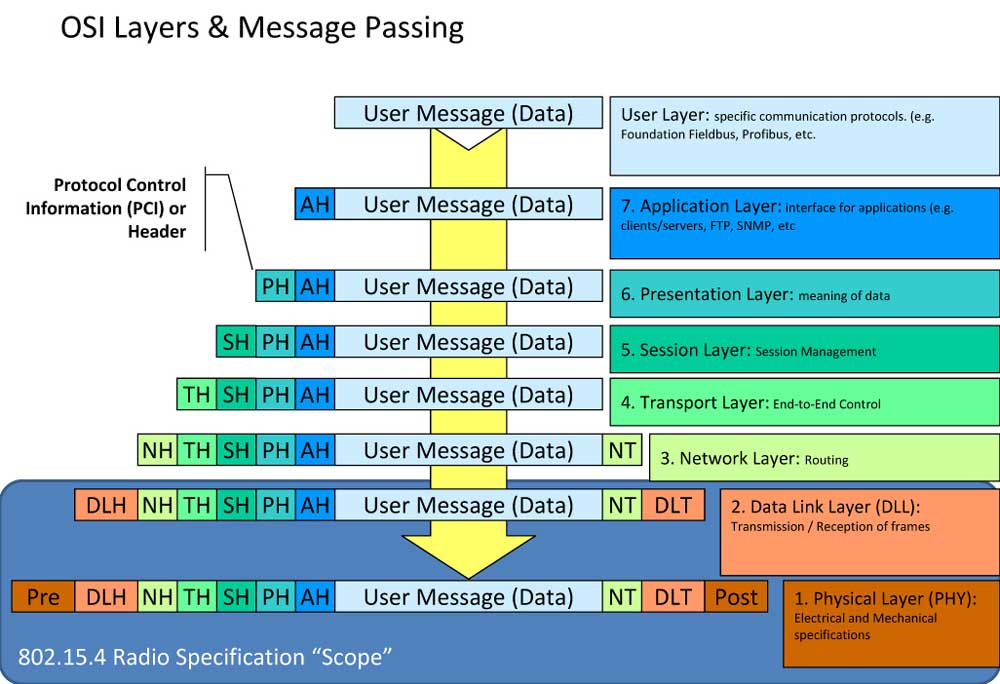
- Application Layer is the one users and applications interact with the most which include protocols that focus on process to process communication across an IP network and provides a firm communication interface and end-user services such as displaying received information to the user
- Presentation Layer can be viewed as the translator for the network and is responsible for mapping resources and creating context used to translate lower level networking data into data that applications expect to see
- Session Layer is a connection handler that creates, maintains, and destroys connections between nodes
- Transport Layer is responsible for handing the layers above it and ensures that the data is delivered error-free, in sequence, and with no losses or duplications (This layer can also resend information that has been dropped or corrupted and acknowledge the receipt of data to remote computers.)
- Network Layer is used to route data between different nodes on the network and uses addresses to be able to tell which computer to send information to
- Data Link Layer is used as a method of establishing and maintaining reliable links between different nodes or devices on a network using existing physical connections
- Physical Layer is the lowest layer of the OSI model that is responsible for handling the actual physical devices that are used to make a connection which involves the software that manages physical connections as well as the hardware itself, like thee Ethernet
Transmission Control Protocol/Internet Protocol (TCP/IP)
As you can see there are several different layers that can be looked at as part of the transfer of data. The TCP/IP model is a simpler model that has been widely adopted which defines only four separate layers some of which overlap with the OSI model.
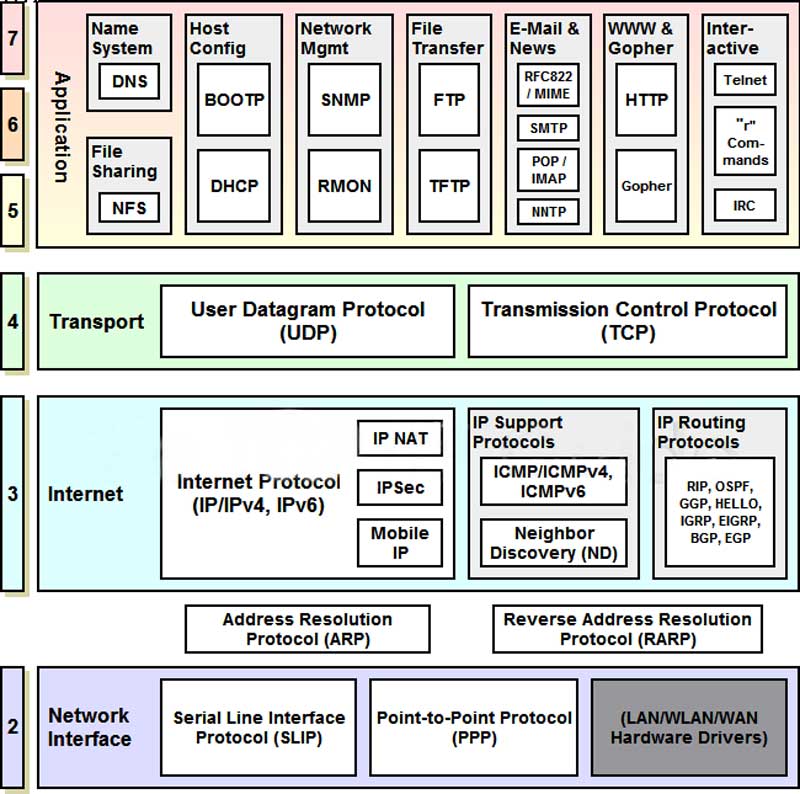
- Application Layers provides applications the ability to access the services of the other layers and defines the protocols that applications use to exchange data such as Hypertext Transfer Protocol (HTTP, File Transfer Protocol (FTP), Simple Mail Transfer Protocol (SMTP) and Telnet with other layers to also help with use and management of the TCP/IP networks such as Domain Name System (DNS), Routing Information Protocol (RIP), and the Simple Network Management Protocol (SNMP)
- Transport Layer is responsible for providing the Application layer with session and datagram communication services using core protocols Transmission Control Protocol (TCP) and the User Datagram Protocol (UDP)
- Internet Layer is used to package and route data between different nodes on the network and uses addresses to be able to tell which computer to send information to
- Network Interface Layer is used as a method of establishing and maintaining reliable links between different nodes or devices on a network using existing physical connections
IP Addressing

IP4 vs IP6 Network Addressing
We looked at binary numbers in the last unit, so remember that IP addresses are made up of 4 segments of bits which represent the the common current IP addresses that we commonly use.
IP address, or "Internet protocol address", is a unique identifying number given to every single computer (X-box game systems, cell phones, fax machines, etc.) on the Internet This special number is used for identification, as it shows ownership, allows it to be located by other machines, and is tracked for peoples safety. To also clarify, IP address is different from a DNA (Domain Name Address) or a MAC (Media Access control) address
Right now the Internet uses mostly IP version 4 (IPv4) with its 32-bit address size. As the Internet has run out of new large blocks of IPv4 addresses, there is increasing pressure to convert to IPv6, with its 128-bit address size. It has been slow, however, and delaying of IPv4-address markets and NAT (Network Address Translation) which multiple hosts can share a single public IPv4 address, have allowed IPv4 to continue. As of April 2013, instead of 4.3 billion possible IP addresses, IPv6 will give us 34,000,000,000,000,000,000 billion possible IP addresses. Except for the change in address structure, there are relatively few differences in the routing models of IPv4 and IPv6.
IP Addresses for web servers is invisible and translated into a English domain name for ease of use. IPv4 consists of four number segments while IPv6 is made up of 8 segments. Internet authorities stock a large bundles of IP addresses for Internet service providers (ISP) which then assign to every server and Internet user that logs on. Prior to the World Wide Web becoming very popular in thee 1990's, computers were assigned static IP addresses, but with so many users, ISP's now lend the IP addressees from a block of numbers which are known as dynamic IP addressing and works better for individual users.
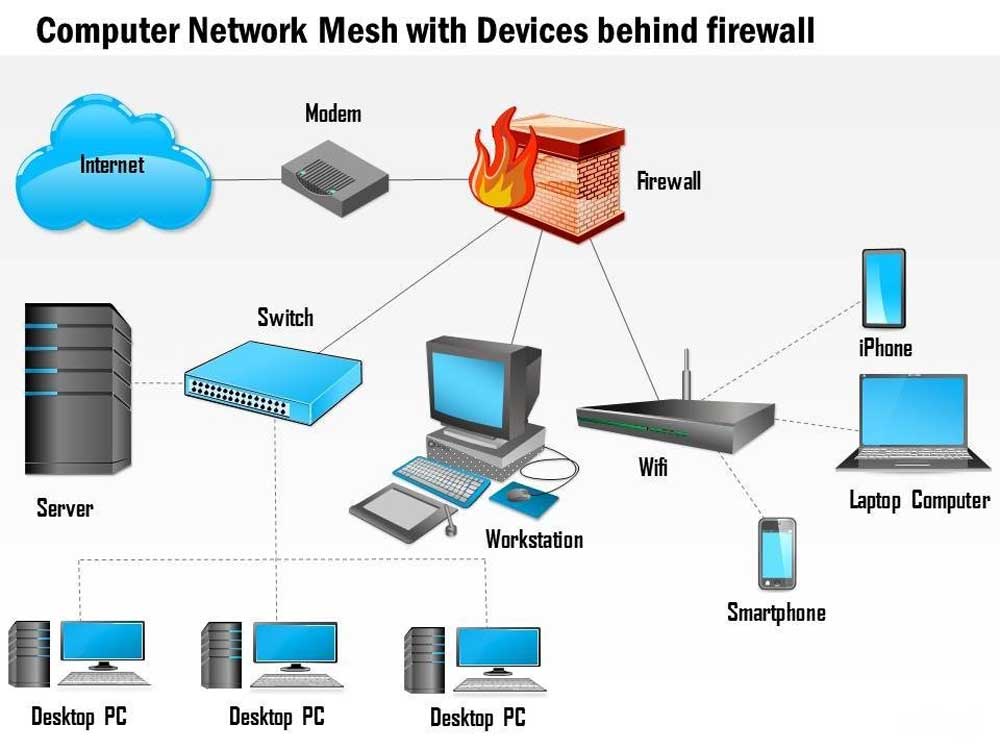
Sample mesh network office diagram
Useful Utilities
There are many useful network programs for probing and diagnosing networks and the following are some common:
pingto determine if another machine is availableipconfig(windows),ifconfig(Linux and Mac), andip(newer Linux) finds your own IP addressnslookukp,digandhostare all used for DNS look-ups, each varying in convenience and optionstraceroutlists the route from you to a remote hostroute,route print(Windows),ip route show(Linux), andnetstat -r(all systems) display the host’s local IP forwarding table- Here is a cheat sheet showing some related networking information
- Five free network drawing tools that you will find handy when designing your own network system
Network Cabling and End Termination
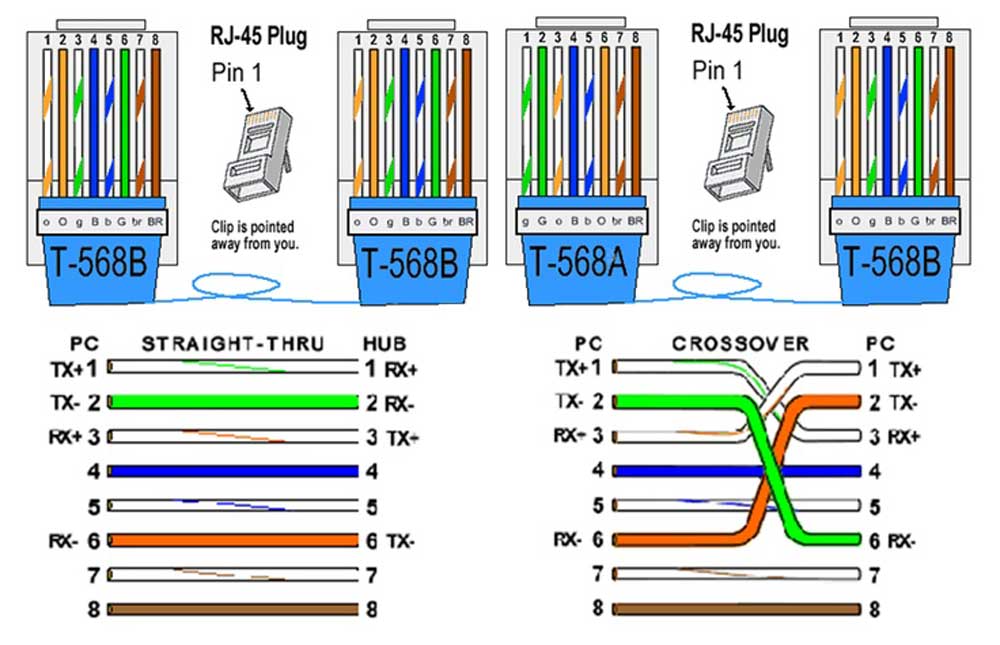
Cat5 cable termination connections
Connecting computers to the network requires a ![]() common Cat5 cable, 3.45 with RJ45 connectors. You can purchase smaller patch cables with manufactured ends or buy a roll of Cat5 cable and prepare the ends yourself. Custom cabling lengths and connections requires you manually make your own end terminations. Other situations may be that you need to replace a broken end off a long cable. In a
common Cat5 cable, 3.45 with RJ45 connectors. You can purchase smaller patch cables with manufactured ends or buy a roll of Cat5 cable and prepare the ends yourself. Custom cabling lengths and connections requires you manually make your own end terminations. Other situations may be that you need to replace a broken end off a long cable. In a ![]() switch/hub home/small office, 844, you will usually find cables will come into room, and then ends are punched into a patch panel board from the back and then use small patch cords going from this patch panel to the switch (distribution network device). This allows for quick switch upgrades.
switch/hub home/small office, 844, you will usually find cables will come into room, and then ends are punched into a patch panel board from the back and then use small patch cords going from this patch panel to the switch (distribution network device). This allows for quick switch upgrades.
Below are some related images showing a white box server, half size rack, punch panel, Cat6 termination, and testing. These are pictures showing my last server build and creating my own custom terminations using the unofficial Cat6 cable termination process. It is a little harder as you are using a larger gauge wire/cable to work with. The whole process of designing and building your own home network is a great way to learn about networking from a practical stand point. Learning about the theory behind how it all works gives you a better understanding of the whole process.
Home Networking Build and Cable Termination Related Images
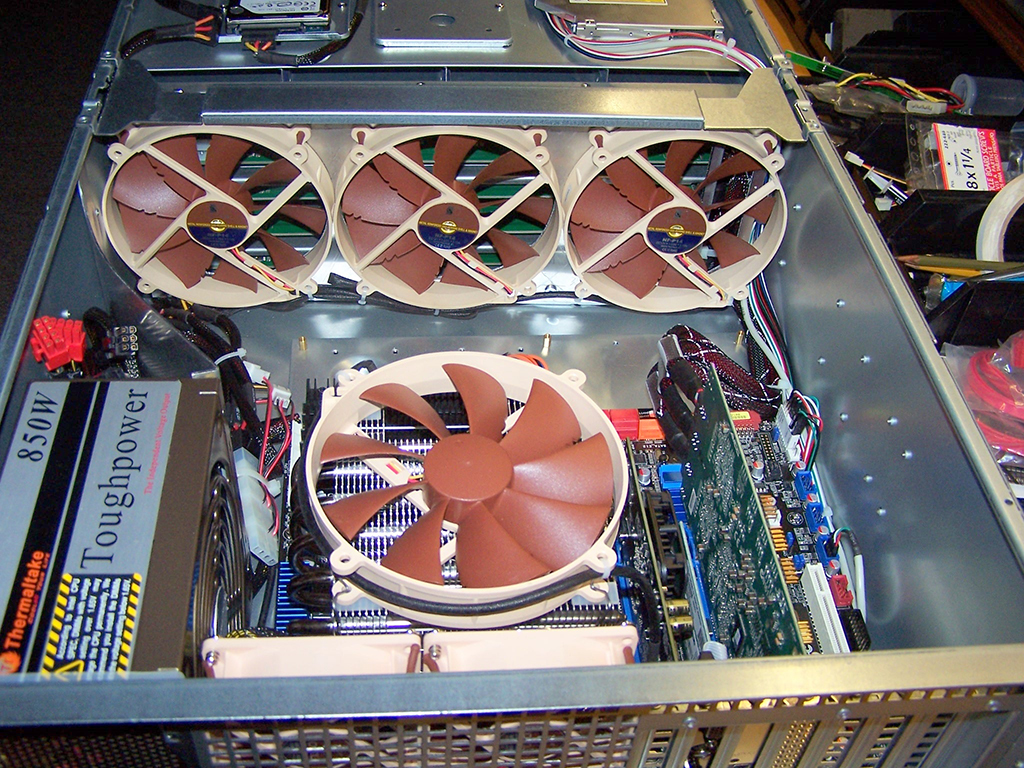
Server
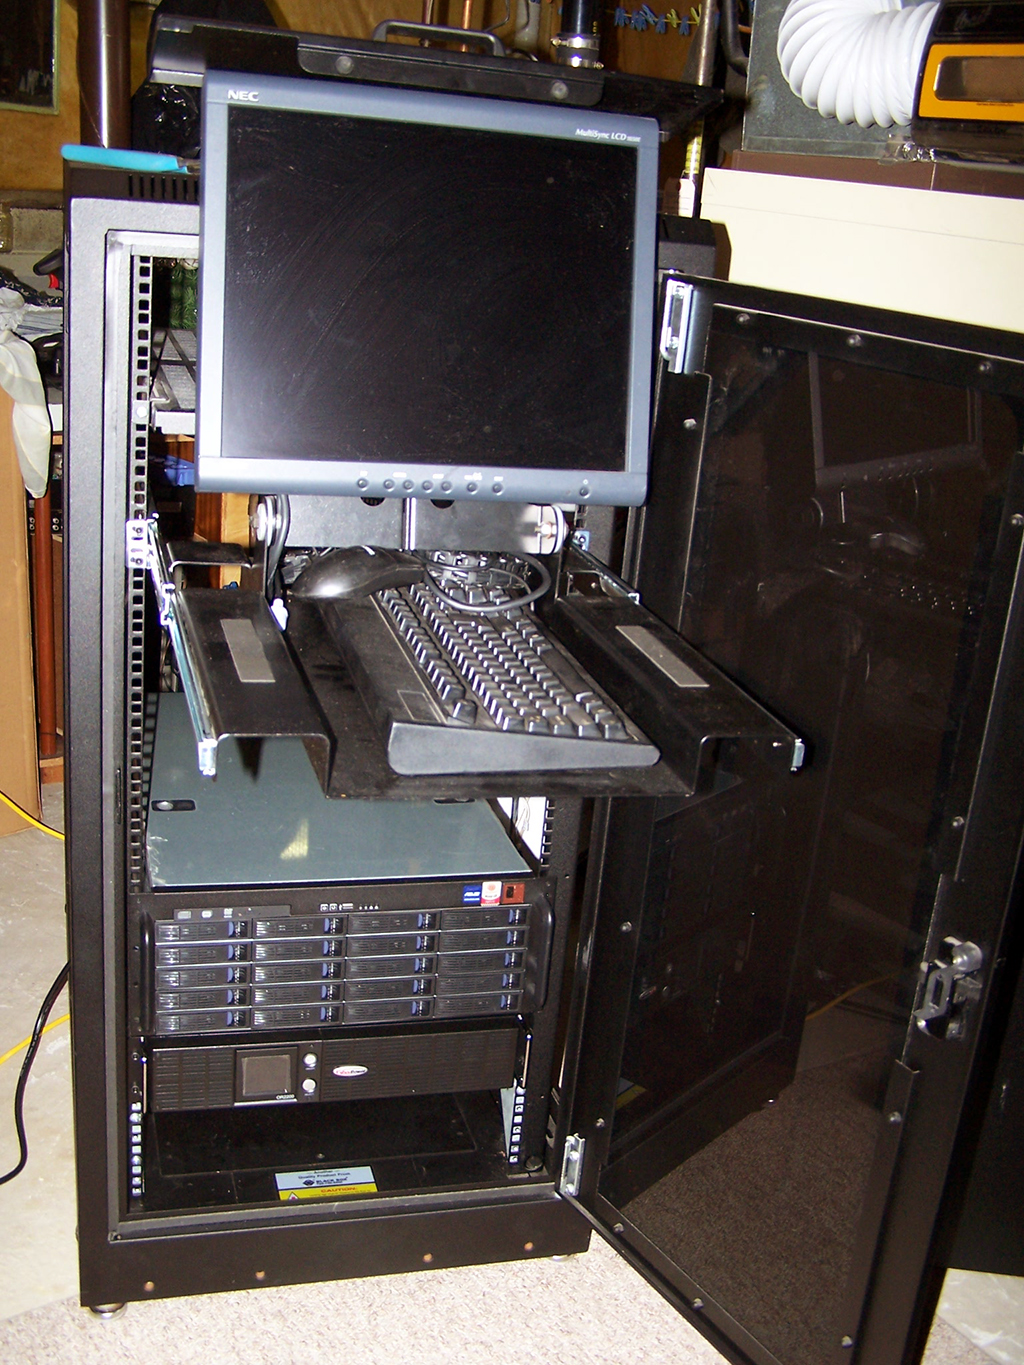
Server Rack
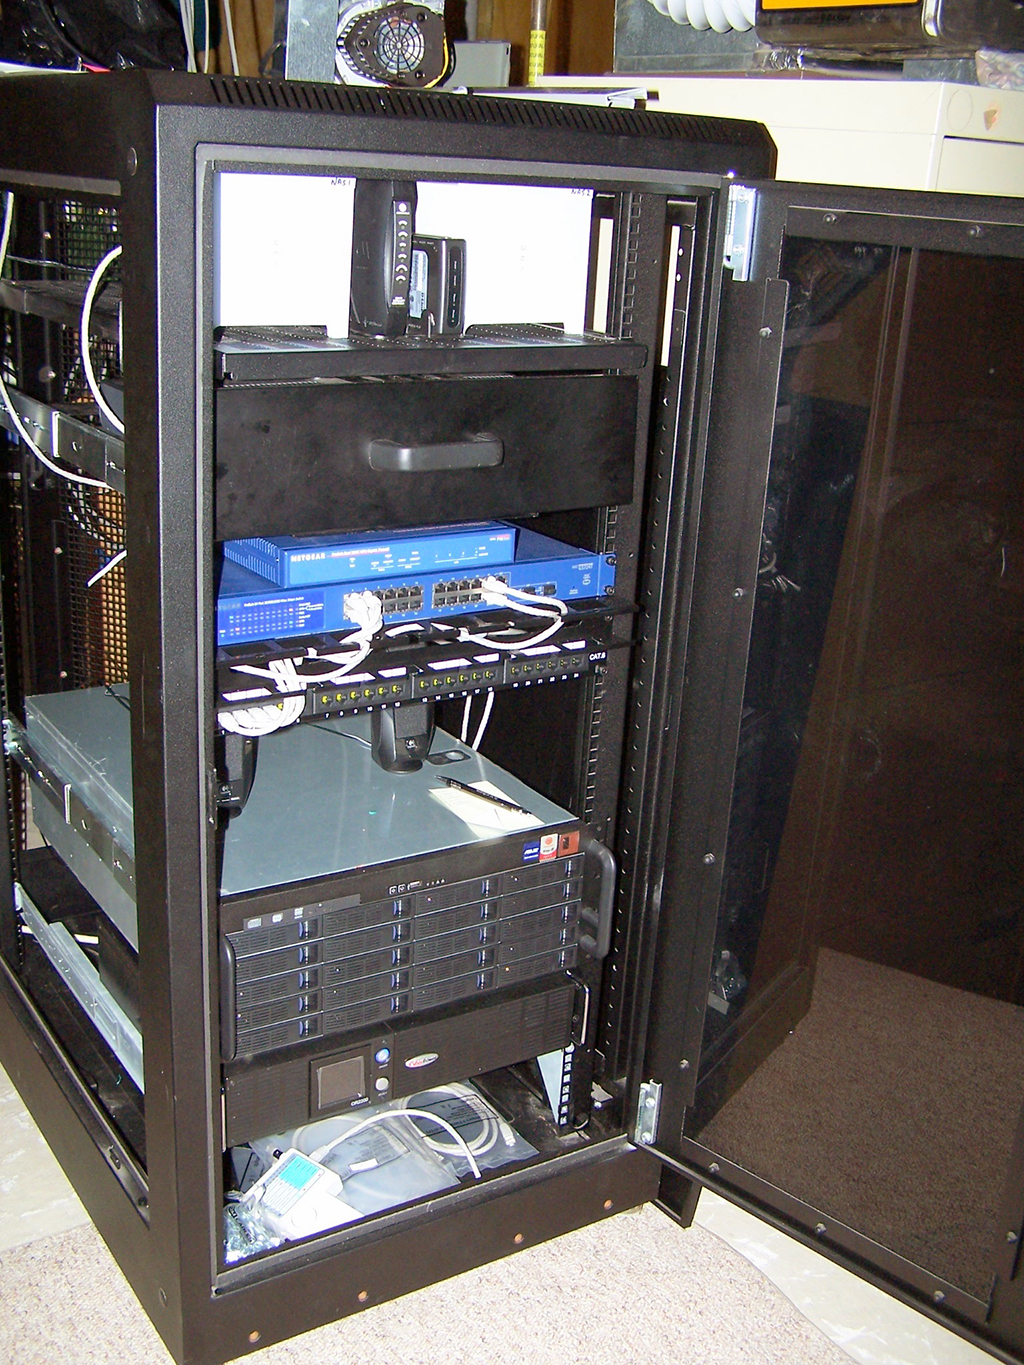
Server Rack
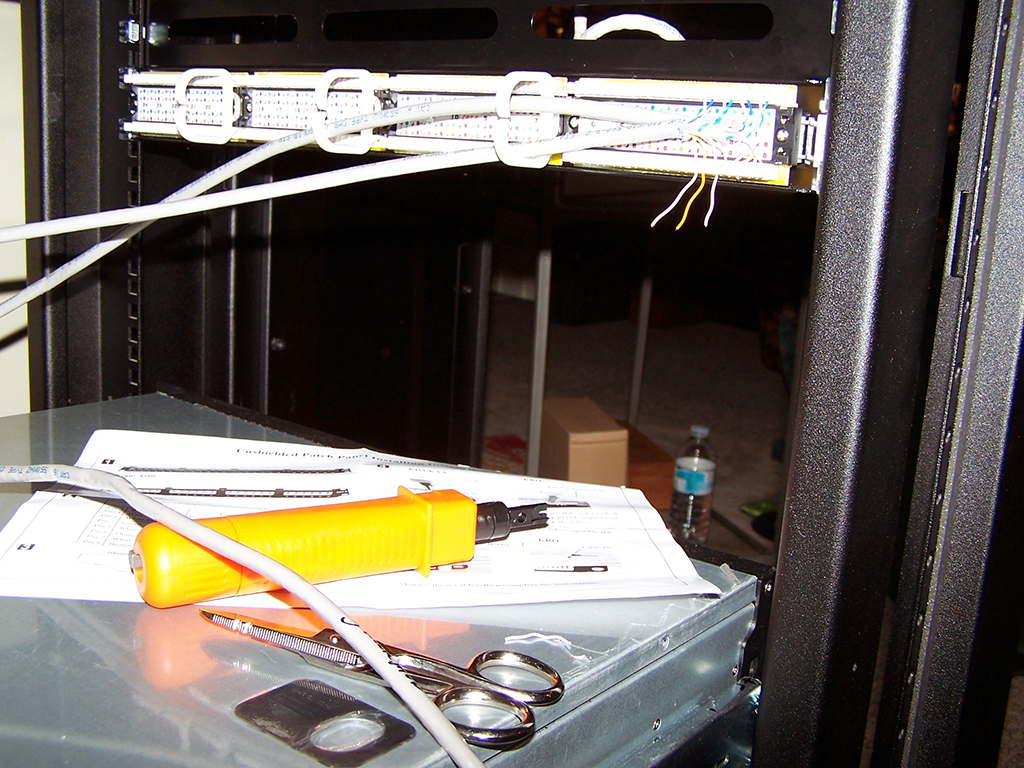
Punch Panel
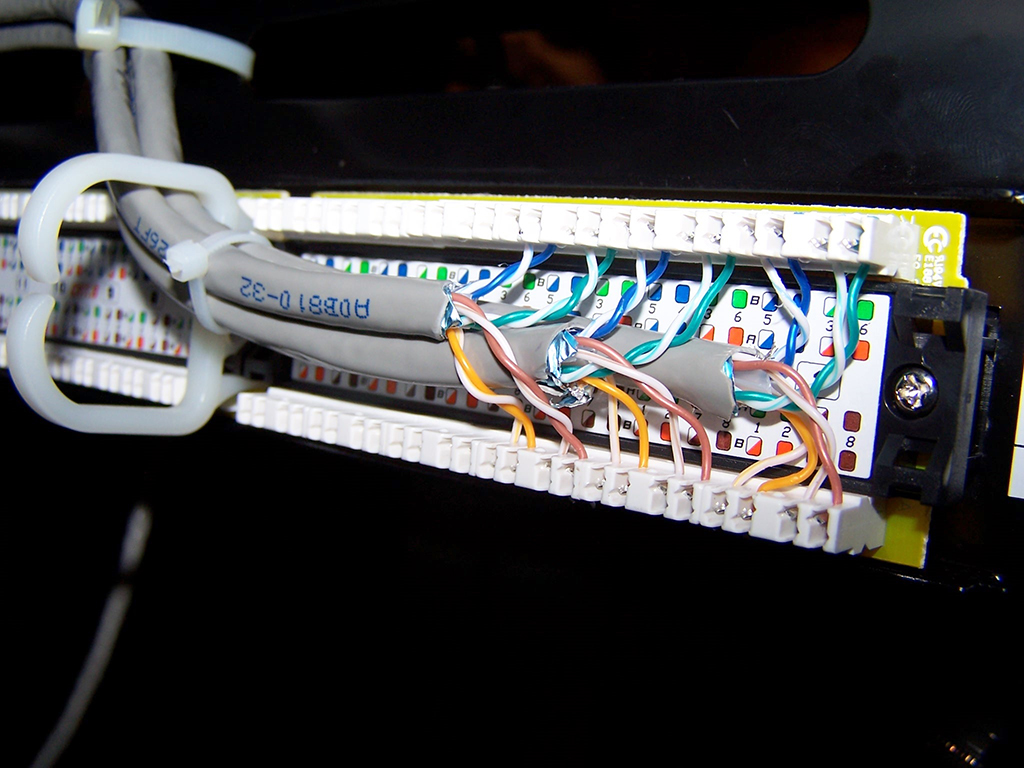
Close-up
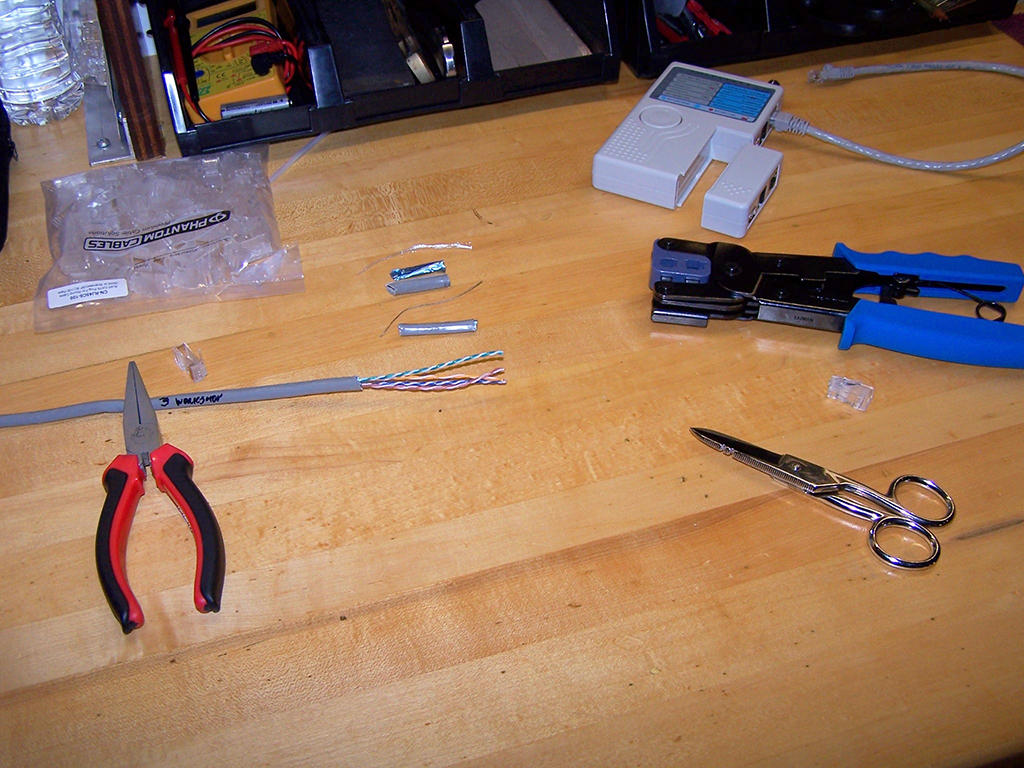
Cable Strip
Trim
Crimp
Terminated
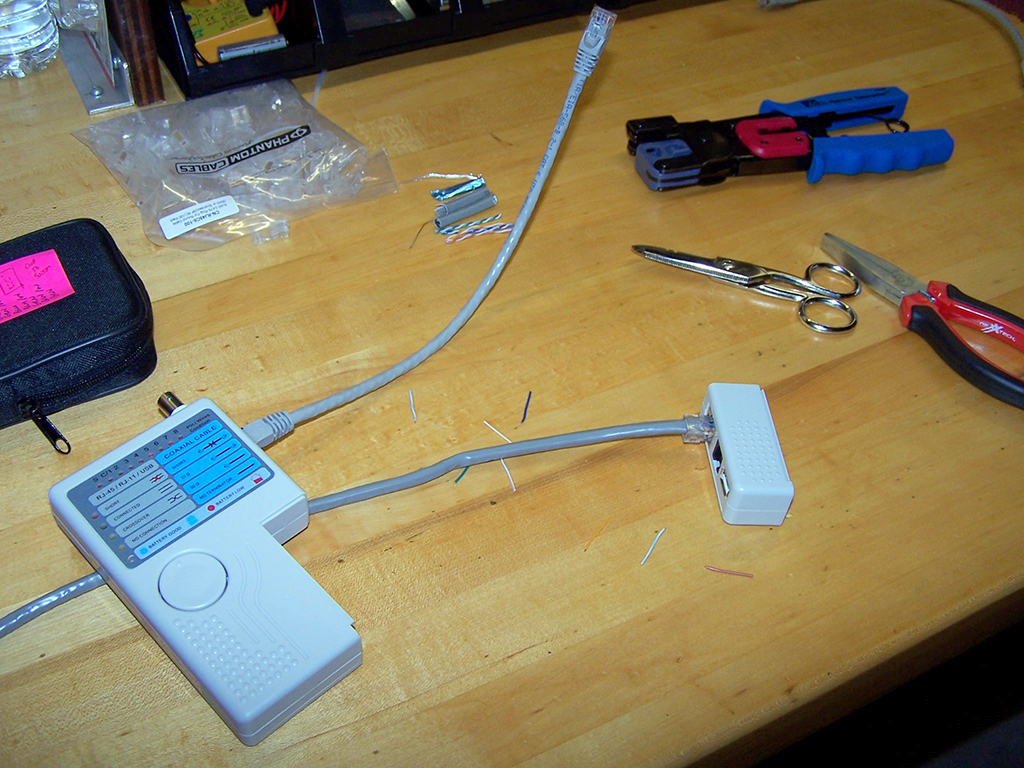
Testing
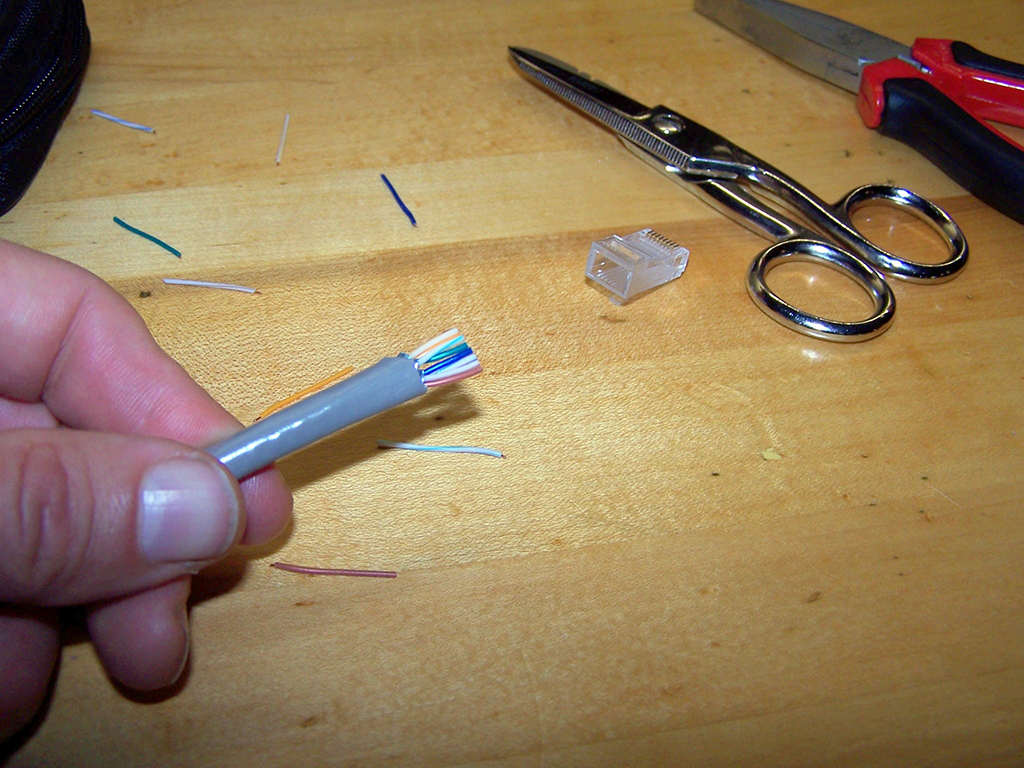
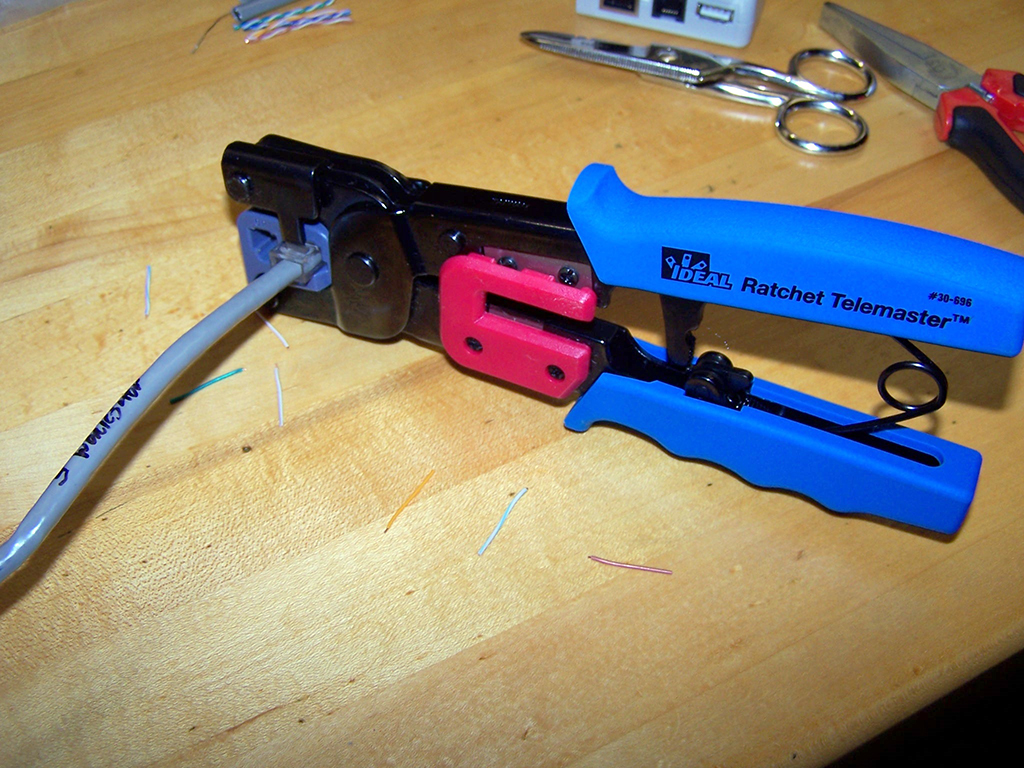
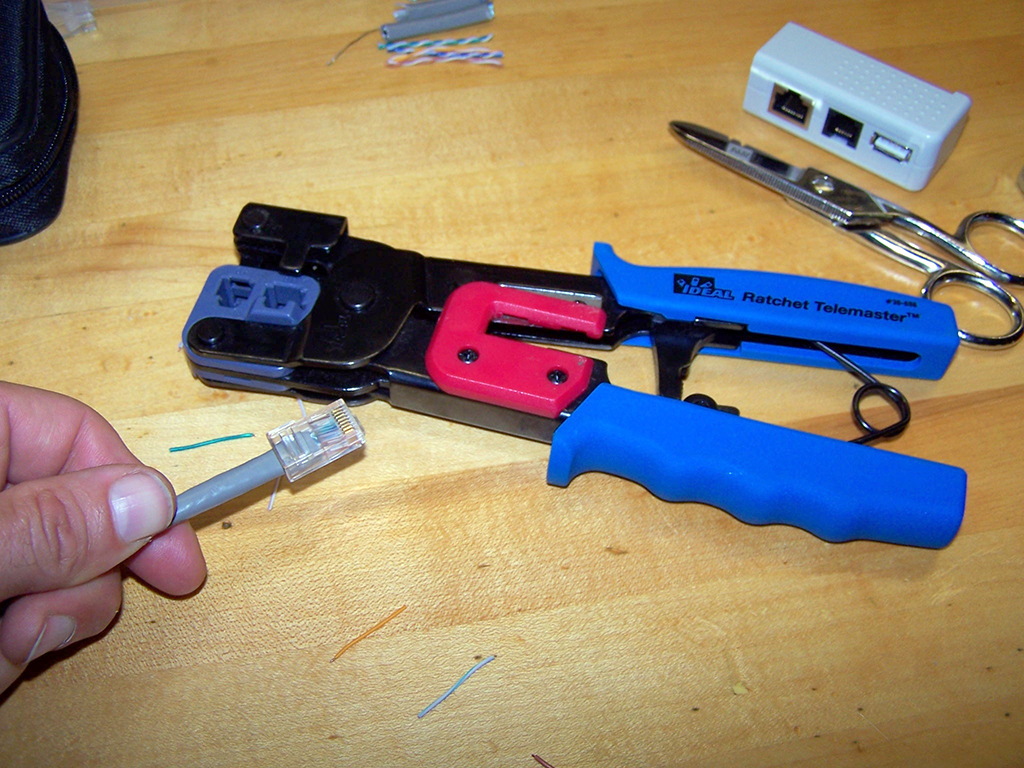
Process is pretty straight forward to ![]() terminate Cat5 cable to an RJ45 end connector, 6.33. There are three types of connections with the most common, straight cable connection, to connect the computer to a wall outlet. This Wiki How guide shows your the steps with pictures and instructions on the termination process, along with
terminate Cat5 cable to an RJ45 end connector, 6.33. There are three types of connections with the most common, straight cable connection, to connect the computer to a wall outlet. This Wiki How guide shows your the steps with pictures and instructions on the termination process, along with ![]() computer networks Prezi which has a focus on network cabling and a embedded video at the end showing Cat5&6 terminations.
computer networks Prezi which has a focus on network cabling and a embedded video at the end showing Cat5&6 terminations.
Resource links
Here are some resource links you can use to further review in detail related networking topics:

 History of the Internet 48s
 - Basic networking 117s
- Networks Part 1 34s
- Networks Part 2 20s
- Computer Networks 31s
- Intro to networking v1
- Intro to networking v2
- Intro to networking v3
- Intro to networking v4
- Intro to networking v5, 23p
- Computer Networking
- Beej's Network Programming
- Computer Network Basics
- Networking tutorial
- The TCP/IP guide
- Network Security
- Elements of Networking 35s
- Networking index of videos
- Robert's Virtual Networking
- Networking Concepts
- Network - IPv4
- Network - IPv6
- More on IPv6
- IPv6 Tutorial
- Test your IPv6
- Online Cisco Training
- Cisco Video Training
- Computer networks 14-740
- Computer networks 5e
- Computer Networking PL40
- Data Communication PL41
- Computer Networks PL40
- Cisco CCNA Training
- Packet Tracer 6.2
- Packet Tracer download
- GNS3 for network sims.
- CBT Nuggets
- Network Troubleshooting 57s
- Linux commands reference
- Network drawing tools
Further Areas of Study
There are many other areas of study in networking architecture such as topologies, ports and protocols, command lines and options, cable types, and infrastructures. Network operations, security, troubleshooting, industry standards, practices, and theory behind how it all works are also areas that may be studied in more detail to get a better understanding of networking.
Create/Construct:

The following are some networking related projects which you will need the above resources to complete.:
- Complete assigned review questions on computer networking.
- Draw a 5 room common office networked system showing standard wiring, topology, router, firewall, switches, telephones, shared devices such as printers, scanners, cameras, etc., WAP (wireless access point)/WiFi, using one of the following Network drawing tools showing appropriate connections and device location placement
- Using your Raspberry Pi, find the ping from your workstation to this web site, then using the ipconfig dos windows command find out the ip address of your station and document both.
- Using tutorial guides control your Raspberry Pi GPIO outputs from either another Raspberry pi, or from your phone, or from another computer
- Create a twisted pair Cat5 patch network cable to connect from the computer to the wall jack and confirm proper operation with testing process
Evaluation:
Complete your review questions, practical network exercises, and network end terminations for full marks.

| Evaluation Breakdown Component Descriptions | Marks |
|---|---|
| Always double check that you have completed all components for full marks. | |
| Review Questions - Complete all review questions | 20 |
| Network Diagram - Devices and how they are connected | 10 |
| Network Exercises - Ping and Ipconfig exercises | 10 |
| Raspberry Pi Networking - Demo control of output over the network | 30 |
| Cable End Terminations - Cat5 cable ends and testing | 20 |