Unit 4: Computer Technology - Boe-Bot/Tetrix
This unit will introduce you to the boe-bot. You will learn about basic electronics,basic programming, servos, and different navigation methods.
Course Units and Descriptions
Use this table for an overview and navigate to each of the course unit pages.
| Unit | Description |
|---|---|
| Review course outline for more details | |
| 1 | Careers & Safety- Intro, computers, organization, safety, and research careers |
| 2 | Computers- organization, hardware, design, software, maintenance, building, repair, and troubleshooting |
| 3 | Circuits- Electrical characteristics, calculations, components, digital logic design, project build, and troubleshooting |
| 4 | Tetrix-Bot- micro controllers, electronics, robot builds, circuit building, programming, robot navigation, testing, and troubleshooting |
| 5 | Web Portfolio- Showcase course work, projects, and understanding with web portfolio and presentation |

Unit Content Activity Quick Links, Click to Jump to Specific Activity!
- Unit 4, Act. 1: Tetrix Introduction
- Challenge, (Invest) What is Tetrix, Safety, Code Standards, Coding Tips, Reports, Activity videos, Resources,
TinkerCAD Intro, (Create)Tetrix Background, Programming, TinkerCAD Intro & Component Coding, Evaluation - Unit 4, Act. 2: Tetrix Build and Navigation
Unit Content Activity Quick Links, Click to Jump to Specific Activity!
 Unit 4, Act. 1: Boe-bot/Tetrix Introduction


Situation:
The boe-bot is an amazing robot starter kit that allows the user to learn about all the basics of robots. This includes electronics, mechanics, servo's, circuits, design, interfacing, logic, programing, and computers.
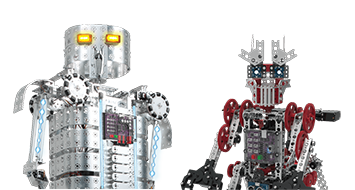
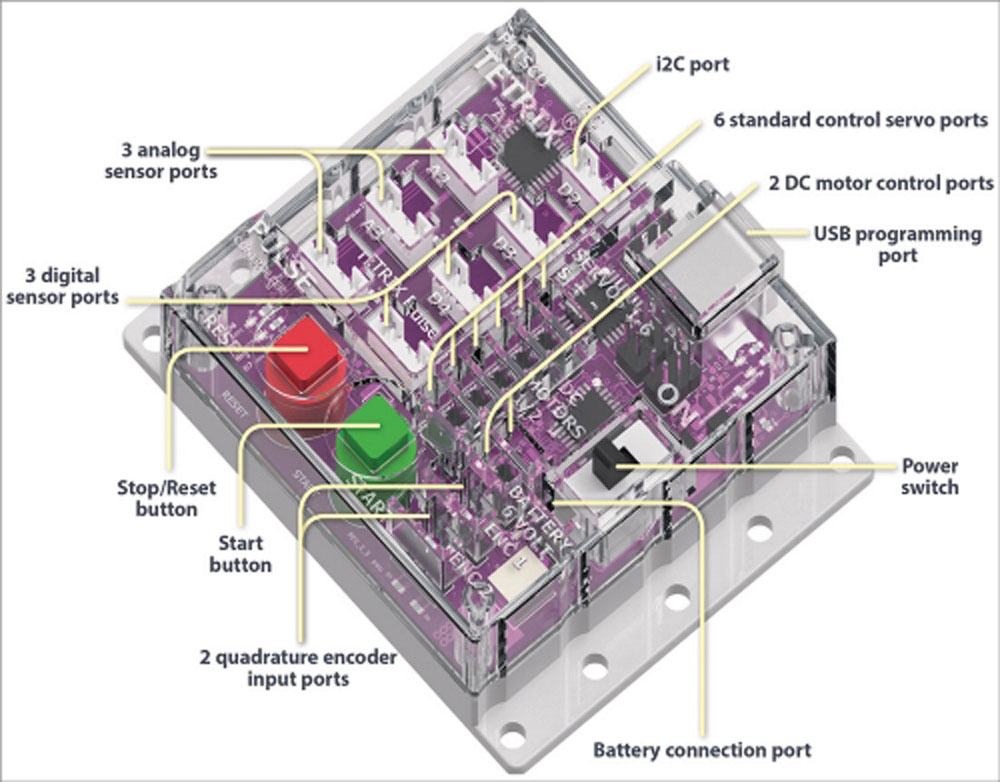
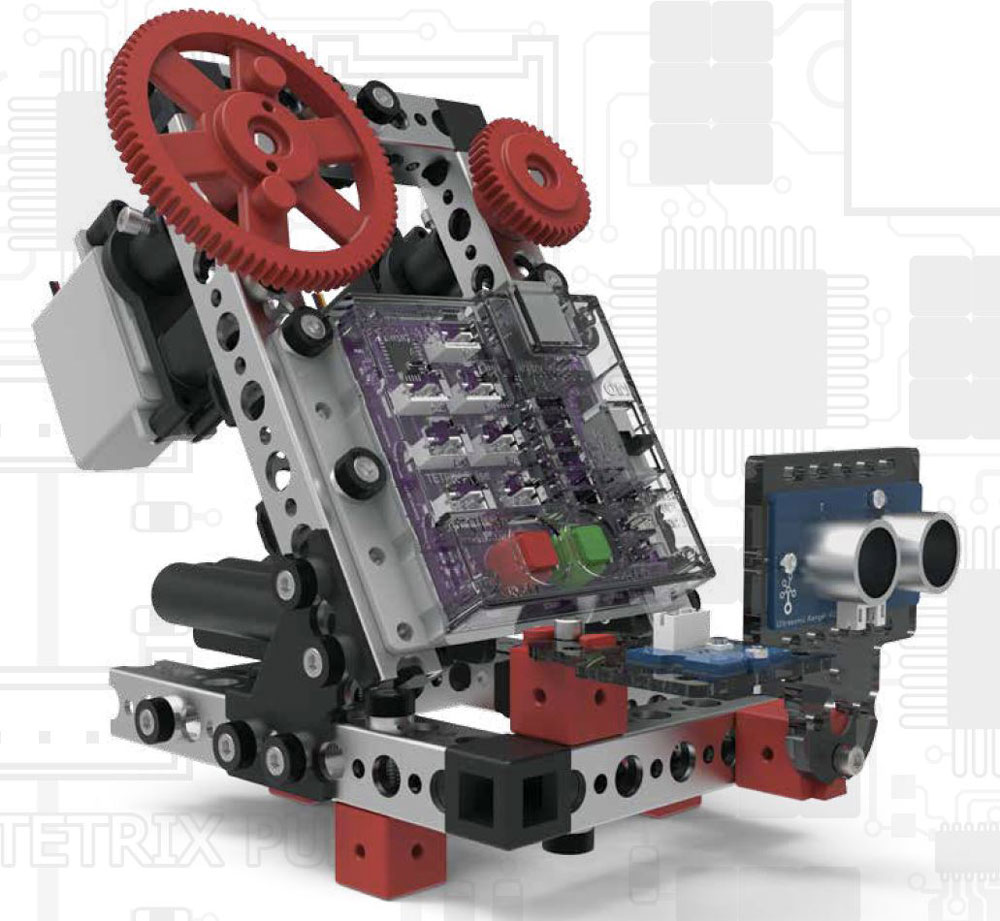
Our class now has the new Tetrix Prime robot kit package, consisting of a hardware mechano-style of robot build parts, micro-controller, remote controller, and receiver. Tetrix Prime was developed for high school use but can also be used with Tetrix Max components. The systems can also be used with R/C styled controllers or a variety or programmable options such as myRIO, Arduino and Labview with LegoMindstorm. The Tetrix Prime hardware of parts include servos, sensors, gears, wheels, shafts, brackets, fasteners, and some tools. Two key sensors include an ultrasonic distance sensor and line follower sensor. The completed package allows students to design, build, program, test, modify, and troubleshoot their robot builds.
![]() Having fun by gaining experience easily with a smaller, simple robot will give you a base knowledge to work on more sophisticated and larger robots.
Having fun by gaining experience easily with a smaller, simple robot will give you a base knowledge to work on more sophisticated and larger robots.
Problem/Challenge:
Download and save the Tetrix guides on to your USB flash drive, for easy access in the future, and review the hardware components and programming sections. In your group, get your numbered group Tetrix build kit of parts box and Tetrix and familiarize yourself with and document all of the components that should be in the box. The Pitsco Tetrix Prime kit should have the same hard copy guides in your box.
For build experience, take your Tetrix kit bot apart from previous classes build by removing the wheels, servos, electronic components and record inventory, then confirm with teacher.
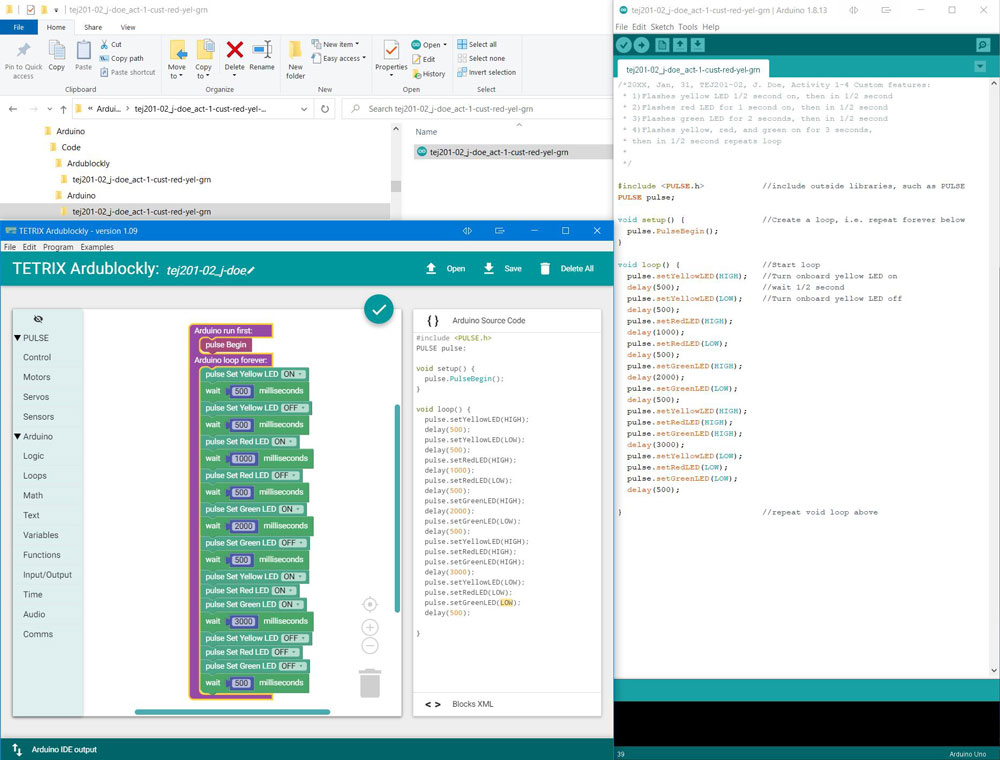
In your group, start on the Hello World introductory activity using the guide, Ardublockly, and Arduino IDE software for programming. Each activity will be checked by your instructor after you have completed it successfully. Extension activities will also gain you experience and marks depending on specific instructions. There are 5 in total of basic activities to get you familiar with the hardware components you will be using in this kit, and the C type Arduino programming language through the Ardublockly interface.

Complete the first 5 activities You will then start on assigned activity on Communicating with your Boe-bot. All programs written need to be saved and coding handed in through a report as instructed for full marks. Two micro-controller question sheets will need to be answered as you work on these assigned activity tasks. With all parts removed, identify and organized all kit components, record number of each on given tracking sheet, then show your teacher.
Investigation/Ideas:

What is TETRIX?
Introduced in 2008, TETRIX is the metal building system from Pitsco, currently comprising TETRIX MAX and TETRIX PRIME. As a great platform for robotics, it has become the building system of choice for many robotics competitions as well as the preferred choice in classrooms across the country and around the world. In 2016, Pitsco Education introduced the TETRIX PRIZM Robotics Controller, a proprietary brain for MAX robots geared at bringing coding to life for students. In 2017, the TETRIX PULSE Robotics Controller was released as the proprietary brain for the PRIME building system.
Safety
Safety is always the number one concern and therefore some safety concerns you should be aware of when working with the Tetirx bot system must be kept in mind when working on it with your partner. First priority is to continue to wear your mask and social distance as much as possible considering current pandemic.
Cleaning, Disinfecting and Sanitation
Cleaning gets rid of debris and deposits on a surface while sanitizing involves killing bacteria after the surface has been already cleaned. Disinfecting is more potent and means to kill most viruses and pathogens on a surface while sanitizing is meant to kill the majority of germs. Some key things to keep in mind with sanitation:

- Sanitize your hands, high touch areas, and tools
- Keep your equipment clean
- Limit communal access
- Make sanitation part of your routine
- Sanitize wipes, spray, and paper towels
- limit excess liquid - spray towel
- Unplug before disinfect
- Allow it to dry
Mechanical
- Keep fingers, hair, and loose clothing away from moving parts
- Never pick-up robot while it is moving
- Remove any burs or sharp edges
Electrical
- Turn off power when robot is not in operation
- Do not operate in a wet environment
- Power down before making any changes
- Use caution when working with bare wires
- Route wires carefully and secure them to avoid damage
- Mount battery pack and electronic equipment securely
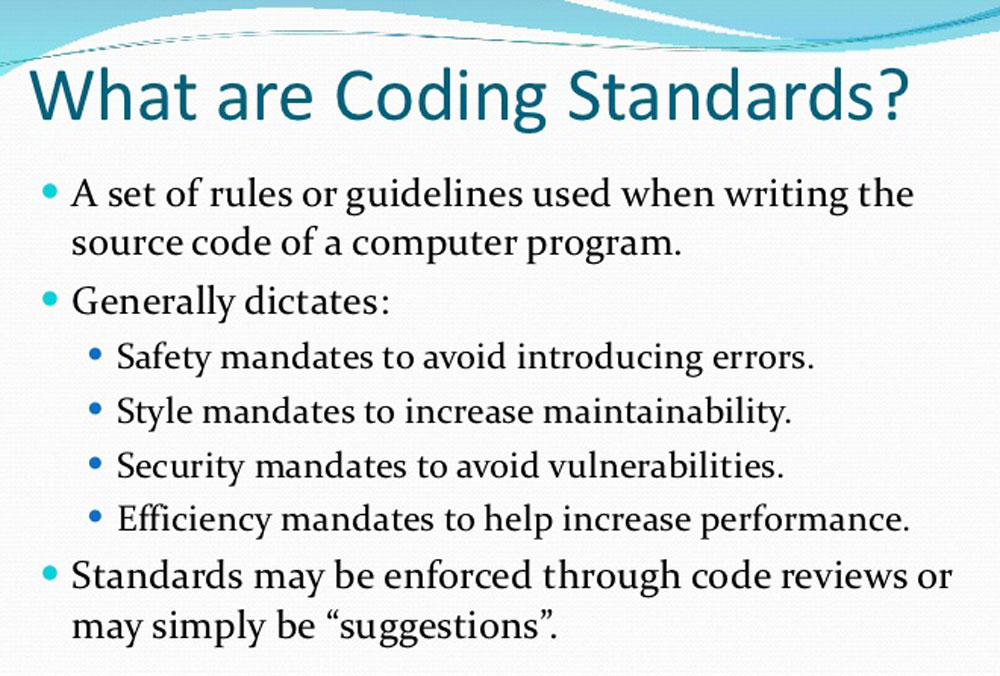
Organization and Coding Standards
The source code for programming Tetrix projects should always be organized and written with the future tasks of testing, debugging and maintenance (possibly by others) kept in mind. These tasks will be easier if the project is well organized and the source code is written in a clear and consistent fashion. It is always good to get into the habit of coding with basic standards in mind. In addition, the future possibility of porting the program to different environments (portability) should be a consideration.
Organization
Each program should be in it's own folder with appropriate file naming convention and include a READ-ME text file representing an overview of the program.
Documentation
The ``public'' documentation of your written source code should inform the reader of who wrote the code and describe what it does. It is common to write these public comments before you write your code. (This also allows you focus and plan your what you really want your program to do.)
/* 2020 Jane Smith (jsmith@tdsb.on.ca) */
/* Hello World - flashing green and red LED */
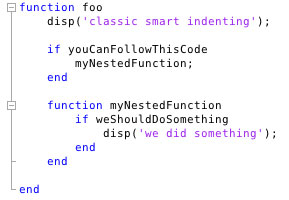
Indentation and Spacing
For all programming languages including C, indentation and spacing is important to apply as a good habit. Source code lines should be no longer than 80 characters as a general rule and recommend using spaces, not tabs, for indentation. Generally by using spacing and indentation, it is easier to follow/read the code, easily shows levels of nesting, scope of the code, and it is better programming sense.
Coding Tips and Info
Ardublockly is a graphical code editor that shows and defines code in a convenient manner which is great for beginners, where Arduino IDE is a strictly a text/syntax coding editor.

Ardublockly
- The Ardublockly graphical code editor saves in an .xml file
- To find out what the code is doing in Ardublockly, hover over the coloured graphical coding pieces, and pop-up will show a quick definition
- Because of Ardublockly's graphic coding blocks, it is easy to see how the code interacts and is easy to understand, see page 21 of programming guide for code explanation
- Once code is completed, Ardublockly uses Arduino IDE's compiler and loader to upload code to the microcontroller
- Ardublockly in our school network is prevented from communicating with Arduino IDE because of account policy settings, but you can manually copy the code to Arduino IDE to compile and upload
COM Ports
- The COM port is a open switched connection to communicate to a specific device that needs to be configured prior
- When initially connecting your microcontroller to your computer, you need to check Ardunio's com port addresses prior, then once connected, you should see a new COM port open up, and that is the one you need to select/point your Arduino to, for it to be successful, loading your code to your microcontroller
Complier
- The Complier is a program that translates one programming language into another lower level machine language to create an executable program
- Low level machine language/code is a set of binary instructions consisting of 1's and 0's called bits, grouped together in 8 bit combinations called bytes, which send various signals to the transistors (millions) containing logic gates in the CPU, opening and closing allowing you to control your computer, or in this case microcontroller
Arduino IDE
- The Arduino IDE text code editor saves a .ino file and wants the coding file saved in a folder named the same
- To find out what the code is doing in Arduino, copy the code command, click on the help menu, for Reference, Ctrl F, paste copied text, will bring up a detailed description
- You can not open an .ino in Ardublockly as it is a different file and needs the .xml structure
- Saving your code in its own folder is a common practice in coding for organization
- Use // two forward slashes to comment after your code, in-line with your code, on the same line - great for defining what that line of code is doing
- Use /* to put multi-line comments, then close with */ - great for beginning documentation for the code creation date, your name, section number and what your code does

Making a Great Report
Making a great report about a project you completed is all about sharing your experiences, the learning process, the highlights, the challenges, and documenting what you completed and showcasing it in a professional structured format.
- How to Write an Effective Project Report in 7 Steps
- In depth Guide to Technical Report Writing
- Title page will usually include a picture related to project reporting on, a main title, sub-title, report creator name, date, and any other relevant information
- Overview will give the reader a quick simple preview (intro) of the report's contents allowing the reader an understanding of the project, key info, main points and/or components in your report
- Body of the report is where you will show your documentation from your project in a neat organized manner including titles and sub-titles if necessary
- Summary/conclusion talk about what you accomplished, your experiences and highlights, what you found challenging, what you would change if you could do it again, what you liked most, and anything else you feel important to recap
- Resources and references usually are included in the end, crediting information sources, guides, equipment, tools, and support partners arranged in order of importance
Tutorial Videos
Below are tutorial videos going over the 5 activities to be completed in this unit activity.
 Activity 1: Hello World! 16.30
- Activity 2: Moving Your DC Motors 7.02
- Activity 3: Moving Your Servo Motors 8.03
- Activity 4: Using the Line Finder Sensor 5.49
- Activity 5: Introduction to the Ultrasonic Sensor 5.38
Resources
- TETRIX PULSE Robotics Controller 8.50
- Installing Tetrix Software 8.50
- Pitsco Tetrix Prime support page
- All about Arduino code
- Arduino Built-In Examples
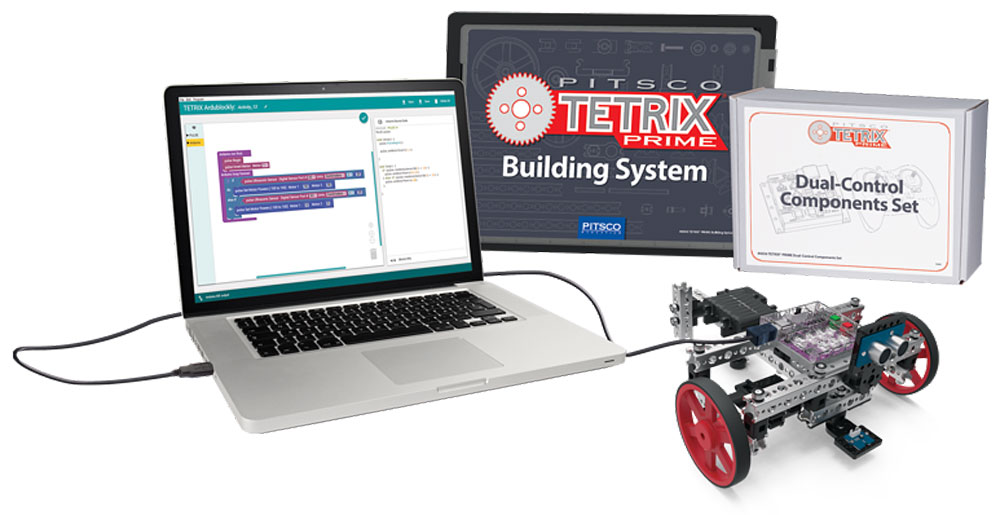
- TETRIX PRIME Dual-Control Robotics Set
- Micro-controllers Intro
- Micro-controllers Types
- Ardublockly online demo
- C Coding Standard
- Indent size for code
- TinkerCAD
- fritzing
- Electronic components
-
 Electronics Intro
 - Basic Electronics 1
- Basic Electronics 2
- Arduino Class
- Electronics Class
- LEDs and Lighting Class
- Robobench: Tetrix Prime video Resources Index
TinkerCAD Introduction
Tinkercad Circuits allows anyone to virtually create and program Arduino projects without the need for physical hardware. This will be used while we are full virtual to simulate hardware and programing for the Arduino controller.
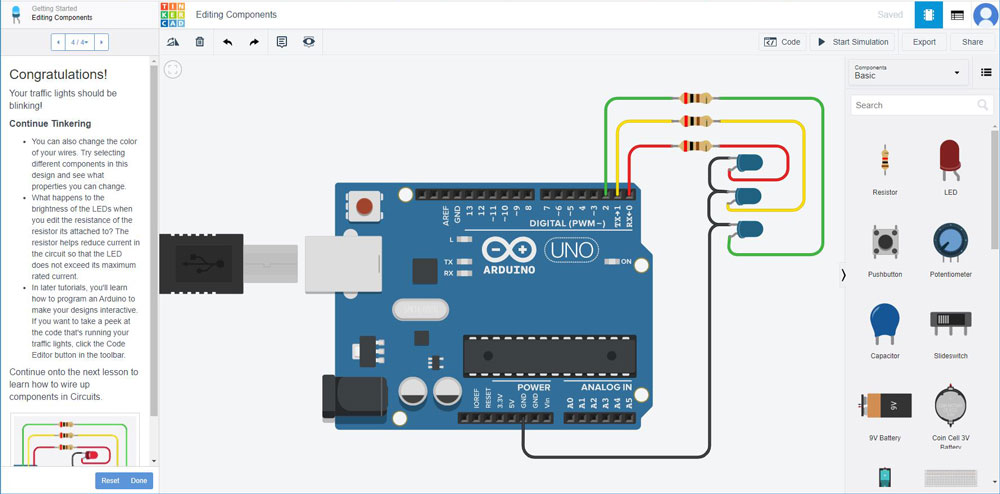
You will have to learn how to use TinkerCAD. It is a virtual online electronics control board and circuit simulator. Instead of doing your programming for the Tetrix prime controller board, you would use the Arduino Uno R3 with a breadboard.You would need to build your circuits (add LED's, servo's, etc and wire them up) virtually before programming them, then write the code.
For our hardware and coding projects, you will have to set-up a new project with the Arduino board with a breadboard, and add your components on the breadboard as needed (you are limited with the components they have, but they have a fair bit), wire up, then write the code, and finally simulate the circuit and coding to see if it works.
Resources
Create/Construct:

Background, Familiarization of Robot Kit

For this activity we have a numbers of tasks to complete to familiarize ourselves with the Tetrix bot kit. These tasks will help you fully understand how to work with the Tetrix and learn about the important components of a robot such as sensors, movement, energy, intelligence, and functions. Here are the steps/tasks to be completed:
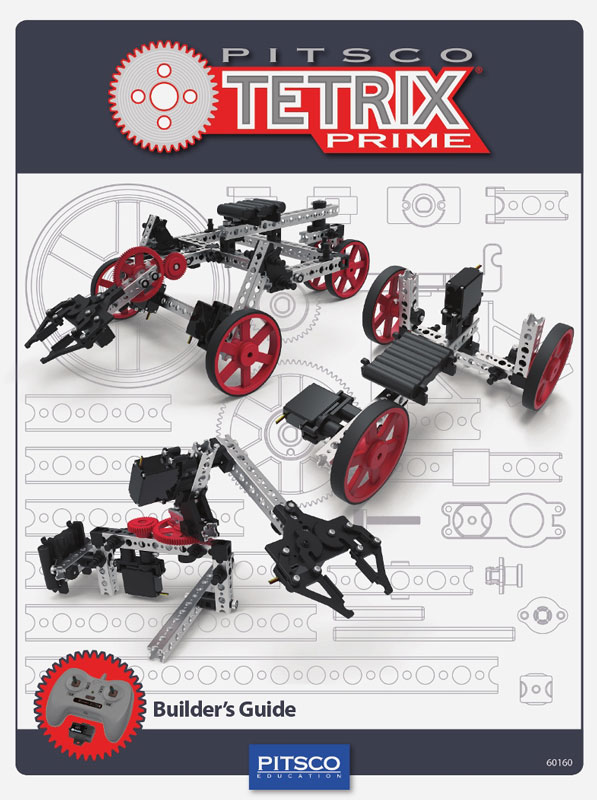
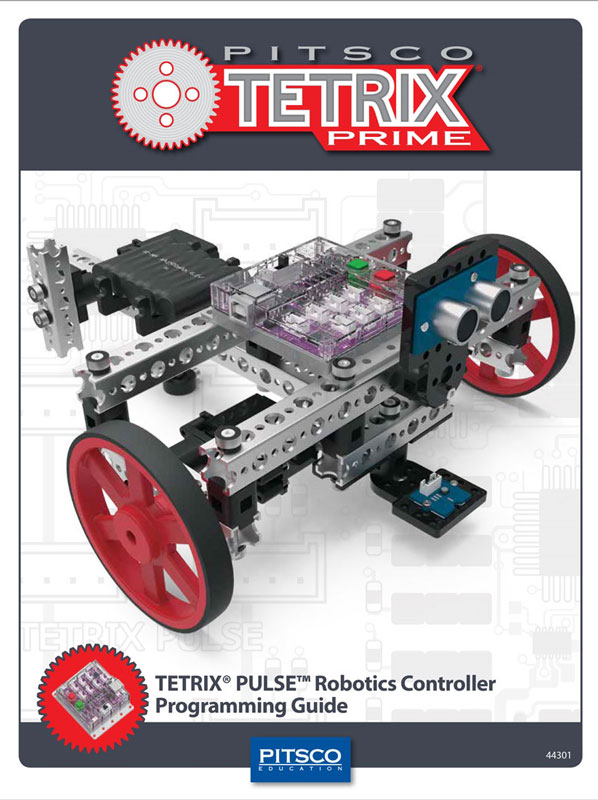
- Download and save the Tetrix Prime Builders Guide manual and the Tetrix Prime Pulse Programming Guide manual on to your USB flash drive to review during activities, at home, and for future robot design.
- After review of both manuals, you are to research and answer the questions to the Tetrix Micro-controllers assignment handout provided, to be later taken up in class.
- Students are to be assigned into groups of two, to work together and share a Tetrix kit of parts.
- The Tetrix is to be disassembled separating the servos, control board, beam frame, connectors, fasteners, etc. Organize your parts using your tray and bin
- With your assigned robot kit: TETRIX PRIME Programmable Robotics Set Parts list, you are required to confirm all parts in your assigned plastic kit box which is filled with assorted hardware, tools, cables, power charger, battery pack, robot build pieces, hard copy guides, etc - remove/add components, if possible and update/show in inventory sheet.
The intention in step 5 above is to balance kits out, with those who have too many parts with those that missing parts/components, i.e. groups with extra parts to put in the overflow parts bin, and those who need parts use the overflow bin to re-stock their inventory, then update their iventory sheet, both showing their efforts.
Hardware and Programming Activities
For each of the 5 activities (in the ![]() Tetrix Prime Pulse Programming Guide) below, you are to complete them in your group with both partners practicing the same steps at their own station, saving files for each project in your own organized folders and file save locations. Extension projects of each of the activities will be customized with a minimum of 4 additions/modifications to show your own custom additions modifying and expanding on the original activity. Once each person in the group has completed their own custom extension activity, they are to show the instructor their completed code and successful operation before moving on to the next activity.
Tetrix Prime Pulse Programming Guide) below, you are to complete them in your group with both partners practicing the same steps at their own station, saving files for each project in your own organized folders and file save locations. Extension projects of each of the activities will be customized with a minimum of 4 additions/modifications to show your own custom additions modifying and expanding on the original activity. Once each person in the group has completed their own custom extension activity, they are to show the instructor their completed code and successful operation before moving on to the next activity.
Remember to save work with a folder, class file naming conventions, coding standards, including commented in order of date, course/section, name, and description with new lines of code showing definition/explanations. A final Google doc report is to include a title page, with picture of one of your circuits in action, an overview, all your code activities (sample and custom), below each activity code - state 3 real life applications and related careers and a final report summary conclusion.
- Activity 1: Hello World - you will complete an intro activity for beginner to blink on-board LED
- Activity 2: Moving Your DC Motors use PULSE to control one PRIME DC Motor
- Activity 3: Moving Your Servo Motors - rotate a servo motor work with positioning
- Activity 4: Introduction to the Line Finder Sensor - introduce sensors and how to work with the Line Finder Sensor using PULSE
- Activity 5: Introduction to the Ultrasonic Sensor - work with the Ultrasonic Sensor using PULSE
- As you complete each task, copy and paste/save your text coding in a doc file for later, to hand-in a report with title page, overview, your code with 2 real life applications and related careers for each activity, and a final summary conclusion.
- Remember when you finish each task in order given, have the teacher check your work to assign you a practical mark, which is separate to the report.
TinkerCAD Virtual Exploring
1) Virtual Intro
Instead of working directly with the Tetrx kit, we will experiment with some virtual electronics and hardware with the built-in coder offered by TinkerCAD. You can get started by following these instructions using your school Gmail account and your class link given by your teacher:
- Go to your class link, link attached in the Google Classroom assignment
- Log in using your school email account
When you join up, go to circuits, and you will go through a "Getting Started" set of tutorials (for practice and get familiar with the circuit simulator) to complete. There are 4 tutorials for you to complete that include:
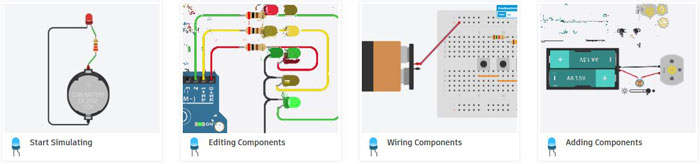
- Start Simulating
- Editing Components
- Wiring Components
- Adding Components
Using a Google doc, you are to create a one page report that includes the following:
- Create a header with title (to the left), name, date, section (right side), then create a page title (header 1) "TinkerCAD Intro" in body
- take a screen-shot of your favorite completed project from the four that you have done, sized to fit about 1/3 of the top of the page (4)
- for the rest of the page, create subtitles (header 2's) for each project
- a short description of each (4*2=8)
- list three things you learned in each tutorial in point form (3 bulleted points, 2*4=8)
2) Virtual Component and Coding
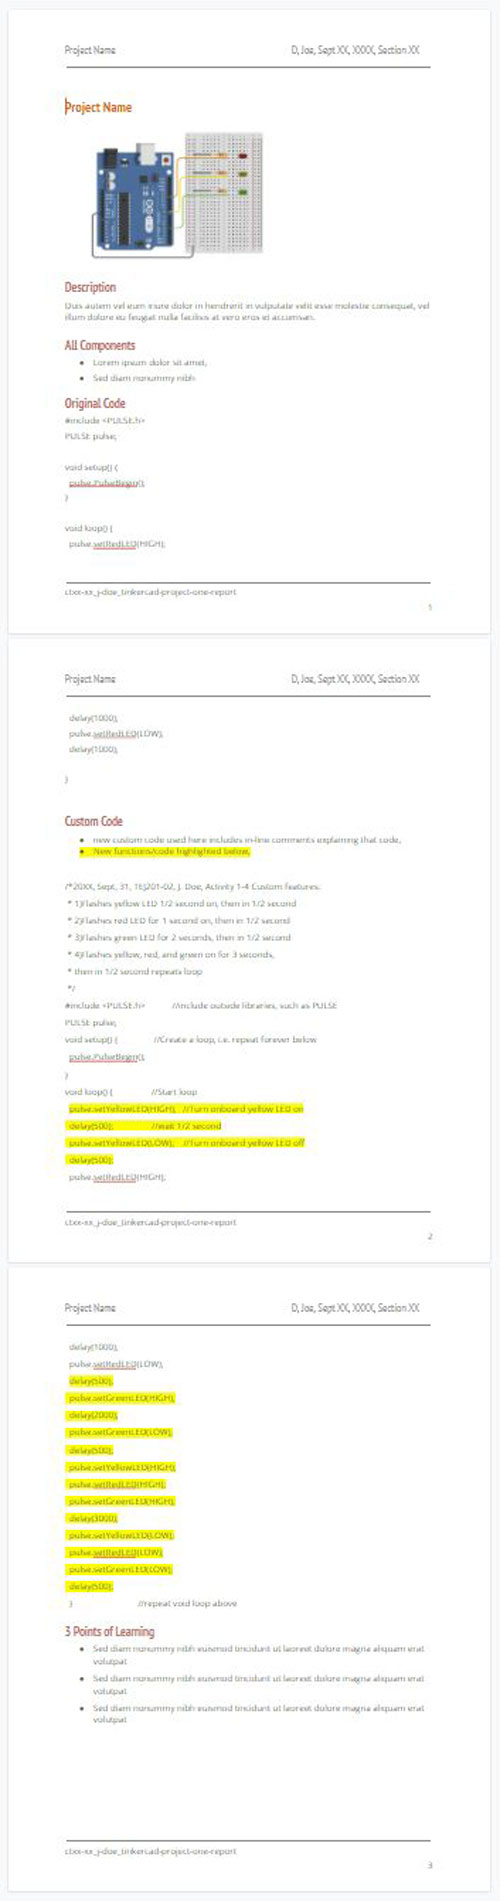
For this project in TinkerCAD, (remember to join your class, class code name was given in email join invite) you will be building a virtual electronic hardware project, adding some code, testing to see if it works, then modifying with 3 new coding functions which may include additional hardware. Each project will require a report showing your final project with new components and coding. Your custom coding will show the coding syntax (text) with multi-line documentation at the beginning and in-line comment explanations for new code not yet used before. Using a Google doc (template supplied in Google Classroom), fill in a report for each project completed, which is to include the following:
- Header with Project name, Your Name, Date, Section & Footer with file name and page number
- Title of your project
- A screenshot of your final custom completed project, sized to fit about 1/3 of the top of the page (6)
- Description of project (2)
- List of the technical names of all electronic hardware components used in project (2)
- Original code used to test initial cct and function (1)
- Custom code with 3 modifications to code and components (highlighted) (6)
- Three bulleted points, detailing what you learned (3)
Below are the projects to be completed in chronological order, once you have finished project, create report and submit for review while you start on the next one. Ensure you check your feedback on your previous project report before submitting your next report.
- Blink an LED rev, Multiple LEDs and Breadboards
- Fading LED
- RGB LED Color Mixing
- Digital Input With a Pushbutton
- Read a Potentiometer (Pot)
- Light Sensor (Photo-resistor) Vid 7.39
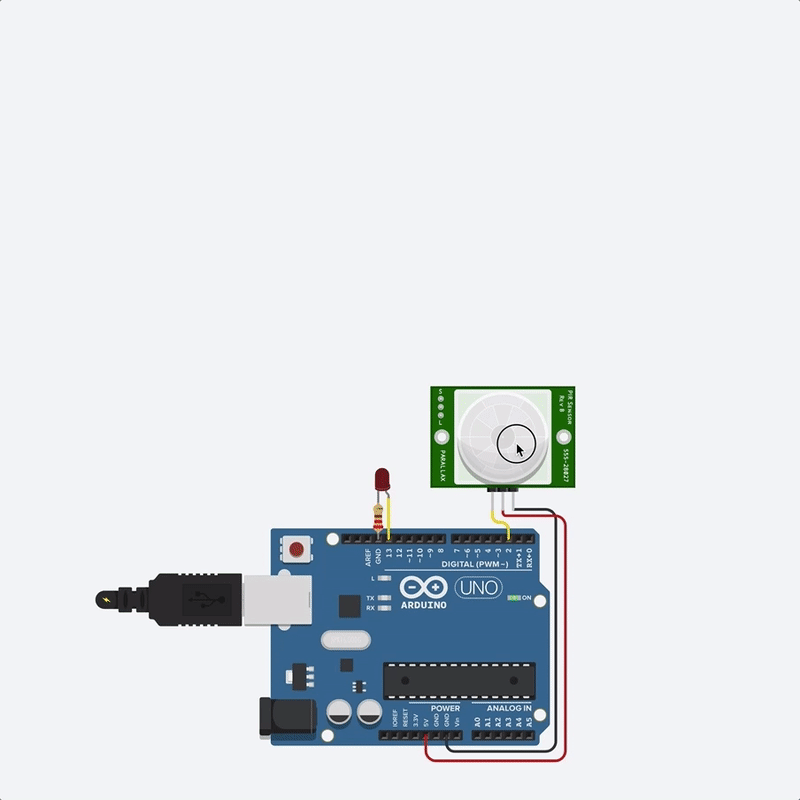
- PIR Motion Sensor
- Ultrasonic Distance Sensor Vid 7.55
- TMP36 Temperature Sensor
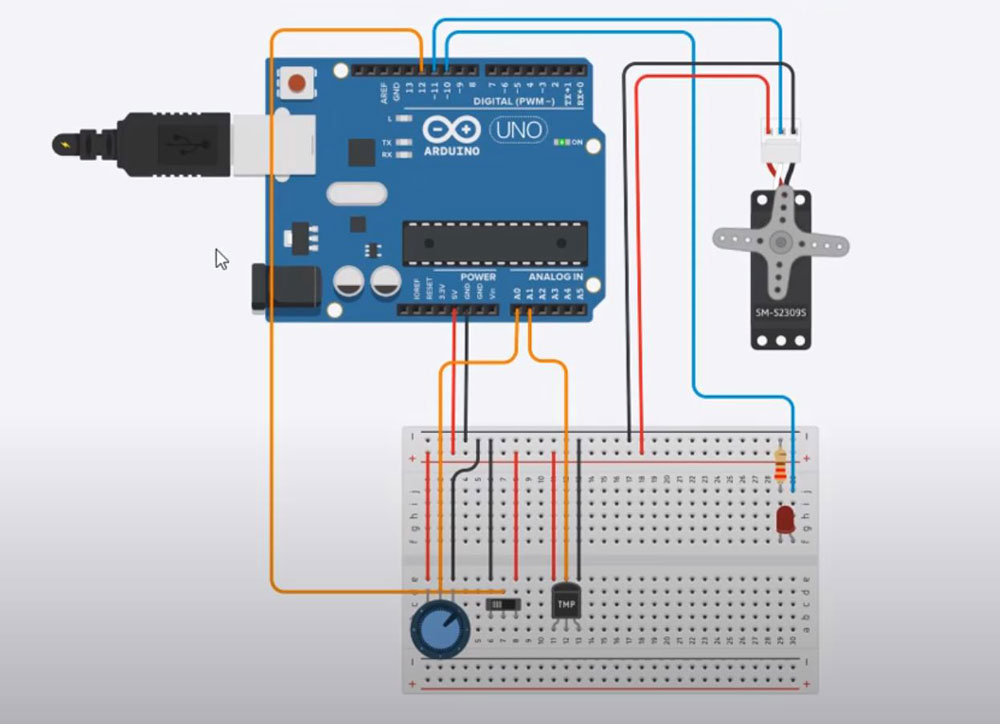
- Servo Motor, ctrl by Pot
Original Cct Build
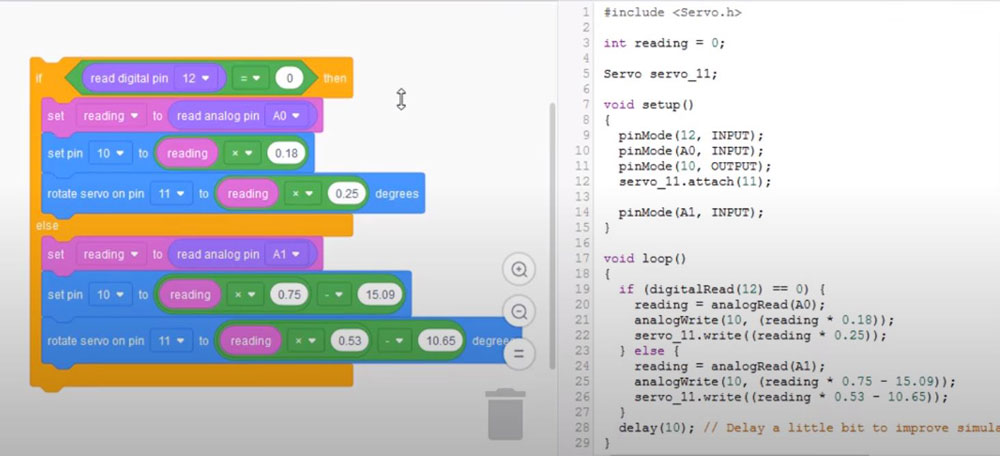
Original Cct Code
Flex Project - TCAD Sensors and Actuators
For a "Flex" project, you can improve your mark by doing this ![]() TCAD Sensors and Actuators project, but if you don't, it will not count towards your mark. This way students can choose to work on finishing up term work or work on this project to improve mark. This project will be out of 40, to include the usual custom code with 3 function modifications, documentation, highlighting, and 3 detailed learning points. For your convenience, you have images of the original build and code along with the
TCAD Sensors and Actuators project, but if you don't, it will not count towards your mark. This way students can choose to work on finishing up term work or work on this project to improve mark. This project will be out of 40, to include the usual custom code with 3 function modifications, documentation, highlighting, and 3 detailed learning points. For your convenience, you have images of the original build and code along with the ![]() video tutorial provided.
video tutorial provided.
Evaluation:
Each Tetrix custom activity task is to be checked by the teacher before moving on to the next project. Remember code writing conventions for each of the program tasks to be done.

| Evaluation Breakdown | Marks |
|---|---|
| Always double check that you have completed all work for full marks. | |
| Micro-controllers 1 - Questions answered correctly | 40 |
| Tetrix Disassemble & Inventory - Actual +/- from/to overflow bin = balanced final kit | 20 |
| Activity 1 - Hello World! - sample /4, cust /6 | 10 |
| Activity 2 - Moving Your DC Motors - sample /4, cust /6 | 10 |
| Activity 3 - Moving Your Servo Motors - sample /4, cust /6 | 10 |
| Activity 4 - Using the Line Finder Sensor - sample /4, cust /6 | 10 |
| Activity 5 - Introduction to the Ultrasonic Sensor - sample /4, cust /6 | 10 |
| Programming Doc Report and Code - Code, 2 real life, & career /50, title, over, sum /10 | 60 |
| TinkerCAD - report on the completed 4 intro tutorials (4, 8, 8) | 20 |
| TinkerCAD - project build and custom 1-9 reports, each worth | 20 |
| TinkerCAD - projects build and custom 10 report | 30 |
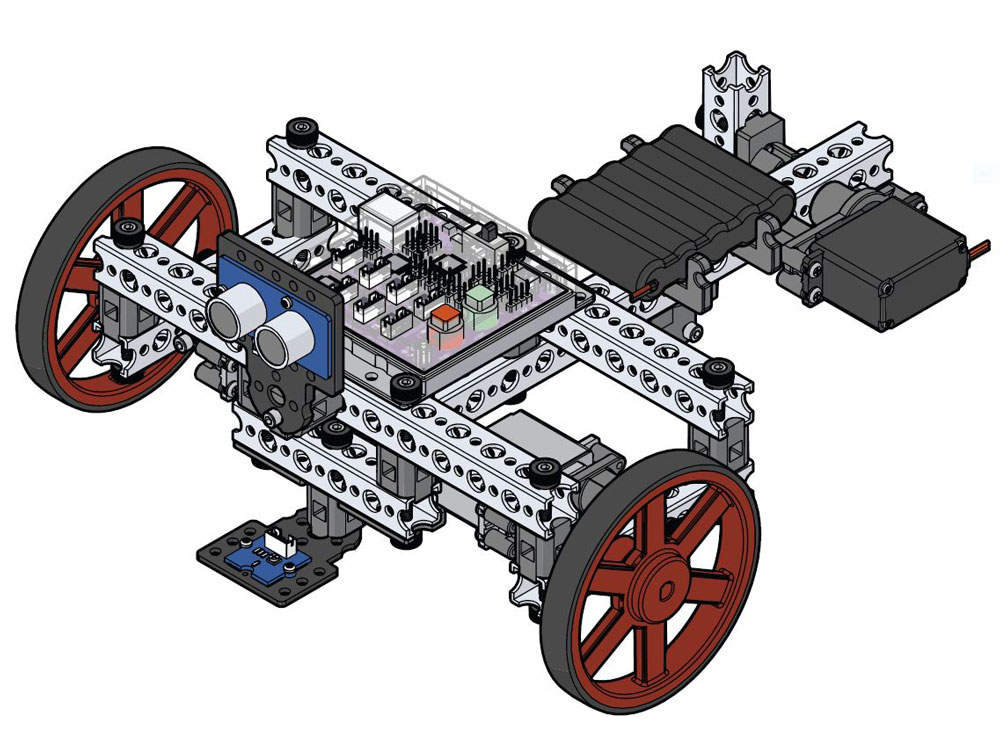
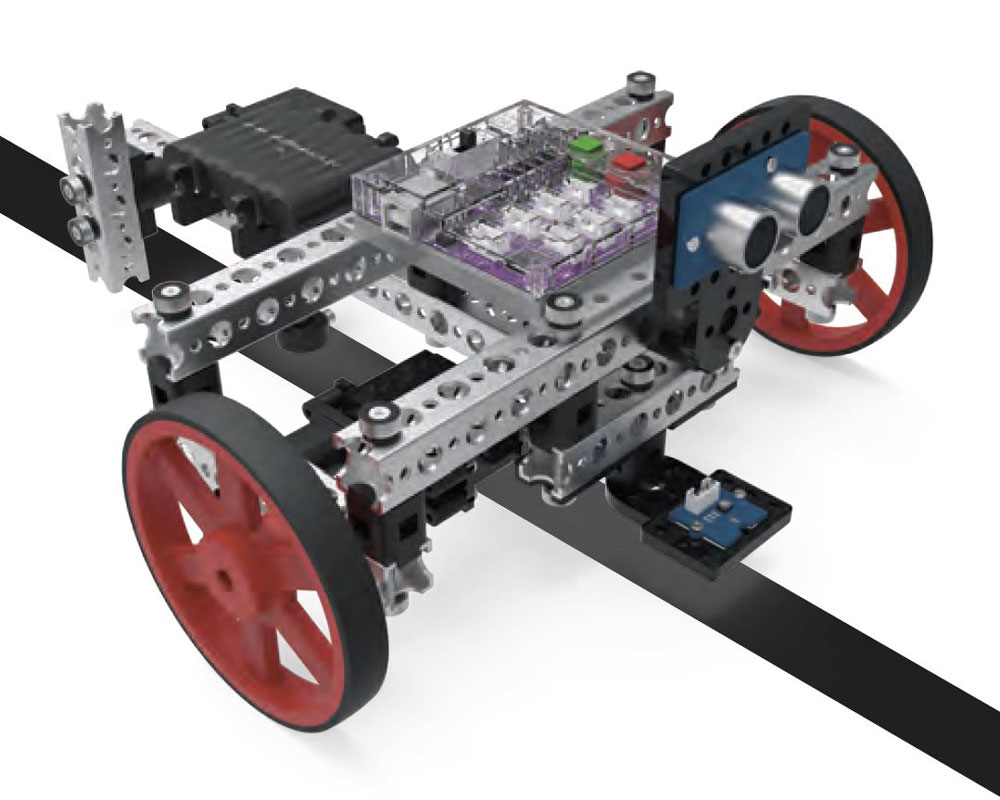
Unit 4, Act. 2: Tetrix Build and Navigation
Situation:
Now that students are familiar with the Tetrix kit (inventory check and balance), some basic coding, servo operation, and sensors, students are ready to explore a little more in-depth with the autonomous robot features. To create some more advanced programming automation, the Tetrix Codee bot build will be needed to combine kit components for more coding sequences.
Problem/Challenge:
Students are to complete activity 6, to build Codee using the steps found in the programming guide provided. Once Codee is built, students will work through activities 7-15 running code for; driving forward, circle, square, to a line, follow a line, wall stop, avoiding obstacles, and combining sensors. Each of the activities will require you to customize your coding to do 4 new task/features, based on current given coding exercise activities along with the proper coding standards, documentation, and defining new code functions used. Once finished all of the activities with your individual custom coding, a document report with title page to include picture of your bot, overview, your coding (sample and custom), and summary, will be submitted for a report mark.
Investigation/Ideas:

Build time with your partner should be less than an hour, allowing you to get coding relatively quickly. The ![]() Tetrix Prime Builders Guide has multiple sample robot design ideas, but as you will be using the Tetrix Prime controller with Arduino programming code with the activities, the
Tetrix Prime Builders Guide has multiple sample robot design ideas, but as you will be using the Tetrix Prime controller with Arduino programming code with the activities, the ![]() Tetrix Prime Pulse Programming Guide will be better to follow here. This programming guide gives you great information and illustrations on getting started with your Codee bot build. Here are some of the highlights you should check out:
Tetrix Prime Pulse Programming Guide will be better to follow here. This programming guide gives you great information and illustrations on getting started with your Codee bot build. Here are some of the highlights you should check out:
- Parts Index, p47
- Servo Assembly, p54
- Construction Tips, p61
- Wheel/axle build, p67
- Codee Bot build steps, p69-87
One of the first things you will have to do is to build a bot using the building components from the Tetrix Prime kit. The following are some points to keep in mind when building your bot.
- Use the right tool for the right job
- Don't over tighten, snug tightness only
- Rivet and thumbscrews for fastening
- Use bronze bushings with D axles in beams
- Standard servos only have limited rotation (180 degrees)
- Mount battery securely
- Ensure cables are secure
- Ensure your electrical connectors are properly connected (match wire colours)
- Handle bot carefully as sensor brackets are easily broken
- Run program only when safe to do so, on floor or wheels jacked off surface
- Do not run robot on a table, use floor
Activity Videos
Use the videos below in addition to the ![]() Tetrix Prime Pulse Programming Guide steps to gain more insight into each of the activities. We will focus on building and programming the PULSE Codee Bot, but there is a great video resource showing the build for the Tetrix Prime Wheelee Bot 18.34, you can also use as a resource for building support along with the
Tetrix Prime Pulse Programming Guide steps to gain more insight into each of the activities. We will focus on building and programming the PULSE Codee Bot, but there is a great video resource showing the build for the Tetrix Prime Wheelee Bot 18.34, you can also use as a resource for building support along with the ![]() Tetrix Prime Pulse Programming Guide
Tetrix Prime Pulse Programming Guide
- Activity 6: Build the PULSE Codee bot, Page 69 of the Pulse Programming Guide
- Activity 7: Drive Forward 4.50
- Activity 8: Drive in a Circle 3.56
- Activity 9: Drive in a Square 6.14
- Activity 10: Simplify the Square 4.35
- Activity 11: Drive to a Line and Stop 4.56
- Activity 12: Follow a Line 4.32
- Activity 13: Drive Toward a Wall and Stop 5.17
- Activity 14: Avoiding Obstacles 4.13
- Activity 15: Combining the Sensors 6.53
Create/Construct:
You are to build your PULSE Codee Bot, have it inspected by a peer group before getting approved by the instructor. Once given the go to start coding, follow the activity guides to run different navigation codes given, then as before, add 4 additional program features to individually expand/customize on the activity. You are to document your custom code in the Arduino IDE editor with your information and the bots 4 new programmed features and save the code for your report later.

- Activity 6: Build the PULSE Codee Bot - follow the guide and/or video demo
- Activity 7: Drive Forward - move the Codee Bot forward for three seconds and stop
- Activity 8: Drive in a Circle - move Codee Bot in a preset diameter circle
- Activity 9: Drive in a Square - make 90-degree turns to make the Codee Bot drive in a square
- Activity 10: Simplify the Square - another simpler way to drive in a square
- Activity 11: Drive to a Line and Stop - using the line follower sensor, have Bot stop at a dark line
- Activity 12: Follow a Line - create different curves for bot to follow
- Activity 13: Drive Toward a Wall and Stop - using the sonic sensor, have bot stop a set distance from wall
- Activity 14: Avoiding Obstacles - program different direction if something is in the way
- Activity 15: Combining the Sensors - combination of all to do multiple tasks autonomously
Remember to save work with a folder, class file naming conventions, coding standards, including commented in order of date, course/section, name, and description with new lines of code showing definition/explanations. A final doc report will include a title page, with picture of one of your circuits in action, an overview, all your code activities (sample and custom), below code state 3 real life applications and related careers and a final summary conclusion.
Evaluation:

Each Tetrix custom activity task is to be checked by the teacher before moving on to the next project. Remember code writing conventions for each of the program tasks to be done.

| Evaluation Breakdown | Marks |
|---|---|
| Always double check that you have completed all work for full marks. | |
| Activity 6 - Build the PULSE Codee Bot, wiring, build quality, and fit | 40 |
| Activity 7 - Drive Forward sample and custom code (4 new features) | 10 |
| Activity 8 - Drive in a Circle sample and custom code (4 new features) | 10 |
| Activity 9 - Drive in a Square sample and custom code (4 new features) | 10 |
| Activity 10 - Simplify the Square sample and custom code (4 new features) | 10 |
| Activity 11 - Drive to a Line and Stop sample and custom code (4 new features) | 10 |
| Activity 12 - Follow a Line sample and custom code (4 new features) | 10 |
| Activity 13 - Drive Toward a Wall and Stop sample and custom code (4 new features) | 10 |
| Activity 14 - Avoiding Obstacles sample and custom code (4 new features) | 10 |
| Activity 15 - Combining the Sensors sample and custom code (4 new features) | 15 |
| Programming Report and Code - All sketches in a doc format | 50 |