Unit 1: Grade 10 Construction - Woodworking Safety, tools, and Practice

Welcome to the the grade 10 Construction Woodworking course. This 18 week course introduces students to wood shop safety, hand tools, machines, industry, and a series of hands-on wood working projects starting from common wood joints to a significant chess-game coffee table.
Course Units and Descriptions
Use this table for an overview and navigate to each of the course unit pages.
| Unit | Description |
|---|---|
| Review course outline for more details | |
| 1 | Safety, tools, and Practice - intro, safety, hand tools, joints, and practice |
| 2 | Woodworking Machines & Build - machine safety and table build |
Unit Activity Breakdown Format
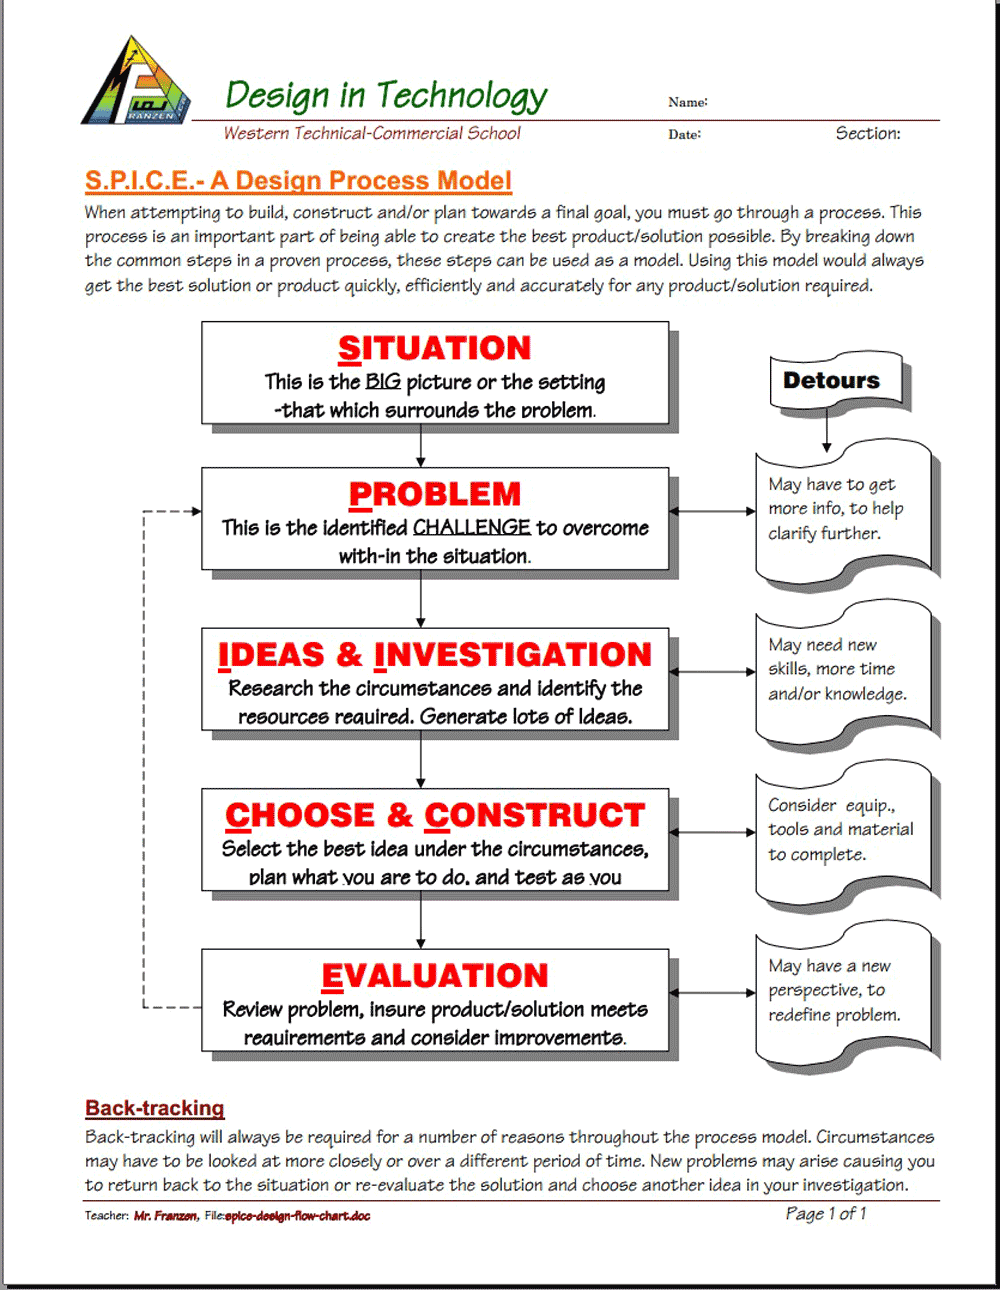
You will notice each unit activity below is broken down into five subtopics using ![]() SPICE, to guide and help you through the project and assignments related to the unit activity:
SPICE, to guide and help you through the project and assignments related to the unit activity:
- Situation - This is the introduction, big picture, or you can think of it as the setting of story/novel
- Problem/Challenge - What must be resolved or completed, i.e. what you will need to accomplish
- Investigation/Ideas - includes gathering ideas, research and organizing information to help create, construct, and/or complete the Problem/Challenge
- Create/Construct - take your best idea and complete and/or build the needed solution
- Evaluation - did the Problem/Challenge above get resolved and/or completed

Unit Activity Quick Links, Click to Jump to the Specific Activity!
- Unit 1, Act. 1: Course Information, Organization, Shop, and Safety
- Unit 1, Act. 2: Hand Tools, Building a Wood Joint Frame Project
- Unit 1, Act. 3: Jack plane - Sanding Block
 Unit 1, Act. 1: Course Information, Organization, Shop, and Safety
Situation:

Class of students starting a new course-rotation to learn about woodworking
Problem/Challenge:
Getting familiar with what the course is all about, class routines, expectations of the course and the teacher, general administration of class, and safety are all important issues to know and understand, so that the learning process can begin.
Investigation/Ideas:
The following is list related to this course and should be reviewed by students:

- Course Details
- General Safety
- Detailed Safety Issues
- Shop/room Layout
- Shop/room Resources
- Emergency Procedures
- Expectations
- Evaluation
- Class Policies
- Routines
- Attendance and Lates
- Moodle Log-in
It is important that students feel comfortable with the above points and should know what is happening in the course.
Create/Construct:
Start by organizing your school equipment and supplies for taking and storing your notes. Review the course outline and class routine, write down any questions you have about the course, requirements, or responsibilities you need to be clear on.

Intro Links and Resources
The following list of links are details that students are to review, after going over them in class:
- Construction Wood Working Course Outline
- Introduction to Technical Classes
- General Safety Presentation
- General Safety Contract
- Course Achievement Breakdown
- Evaluation and Tips Breakdown
- Mark Feedback HO
- Introduction package handout
- Text Reading Assigned Questions
- Shop and Machine safety package handout
Daily Notes
The following are links to ![]() PDF notes, students copy down daily, for reinforcement of related lesson topic, discussion, samples shown, and demonstrations which also greatly supports safety and practical course projects.
PDF notes, students copy down daily, for reinforcement of related lesson topic, discussion, samples shown, and demonstrations which also greatly supports safety and practical course projects.
Evaluation:
Although these are not heavily weighted, they are important project assignments that will benefit you throughout the rest of this course

| Evaluation Breakdown Component Descriptions | Marks |
|---|---|
| Always double check that you have completed all components for full marks. | |
| Survey - Answer all 7 questions fully | 10 |
| Course Outline Signed - Take home to show your parents and get signed by parent | 5 |
| Tech Info - Filled out with weight %, 10 course components, and two peer contacts | 10 |
| Total Marks | 25 |
If you feel comfortable that you know all the details of the class/course details, you are ready to move on to the next activity. Be prepared to be able to write a quiz on the above details.
Unit 1, Act. 2: Hand Tools, Building a Wood Joint Frame Project

Situation:
New to the shop, wood hand tools, wood industry, etc., students will have the opportunity to start learning about the wood industry, wood basics, terminology, and how to use hand tools.
Problem/Challenge:
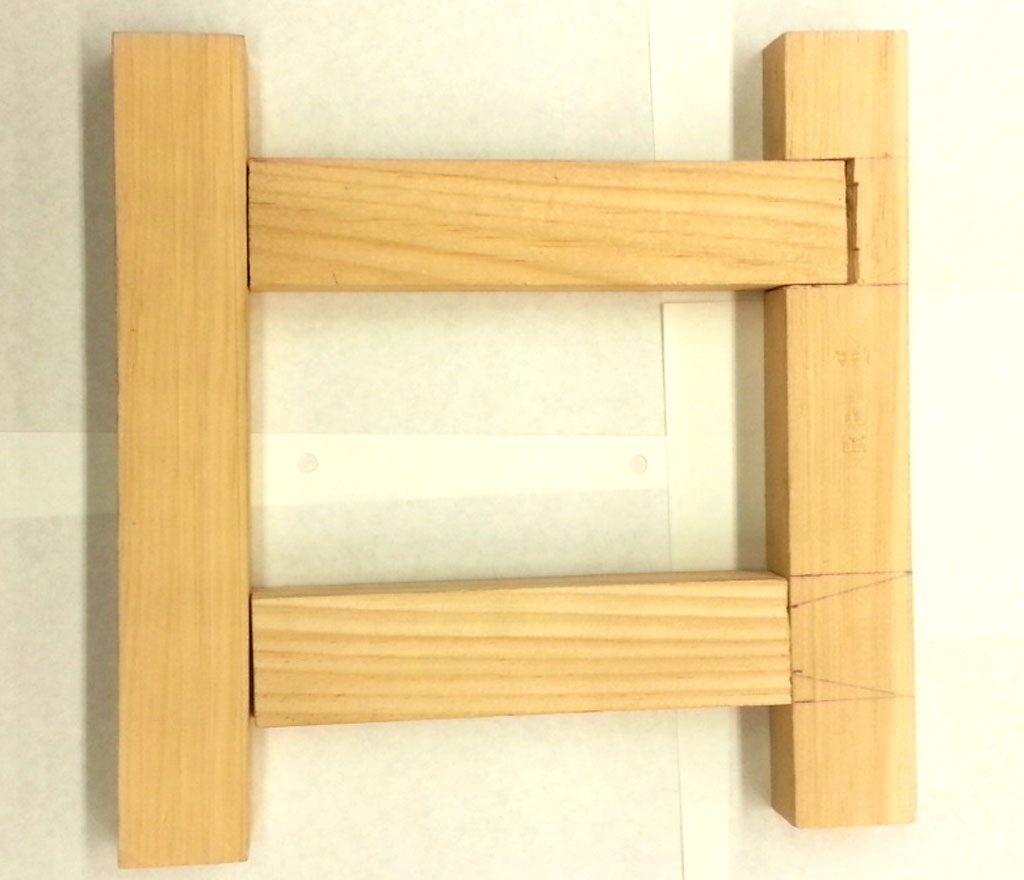
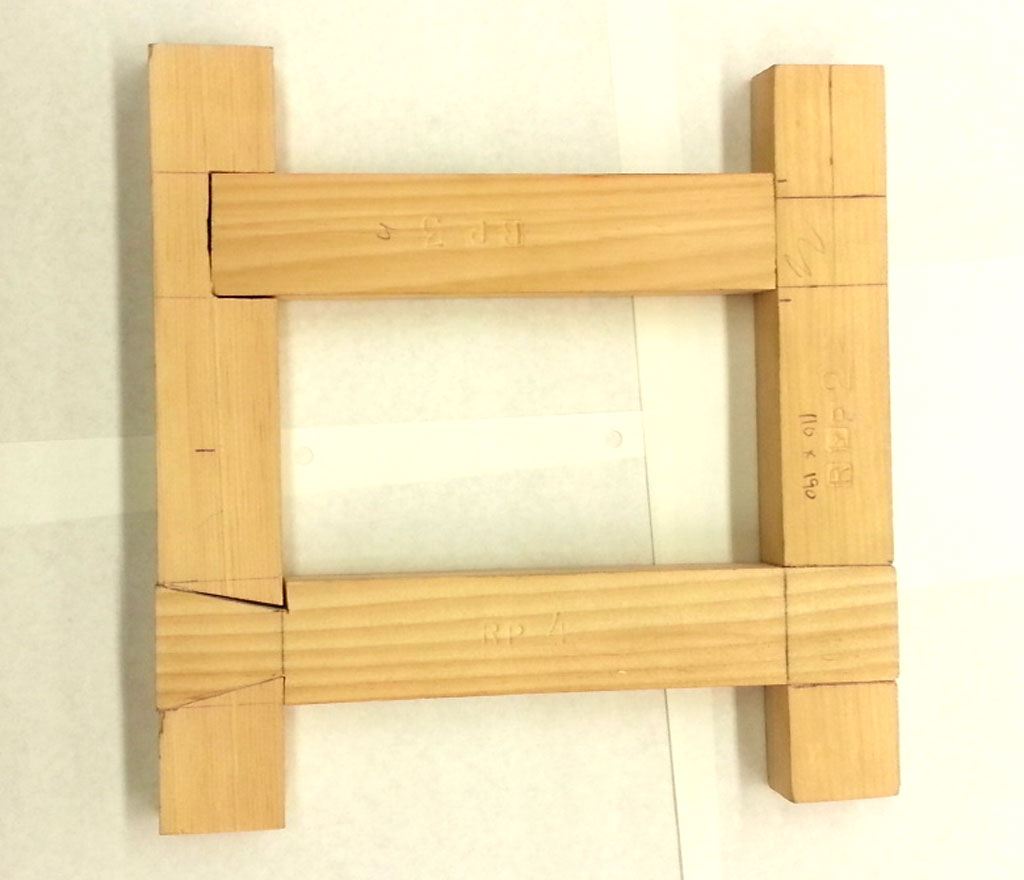
Learn about related wood industry occupations, safety and use of wood hand tools, apply learned skills to create wood joints to create a frame to show common wood joints using wood hand tools.
Investigation/Ideas:
General Information
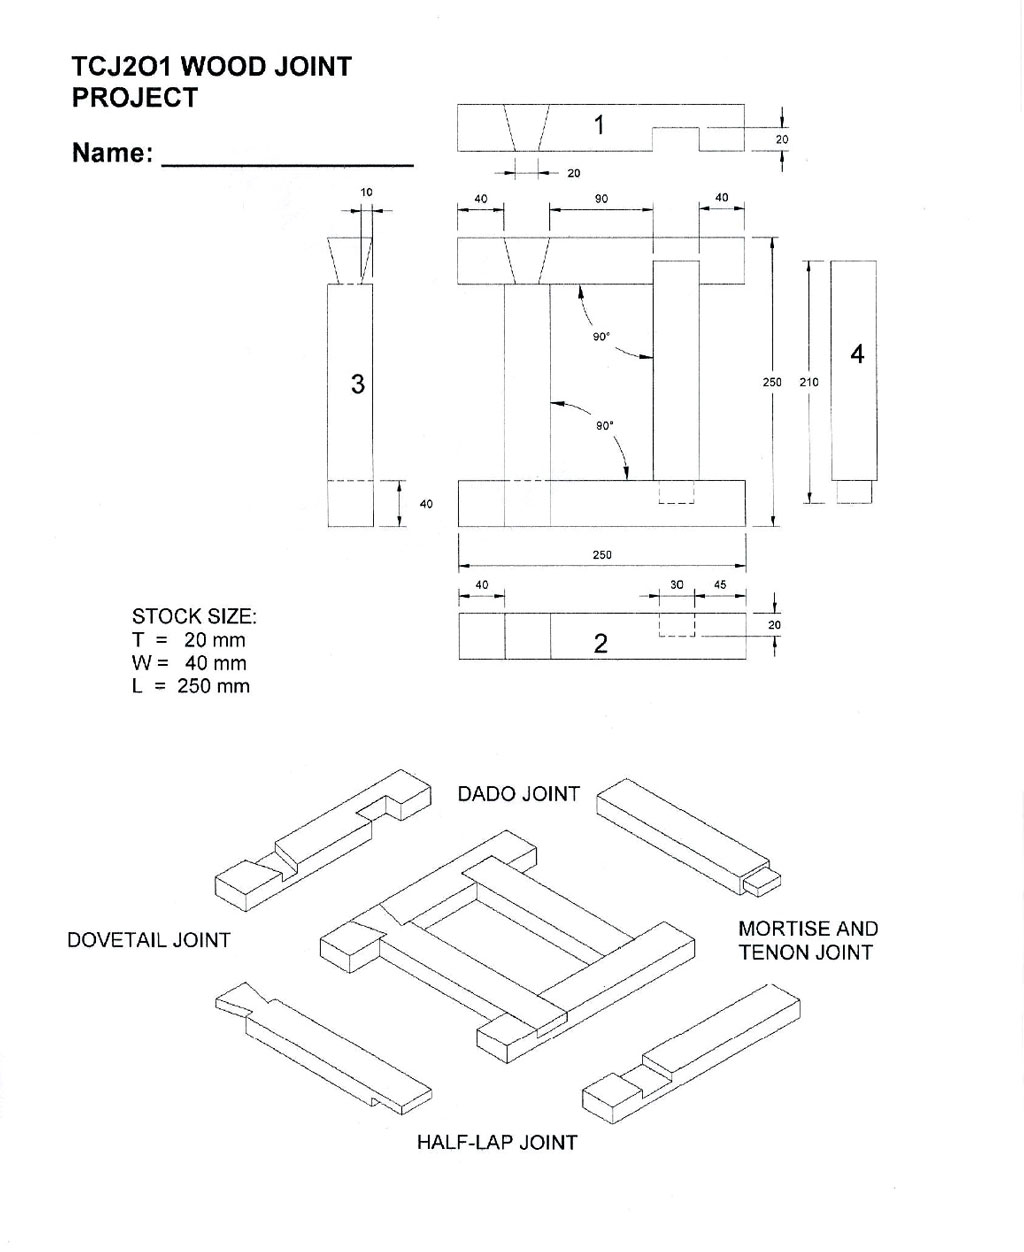
Introduction to the basics of woodworking, shop safety, hand tools, operation, and related safe skill sets to measure, mark, layout, and create wood joints. Wood joint project will be the goal for students to build which will include a dado, cross lap, mortise and tenon, and dove tail. This project will also use the router to create a dado backing ledge for centre backing picture support.

Daily Notes
The following are links to ![]() PDF notes, students copy down daily, for reinforcement of related lesson topic, discussion, samples shown, and demonstrations which also greatly supports safety and practical course projects.
PDF notes, students copy down daily, for reinforcement of related lesson topic, discussion, samples shown, and demonstrations which also greatly supports safety and practical course projects.
 Marking and Measuring
 - Rabbet, Dado, and Chisels
- Hand Saws
- Mortise and Tenon
- Wood Joint Review
- Typical Wood Joint Illustrations

Related Reading Assignment
Reading assignment involves three selected chapters related industry and our current activity. This supports, gives background, and assist students with topic details and further encases practical project work.
- Reading Assignment 1 - Chp.1,-Introduction, Chp.2-Shop Safety, and Chp.3-Measuring & Layout
- Ten questions to answer: Chp. One-1, 4, & 5, Chp. Two 1, 3, & 8, Chp. Three 8, 9 ,11, & 12 for a total of 25 marks.
Project Sample Pictures
Below are some pictures showing the wood joint project:
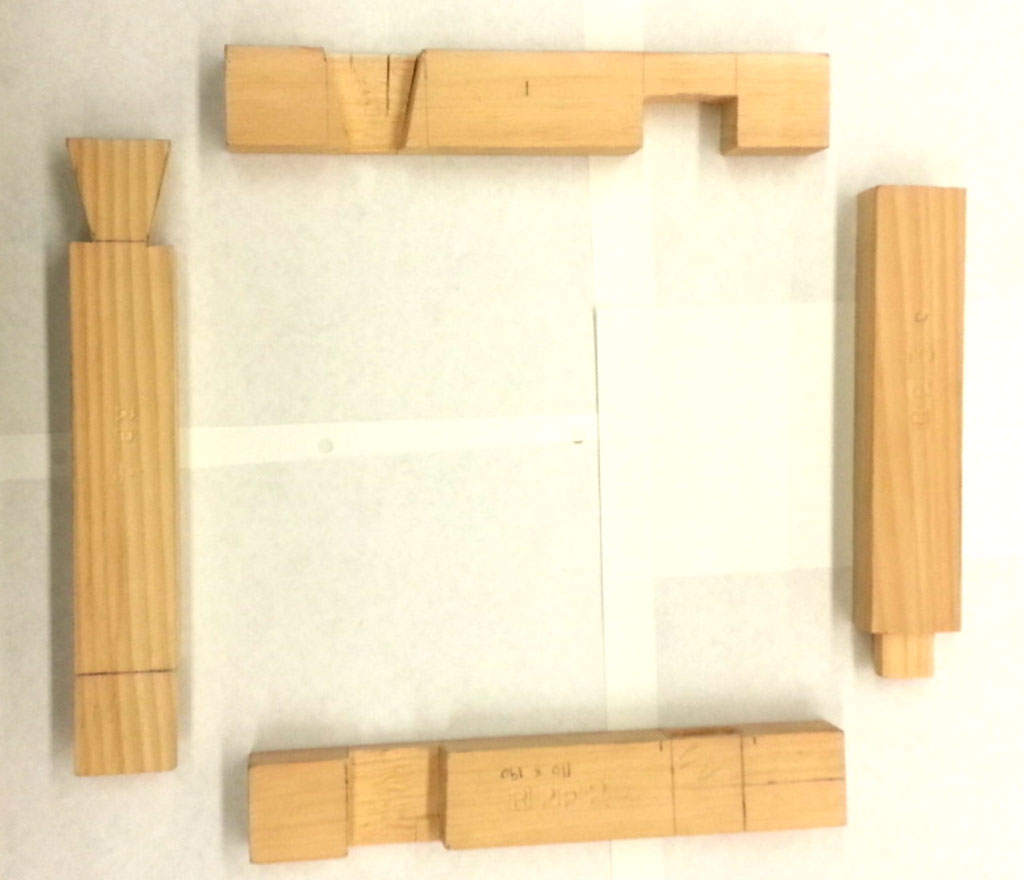
Sample 1
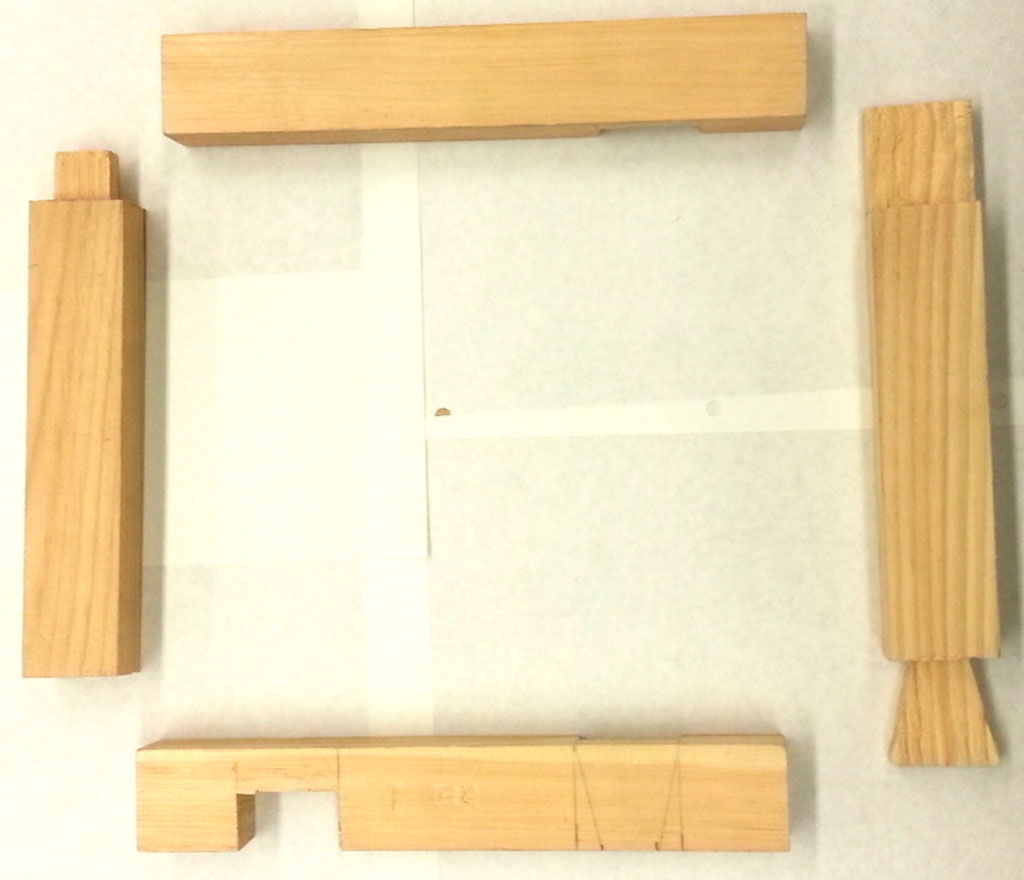
Sample 2
Sample 3
Sample 4
Related Resource Links
Below are some links to online support resources related to this project:
Create/Construct:
Use the following steps to complete your wood joint project:
- You will receive a related drawing and 4 pieces of wood
- Using metal stamp and a hammer, mark each piece with your name initials and the piece number according to the drawing
- Start on your dado wood joint using pencil, rule, marking gauge, back saw, and chisel only to make a tight snug fit
- Work on your half-lap joint using similar technique and process as the dado joint and remember to take small amounts of wood out with chisel to prevent over chipping
- Next work on the Mortise joint by first laying out, then chopping with 10 mm chisel then tenon joint, again laying out the material to remove and using the back saw to carefully cut to tenon shoulders and clean up with chisel to a snug fit
- Work on the last wood joint, the dovetail joint, using a combination of all the skills you have learned to complete.
- Using the router, you will create a small rabbet joint on the inside back of your frame and finish with a chisel in the corners to make room for a frame backing
Evaluation:
Once wood joint project is finished, complete the evaluation rubric and hand in with your project to the teacher for final mark.
Unit 1, Act. 3: Jack plane - Sanding Block
Situation:

Past project we learned how to create common joints by using hand tools with 4 finished pieces of wood. How did those pieces get made?
Problem/Challenge:
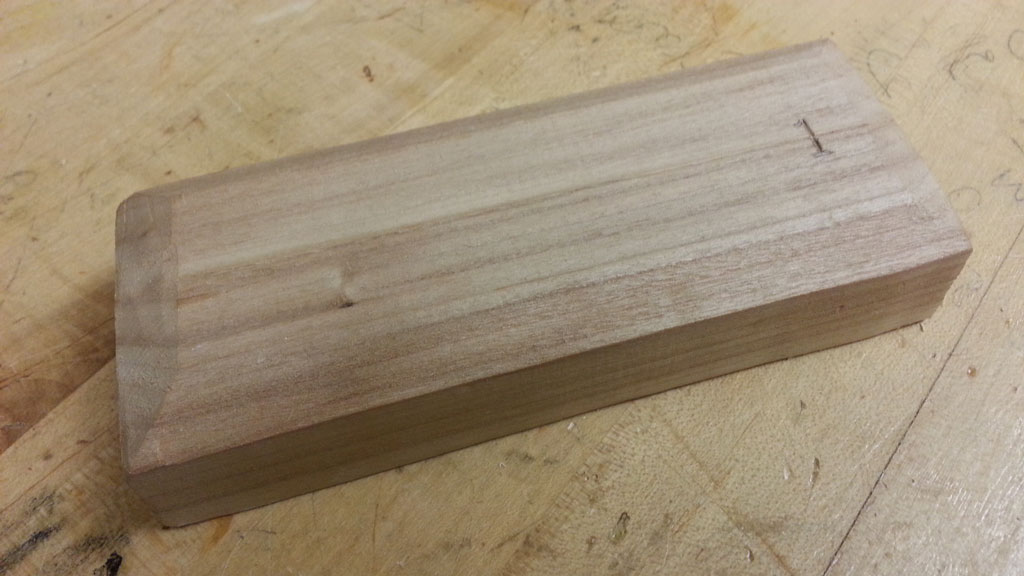
You are to make a sanding block from a scrap piece of wood provided which will include three sides stamped 1, 2, and 3. You will need to square and size up this piece of wood to given dimensions of 30 mm thick, 60 mm wide, and 120 mm long and finish with chamfered top
Investigation/Ideas:
General Information
Introduction to the basics of breaking out stock manually, measuring, using a jack plane to create a sanding block for future use with a later project.

Daily Notes
The following are links to ![]() PDF notes, students copy down daily, for reinforcement of related lesson topic, discussion, samples shown, and demonstrations which also greatly supports safety and practical course projects.
PDF notes, students copy down daily, for reinforcement of related lesson topic, discussion, samples shown, and demonstrations which also greatly supports safety and practical course projects.

Related Reading Assignment
Reading assignment involves three selected chapters related industry and our current activity. This supports, gives background, and assist students with topic details and further encases practical project work.
- Reading Assignment 2 - Chp.7,-Planes, Chp.8-Hand Saws, and Chp.22-Wood Joints
- Ten questions to answer: Chp. Seven-3, 8, 9, & 10, Chp. Eight 2, 7, & 9, Chp. Twenty-Two 1, 10 , & 11 for a total of 25 marks.
Project Sample Pictures
Below are some pictures showing the sanding block project. Sample 1 shows an unfinished piece of wood with number stamped sides. Sample 2 shows the finished sanding block with chamfer, and sample 3 shows a size comparison of start and finish.
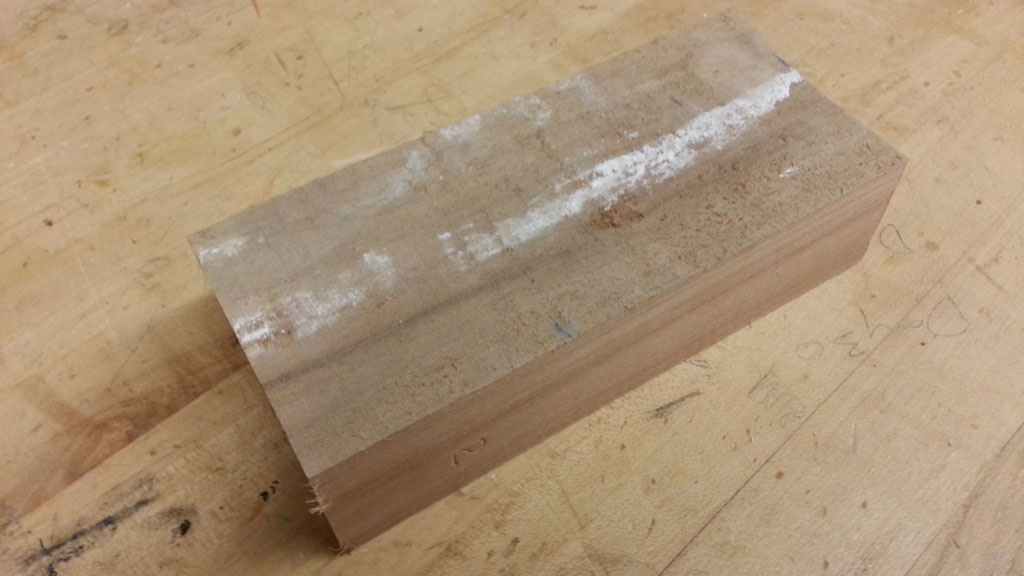
Sample 1
Sample2
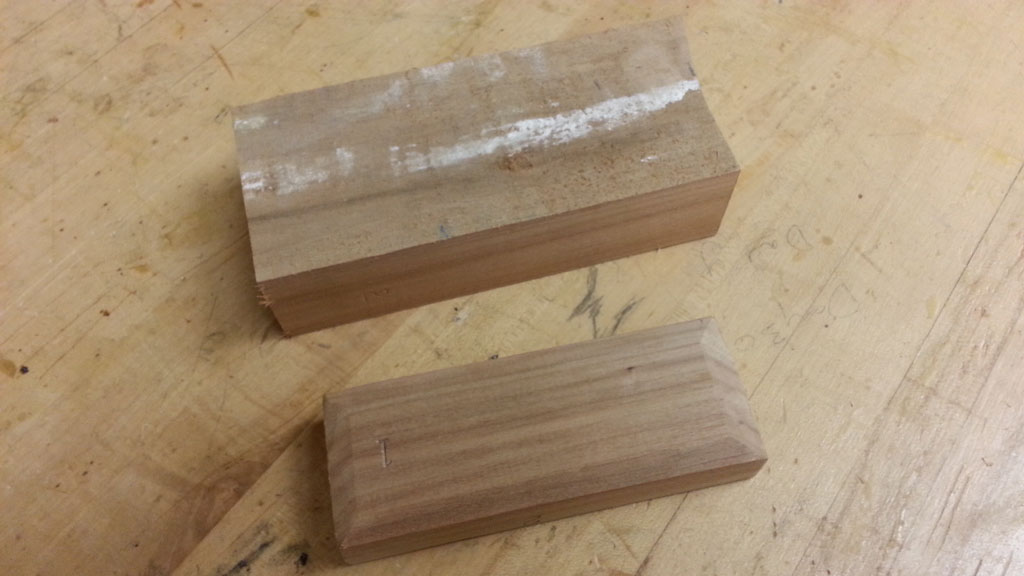
Sample 3
Related Resource Links
Below are some links to online support resources related to this project:
Create/Construct:
Sanding block steps are as follows::
- Get your piece of wood and stamp your name initials beside the number one already stamped in the wood
- With appropriate tools layout your sanding block for wood removal
- Plane down second edge to correct width
- Mark and plane second face to correct thickness
- Mark and saw second end for correct length
- Mark and plane top edge and chamfers
Evaluation:
Once wood joint project is finished, complete the evaluation rubric and hand in with your project to the teacher for final mark.