Unit 2: Planting the Seed

This unit is focused on plant identification, classifications, environment, and design. Creating a planter box will be a part of this unit's process. Students will learn about plants while designing and building a box planter. The first activity will start with basic sketching, so that students can communicate their technical design clearly with construction planing standards.
Course Units and Descriptions
Use this table for an overview and navigate to each of the course unit pages.
| Unit | Description |
|---|---|
| Review course outline for more details | |
| 1 | Green Industries Intro & Safety- Intro, organization, and safety |
| 2 | Planting the Seed- design, sketching, building planter for herbs |
| 3 | Landscaping Design & Practice - design, planting, caring of landscape |
Unit Activity Quick Links, Click to Jump to the Specific Activity!
- Unit 2, Activity 1: Sketching Your Planter Design
- Unit 2, Act. 2: Building In 3D
- Unit 2, Act. 3: Constructing Planter and Putting to Work
 Unit 2, Act. 1: Sketching Your Planter Design
Situation:
A class of students interested in the Greens Industry have taken a course to find out what it is all about. One of the major areas to cover is plants, and one way to explore this is by designing and making your own planter for the purpose to grow herbs for use in the kitchen. This will allow students to use their planter in their own kitchen, to grow several herbs to freshly use with recipes while making different food servings.. First step is to design your planter and for that we will need to practice some sketching.
Problem/Challenge:
Practice your sketching techniques with sketching practice assignments listed below, then use this new skill and experience to create your own planter design.
- Basic Sketching
- Basic Shapes Sketching
- Orthographic Sketching
Once you have completed all three practice assignments, you are to design a planter that will fit on the window sill close or near your kitchen where the planter will be able to get lots of light, be easy to get to for watering, maintaining, and care. The size will be determined by your planned location you will be keeping this, in your home. Maximum size restriction will be 28" long by 7 " wide by 7" high using pinewood with a thickness of 3/4". The shape should be rectangular to accommodate the window sill it will be sitting in.
You will need to come up with five different thumbnail ISO sketch ideas on what your planter may look like, and include approximate dimensions. Your final design is to be neatly sketched out on a landscape sheet of paper showing your design with 3 orthographic views and one isomeric view. The orthographic sketch must also show overall and detail dimensions in imperial dimensions
Investigation/Ideas:
Technical sketching is used in all kinds of situations. Thumbnails are where ideas initially start... some of the greatest ideas started on a napkin in a restaurant for example. Full size sketches take a little more work and formality to the steps of creating a clean technical sketch. Below are several resources you may check out all related to technical sketching:
- Importance of Sketching
- Sketch-38 box car
- Sketch-space transport

- Thumbnail sketching
- Technical Sketching
- Process of Sketching
- Principles sketching
- Third Angle Projection
- Orthographic Projection
- Isometric Projection
- Isometric tutorial
Here are some links to different planter box tutorials and related designs:. Here you can figure out what kind of design you are thinking of doing.
- Cedar
- Basic
- Kitchen
- Herb
- Herb Box
- Green Man
- Wall to Wall
- Window Planter
- Herb Garden
- Herb 2
- Painting
- Making a planter
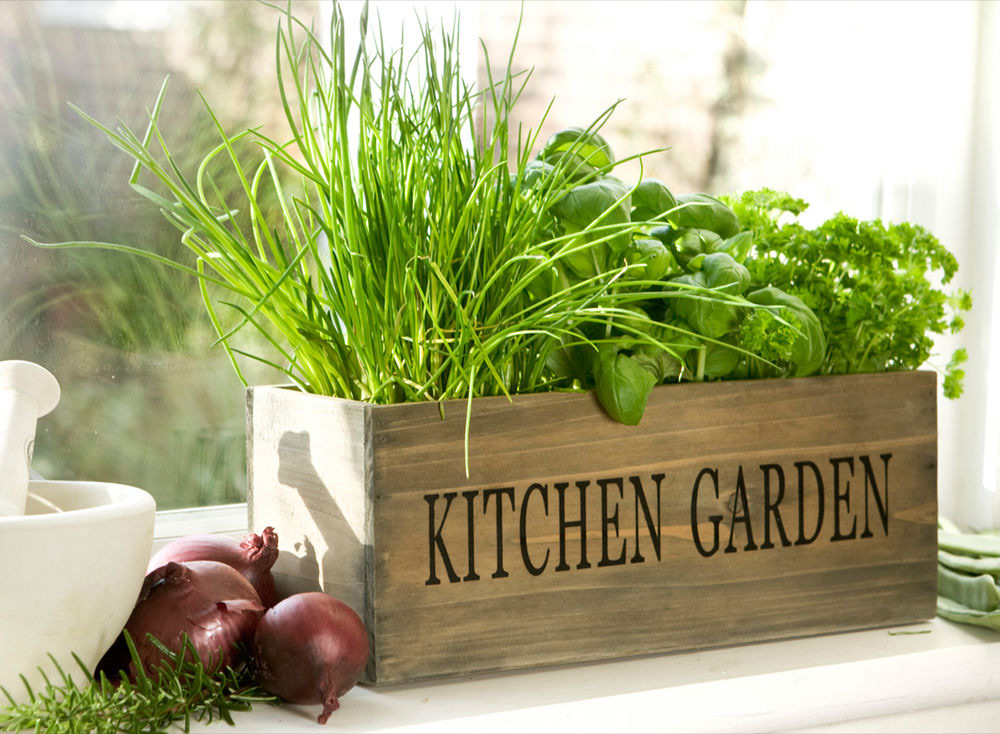
Below are some different planter ideas.
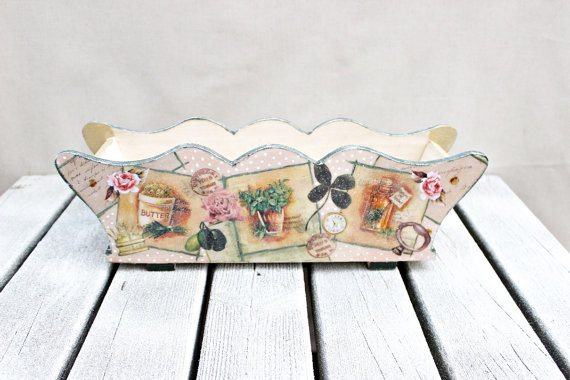
Sample 1
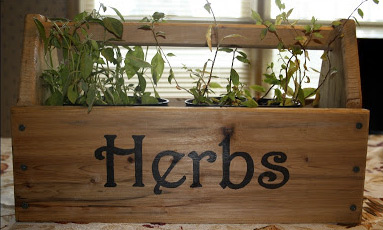
Sample 2

Sample 3
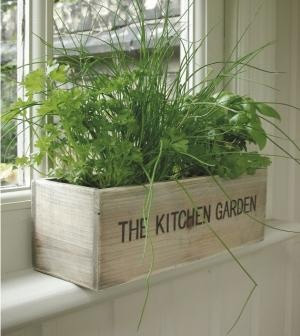
Sample 4
Sample Showing Thumbnail Sketching of 5 different Planters
Below show the basic steps to create 5 planter ideas. Start with a base line and draw your two 30 degree angles. Use one vertical to get your "corner building" look, then start sketching the rest of your idea, keeping in mind your sketching shapes practice exercise. All five of your ideas must be different, each named based on their design, and remember to include information about your location and the amount of room you will have in, for example, your kitchen window sill.

Construction lines

Object lines
Sample Sketching Steps for Orthographic Final Planter Design
Show below are the steps you should be taking to properly finish your orthographic final planter sketch design.
- Step 1, using construction lines, map out where you will be drawing each of the views. Remember to keep the sizing relative to each other
- Step 2, lightly sketch in your object views with all of your features. There should be at least 4 water release holes at the bottom of your planter, just -in -case you over water
- Step 3, sketch your isometric of your final idea and rough-in your dimensions - overall and detail dimensions
- Step 4, darken all object view lines - orthographic and isometric, so it is clear to see what your object is. Ensure that the dimensions are also darken for easy view
Step 1
Step 2
step 3

Step 4
Create/Construct:
Sketching Exercises
The following sketching basics and sketching shape assignments are to be practiced in class and handed in for check, before moving on to the next sketch assignment. You will need blank paper and a pencil to complete the following assignments.:
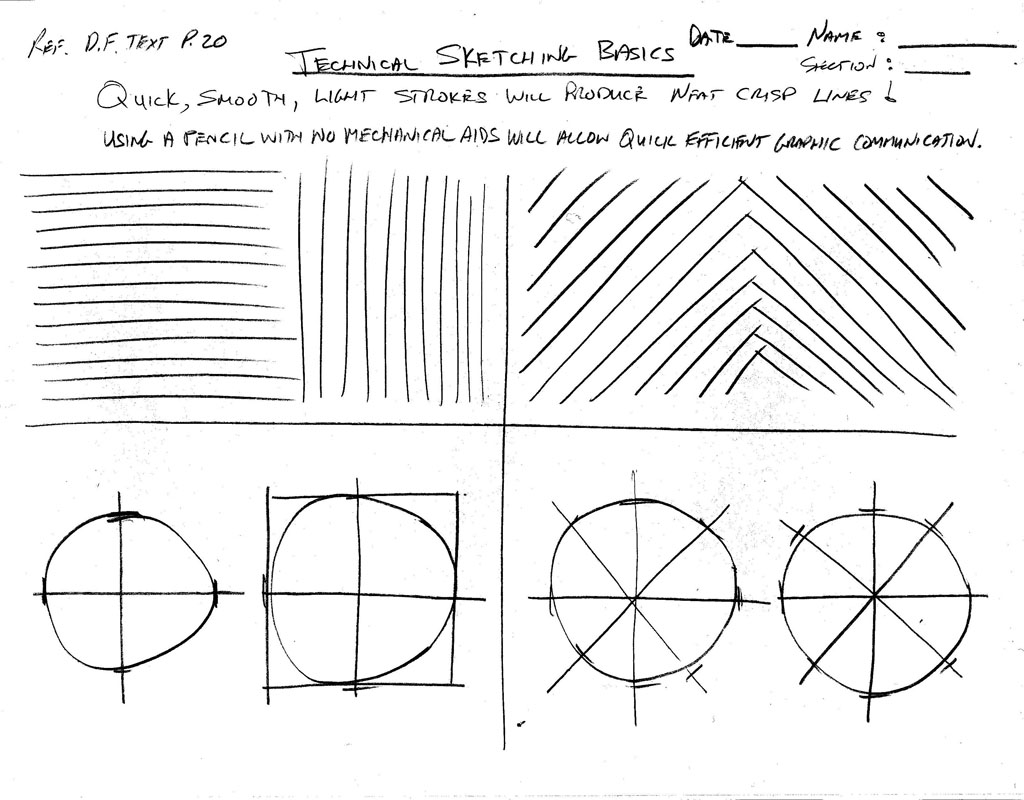
Sketching
Basics
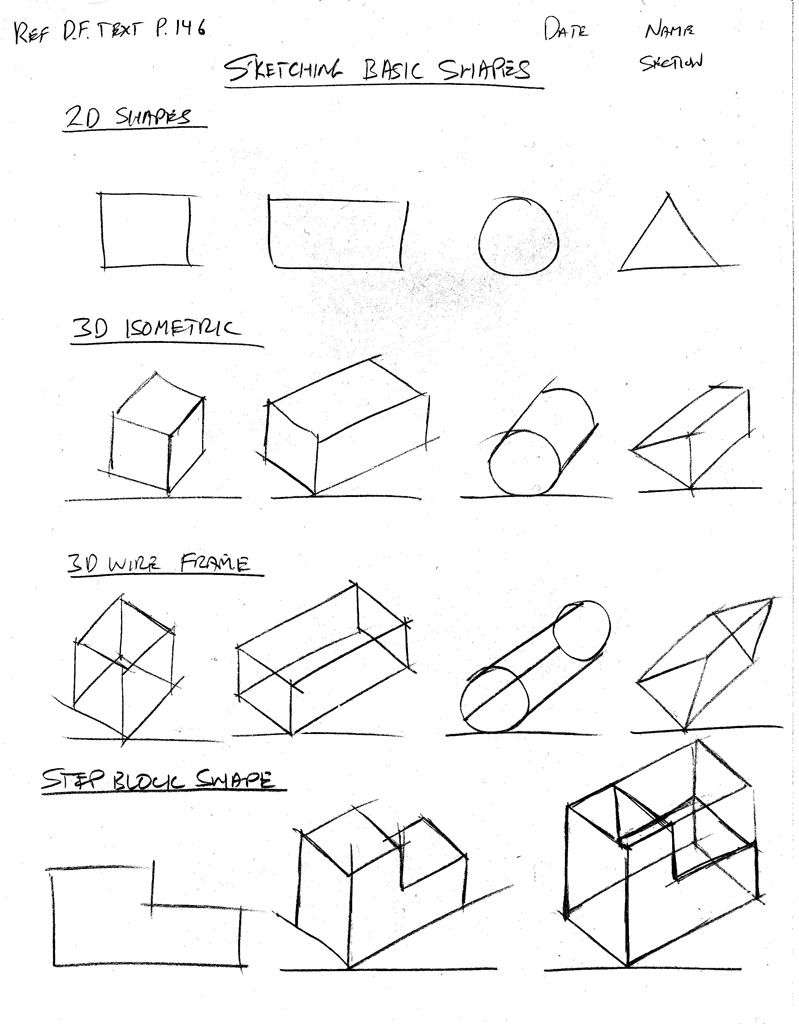
Sketching
Shapes
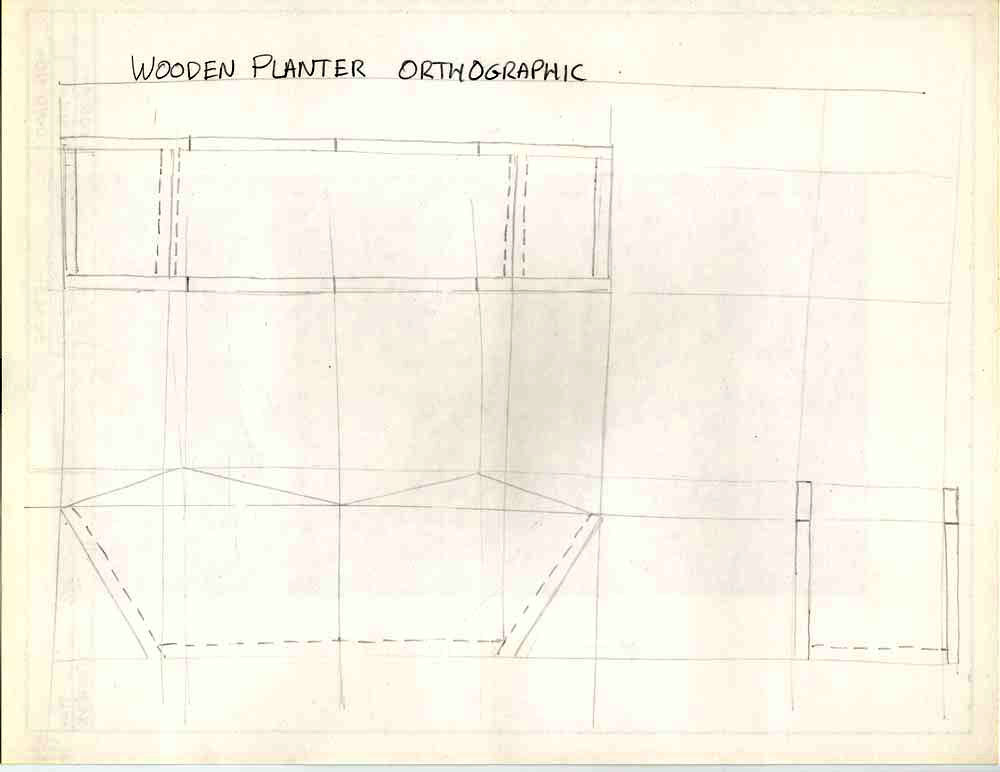
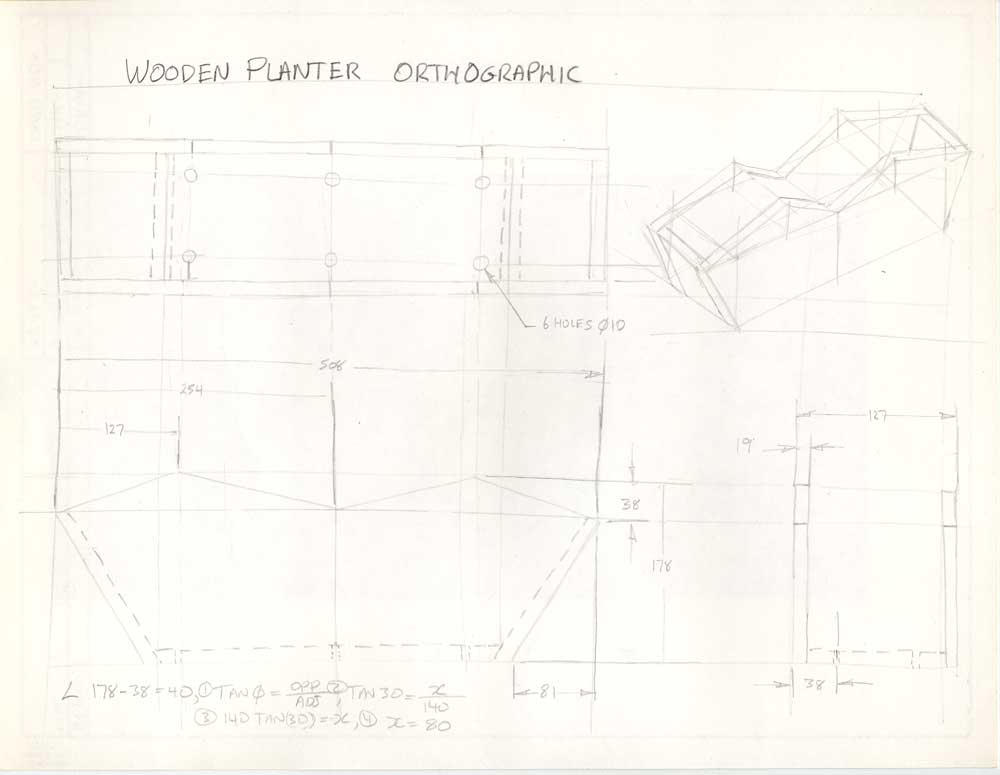
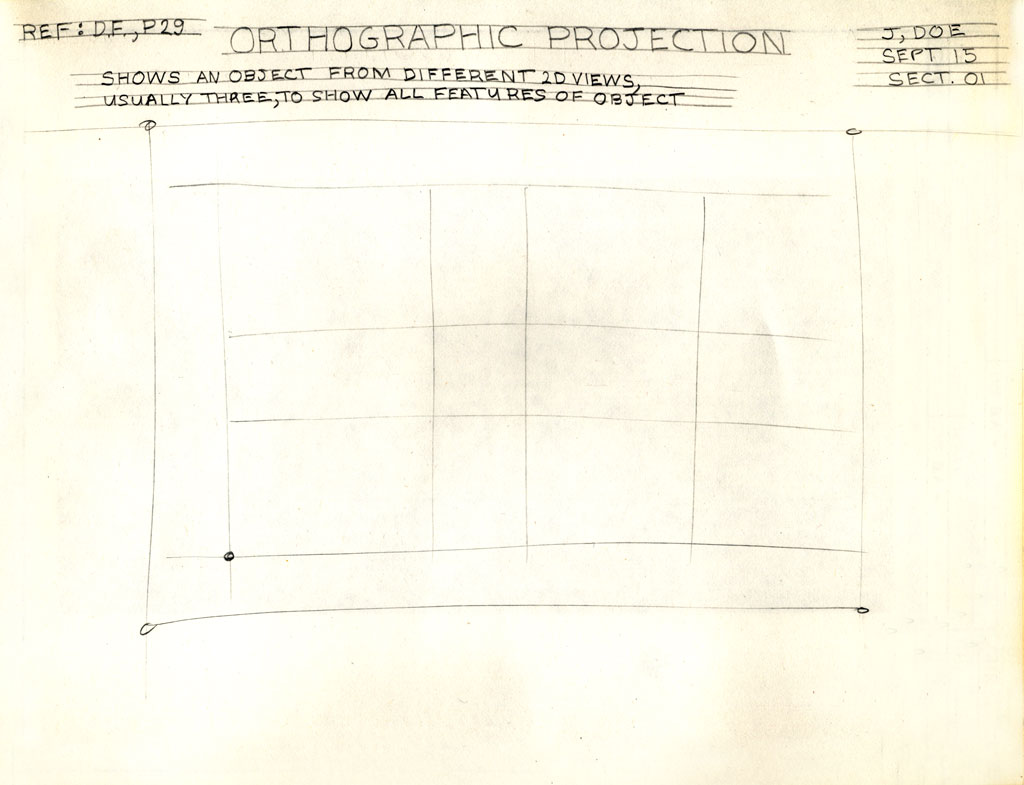
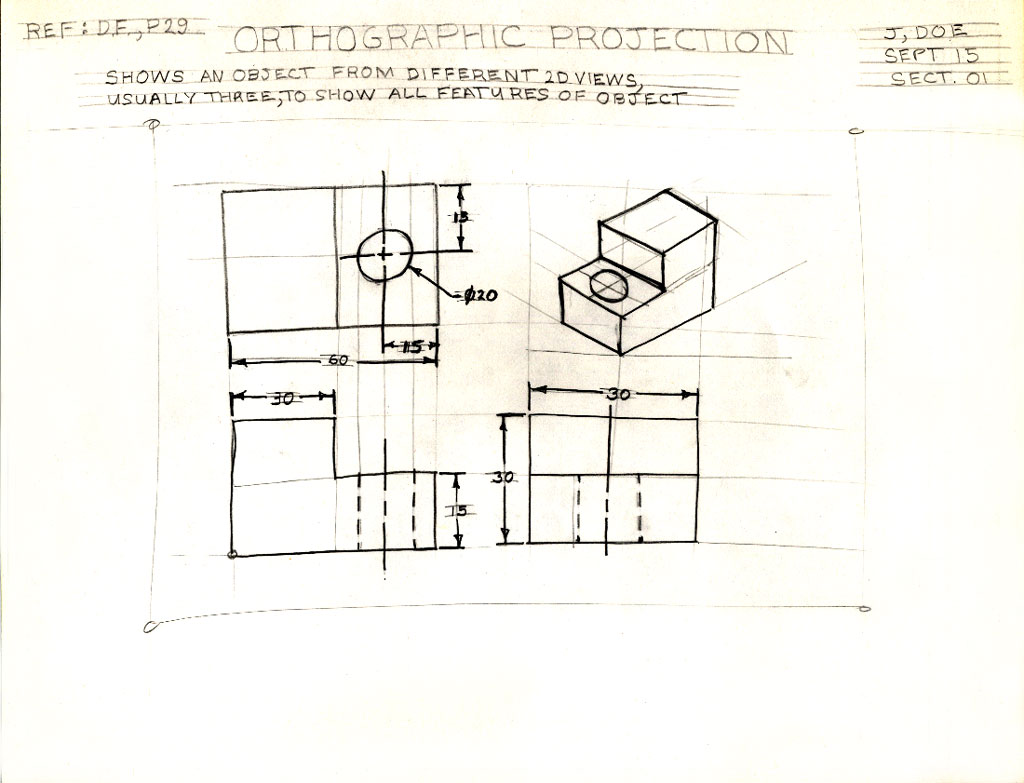
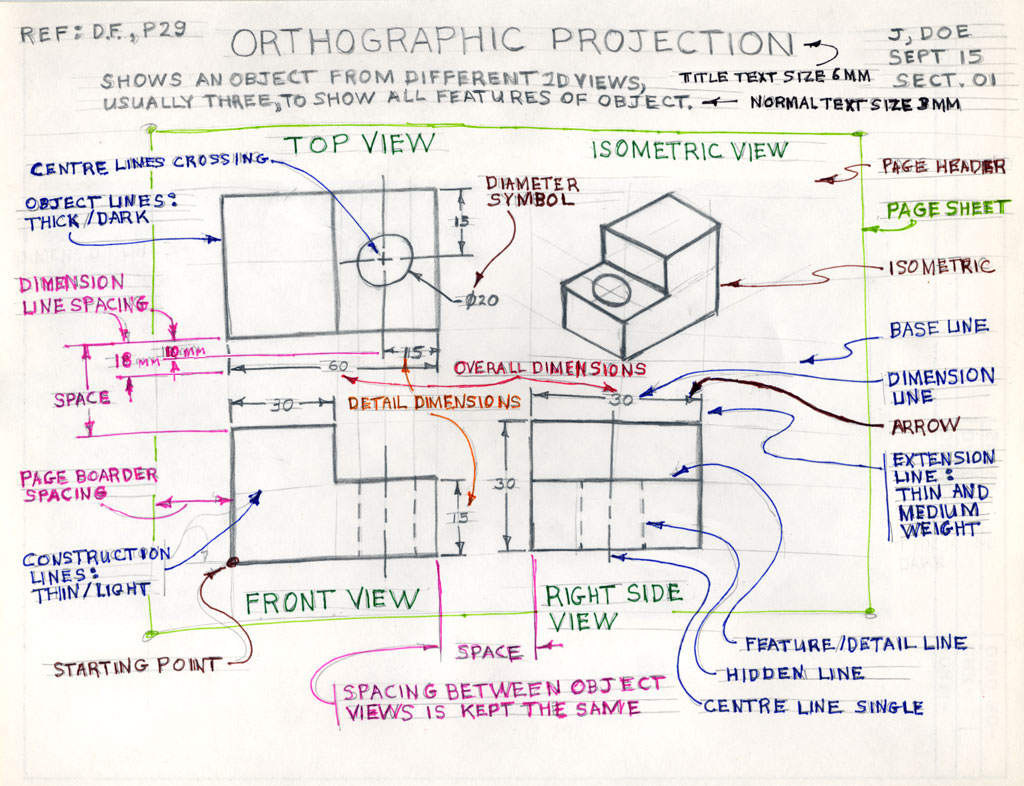
Orthographic Sketch Sample Note
The following three images below, show a third angle projected orthographic sketch with dimensions using a standard "step block" shape with a circular hole going through the center of the bottom step.
- Using a full blank page, start drawing the layout, then add the dimensions, and then label all the related terms associated orthographic projected views and dimensioning.
- On the back copy the section below titled "Selecting Front View" with the three rules selecting a front view
- Bring ortho note to teacher to check (mark) before starting step 4
- Select a block sample, select the front view, sketch out the front, top, and right side view showing overall and detailed dimensions as in previous graphic note. No need for labels.
- Sketch the isometric in the top right corner.
- Bring to teacher to mark
![]() Remember your sketching techniques you learned above while you sketch this out:
Remember your sketching techniques you learned above while you sketch this out:
Sketching
Ortho-Layout
Sketching
Ortho-dimensions
Sketching
Ortho-Terminology
Block Samples
Ortho-Practice
Selecting Front View
When deciding which view is to be used for the front view, three rules are used to determine this. You must look at the object you are going to draw or sketch and decide which view shows the:
- the most detail
- length across the page (layout usually in landscape format
- least amount of hidden lines
Generating Planter Thumbnail ideas
You are to come up;with five different planter shape ideas, keeping in mind planter dimension restrictions Sketch these out on a single sheet showing detail designs in isometric format. Make any necessary notes and title each sketch based on your design, i.e. give it a design name.
Final Orthographic Planter Design
You need to decide what size and look you want for your planter. This must be based on the best window setting with maximum sun coverage..
- Decide on size and shape of planter, most likely rectangular.
- Remember to select the proper front view for the orthographic sketch
- Use construction lines first to line up each view and their features
- Use object lines to show actual design views
- Ensure you show necessary overall an detail dimensions
- Sketch out your isometric
Evaluation:
You will be evaluated based on the completion of the above sketching assignments.

| Evaluation Breakdown Component Descriptions | Marks |
|---|---|
| Always double check that you have completed all components for full marks. | |
| Sketching Basics - clean, straight lines, and smooth round circle curves | 10 |
| Sketching Shapes - clear shapes sketched with correct angles, lines, and shapes | 12 |
| Orthographic Sketch Note - 3 ortho views with all labels & 1 isometric sketch | 15 |
| Orthographic Custom Block - 3 ortho views with dimensions & isometric sketched | 15 |
| 5 Isometric Sketches - isometric sketches, different ideas, sizes to fit | 15 |
| Orthographic Planter - 3 ortho views with dimensions & 1 isometric sketch | 20 |
Unit 2, Act. 2: Building In 3D
Situation:
Before building a planned project such as the herb planter, it is really great to be able to see what it looks like and how it fits by using 3D CAD to make sure it all fits and you are able to fine tune your project design easily.
Problem/Challenge:
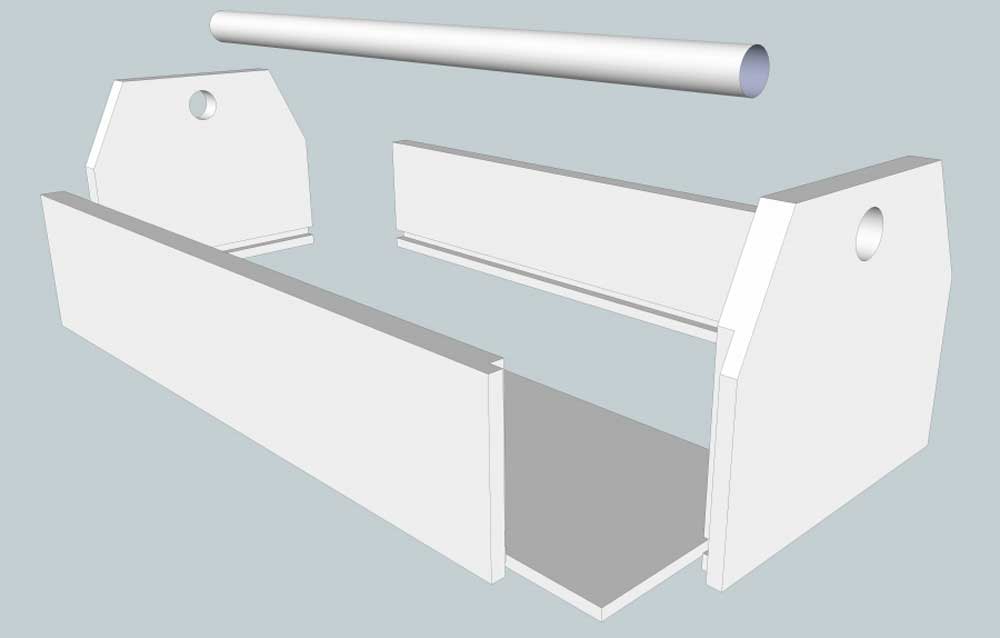
Create a 3D CAD of your planter using Sketchup. Each part is to be grouped separately and dimension as you go. Dimension based on your orthographic that you previously made and has been marked. Decide on what type of joint you are going to do. Butt joints are the simplest, but if just glued do not hold very well. Ensure that you have your wood joints as you would build / make your planter. You will need an isometric view with overall dimensions. Also create a separate file showing your planter in exploded view, and show parts separated length wise with dimensions, and planter end views with dimensions. Each view must also be exported out in JPG format., 1200 pixels wide by constrained height.
Investigation/Ideas:
You need to consider the wood joints you will be making for your project. A butt joint may not be good enough and using just glue will not hold together well. It is a good idea to consider the dado joint as finger joints will be difficult to do in the shop we will be in. Below are some links that you may review if you need to review how Sketchup works.:
- Official Sketchup video support site
- 12 Short video's on the basics
- Sample sub-woofer build
- Detailed look at set-up and basic drawing
- Exporting to JPG
- All about printing
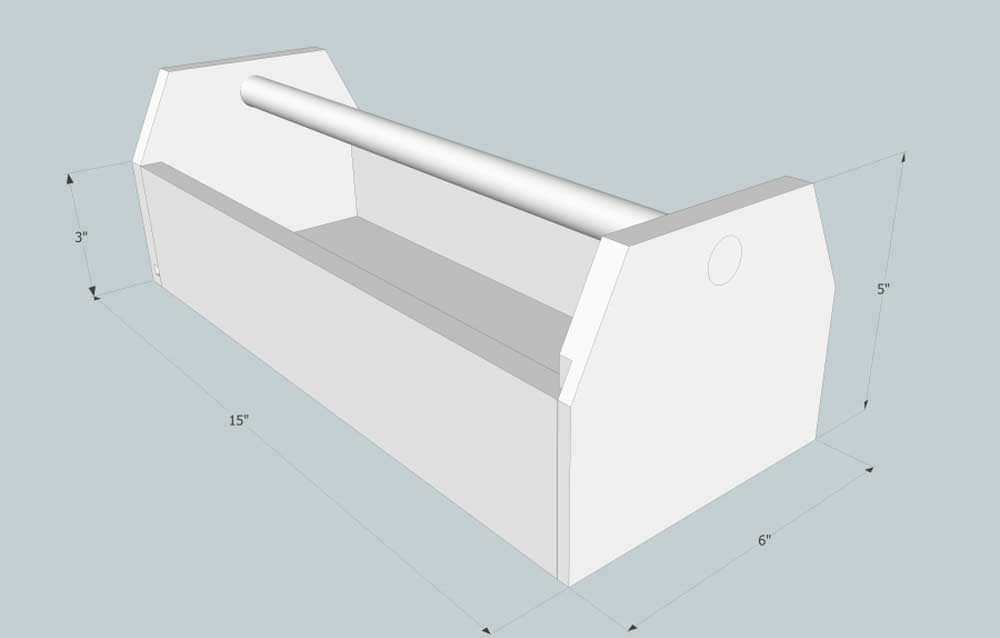
Example of a Toolbox Planter Style
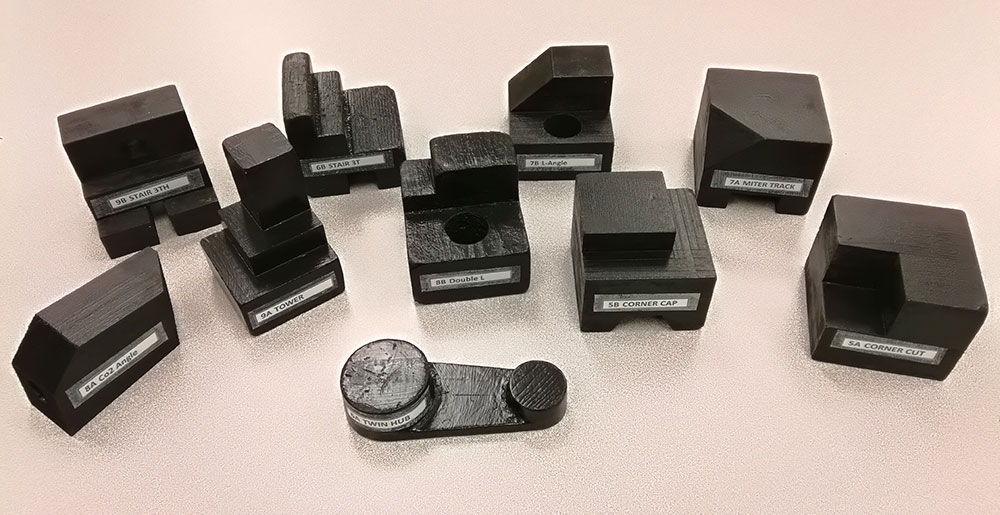
Below show samples of different wood joints you could use on you planter and sample Sketchup layouts that are required.

Wood Joints
Planter 3D
Planter Exploded
Planter Side Dim.
Planter End Dim.
Example of a Simple Planter Box
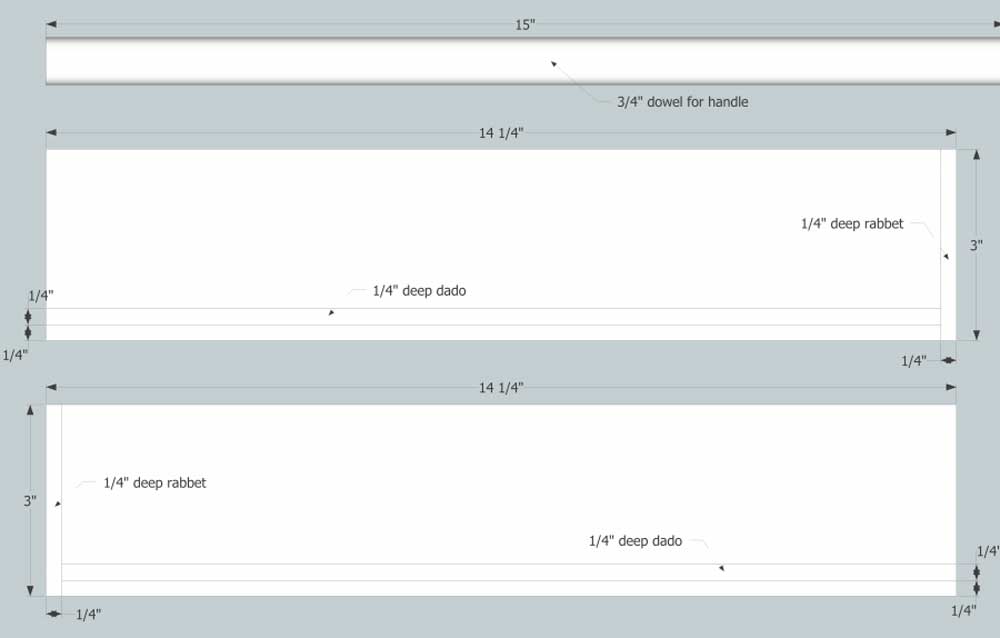
This is the format you are to follow to create your own set of views. For those who would like to design and build a simple planter, this is a sample of a simple planter box..
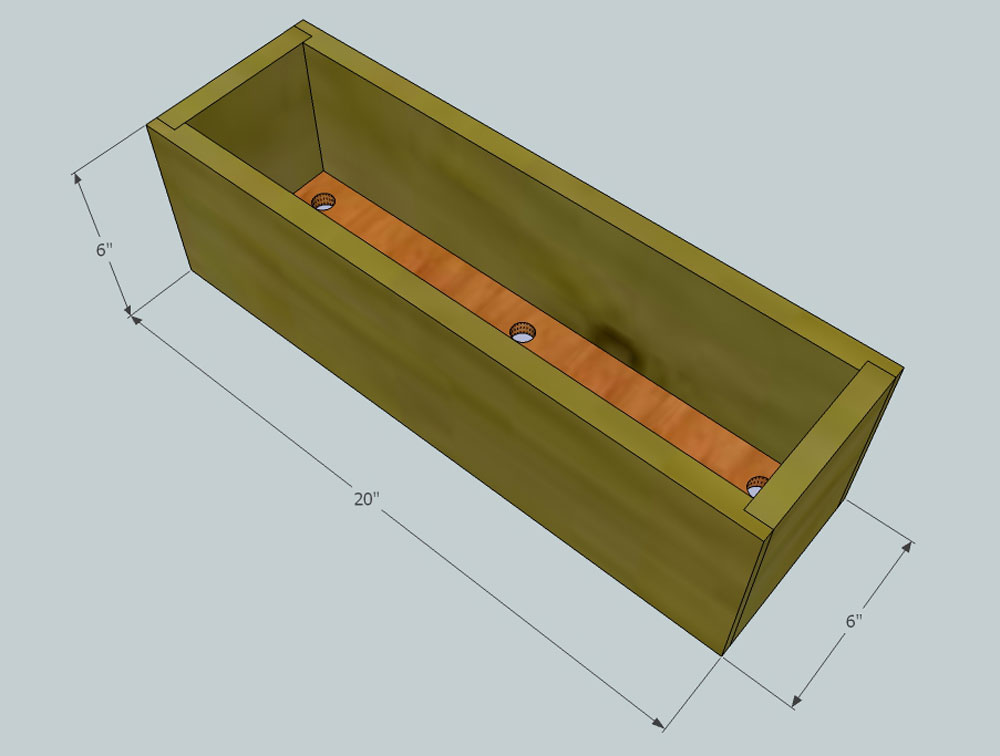
Planter 3D
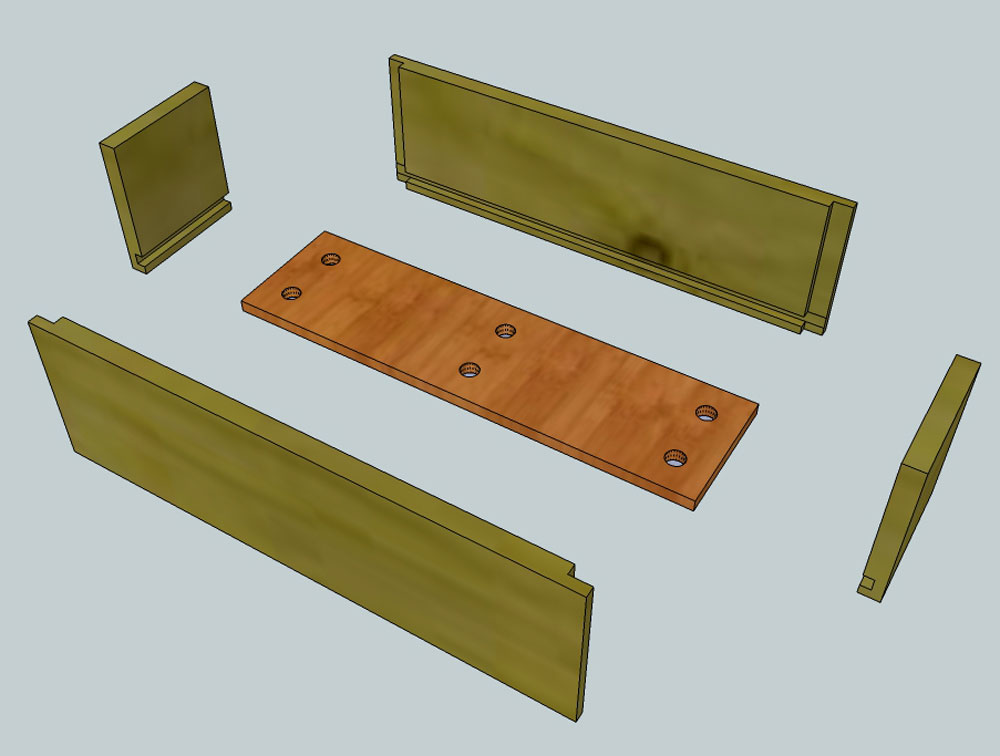
Exploded View
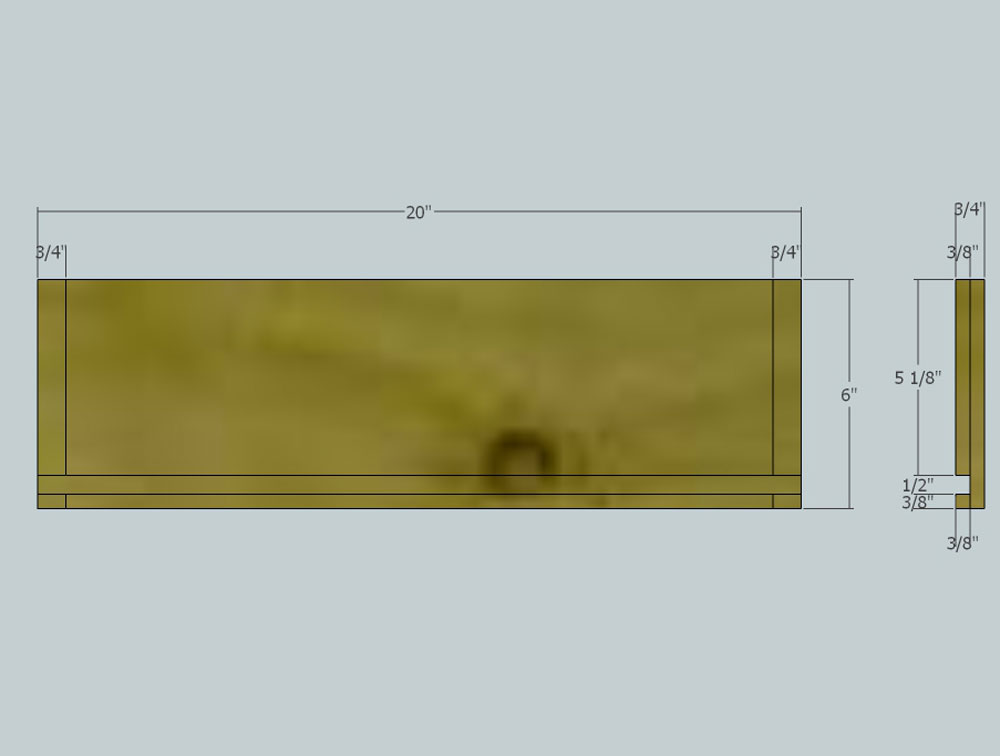
Front Ortho
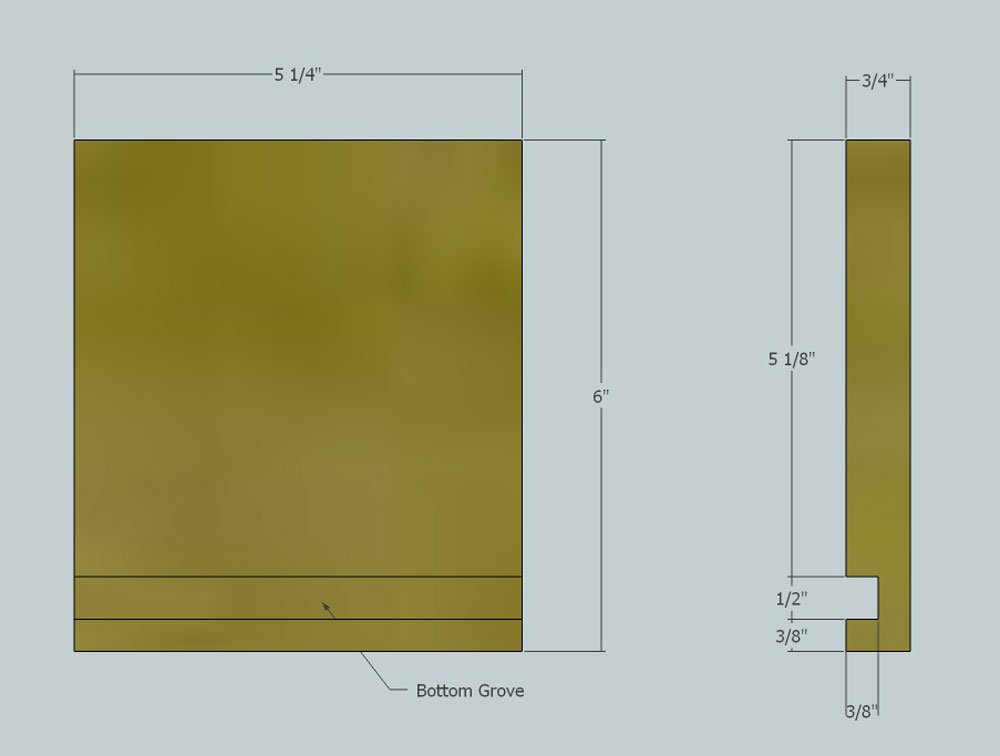
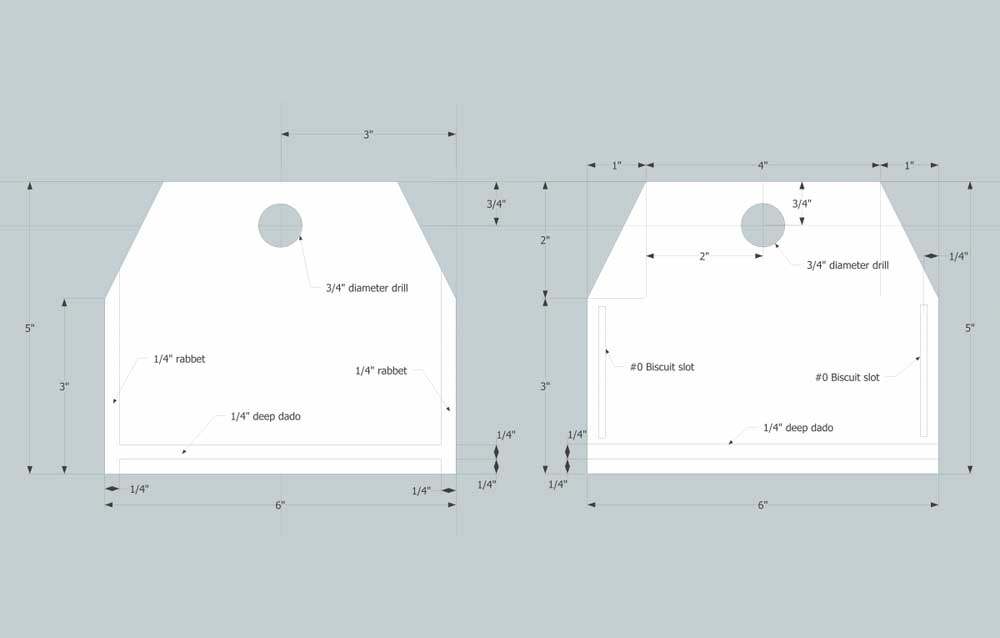
Side Ortho
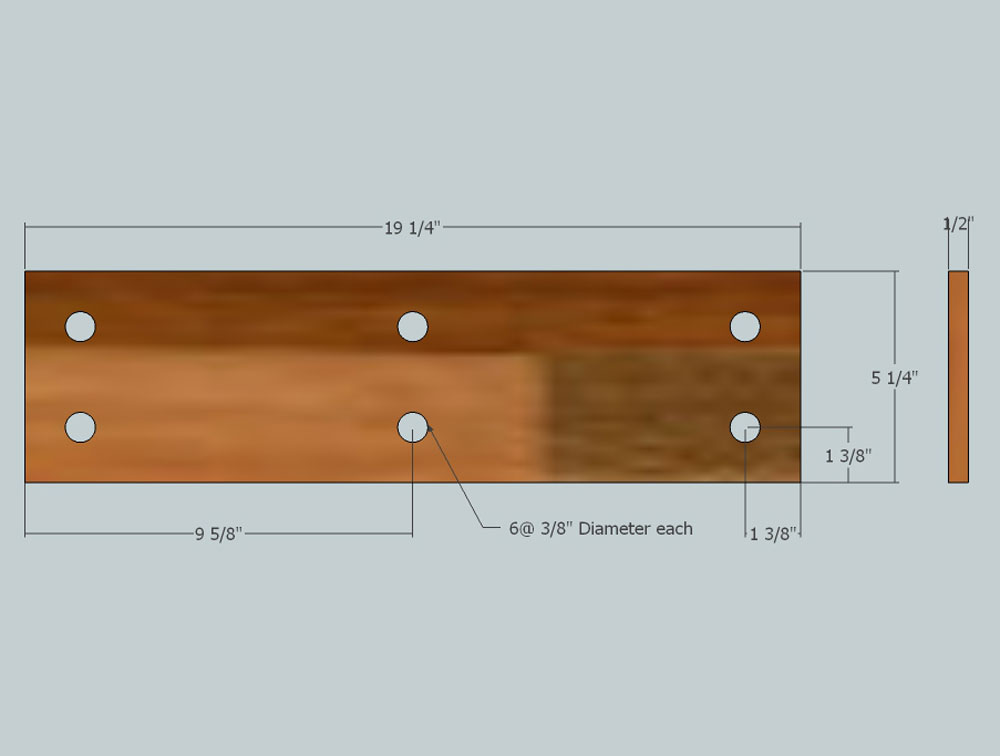
Bottom Ortho
Note for the above planters, holes would still have to be also shown in your 3D model and ortho view of bottom piece. Pay close attention to the joints and how the separate pieces would be cut and put together. When you are finished you will need to put the exploded, front , side, and bottom view on a single sheet for printing. This will allow you to have your dimensions of your planter handy when you create your planter box in the next activity.
Tools You Will be Working With:
- Templates - select appropriate one for easy start-up
- Large Tool bar - found under View menu > Tool bars, then select it to view and use them
- Select tool - to select drawing features/objects
- Zoom - roll your mouse
- Pan - press middle mouse and shift key
- Draw then enter dimensions via keyboard for exact sizing of parts
- Line, rectangle, and circle tools - for drawing basic shapes
- Tape measure - to measure and insert guide lines
- Eraser- to delete line segments, guide lines, and/or objects
- Push/pull - create z axis 3D shape
- Move and rotation tool
- Group - once you have made a part, you should group it as a unique part
- Component - similar to group, but used to make several of the same part and only have to edit one, all will change
- Dimension - use to draw in dimensions by picking two points and dragging out
- Flipping objects - for use to flip or mirror, by right clicking and selecting option
- Copy and paste whole components or groups
- Hide - you can hide groups or components by right clicking and selecting in menu, un-hide same process
- ISO and Ortho views - found under Camera menu > Standard views
- Perspective - default view when you are drawing
- Parallel projection - for creating ortho views with dimensions
- Export - Found under File menu > export to create JPG images of current view
Create/Construct:
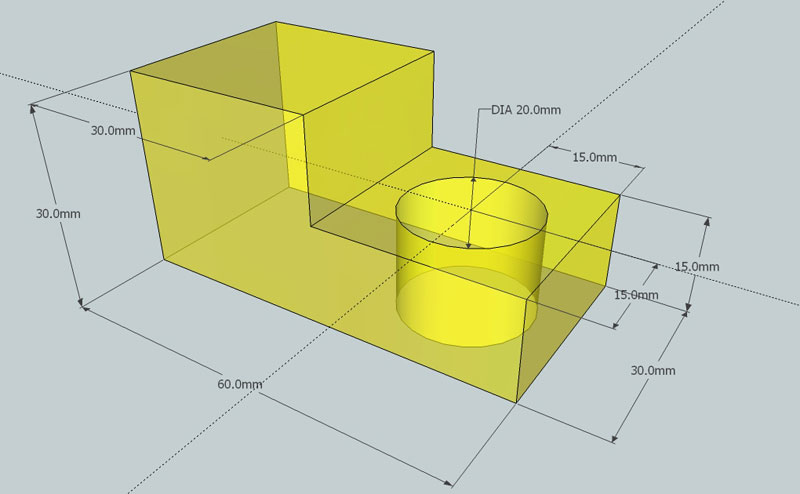
StepBlock Exercise
Here is a practice assignment to try first before attempting to create your planter design. Follow the steps below.
- Select template: Product Design and Woodworking Millimeters
- Draw a rectangle using the Rectangle tool, type the exact height, press enter
- Use the zoom extents icon to re-size, re-draw and center your object at any time
- Use the push/pull tool to pull up the object up, type the exact height, press enter
- Finish the rest of the block using the same tools/process
- Tip: use the tape measure to find centre for hole.
- Create/show dimensions by selecting the menu tools, and dimensioning
- Show overall and detail dimensions
- Save in proper file format in two file types: SKP and JPG formats
- Use File > Export > 2D Graphics for creating the JPG
![]() Tip: ensure view is centred and full screen prior to exporting to jpg
Tip: ensure view is centred and full screen prior to exporting to jpg
Sample 3D
Step Block
When you are finished check with two peers to ensure you have completed the tutorial correctly. When handing in any files, you will submit it in the student drop-off -folder. Ensure the file extension is correct and present. Here are some examples of file name you should be using:
- Google Sketchup file name example: d-joe_3Dstepblock.skp
- JPG - Joint Photographic Experts Group file name example: d-joe_3Dstepblock.jpg
Planter Design build
At this point if you have your orthographic completed and have had it checked your instructor, you may start creating it here. If you are not done, start drawing the simple planter box sample above, so that you may have a design to work with and build.
- Open Sketchup and select template on splash window for Product Design and Woodworking - inches
- If you miss this window, you can still open template through Window menu, select Preferences
- Select start-up, if you end up wit a person in the middle of your workspace, select and delete
- Expand/maximize your window to full screen for easier working
- Ensure units are good, go to Window menu, select Model Info, select units, and adjust if needed
- If Tool bar is not visible, select Menu View, select Tool Palets, select Large Toolset
- Start by creating your bottom planter piece, use rectangle tool
- Click in the centre of all axis, and start to draw, then enter in your piece's dimensions x, y then hit enter.
- Use the push/pull tool to pull up a little, then type in your thickness 0.75 (in inches)
- Using your tape measure, measure out from all sides 1 3/8" and 9 5/8" for centre to create your 3/8" drain holes
- Select your piece using a marquee, then right click and make it a group (this keeps it a separate entity)
- Congratulations, you have made your first piece. Do the same building the rest of your planter exploring different tools as needed.
- You will need to finish making all the rest of your parts, build it, place in ISO view, then dimension overall views, Save as..., then export JPG
- Create and exploded view, Save as..., then export JPG
- Then arrange planter ortho views, dimension with appropriate amount, Save as and also export JPG
- Custom planters will need a printed file of exploded, front, side, and bottom views showing dimensions on a single letter sized paper, use system printer and make sure all four images are selected and have four on one page selected and print (no printer - then send your instructor the digital version to print later)
![]() Double check your images are 1200 Pixels wide by constrained height in JPG format with appropriate file name as below in mark breakdown with your name - example: planter-3d-iso-d-joe.skp, planter-3d-iso-d-joe.jpg
Double check your images are 1200 Pixels wide by constrained height in JPG format with appropriate file name as below in mark breakdown with your name - example: planter-3d-iso-d-joe.skp, planter-3d-iso-d-joe.jpg
Evaluation:
You will be evaluated based on the planter drawing - accuracy, placement, view, and with your dimensions - the number of, neatness, lined-up, and organized.

| Evaluation Breakdown Component Descriptions | Marks |
|---|---|
| Always double check that you have completed all components for full marks. | |
| Step Block ISO- Isometric with overall dimensions neatly placed and lined up | 10 |
| Planter-3D-ISO- Isometric with overall dimensions neatly placed and lined up | 20 |
| Planter-3D-Exp- Isometric with parts exploded apart showing all joints | 5 |
| Planter Ortho Dim- Sides & bottom ortho views with overall and detail dimensions | 15 |
| Planter-Print-out- Exploded and ortho views of above views/dimensions printed | 5 |
Unit 2, Act. 3: Constructing Planter and Putting to Work
Situation:
Now that you have virtually designed your planter, it is time to build and put it use with some common herbs that are commonly used in the kitchen.
Problem/Challenge:
Using 3/4" pinewood sides and 1/2" plywood bottom, learning about some basic wood cutting machine and tools, cut out and build your planter. Then you are to put a sealer/finish to protect the wood, create a vapour barrier inside up to edges with at least 6 1/4 -3/8" drain holes, then fill with an inch of gravel, weed cloth, then potting soil, with fertilizer and 4-5 different herb seeds. To decide on herb types and plant growth, a research mind-map (sample html - PDF) is to be created to show plant classifications, plant growth, plant care, and its environment. Once planter is seeded, it will need daily watering and be placed in a sunny location with a warm temperature to promote growth. You need to keep your work area clean, tools will be expected to be put back, and work in a safe mature manner.

Investigation/Ideas:

Safety is paramount and each machine must be operated in a safe manner. Prior to use of these woodworking machines and tools students will learn about the parts, safe operation, and demonstrate understanding of proper use of each piece of equipment. For this reason you will need to track and fill out related paperwork and fill in a passport tracking sheet in order to keep track of and confirm that you have been properly trained prior to use of that tool or equipment.
Woodworking Machine Use and Safety
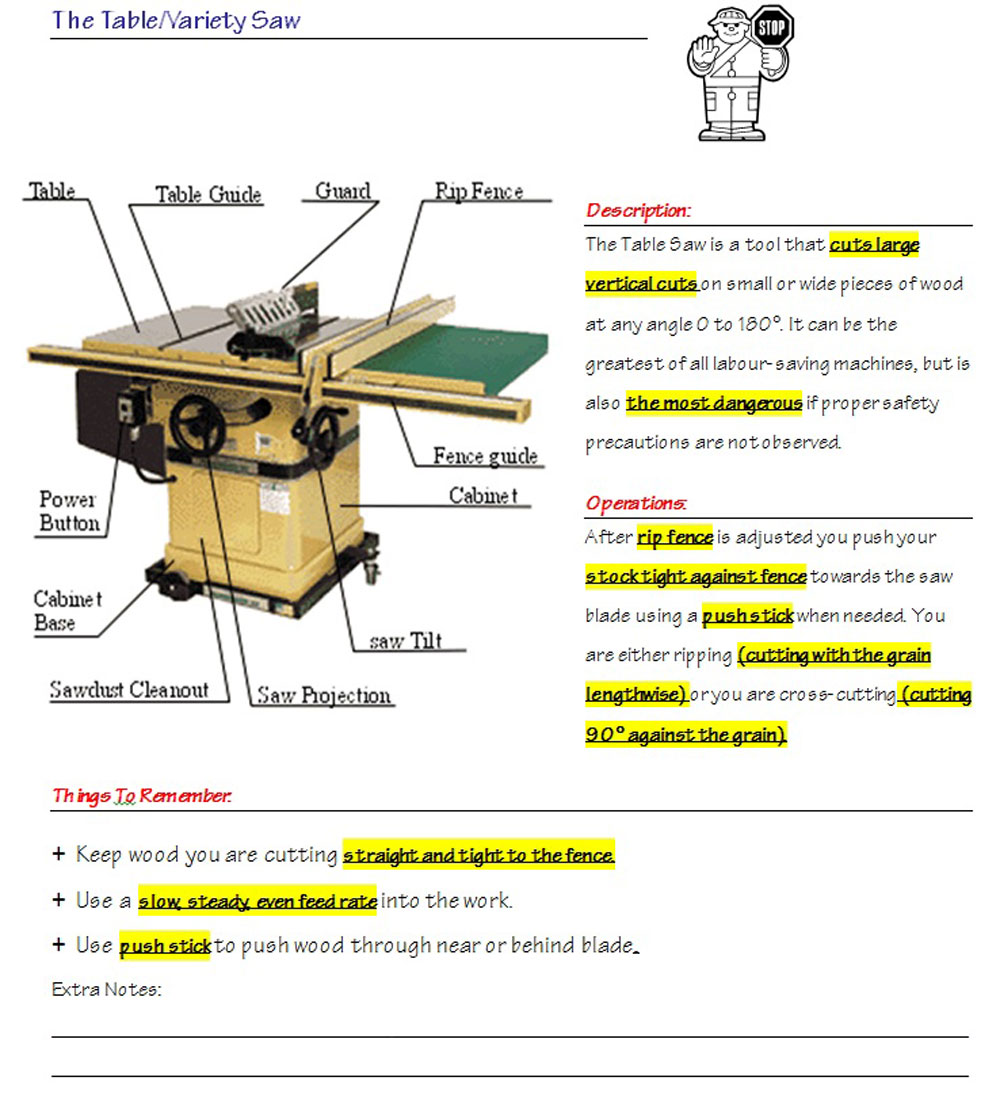
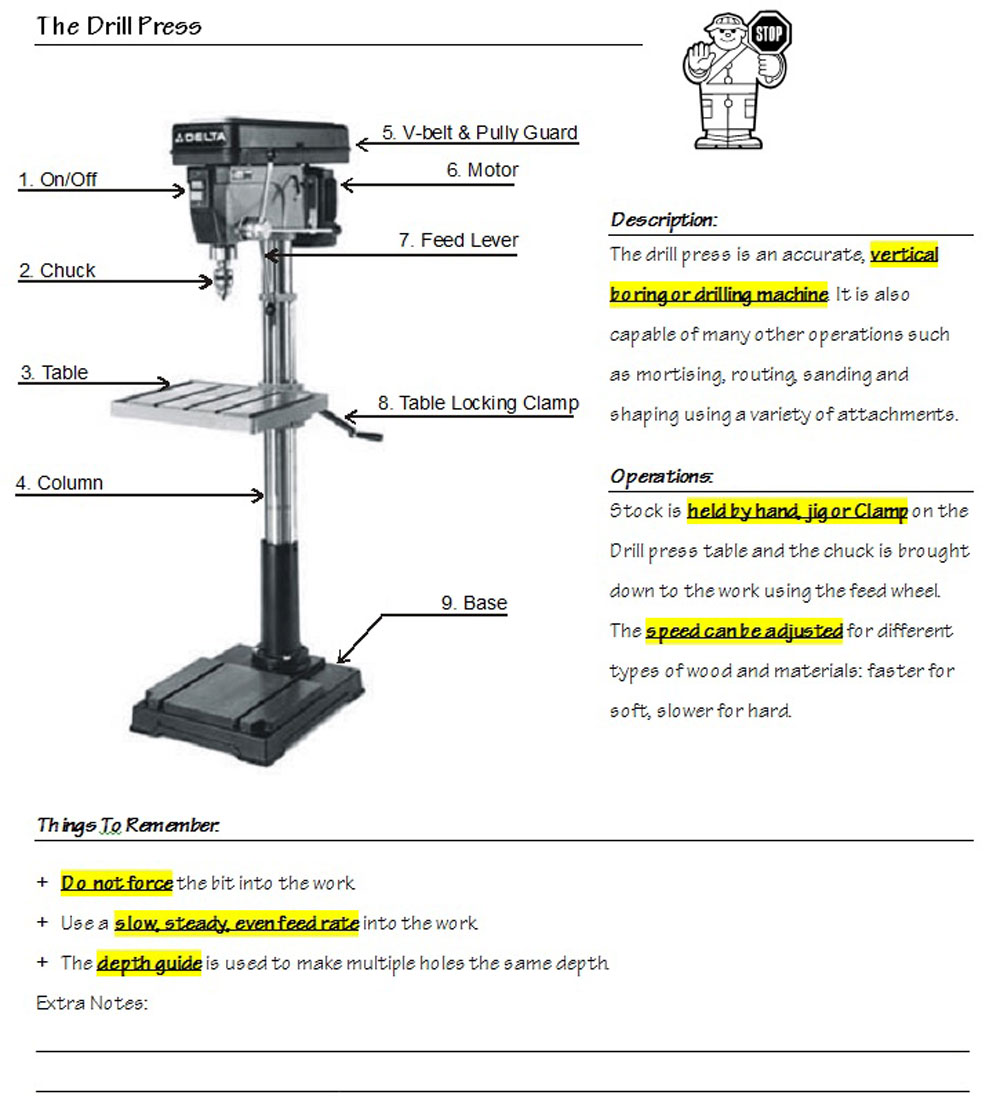
Possible power tools and equipment you may be using depending on your planter design, the band saw, disk sander, mitre saw, router, drill press, and table saw may be used. The table saw is the most dangerous of all the equipment. Power tools and equipment will only be used only after student shows knowledge of parts, safe operation steps, and clearly demonstrates safe operation. In addition to live demo's in class you may review videos below to reinforce and support your familiarization and safe operation of these machines.
- Preventing power tool accidents
- Table saw safety
- Miter saw safety
- Band saw safety
- Drill press safety
- Disk sander safety
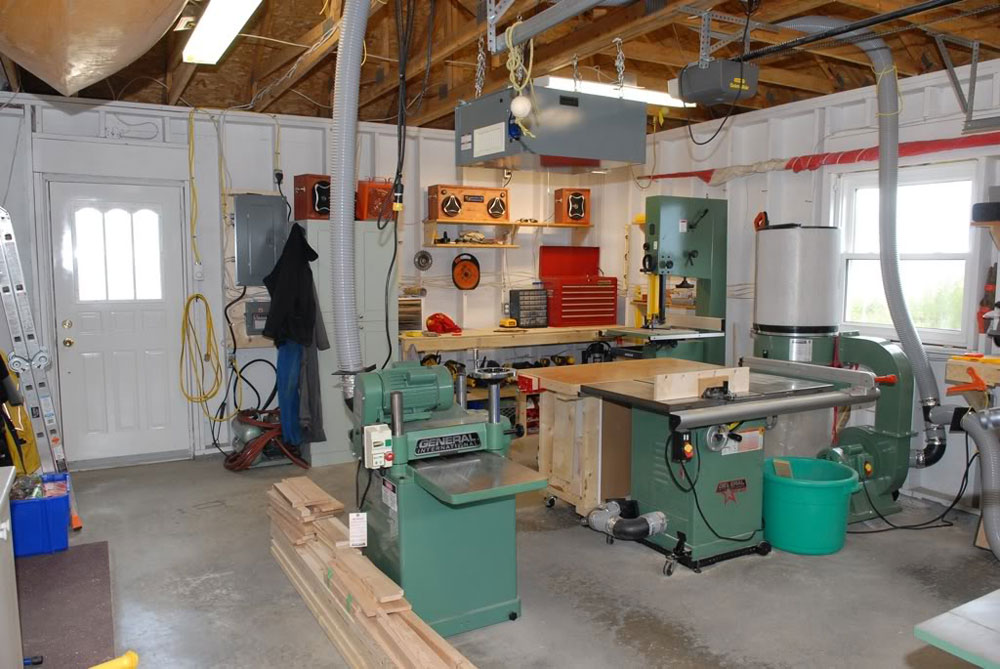
- Sample shop Info pics

Woodworking Tool Use and Safety
Depending on your design and build process, certain hand tools will help you get your planter completed. Each hand tool has the flexibility to be used in different manners, but using the right tool will benefit the work, reduce the time to complete the process, and the quality of the end product. Below is a list of common tools that you may need to use.
- Clamps
- Steel square
- Combination square
- Staple gun
- Sanding block
- File
- Rasp
- Hand tool buying guide
- Measuring, marking and layout tools
- Layout, Measuring, and Marking
- Marking & measuring tips
- Hand tools
- Top 40 tools
- Tools & Uses
- Basic woodworking tools
- General woodworking
- Using hand tools
- Tool pics collection
Materials, Sealant and Finishing
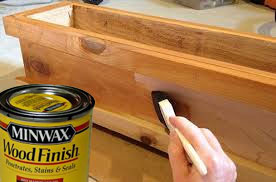
We will be using rough pine which will be planed down to about 3/4" and some 1/2" or 3/8" plywood. Depending on the sizes available at the time of build you may have to make some minor dimension changes to allow pieces to fit together. For sealing the wood, depending on availability, either a stain/varathane or a flat colour primer with top coat may be used. This will prevent the wood from rotting and protect the wood from outside elements.
For the fill of the planter, you will need soil, vapour barrier or sort, crushed gravel, pot soil. The following links will help you with creating a sectional view of how your planter should look once it is set-up properly to receive herbs you have chosen.
- How to plant a herb pot
- DIY kitchen garden planter
- Safe protective coating for planter boxes
- How to get wooden planters ready for planting
- How to Layer Planter Boxes
- How to Plant a Planter Box
- How to fill a planter box
- How to plant a garden in a wood container
Plant Growing Process

Before planting your herbs, it is important to have an over view of plants, their classifications, how they grow, and care/maintenance of plants. Below are some links to help you get started on your one page report.
- What is a Plant
- Best herbs for container gardens
- What herbs do well in shallow soil?
- Best herbs in a container garden
- Indoor Plant Care
- 5 Best Herbs For Containers
- Ecosystem
- Plants Needs

- How do seed plants grow & reproduce

- Grow your veggie garden
- Plant introduction and photosynthesis
- Grow Herbs from Seed
- Grow Herbs from Seed
- How deep to plant the seed
- Starting Herbs from Seed
- Growing Herbs from Seeds
- Specific Herb Details
- Herb Gardening 101
Mind Mapping Online Software
Here are some links to common mind mapping software that will allow you to create your own mind map all about Plants. Your main central topic is Plants with sub points showing classifications, growth process/cycle, care, environment. The Youtube video sample shows you what and how to create a mind map using the first online mind mapping link below:
Create/Construct:
Three major steps will include cutting your wood to the right sizes and creating joint features, then gluing together and letting it dry, finishing with a coat of sealant: You will need to fill out the following handouts and demonstrate proper use of the following machines:


- Complete all required safety sheets on machine tools and review the safety guideline to the right.
- Ensure you have all of single sheet planter sheet that shows exploded, front, side, and bottom view sheet with you.
- Plan out your cuts with your material , then "measure twice" and "cut-once" your largest pieces to your smallest pieces
- Always double check your measurements prior and after cuts
- Sketch a full page right side sectional view of your planter showing how to fill a planter properly with paragraph exlpaination. Include in the sectional view drainage holes also
- Drill out your water drain holes with a 1/4" to 1/2" holes
- Check if all parts are going to fit together properly prior to gluing
- Use appropriate screws/clamps/straps for holding glued members together
- Sand all rough sharp edges down and prepare surface for sealing in with a wood sealant/protector
- Prepare work area to paint with ventilation, temporary stands, drop paper, and painting utensils
- Paint your planter with even brush strokes, most likely will need two coats, let dry in between, sand, clean, and repaint
- Research and decide on which 4-5 herb plants you are going to plant in your planter. You will be responsible to take care of it till the end of school
- Write up a 1 page report in the form of a mind-map on plant classifications, plant growth process cycle, plant care, and plant environment which should show text and may also include picture/illustrations. Make sure you can download /save for handing in once you are done

Evaluation:
Safety and proper procedures will be a focus, for project process for marks.

| Evaluation Breakdown Component Descriptions | Marks |
|---|---|
| Always double check that you have completed all components for full marks. | |
| Equipment- Parts filled in, highlighted points, signatures, and safety passport | 25 |
| Safety Test- Equipment parts, safe machine operation, use of tools, and procedures | 15 |
| Planter Pieces Cut- Process, measuring, cuts, and accuracy | 25 |
| Planter Built- Fit, glue amount, construction, and edges sanded | 25 |
| Planter Finish- Completely sealed, even coat, | 15 |
| Planter-Sectional View- Full page sketch with labels, fill materials, and set-up | 10 |
| Plant Mind Map Report- Plant Classifications, illustrations, growth process, and plant care. | 25 |