Unit 1: Exploring Technologies - Technical Design Course Introduction
Welcome to the the grade 9 Exploring Technolgies course. This is the Technical Design rotation section,with the other two rotation sections being Transportation and Manufacturing. Each rotation will be approximately 6 weeks in duration with your final mark broken down evenly between each section rotation.

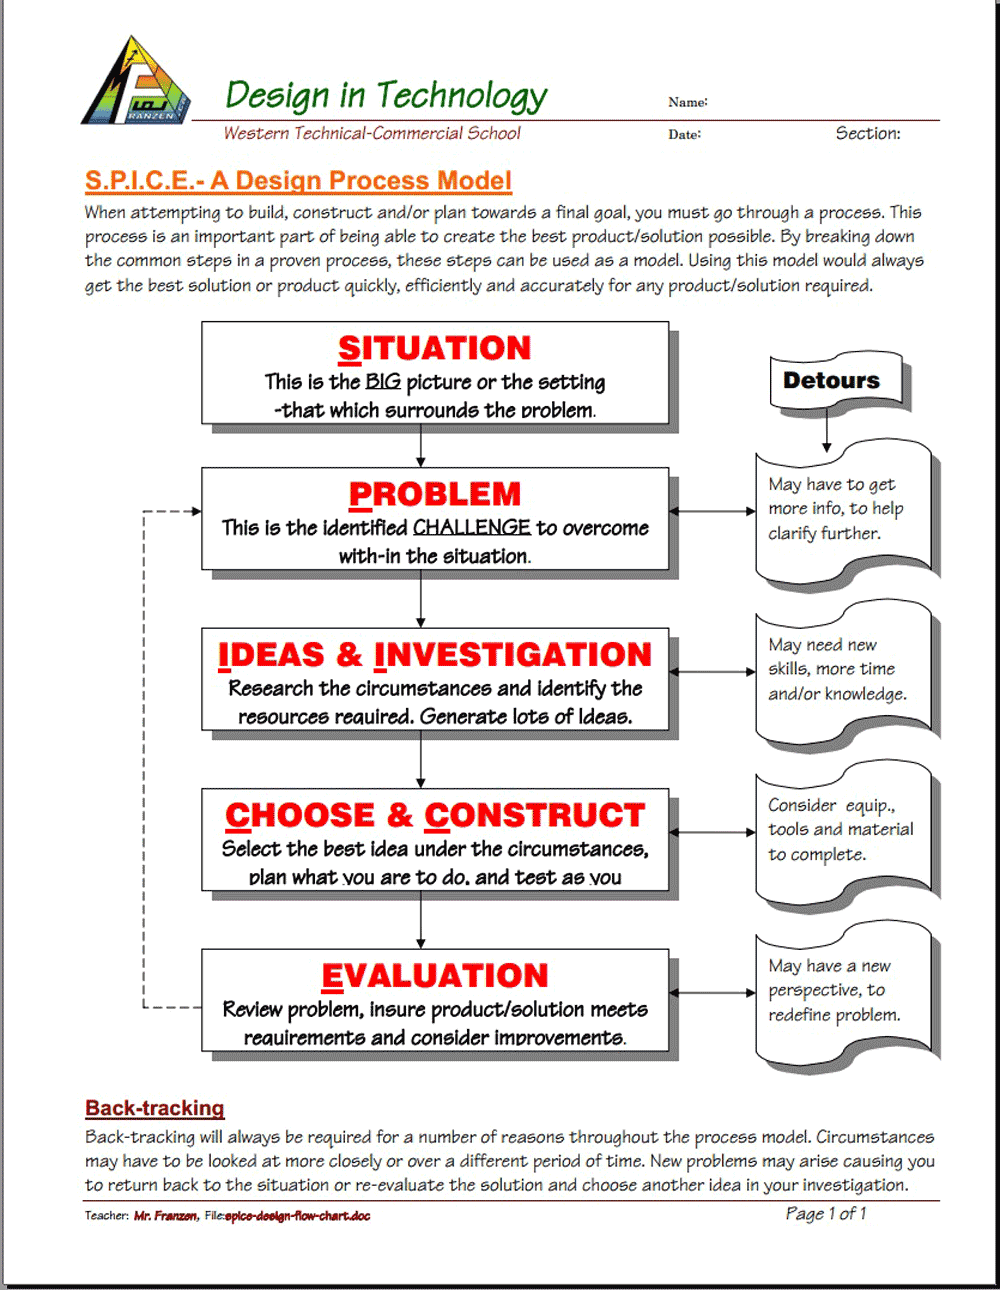
You will notice each unit activity below is broken down into five subtopics, SPICE, to guide and help you through the project and assignments related to the unit activity:
- Situation - This is the introduction, big picture, or you can think of it as the setting of story/novel
- Problem/Challenge - What must be resolved or completed, i.e. what you will need to accomplish
- Investigation/Ideas - includes gathering ideas, research and organizing information to help create, construct, and/or complete the Problem/Challenge
- Create/Construct - take your best idea and complete and/or build the needed solution
- Evaluation - did the Problem/Challenge above get resolved and/or completed
This unit will introduce you to the course, routines, safety, expectations, and introduction to photo editing.
Unit Activity Quick Links, Click to Jump to the Specific Activity!
This unit will introduce you to the course, our routines, safety, expectations, and basic technical sketching.
Unit Content Activity Quick Links, Click to Jump to Specific Activity!
- Unit 1, Act. 1: Safety, Organization, and Course Information
- Unit 1, Act. 2: Basic Technical Sketching
- Unit 1, Act. 3: Faulty Towers - The Technological Design Process
 Unit 1, Act. 1: Safety, Organization, and Course Information
Situation:
Starting a new course here at school
Problem/Challenge:
Getting familiar with what the course is all about, class routines, expectations of the course and the teacher, general administration of class, and safety are all important issues to know and understand.
Investigation/Ideas:
The following is list related to this course and should be reviewed by students:
- Course Details
- General Safety
- Detailed Safety Issues
- Shop/room Layout
- Shop/room Resources
- Emergency Procedures
- Expectations
- Evaluation
- Class Policies
- Routines
- Attendance and Lates
It is important that students feel comfortable with the above points and should know what is happening in the course.
Create/Construct:
Start by creating a full page basic sketch of your dream house showing doors, windows, levels, landscape, driveway, background, etc. Try to add perspective to your house and with different settings.
The following list of links are details that students are to review, after going over them in class:
- Exploring Technologies Course Outline
- Introduction to Technical Classes
- General Safety Presentation
- General Safety Contract
- www.passporttosafety.com
- Rotational Course Achievement Breakdown
- Evaluation and Tips Breakdown
USB Memory Stick, Folders and Shortcuts
One of the first things in class we do is review the Tech Info page, point number 2 above. The top section with 10 blanks is to be filled in with the important things we will cover in this course. You will find this information by reviewing the course outline and listening to the teacher discussing what is happening in the course. The bottom section will also need to filled out with two in class peers for contact information and support with in the class to help foster teamwork and responsibility.

Next you will need to get a USB memory stick, for saving your work on to. You will need to follow instructions on the tech info page to create three shortcuts inside a main folder with your course code, and a sub-folder Shortcuts.:
- Pick-up Folder
- Hand-in Folder
- mfranzen web
You will also need to create more folders for future projects as you go, to keep your work organized. The intent is to work off of your USB in school and save to your H: drive when you are finished at the end of class as a back-up. This way you can take your work with you and work elsewhere if needed and it is usually faster to access then the board network.
File Naming Conventions and Shortcut Test
To finish you will need to use all three shortcut links in an exercise called Shortcut Test:

- Go to the pick-up folder and get a file called Shortcut Test
- Save the text file to your shortcuts folder, and open it up
- You need to type your name in, then go to each of your shortcuts, right click and select properties, then copy the shortcut link address and paste it into the text file in the required location
- Go to the Tech info page on the site and open up the PDF file and copy the section that explains file naming conventions, i.e. how to properly name files you hand in (just above the shortcut instructions
- Re-name your file according the the section you just copied into your text file, then hand in the hand-in folder for your class using your hand-in shortcut.
Make sure all work you put in the hand-in folder is saved first in your USB, then drag and drop into the right sub folder in the hand-in folder. It will have a due date at the front and then the related project name.
Safety Passport

Not only learning about safety in the workplace but being able to show that you completed the certificate will be able to show this to employers and keep in their portfolio. This is worth almost $15, but through this opportunity, it is free to students who get a code from the teacher. This will make you aware of several safety issues, concerns, and your rights as a young worker. Here are some resource material you can use:
To start, go to the main Passport to Safety page and click on quick register and enter the registration code you received from your teacher, fill in your information and you will receive an e-mail with your username and password to login with and get started. . A tutorial with quiz questions will allow you to earn your safety passport certificate which you can use in your portfolio/ resume. Ensure you keep your user name and password safe for future access when needed.
To hand /show your instructor that you have successfully completed the Passport to Safety program, you will need to print to a PDF file and hand-in.
Evaluation:
Although these are not heavily weighted, they are important project assignments that will benefit you throughout the rest of this course

| Evaluation Breakdown Component Descriptions | Marks |
|---|---|
| Always double check that you have completed all components for full marks. | |
| Survey - Answer all 7 questions fully | 7 |
| Course Outline Signed - Take home to show your parents and get signed by parent | 5 |
| Tech Info - Filled out with weight %, 10 course components, and two peer contacts | 10 |
| General Safety - Class reviewed, read through and sign, parent signature also | 10 |
| Safety Passport - Certificate saved in web page format with file and folder named correctly | 15 |
| Shortcut Test - All 3 shortcuts done, shortcut test file handed in correctly | 10 |
If you feel comfortable that you know all the details of the class/course details, you are ready to move on to the next activity. Be prepared to be able to write a quiz on the above details.
Unit 1, Act. 2: Basic Technical Sketching
Situation:
A class of students interested in the field of Engineering have taken a course to find out what Technology Design is all about. Coming up with solutions is what Engineers do on a daily bases. How they communicate those ideas is critical and one of those ways is with technical sketching.
Problem/Challenge:
Practice your sketching techniques with sketching practice assignments
- Basic Sketching
- Basic Shapes Sketching
- Orthographic Sketching
assignments found below in the Create & Construct section.
Investigation/Ideas:
Technical sketching is used in all kinds of situations. Thumbnails are where ideas initially start... some of the greatest ideas started on a napkin in a restaurant for example. Full size sketches take a little more work and formality to the steps of creating a clean technical sketch. Below are several resources you may check out all related to technical sketching:
- The Importance of Sketching
- Sketch-A-Day project-38 box car
- Sketch-A-Day project-44-space transport and video

- Learning To Draw Buildings Made Simple
- Vex Introduction to Technical Sketching PDF
- Engineering Graphics Technical Sketching and Auto CAD PDF
- Thumbnail sketching - some samples
- Thumbnail Sketching in a design process- a detailed look
- Technical Sketching and Drawing
- Process of technical sketching
- Principles of drawing and sketching to aid designing techniques
- Third Angle Projection Explained.
- Orthographic Projection Explained
- Isometric Projection theory
- Isometric sketching tutorial
- The Process of Architecture
- Ortho dwgs non cylindrical
Communicating your ideas is key for Engineers and a critical skill to learn.
Create/Construct:
Sketching Exercises
The following sketching basics and sketching shape assignments are to be practiced in class and handed in for check, before moving on to the next sketch assignment. You will need blank paper and a pencil to complete the following assignments.:
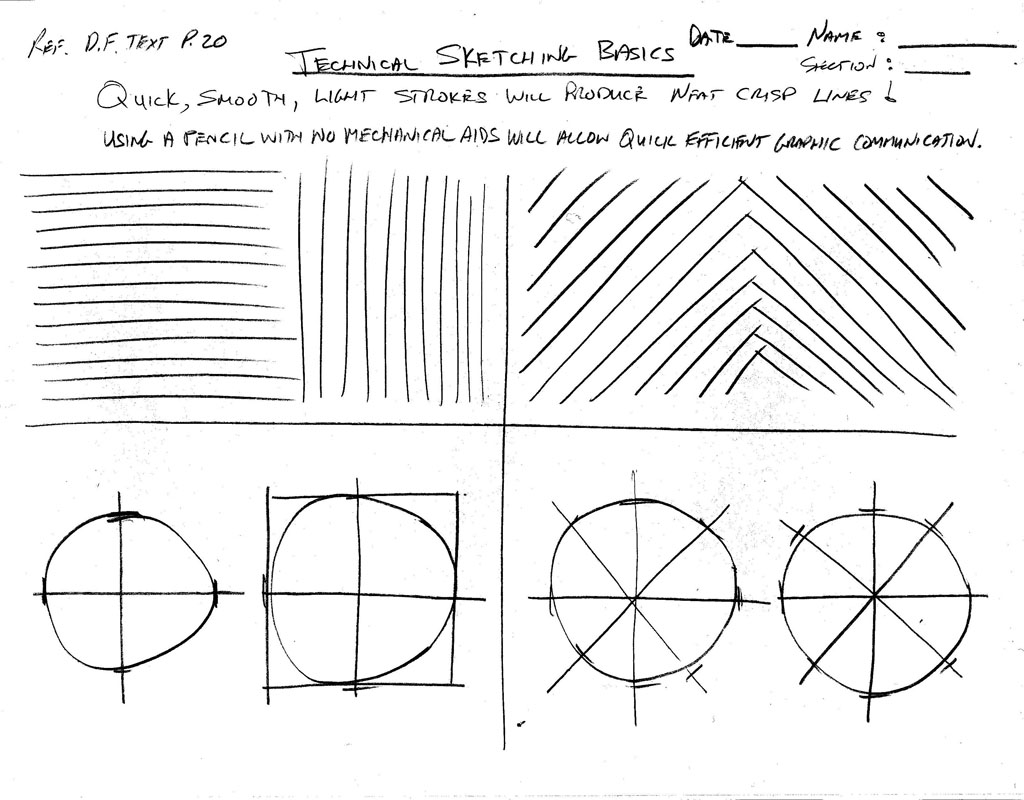
Sketching
Basics
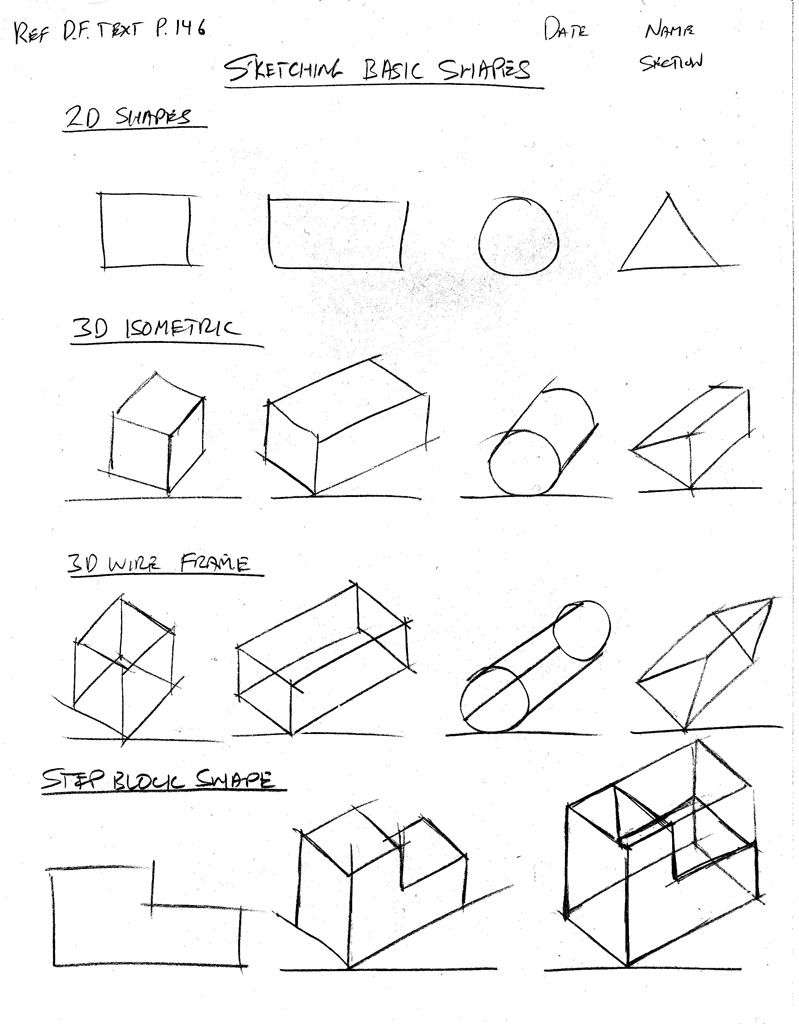
Sketching
Shapes
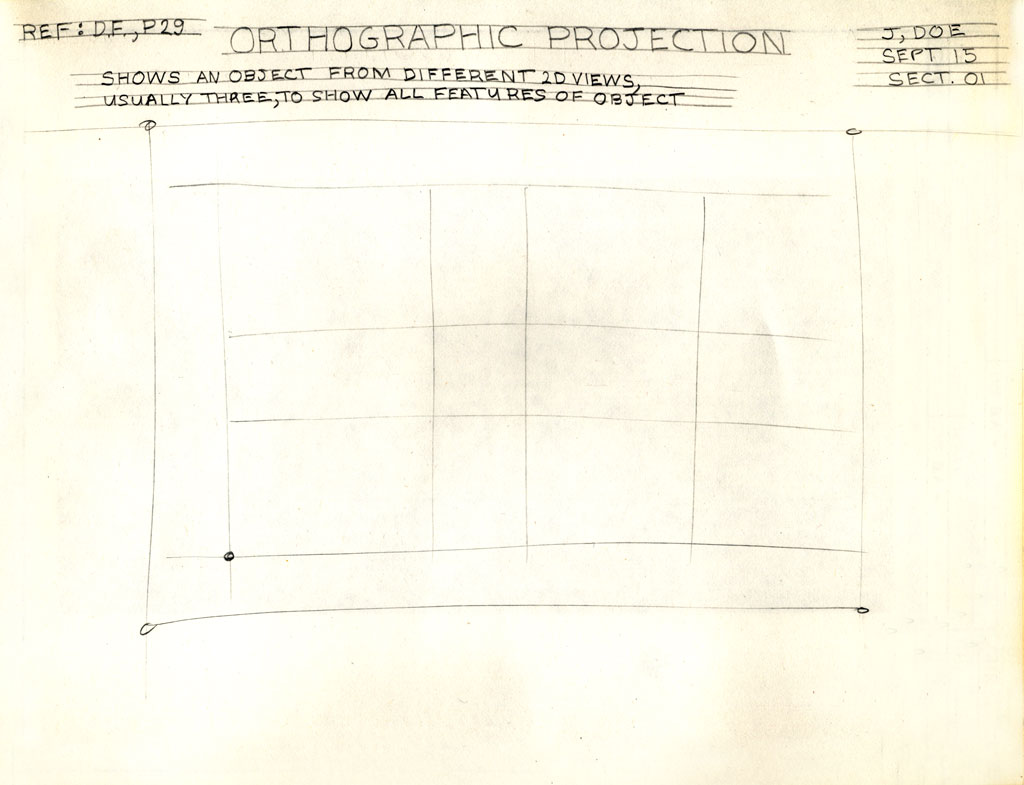
Orthographic Sketches
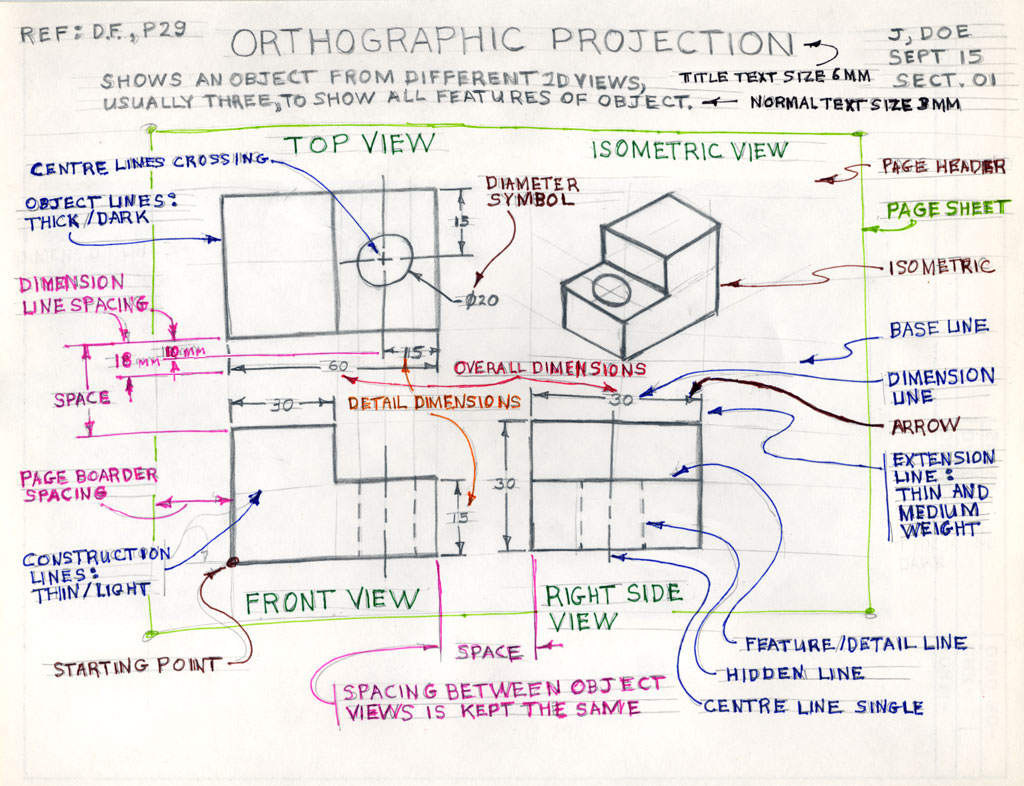
The following three images are showing a third angle projected orthographic sketch and dimensions would look like using a standard "step block" shape with a circular hole going through the center of the bottom step.
- Using a full blank page, start drawing the layout, then add the dimensions, and then label all the related terms associated orthographic projected views and dimensioning.
- On the back copy the section below titled "Selecting Front View" with the three rules selecting a front view
- Bring ortho note to teacher to check (mark) before starting step 4
- Select a block sample, select the front view, sketch out the front, top, and right side view showing overall and detailed dimensions as in previous graphic note. No need for labels.
- Sketch the isometric in the top right corner.
- Bring to teacher to mark
![]() Remember your sketching techniques you learned above while you sketch this out:
Remember your sketching techniques you learned above while you sketch this out:
Sketching
Ortho-Layout
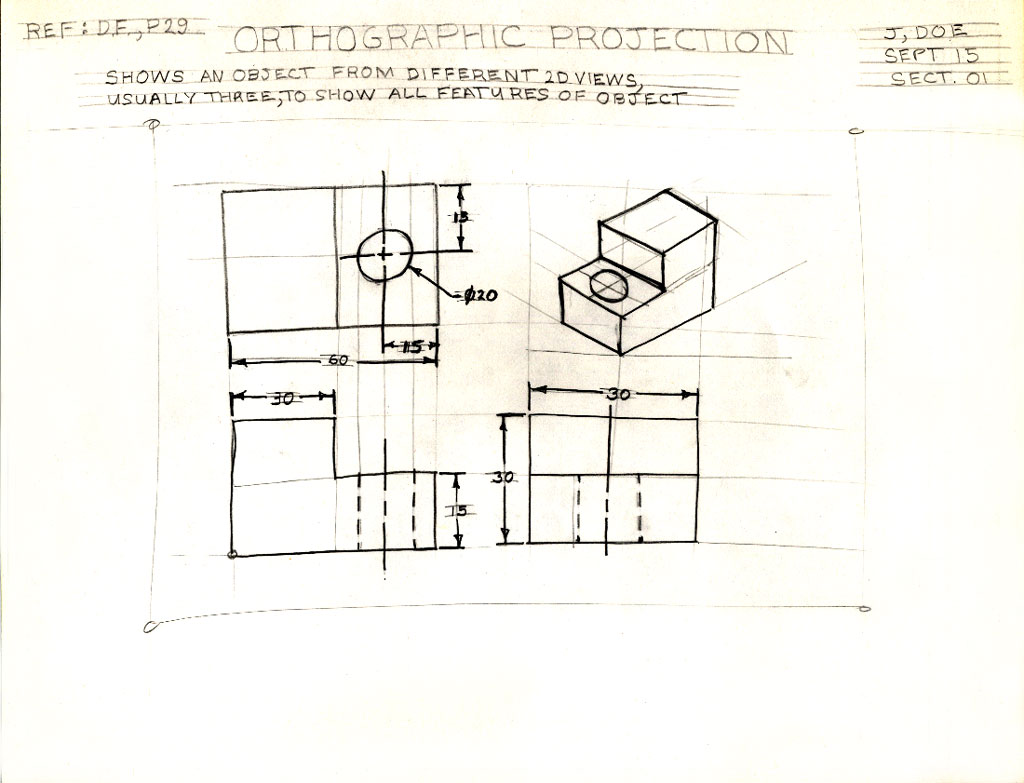
Sketching
Ortho-dimensions
Sketching
Ortho-Terminology
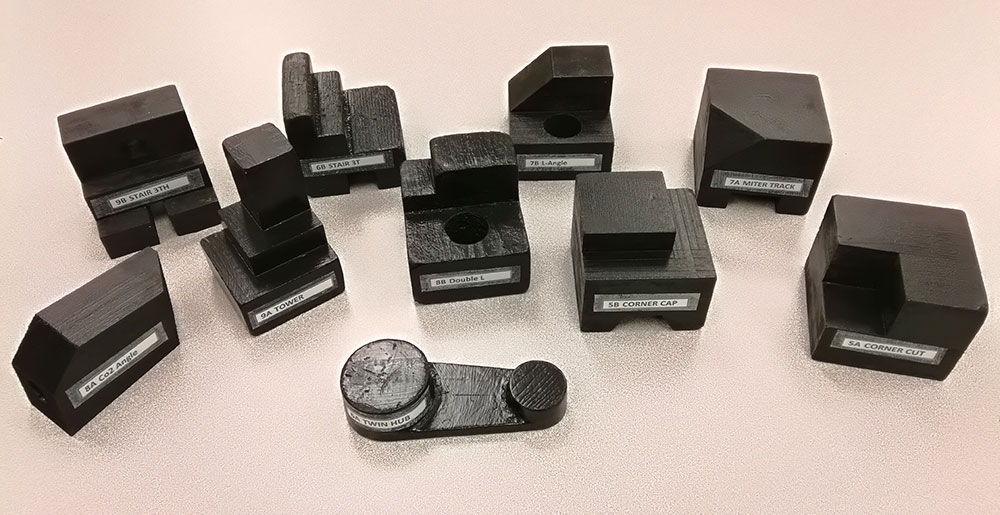
Block Samples
Ortho-Practice
Selecting Front View
When deciding which view is to be used for the front view, three rules are used to determine this. You must look at the object you are going to draw or sketch and decide which view shows the:
- the most detail
- length across the page (layout usually in landscape format
- least amount of hidden lines
Evaluation:
You will be evaluated based on the completion of the above sketching assignments.

| Evaluation Breakdown Component Descriptions | Marks |
|---|---|
| Always double check that you have completed all components for full marks. | |
| Sketching Basics - clean, straight lines, and smooth round circle curves | 10 |
| Sketching Shapes - clear shapes sketched with correct angles, lines, and shapes | 12 |
| Orthographic Sketch Note - 3 ortho views, 1 ISO, dimensions, and labels | 15 |
| Orthographic Sketch Practice - 3 ortho views, 1 ISO, and dimensions | 15 |
Unit 1, Act. 3: Faulty Towers - The Technological Design Process
Handout for this project can be found here.
 Situation:

A class of students interested in the field of Engineering have taken a course to find out what Technology Design is all about. One of the major principals of this course/field is the "Design Process". Coming up with solutions is what Engineers do on a daily bases. For this activity we are going to create a design brief to learn and understand this process:
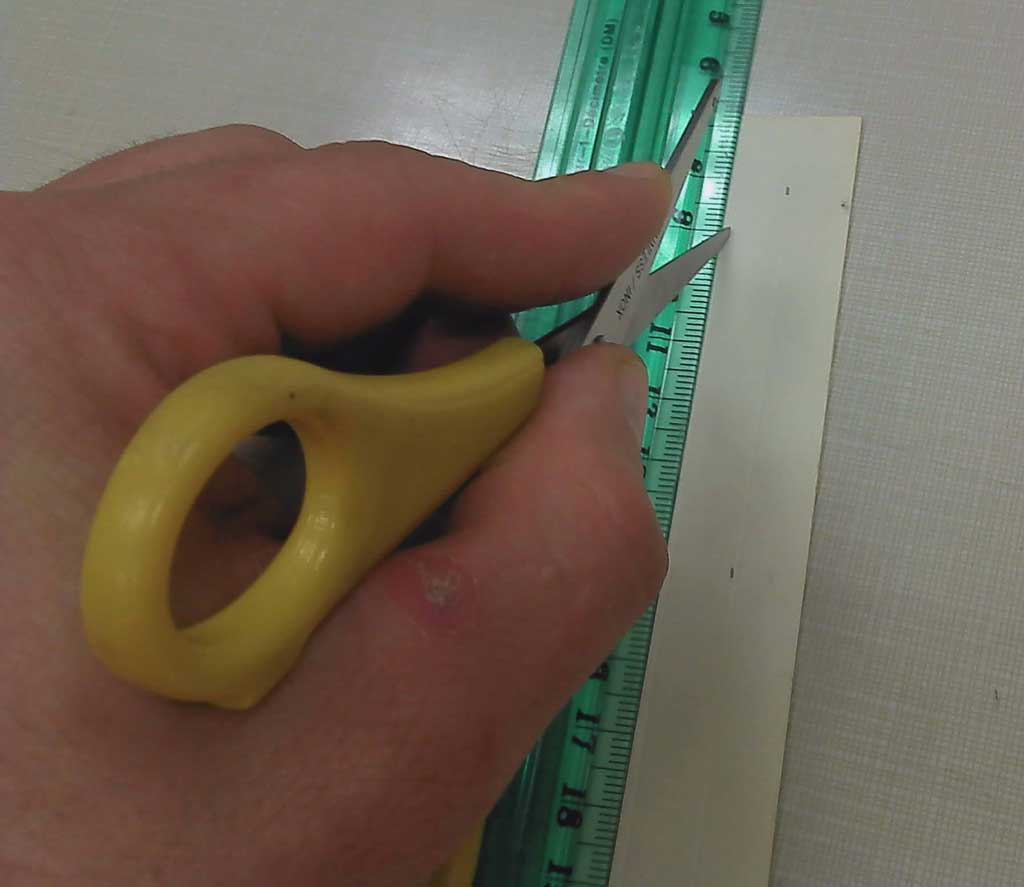
You are shipwrecked on a deserted island and you find the following materials that might help you build a device to make your whereabouts known (in class materials will be similar):
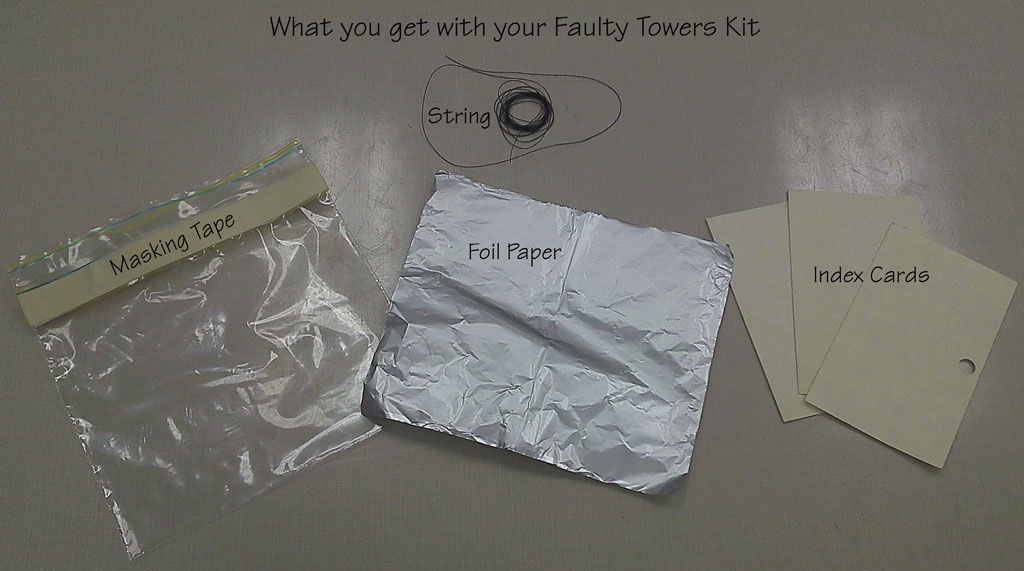
- 3 sheets of composite board material (in class 3 index cards)
- 1 old saw (in class 1 pair of scissors)
- 1 meter of seaweed (in class 1 meter of 3/4" wide masking tape)
- 2 meters of rope (in class 2 meters of thin string)
- 1 piece of aluminum (in class 15*12 cm of aluminum foil)
As your position is away from the shipping lane, your best hope is a radar beacon, held as high as possible. You know two important facts:
- A radar beacon must have 90 degree surfaces to be detected from all different directions
- 117 times the square root of the height of tower in feet will give you a range distance of detection in nautical miles. This is explained in more detail here.
Problem/Challenge:
Using the technological design process model, SPICE, apply it to the design brief situation above and come up with a solution to this challenge.
You and your partner will need to design a radar beacon to be seen from all directions mounted on top of a tower designed to be as high as possible. The tower must be stable, look like it will work, have excellent joints, and hold the radar beacon securely. The higher the tower the better chance you will get rescued (and rewarded with better marks).
Investigation/Ideas:
Design Process SPICE
There are many design process models out there. We will look at a simple model called SPICE to show how the technical design process works:
- SPICE Design Process Model (We will be using this model)
- A detailed look on each stage of designing
- Six Models of the Design Process PDF
- More on Design Process Models PDF
Towers
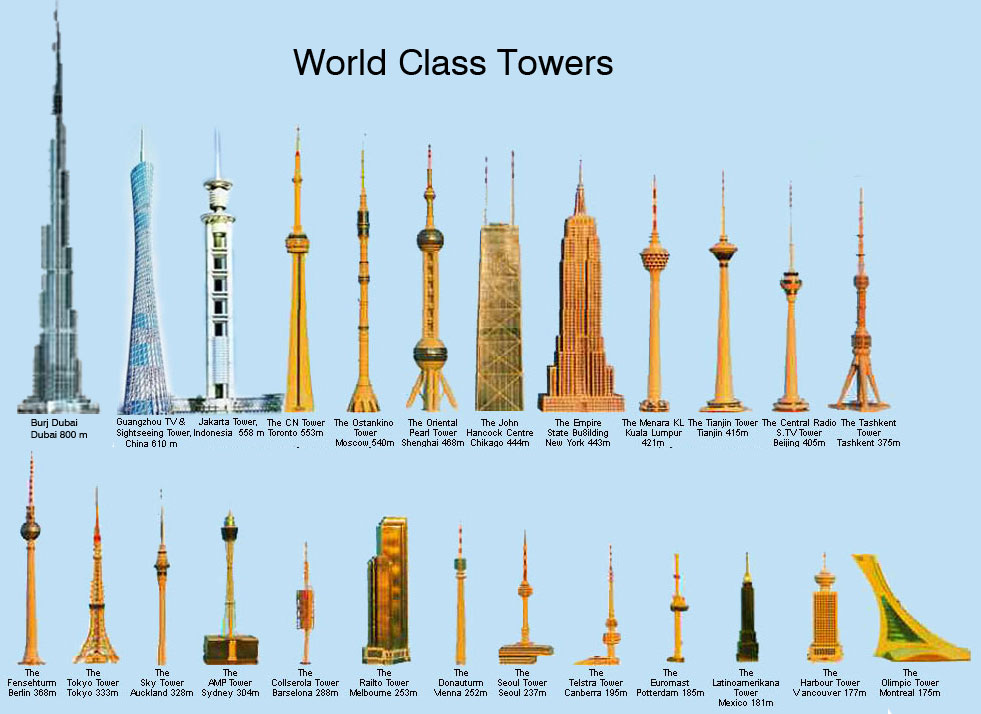
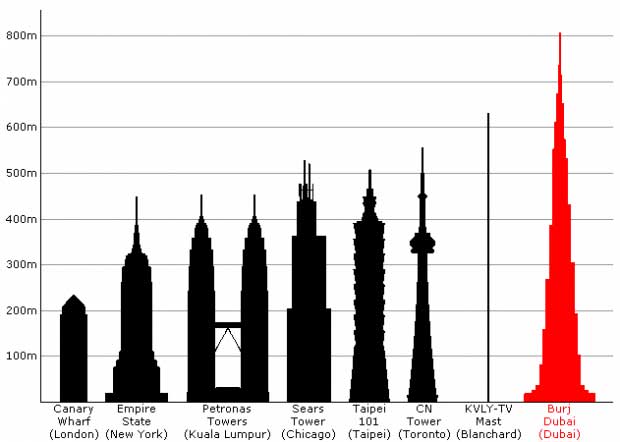
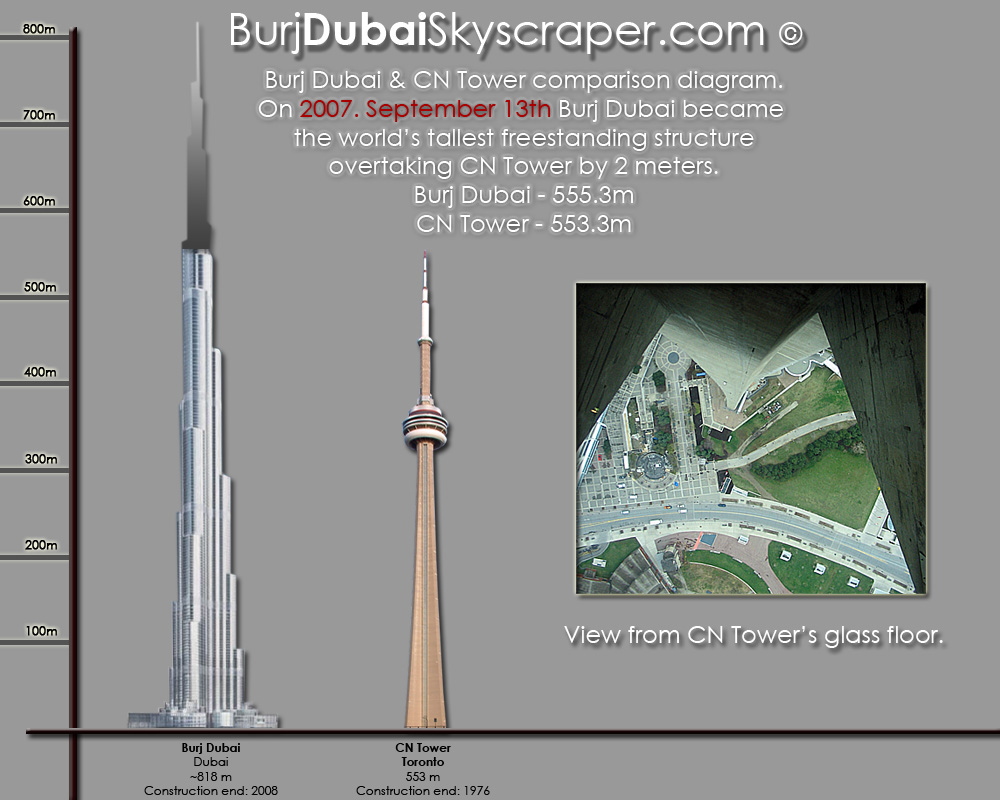
You will find great towers all over the world. We have our CN Tower right here in Toronto. Building one with limited materials will require knowledge and skills to build them right for height and support.
- Structural Engineering
- Building Big Forces Lab
- Technical Information and Tower Comparison
- World Federation of Great Towers
- Tallest Buildings in the World
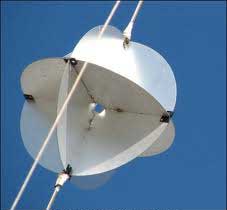
Radar Beacon Reflector
You will need to thing of the best way to design your radar beacon to get maximum detection from ships radar scanners. For that you will need to think of different patterns that could work.
- Creating a radar beacon
- Radar Reflector Site
- All about Radar Beacon Reflectors
- How to Calculate the Distance to the Horizon
- Duck Works Magazine - Radar Beacon Reflectors
Tower Tips
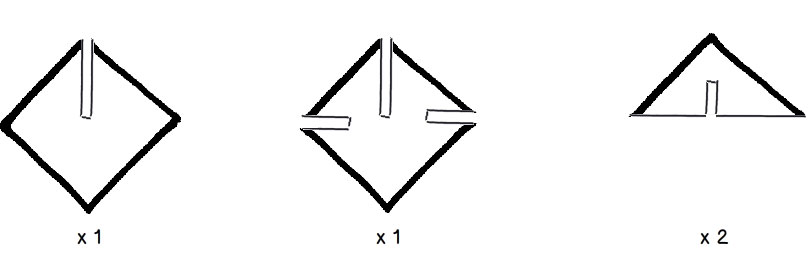
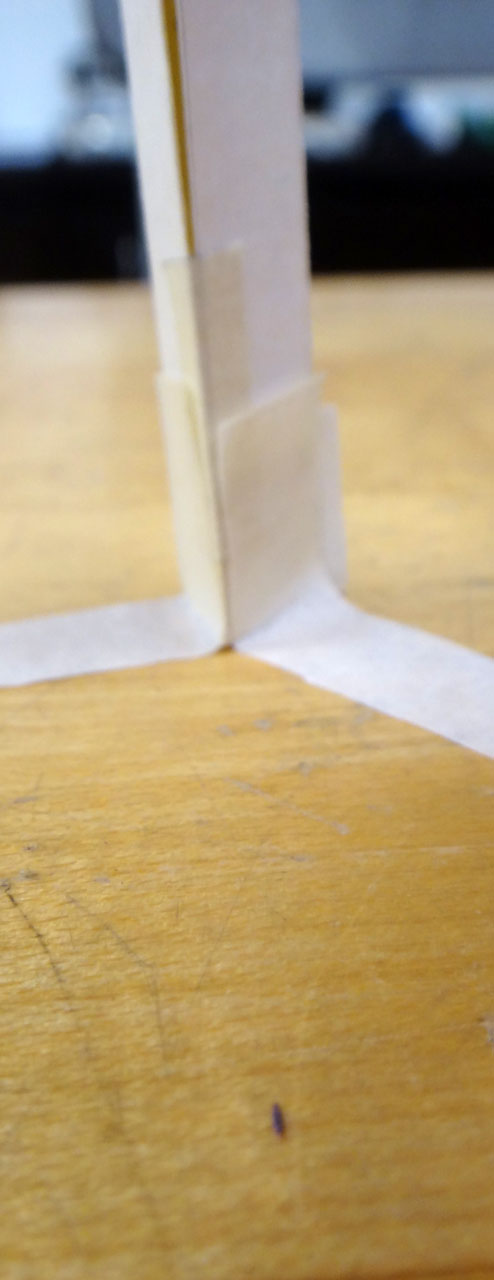
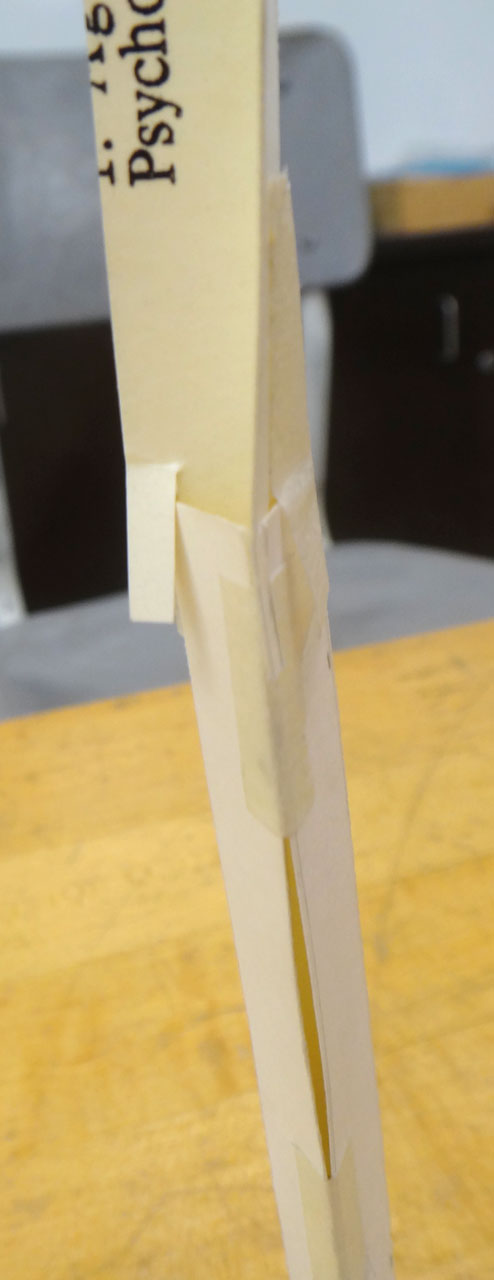
The following shows how scoring before bending can very helpful and also sample shapes:
There are many types of joints that can be made with or with-out tape. Here is one example joint without using tape to hold it together:

How High Can You Go?
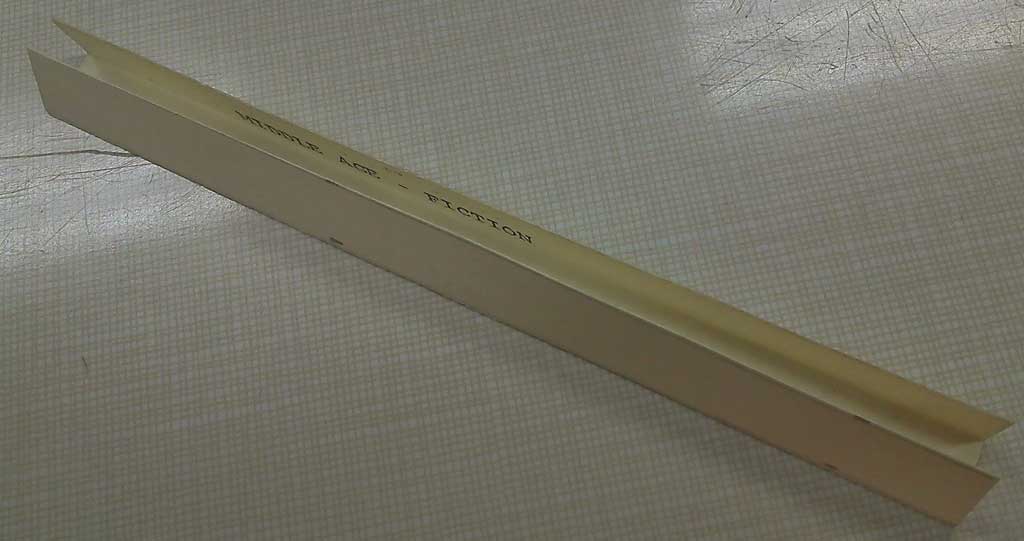
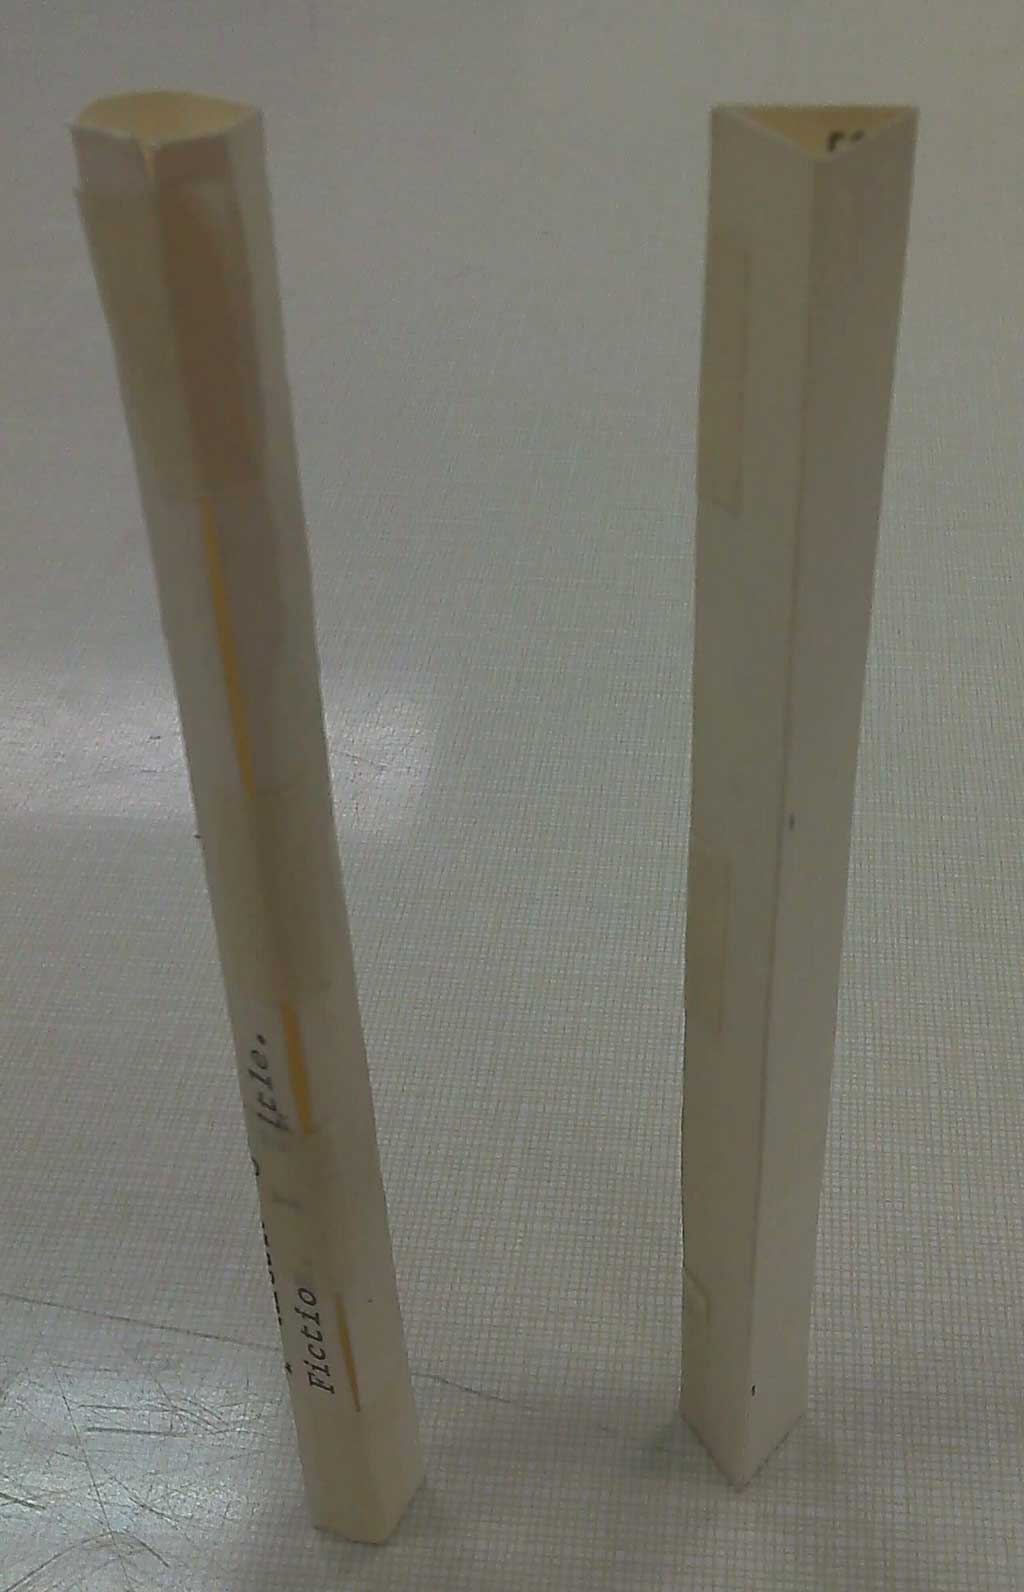
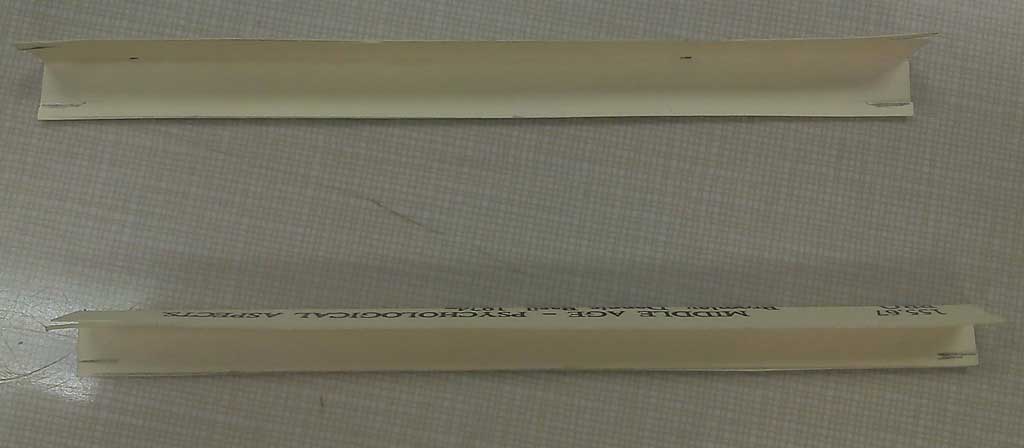
Well you have heard the old saying the sky is the limit? Well the limit is based on how well your design is. Joints need to be strong, stiff, and straight. The higher you go, the more challenge it is to be rescued, but as you get real high stablity becomes a problem. If you cut your index cards too small, you will end up with a tower that may not even stay standing up. If you cut your index cards too wide, then you comprimse height. Remember your tower's primary purpose is to hold the radar beacon, second is to be as tall as possible to maximize beacon range. Below is some pictures showing a tower built well over a meter high and still has extra tape, index card left over:
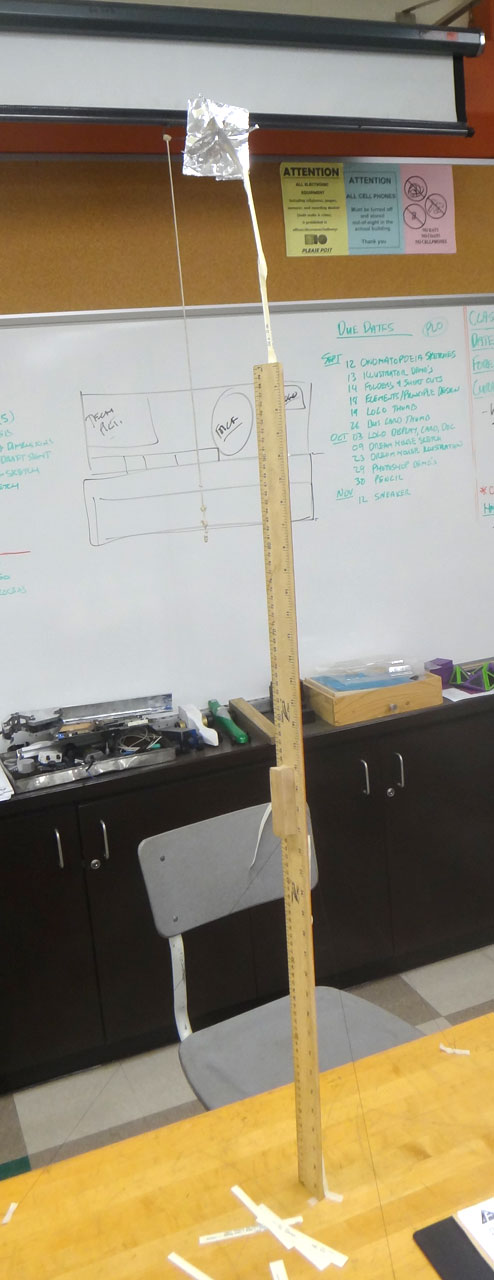
Sample 1
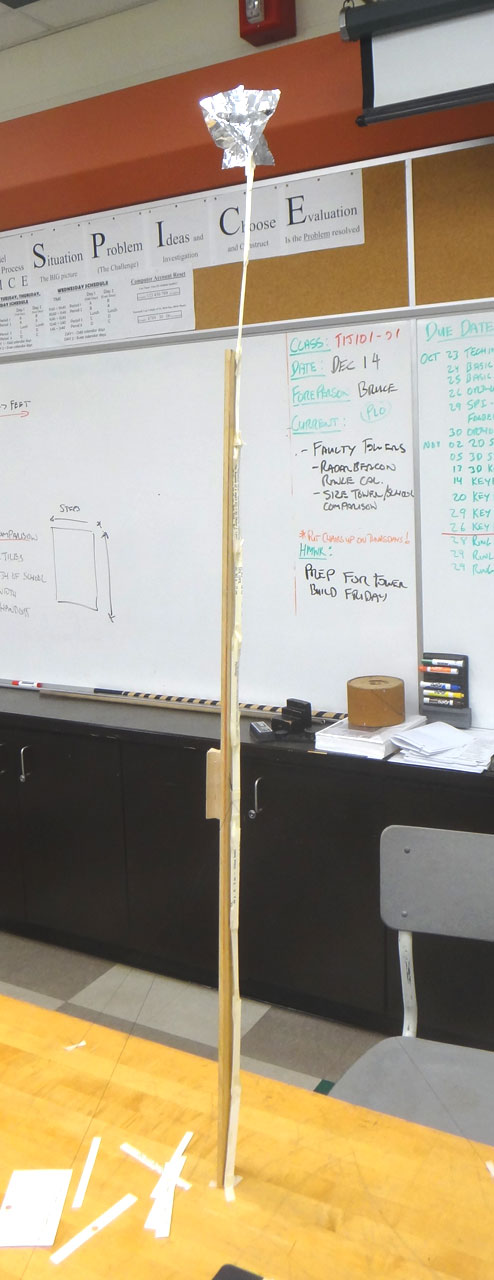
Sample 2
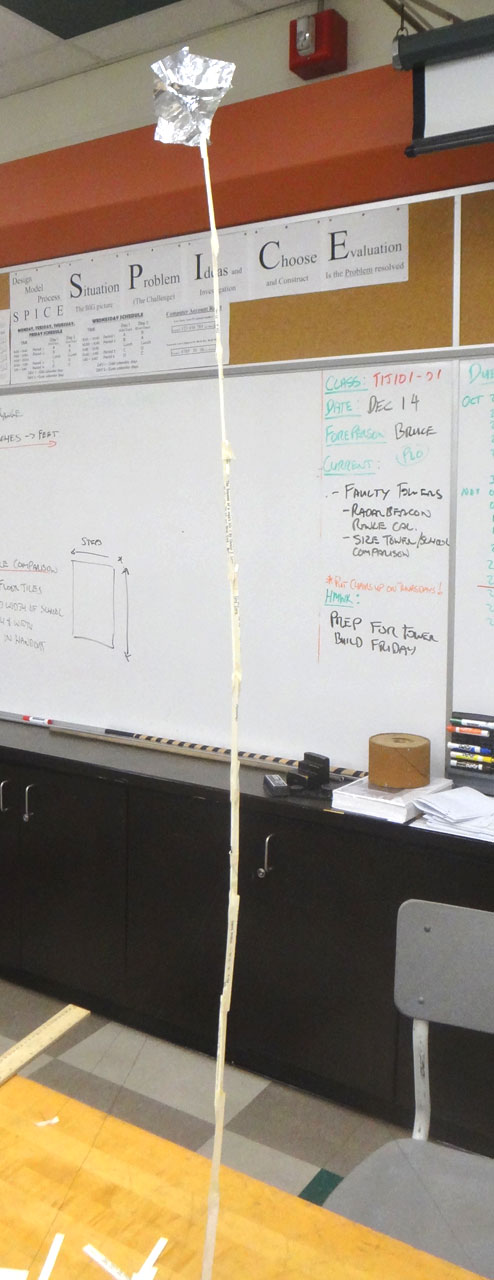
Sample 3
Sample 4
Sample 5
Create/Construct:
Project Process
On the handout you need to fill out all the design steps of the tower project as needed. Investigation Ideas will include research, notes, and sketches. Initial steps can be filled out right away, while others will have to be filled out as you work through your project. The SPICE design process includes the following steps
- Situation
- Problem/Challenge
- Investigation/Ideas
- Create and Construct
- Evaluation
Research and Sketches
The "Investigation and Ideas" step is very important. It could mean whether you are very successful some-what successful or not. Take time to gather all the information you need (research) and then come up with many ideas.
There are several different research methods that you can use to find more information. You can use the internet, library, videos, etc and you also do some testing yourself. For example, knowing what materials you have you can practice different scenarios that may work better then others.
Do not fall into the trap of taking the first good idea that pops into your head. Objectively try to think up at least 5 ideas and sketch thumbnails and add related notes.

Sample
Thumbnails 1
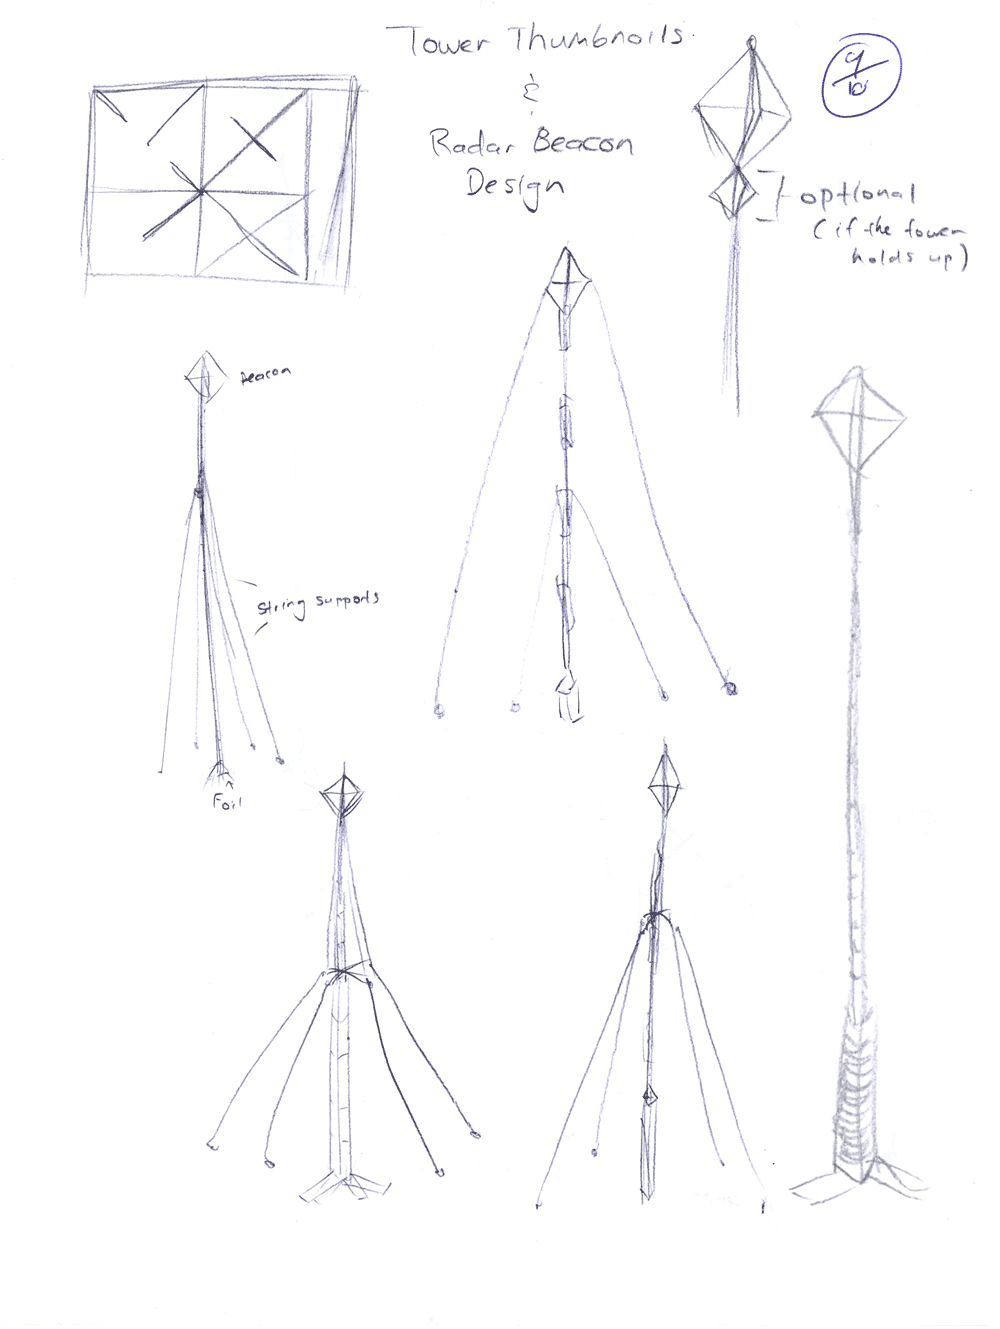
Sample
Thumbnails 2
Sample
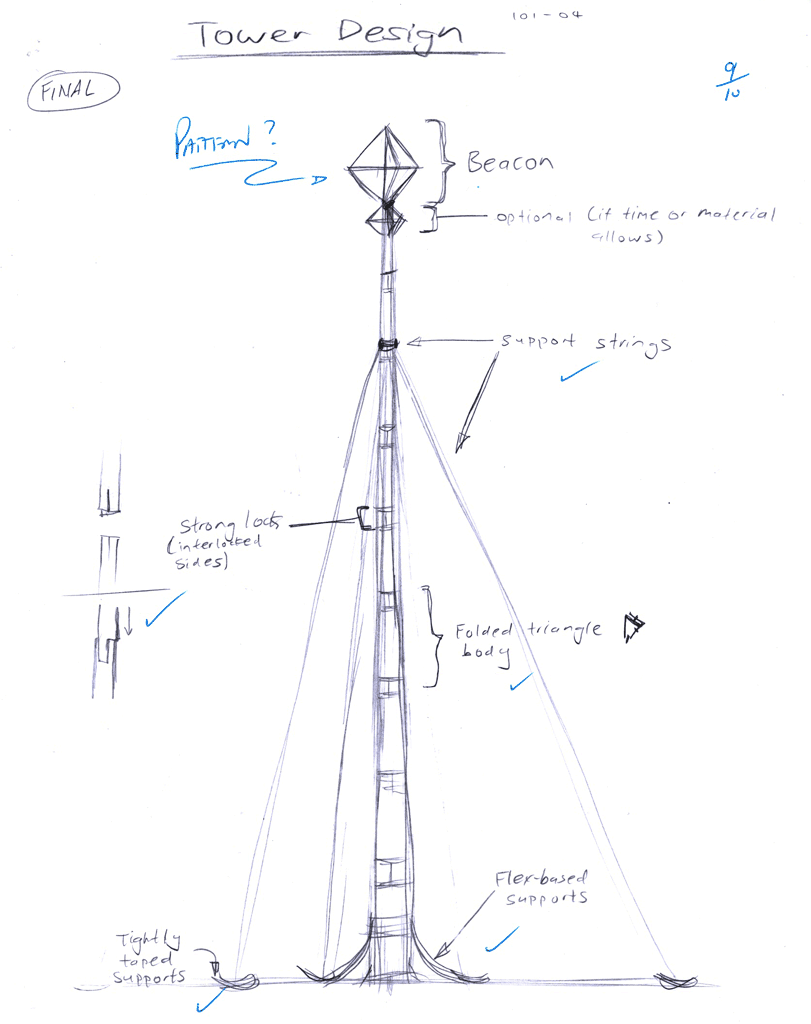
Final Design 1
Sample
Final Design 2
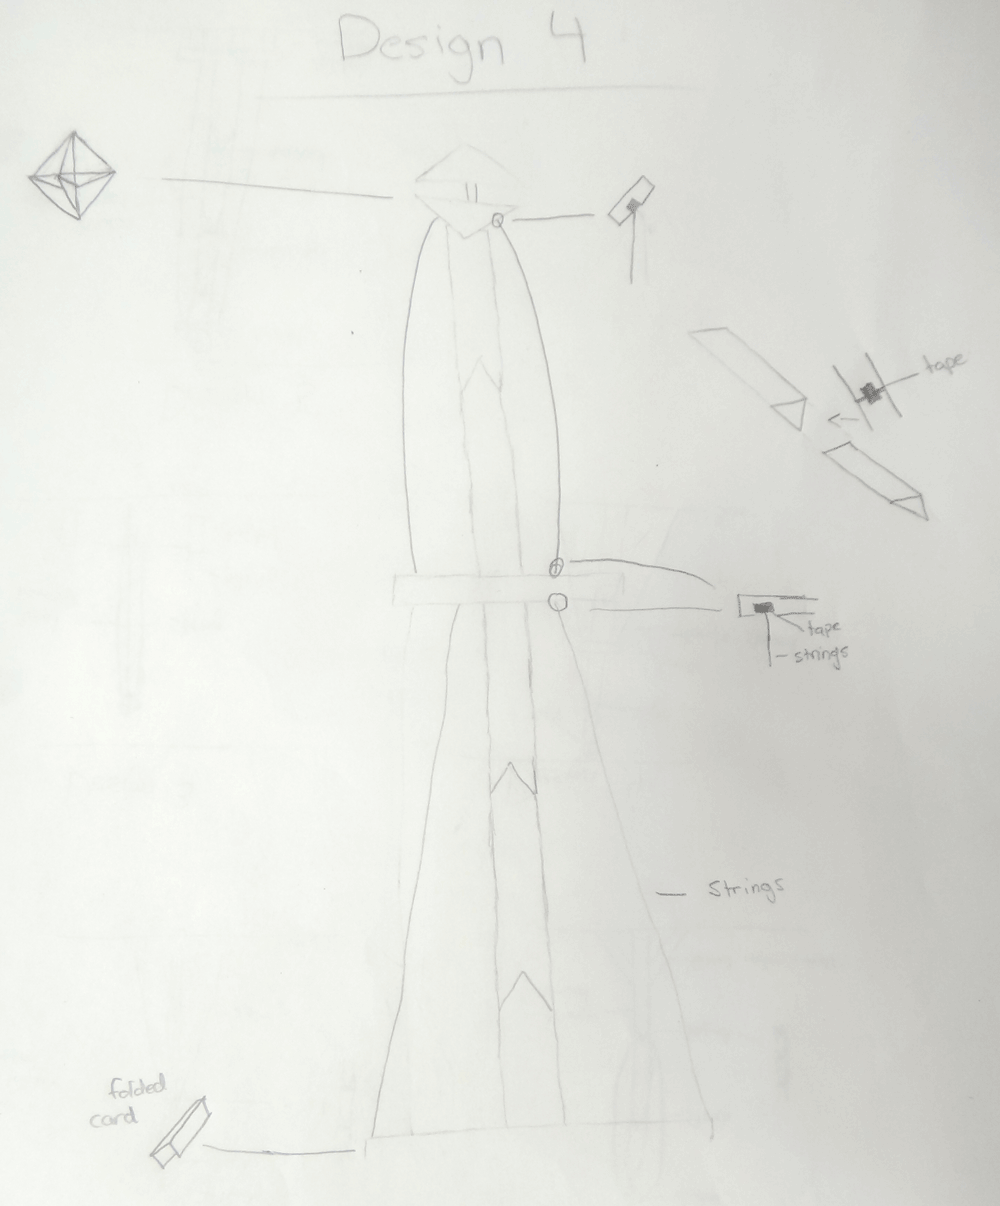
Once you have a minium of 5 ideas, you need to select what you think is the best idea and expand on it. Sketch a full size page showing your main idea with different views. The tower and radar reflector should have related notes and close up details on joints, tape, support, etc. Ideas on how you plan to accomplish each joint, connect them, and how you plan to make your radar reflector should be done prior to the build.
Between your partner and yourself, you will have to objectively decide on which tower and/or reflector design will work the best to get rescued. Remember the best chance of getting rescued is to make the tower as tall as possible with the largest multidirectional reflector.
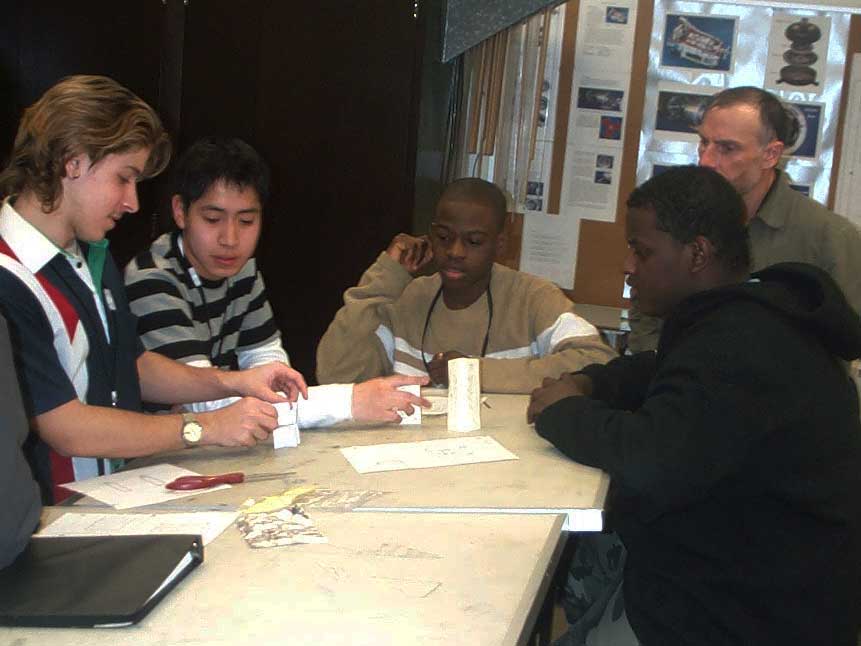
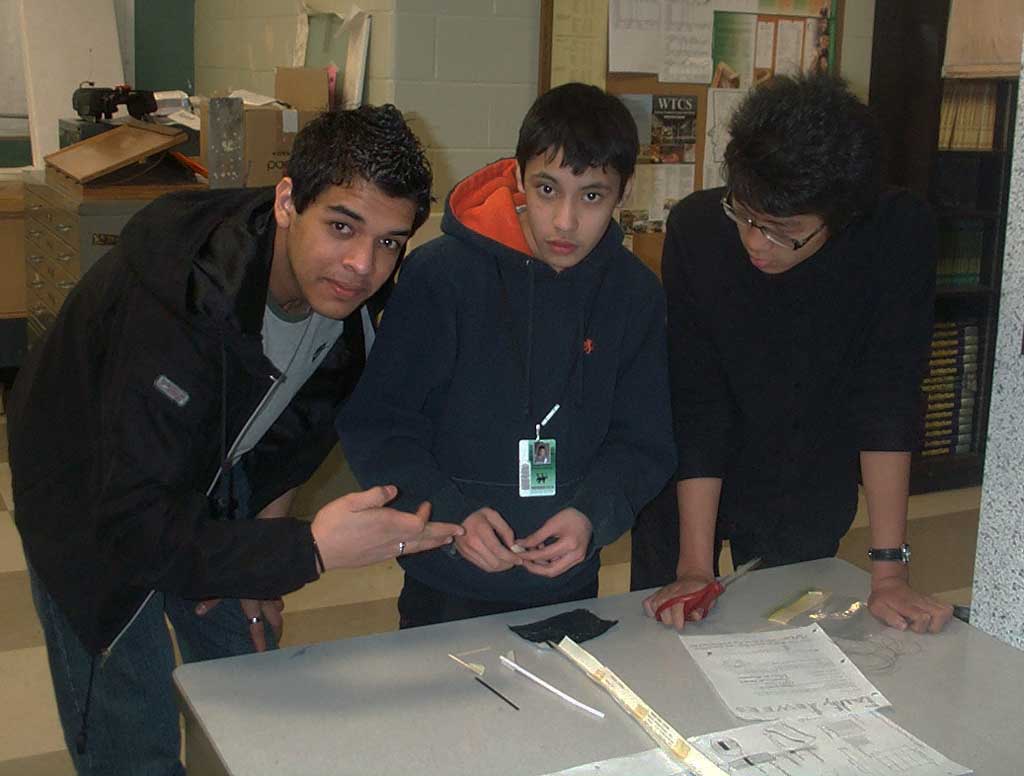
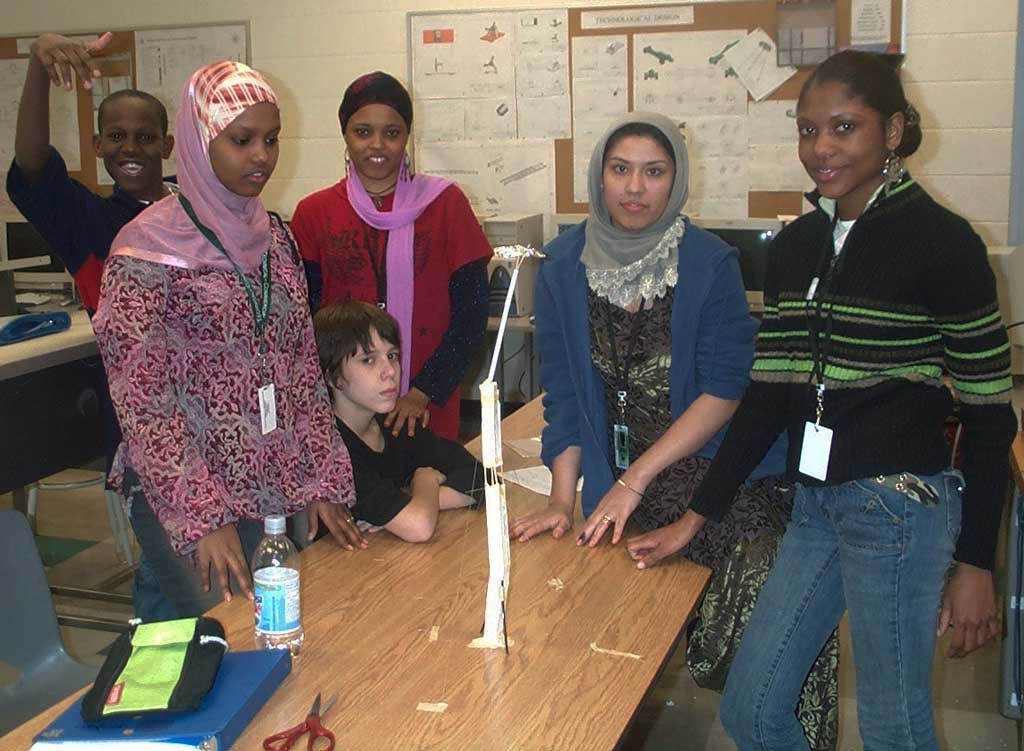
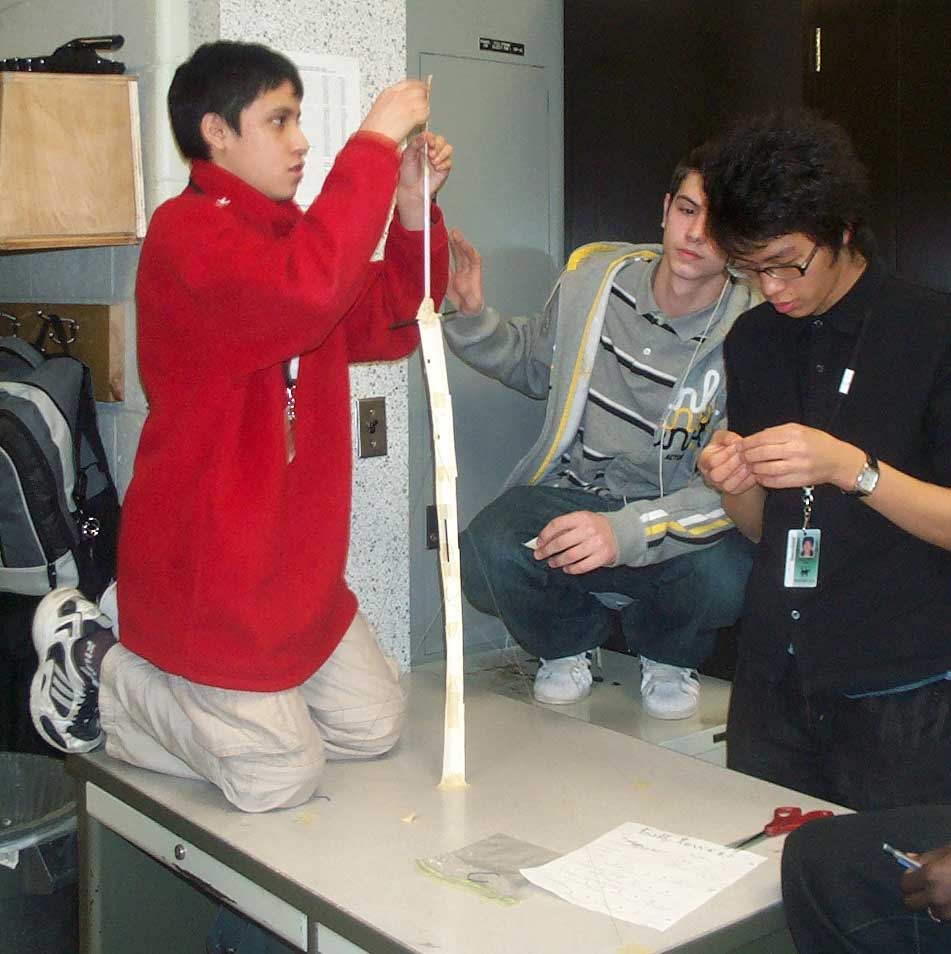
Tower Build
The build process must be done in 50 minutes, so one of your major limitations is time. Make sure you have everything you need prior to starting so that you do not waist time during the build. Here are some sample pictures from a previous class:
Evaluation:
You will be evaluated based on your SPICE explantation, thumbnails, final design, build, and team work.

| Evaluation Breakdown Component Descriptions | Marks |
|---|---|
| Always double check that you have completed all components for full marks. | |
| Thumbnails - create five thumbnails filling a full page with notes on tower designs | 10 |
| Final Design - full page sketch showing final design and notes | 10 |
| TBE-Tower Build Evaluation | |
| TBE-Height - 1 Point per centimeter | ? |
| TBE-Stability - from weeping willow to hurricane proof, how strong is it? | 5 |
| TBE-Ingenuity of joinery - from tape all over to super lock, are your joints amazing? | 5 |
| TBE-Aesthetics - from not working to excellent structure , does it look like it will work? | 5 |
| TBE-Radar Reflector - from stealth to 747, large enough with all angles and sides covered? | 5 |
| Handout -S-I-C-E spice steps filled out | 5 |
| Handout - Radar beacon calculation - show work | 5 |
| Handout - school size and comparison calculation - show work | 5 |
Your final mark on your tower build will depend on the average tower height of tower heights in class that day and the time/effort each partner puts into the project.